
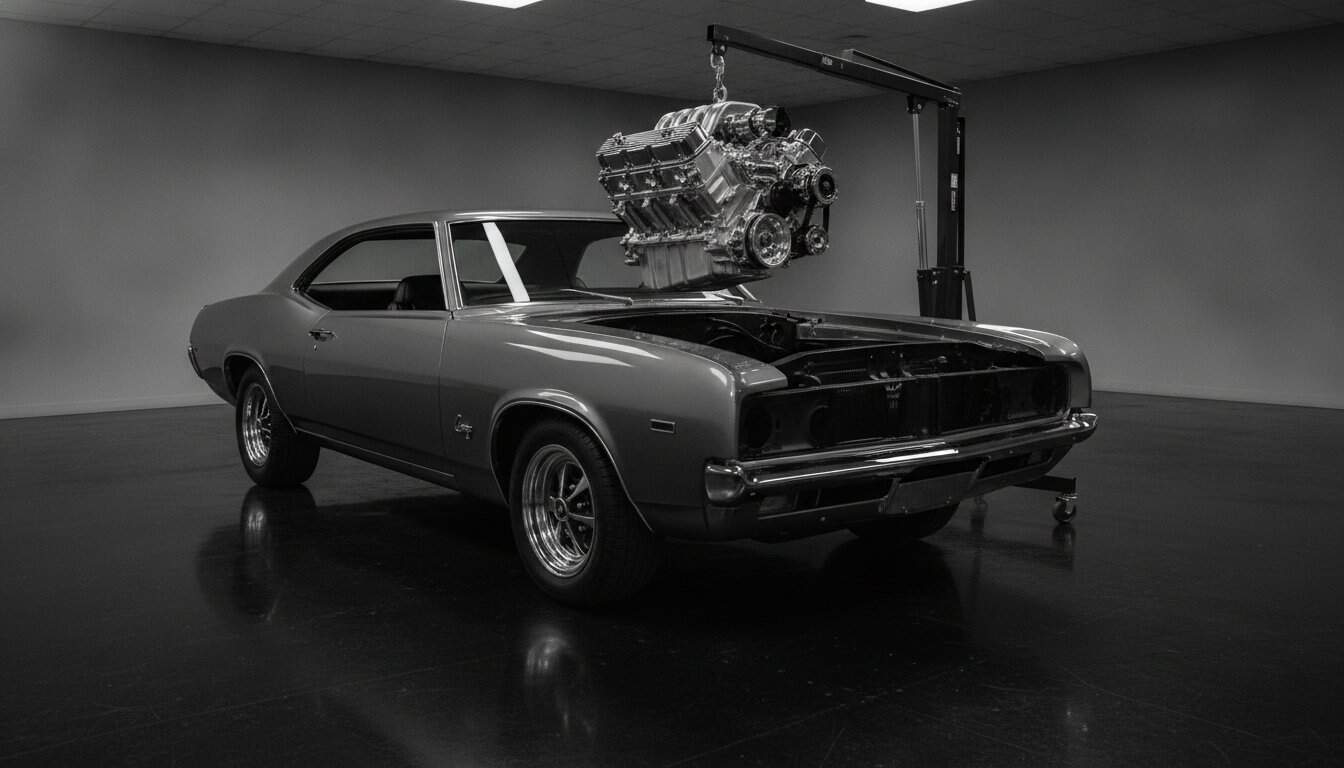
What if you could keep the soul-stirring lines of your 1969 muscle car but lose the cold-start anxiety and the constant tinkering of a finicky carburetor? You aren’t alone in wanting that perfect balance. Most enthusiasts deeply value their car’s heritage, yet the daunting complexity of modern EFI systems or the fear of a $10,317 LS3 crate engine not fitting the frame keeps many projects stalled in the garage. It’s a common hurdle, but one you’re fully capable of clearing with the right technical framework.
This classic car modern engine swap guide provides a strategic roadmap to help you master the surgical heart transplant of your vehicle. You’ll learn how to blend vintage aesthetics with 2026 performance standards while ensuring your build remains reliable and compliant. We’ll explore everything from chassis compatibility and wiring integration to navigating the latest EPA regulations and SEMA-certified emissions pathways. By the time we’re done, you’ll have the confidence to turn that silent garage relic into a high-performance machine that starts every single time you turn the key.
Key Takeaways
- Understand why modern reliability and consistent driveability are the primary objectives for 2026 builds, allowing you to enjoy your classic more often.
- Use this classic car modern engine swap guide to evaluate the packaging and performance benefits of the GM LS series versus the Ford Coyote for your specific chassis.
- Demystify the transition from mechanical systems to high-pressure EFI and complex wiring harnesses with a logical, methodical approach to system integration.
- Master the installation phase by organizing a professional-grade workspace and documenting the original drivetrain removal to simplify the assembly process.
- Secure the longevity of your project through professional engine tuning and essential drivetrain reinforcements like upgraded driveshafts and axles.
The Philosophy of the 2026 Modern Engine Swap
A modern engine swap is the definitive heart transplant of the restomod movement. It marks the transition from a static display piece to a machine capable of handling the demands of modern highways. In 2026, the focus has shifted away from raw, unmanageable horsepower toward a philosophy of seamless reliability and refined driveability. This classic car modern engine swap guide is designed to help you bridge that gap without losing the vintage character that made you fall in love with the car in the first place.
Think of an Engine swap as more than just a mechanical replacement. It’s a holistic system upgrade that touches every part of the vehicle’s DNA. You aren’t just bolting in a new block; you’re integrating sophisticated fuel management, advanced cooling, and digital precision into a platform designed for the analog era. This balance requires a steady hand and a clear vision. It’s about respecting the past while demanding more from the future.
To better understand the practical application of these concepts, watch this helpful video:
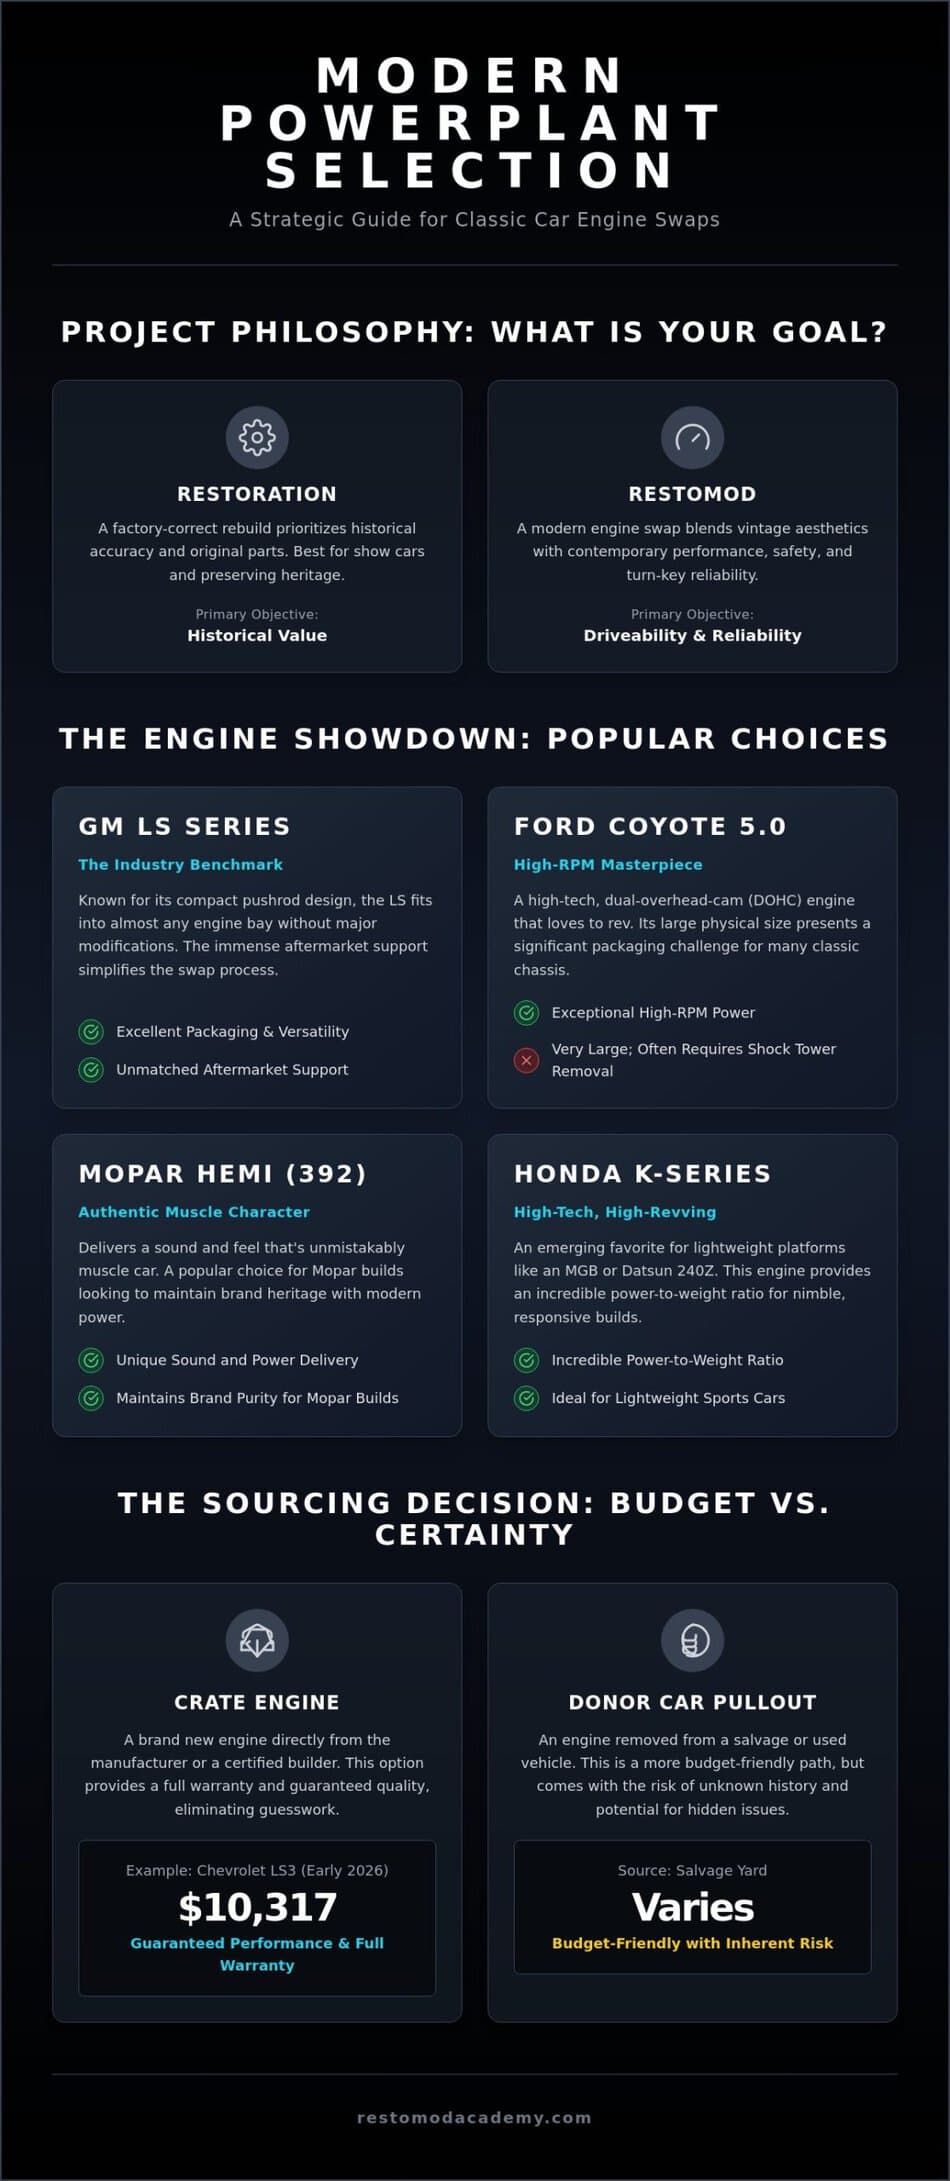
Restoration vs Restomod Swaps
Choosing between a factory-correct restoration and a modern swap often comes down to how you intend to use the vehicle. While a numbers-matching rebuild holds historical weight, a modern powerplant frequently adds more real-world value for the contemporary buyer. Many enthusiasts find that the increased utility of a reliable car outweighs the nostalgia of an original drivetrain. Beyond the financial aspect, you must consider safety. Modern engines provide the predictable throttle response and consistent power delivery needed to merge into fast-moving traffic safely. If you’re still weighing your options, understanding the core principles of what is a restomod can help clarify your project’s direction.
Setting Your Performance Goals
Define your finish line before you pick up a wrench. A car built for cross-country road trips requires a vastly different setup than a weekend track weapon. It’s vital to match your engine’s output to the chassis’s structural capabilities. Dropping 600 horsepower into a frame designed for 150 without proper reinforcement is a recipe for mechanical failure. You should prioritize balance over bragging rights. Focus on the emotional reward of a turn-key classic. There’s an immense sense of pride in knowing that your vintage machine will fire up instantly, idle perfectly, and deliver modern performance whenever the road calls. This roadmap isn’t just about the engine; it’s about the confidence you feel every time you get behind the wheel.
Selecting the Right Modern Powerplant for Your Chassis
Choosing your powerplant is the most critical decision you’ll make in this journey. It’s a technical marriage between two eras that requires more than just a big checkbook. The GM LS series remains the benchmark for the industry because of its compact pushrod design and immense aftermarket support. If you’re looking for a straightforward path, start by consulting our the definitive guide to an ls engine swap to see why this platform is so pervasive. It fits into almost anything, from narrow engine bays to low-slung hoods, without requiring you to cut your car into pieces.
This classic car modern engine swap guide wouldn’t be complete without considering the Ford Coyote 5.0 or the Mopar Hemi. The Coyote is a high-RPM masterpiece, but it’s physically massive due to its dual-overhead-cam architecture. You’ll likely need to remove shock towers to make it fit. Meanwhile, the 392 HEMI offers an authentic muscle car character and sound that an LS simply can’t replicate. For builders working with lightweight platforms like an MGB or a Datsun 240Z, the Honda K-series has emerged as a high-tech, high-revving alternative that provides incredible power-to-weight ratios.
Crate Engines vs Donor Car Pullouts
Deciding between a new crate engine and a salvage yard pullout is a matter of budget versus certainty. As of early 2026, a brand new Chevrolet LS3 crate engine costs approximately $10,317, providing you with a full warranty and zero-mile peace of mind. If you’re on a tighter budget, a donor engine from a modern truck or sedan is a viable path, but it requires a meticulous inspection. Look for signs of oil sludge or bore wear before you commit. Remember that under 2026 EPA regulations, a legal swap generally requires you to retain all the emissions equipment from the donor vehicle, so factor those components into your space and cost calculations. For a truly professional result, consider starting with our Premium Project Blueprints to map out your component list before spending a dime.
The Importance of Engine Packaging
Packaging is where many builders stumble. You must measure the width between your frame rails and the height from the crossmember to the hood. Oil pan clearance is often the biggest hurdle; you might need a specialized low-profile pan to keep the engine from hanging too low. Header clearance around steering boxes is another common headache. Referencing a detailed LT-Engine Swap Guide can show you exactly how modern direct-injection engines require specific fuel pump and accessory drive solutions. Take your time during this phase. A mistake in measurement now can lead to thousands of dollars in wasted fabrication later.
Integrating the Hidden Systems: Wiring and Fuel
While the mechanical installation feels like the biggest hurdle, the true soul of a 2026 restomod lies in its invisible systems. You’ve successfully bolted the engine into the bay, but now you must give it a brain and a steady pulse. This classic car modern engine swap guide wouldn’t be complete without addressing the transition from analog simplicity to digital precision. It’s the most intimidating phase for many builders, but if you approach it methodically, it becomes a rewarding exercise in engineering logic.
Modern high-compression engines generate significantly more heat and require much tighter tolerances than their vintage predecessors. You cannot rely on a 50 year old radiator to keep a modern LS or Coyote engine cool. Upgrade to a multi-pass aluminum radiator and high-flow electric fans controlled directly by the engine control unit (ECU). This ensures the engine reaches operating temperature quickly and stays there, even in heavy traffic. For a comprehensive checklist of components you’ll need during this phase, the Basic Engine Swap Guide from Summit Racing provides an excellent technical baseline.
Electronic Fuel Injection Systems
The ECU is the conductor of your automotive orchestra. You have two primary paths: a reworked factory computer or a standalone aftermarket system. Factory ECUs offer unmatched reliability and cold-start manners, but they often require specialized software to bypass anti-theft systems. Standalone systems are more user-friendly for the DIY builder and offer integrated features like traction control and data logging. Regardless of the brain you choose, a high-quality wiring harness is your best friend. It simplifies the electrical installation by providing labeled connectors for oxygen sensors, crank position sensors, and electronic throttle pedals. Ensuring you have the right crimpers and connectors is essential; you can find our vetted list of tools in the recommended gear section.
Fuel System Plumbing and Safety
Transitioning from a low-pressure mechanical pump to a high-pressure EFI system is a matter of safety and performance. Vintage carburetors operate on roughly 5 to 7 psi, whereas modern fuel injectors require a consistent 58 psi or more. Don’t attempt to use your original fuel tank without significant modifications. The best solution is a modern EFI-ready tank with internal baffles and a submerged high-flow pump. Baffles prevent fuel starvation during cornering, which is critical for protecting your engine from lean-out conditions. Use high-pressure rated fuel lines and AN fittings to prevent leaks. Remember that modern gasoline with ethanol content is corrosive to older rubber lines, so choose PTFE-lined hoses for long-term durability. Proper filtration is equally vital; modern injectors have tiny orifices that can be easily clogged by microscopic debris that a vintage filter would miss.
The Roadmap to Execution: A Step-by-Step Installation
Execution is the stage where your vision finally takes shape in steel and aluminum. It’s a meticulous process that rewards patience and punishes haste. Before you lift the first bolt, establish a clean, organized workspace. You’ll likely spend between 12 to 20 hours on a complex swap, and having a cluttered floor will only lead to frustration. Inventory every component from your classic car modern engine swap guide to ensure you aren’t stopped mid-project by a missing bracket or a specialized fitting. Laying out your parts on a dedicated workbench allows you to visualize the assembly sequence before you start the physical labor.
When you begin the removal of the original drivetrain, document every step. Take high-resolution photos of the factory wiring, throttle linkages, and cooling paths. These images will be your primary reference when you’re trying to integrate modern components into the vintage space. Label every wire you cut and every bolt you remove. This disciplined documentation turns a chaotic teardown into a logical assembly process later on. It’s often the small details, like the orientation of a specific bracket, that cause the most delay during reassembly.
The Mock-up and Fabrication Phase
Don’t rush to bolt in your expensive new engine. Use a plastic dummy block or a cardboard template to finalize your engine and transmission mount locations. This phase is where you identify if the firewall needs massaging or if the subframe requires clearancing for the oil pan. It’s much easier to modify metal when you aren’t worried about scratching a fresh coat of paint on a crate engine. You may need to perform several test fits to ensure the headers don’t interfere with the steering shaft. For advice on the specific tools you’ll need for these modifications, check out our recommended gear for pro-level builders.
The First Startup and Break-in
The moment of truth arrives when you turn the key for the first time. Before that happens, run through a rigorous pre-flight checklist. Verify that you have oil pressure by priming the system without spark. Check for fuel leaks at every fitting under full pressure. Once the engine fires, monitor the coolant temperature and oil pressure gauges like a hawk. Perform several initial heat cycles, allowing the engine to reach operating temperature before cooling down completely. This process allows gaskets to set and helps you identify any minor leaks before they become major failures. It’s the final bridge between a project and a finished machine. To ensure you don’t miss a single step in this complex journey, download our The Ultimate Restomod Guide and start your build with total confidence.
Refining Your Restomod for 2026 Reliability
You must also address the increased mechanical stress on your chassis. If you’ve followed this classic car modern engine swap guide to install a high-torque engine, your original drivetrain is now the weakest link. Factory driveshafts and universal joints from the 1960s weren’t designed to handle 400 plus pound-feet of torque. Upgrade to a balanced aluminum or steel driveshaft and consider a stronger rear axle assembly, such as a Ford 9-inch or a GM 12-bolt, to ensure you can actually put that new power to the pavement without a catastrophic failure. This systemic approach is what transforms a simple swap into a reliable daily driver.
Documentation is your final gift to your future self. Your car is now a hybrid of different eras, and a standard repair manual no longer applies. Create a comprehensive build book that lists every part number, from the serpentine belt to the specific spark plugs and fuel filters you used. If you ever need a roadside repair, you won’t have to guess which year of donor vehicle the alternator came from. This level of detail is what defines a high-value restomod and ensures that maintenance remains a straightforward task rather than a mechanical mystery.
Post-Swap Drivetrain Harmonization
Harmonizing the drivetrain means matching your gear ratios to the new engine’s power band. Modern engines like the LS or Coyote love to rev, and an old set of 2.73 freeway gears will make the car feel sluggish and unresponsive. Aim for a ratio that balances brisk acceleration with comfortable highway cruising. While you’re at it, your brakes and suspension must evolve to match your speed. Increased power demands increased stopping capability. For a deep dive into the parts that make these transitions possible, browse our category product reviews to see which components the community trusts for 2026 builds.
Education and Community Support
Your journey as a builder doesn’t end when the car leaves the garage. The restomod community thrives on shared data and collective problem-solving. We encourage you to contribute your build notes and successes to the enthusiast community to help the next person starting their project. If you’re looking for the next step in your education, our what is a restomod resource offers a broader look at the movement’s philosophy. For those ready to commit to a professional-level build from day one, explore The Ultimate Restomod Guide for our most comprehensive digital resources and Premium Project Blueprints. This is your chance to transition from a passive admirer to an active creator, leaving a lasting legacy on the road.
Build Your Legacy on the Open Road
Completing a modern heart transplant is the ultimate milestone for any dedicated enthusiast. You’ve learned that a successful project requires more than just mechanical fitment; it demands a precise integration of digital electronics, high-pressure fuel systems, and refined drivetrain harmonization. By following this classic car modern engine swap guide, you’ve moved past the initial intimidation of EFI complexity and toward the rewarding reality of a turn-key classic. This journey transforms your vintage machine from a garage ornament into a reliable performer that’s ready for any adventure in 2026 and beyond.
Don’t let the momentum stop here. You can access expert guidance from Restomod Academy founder Brook Walsh and secure your project’s success with our premium project blueprints and technical modules. Join a community of dedicated restomod builders who value precision and craftsmanship as much as you do. Download The Ultimate Restomod Guide to start your project roadmap today and avoid the costly mistakes that stall so many builds. The road is waiting, and with the right roadmap in hand, your vision is well within reach.
Frequently Asked Questions
How much does a modern engine swap typically cost in 2026?
A complete modern engine swap typically costs between $8,000 and $15,000 for most projects. This range includes the engine, specialized mounting kits, and the high-pressure fuel systems required for modern performance. For instance, a new Chevrolet LS3 crate engine is currently priced at approximately $10,317. If you’re hiring a professional, expect labor costs to range from $600 to $4,000 depending on the complexity of the vehicle.
Do I need to upgrade my transmission when swapping a modern engine?
You’ll almost certainly need to upgrade your transmission to handle the increased torque and modern powerband of a new engine. Older factory gearboxes often lack the structural integrity and the necessary gear ratios to keep a modern engine in its sweet spot. Furthermore, modern automatic transmissions require electronic controllers that must communicate directly with the engine’s computer for precise shifting and longevity.
Is an LS swap really the easiest option for a beginner?
The LS series is widely considered the most accessible entry point for builders using a classic car modern engine swap guide. Its compact pushrod design fits into nearly any engine bay without requiring extensive structural modifications. You don’t have to worry about hunting for obscure parts because the immense aftermarket support provides a bolt-in solution for almost every challenge you’ll face during the build.
Will a modern engine swap ruin the value of my classic car?
Swapping a modern engine usually increases the real-world value and desirability of common classic models. While it might detract from the price of an ultra-rare, numbers-matching museum piece, most buyers in 2026 prioritize turn-key reliability and modern performance. A well-executed restomod is often more valuable than an original car because it offers a superior driving experience that owners can enjoy every day.
What is the most common mistake made during an engine swap project?
The most common mistake is failing to plan for the integration of the fuel and cooling systems. Many builders focus entirely on the mechanical fitment but overlook the fact that modern EFI engines require a consistent 58 psi of fuel pressure and significantly more cooling capacity than a vintage V8. Using a detailed project roadmap ensures you account for these critical systems before you ever turn a wrench.
Can I keep my original manual gauges with a modern fuel-injected engine?
You can keep your original gauges by using specialized signal converters and mechanical adapters. Modern engines output digital signals, but aftermarket modules can translate that data into the analog signals your vintage speedometer and tachometer need. It’s a perfect way to maintain the heritage aesthetics of your dashboard while benefiting from the precision of a modern engine control unit.
How long does a typical professional engine swap take to complete?
A straightforward professional swap can take between 8 and 10 hours for the primary mechanical installation. However, more complex vehicles often require 12 to 20 hours or more to properly integrate the wiring and custom plumbing. Don’t rush the process; the refinement and troubleshooting phase is what ensures your car is reliable enough to start every time you turn the key.
Do modern engines require special fuel or maintenance in a vintage chassis?
Modern engines require high-octane pump gas and specific maintenance to keep their electronic sensors functioning correctly. You must use PTFE-lined fuel hoses to prevent the corrosive effects of modern ethanol-blended gasoline from damaging your lines. Regular maintenance is straightforward, but you’ll need to pay closer attention to your electrical system’s health to ensure the ECU receives a steady, clean voltage at all times.
What if you could keep the soul-stirring lines of your 1969 muscle car but lose the cold-start anxiety and the constant tinkering of a finicky carburetor? You aren’t alone in wanting that perfect balance. Most enthusiasts deeply value their car’s heritage, yet the daunting complexity of modern EFI systems or the fear of a $10,317 LS3 crate engine not fitting the frame keeps many projects stalled in the garage. It’s a common hurdle, but one you’re fully capable of clearing with the right technical framework.
This classic car modern engine swap guide provides a strategic roadmap to help you master the surgical heart transplant of your vehicle. You’ll learn how to blend vintage aesthetics with 2026 performance standards while ensuring your build remains reliable and compliant. We’ll explore everything from chassis compatibility and wiring integration to navigating the latest EPA regulations and SEMA-certified emissions pathways. By the time we’re done, you’ll have the confidence to turn that silent garage relic into a high-performance machine that starts every single time you turn the key.
Key Takeaways
- Understand why modern reliability and consistent driveability are the primary objectives for 2026 builds, allowing you to enjoy your classic more often.
- Use this classic car modern engine swap guide to evaluate the packaging and performance benefits of the GM LS series versus the Ford Coyote for your specific chassis.
- Demystify the transition from mechanical systems to high-pressure EFI and complex wiring harnesses with a logical, methodical approach to system integration.
- Master the installation phase by organizing a professional-grade workspace and documenting the original drivetrain removal to simplify the assembly process.
- Secure the longevity of your project through professional engine tuning and essential drivetrain reinforcements like upgraded driveshafts and axles.
The Philosophy of the 2026 Modern Engine Swap
A modern engine swap is the definitive heart transplant of the restomod movement. It marks the transition from a static display piece to a machine capable of handling the demands of modern highways. In 2026, the focus has shifted away from raw, unmanageable horsepower toward a philosophy of seamless reliability and refined driveability. This classic car modern engine swap guide is designed to help you bridge that gap without losing the vintage character that made you fall in love with the car in the first place.
Think of an Engine swap as more than just a mechanical replacement. It’s a holistic system upgrade that touches every part of the vehicle’s DNA. You aren’t just bolting in a new block; you’re integrating sophisticated fuel management, advanced cooling, and digital precision into a platform designed for the analog era. This balance requires a steady hand and a clear vision. It’s about respecting the past while demanding more from the future.
To better understand the practical application of these concepts, watch this helpful video:
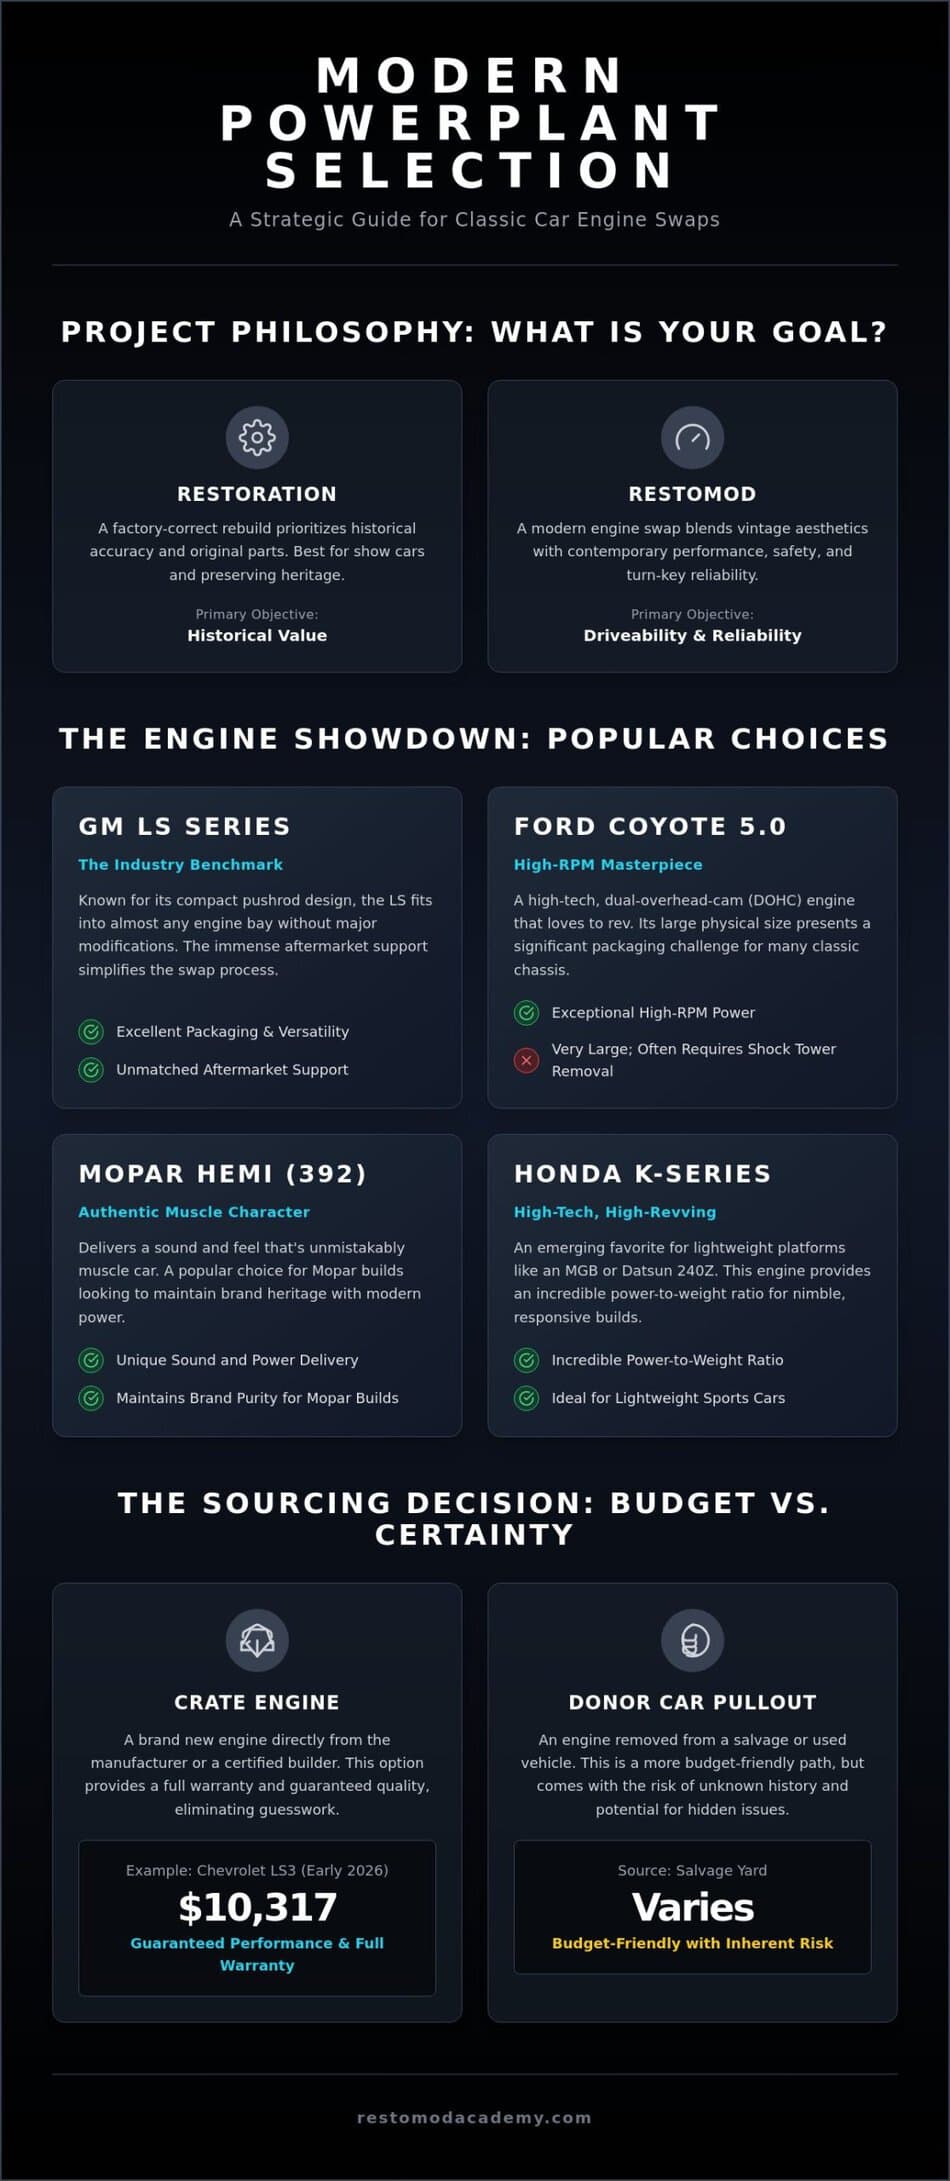
Restoration vs Restomod Swaps
Choosing between a factory-correct restoration and a modern swap often comes down to how you intend to use the vehicle. While a numbers-matching rebuild holds historical weight, a modern powerplant frequently adds more real-world value for the contemporary buyer. Many enthusiasts find that the increased utility of a reliable car outweighs the nostalgia of an original drivetrain. Beyond the financial aspect, you must consider safety. Modern engines provide the predictable throttle response and consistent power delivery needed to merge into fast-moving traffic safely. If you’re still weighing your options, understanding the core principles of what is a restomod can help clarify your project’s direction.
Setting Your Performance Goals
Define your finish line before you pick up a wrench. A car built for cross-country road trips requires a vastly different setup than a weekend track weapon. It’s vital to match your engine’s output to the chassis’s structural capabilities. Dropping 600 horsepower into a frame designed for 150 without proper reinforcement is a recipe for mechanical failure. You should prioritize balance over bragging rights. Focus on the emotional reward of a turn-key classic. There’s an immense sense of pride in knowing that your vintage machine will fire up instantly, idle perfectly, and deliver modern performance whenever the road calls. This roadmap isn’t just about the engine; it’s about the confidence you feel every time you get behind the wheel.
Selecting the Right Modern Powerplant for Your Chassis
Choosing your powerplant is the most critical decision you’ll make in this journey. It’s a technical marriage between two eras that requires more than just a big checkbook. The GM LS series remains the benchmark for the industry because of its compact pushrod design and immense aftermarket support. If you’re looking for a straightforward path, start by consulting our the definitive guide to an ls engine swap to see why this platform is so pervasive. It fits into almost anything, from narrow engine bays to low-slung hoods, without requiring you to cut your car into pieces.
This classic car modern engine swap guide wouldn’t be complete without considering the Ford Coyote 5.0 or the Mopar Hemi. The Coyote is a high-RPM masterpiece, but it’s physically massive due to its dual-overhead-cam architecture. You’ll likely need to remove shock towers to make it fit. Meanwhile, the 392 HEMI offers an authentic muscle car character and sound that an LS simply can’t replicate. For builders working with lightweight platforms like an MGB or a Datsun 240Z, the Honda K-series has emerged as a high-tech, high-revving alternative that provides incredible power-to-weight ratios.
Crate Engines vs Donor Car Pullouts
Deciding between a new crate engine and a salvage yard pullout is a matter of budget versus certainty. As of early 2026, a brand new Chevrolet LS3 crate engine costs approximately $10,317, providing you with a full warranty and zero-mile peace of mind. If you’re on a tighter budget, a donor engine from a modern truck or sedan is a viable path, but it requires a meticulous inspection. Look for signs of oil sludge or bore wear before you commit. Remember that under 2026 EPA regulations, a legal swap generally requires you to retain all the emissions equipment from the donor vehicle, so factor those components into your space and cost calculations. For a truly professional result, consider starting with our Premium Project Blueprints to map out your component list before spending a dime.
The Importance of Engine Packaging
Packaging is where many builders stumble. You must measure the width between your frame rails and the height from the crossmember to the hood. Oil pan clearance is often the biggest hurdle; you might need a specialized low-profile pan to keep the engine from hanging too low. Header clearance around steering boxes is another common headache. Referencing a detailed LT-Engine Swap Guide can show you exactly how modern direct-injection engines require specific fuel pump and accessory drive solutions. Take your time during this phase. A mistake in measurement now can lead to thousands of dollars in wasted fabrication later.
Integrating the Hidden Systems: Wiring and Fuel
While the mechanical installation feels like the biggest hurdle, the true soul of a 2026 restomod lies in its invisible systems. You’ve successfully bolted the engine into the bay, but now you must give it a brain and a steady pulse. This classic car modern engine swap guide wouldn’t be complete without addressing the transition from analog simplicity to digital precision. It’s the most intimidating phase for many builders, but if you approach it methodically, it becomes a rewarding exercise in engineering logic.
Modern high-compression engines generate significantly more heat and require much tighter tolerances than their vintage predecessors. You cannot rely on a 50 year old radiator to keep a modern LS or Coyote engine cool. Upgrade to a multi-pass aluminum radiator and high-flow electric fans controlled directly by the engine control unit (ECU). This ensures the engine reaches operating temperature quickly and stays there, even in heavy traffic. For a comprehensive checklist of components you’ll need during this phase, the Basic Engine Swap Guide from Summit Racing provides an excellent technical baseline.
Electronic Fuel Injection Systems
The ECU is the conductor of your automotive orchestra. You have two primary paths: a reworked factory computer or a standalone aftermarket system. Factory ECUs offer unmatched reliability and cold-start manners, but they often require specialized software to bypass anti-theft systems. Standalone systems are more user-friendly for the DIY builder and offer integrated features like traction control and data logging. Regardless of the brain you choose, a high-quality wiring harness is your best friend. It simplifies the electrical installation by providing labeled connectors for oxygen sensors, crank position sensors, and electronic throttle pedals. Ensuring you have the right crimpers and connectors is essential; you can find our vetted list of tools in the recommended gear section.
Fuel System Plumbing and Safety
Transitioning from a low-pressure mechanical pump to a high-pressure EFI system is a matter of safety and performance. Vintage carburetors operate on roughly 5 to 7 psi, whereas modern fuel injectors require a consistent 58 psi or more. Don’t attempt to use your original fuel tank without significant modifications. The best solution is a modern EFI-ready tank with internal baffles and a submerged high-flow pump. Baffles prevent fuel starvation during cornering, which is critical for protecting your engine from lean-out conditions. Use high-pressure rated fuel lines and AN fittings to prevent leaks. Remember that modern gasoline with ethanol content is corrosive to older rubber lines, so choose PTFE-lined hoses for long-term durability. Proper filtration is equally vital; modern injectors have tiny orifices that can be easily clogged by microscopic debris that a vintage filter would miss.
The Roadmap to Execution: A Step-by-Step Installation
Execution is the stage where your vision finally takes shape in steel and aluminum. It’s a meticulous process that rewards patience and punishes haste. Before you lift the first bolt, establish a clean, organized workspace. You’ll likely spend between 12 to 20 hours on a complex swap, and having a cluttered floor will only lead to frustration. Inventory every component from your classic car modern engine swap guide to ensure you aren’t stopped mid-project by a missing bracket or a specialized fitting. Laying out your parts on a dedicated workbench allows you to visualize the assembly sequence before you start the physical labor.
When you begin the removal of the original drivetrain, document every step. Take high-resolution photos of the factory wiring, throttle linkages, and cooling paths. These images will be your primary reference when you’re trying to integrate modern components into the vintage space. Label every wire you cut and every bolt you remove. This disciplined documentation turns a chaotic teardown into a logical assembly process later on. It’s often the small details, like the orientation of a specific bracket, that cause the most delay during reassembly.
The Mock-up and Fabrication Phase
Don’t rush to bolt in your expensive new engine. Use a plastic dummy block or a cardboard template to finalize your engine and transmission mount locations. This phase is where you identify if the firewall needs massaging or if the subframe requires clearancing for the oil pan. It’s much easier to modify metal when you aren’t worried about scratching a fresh coat of paint on a crate engine. You may need to perform several test fits to ensure the headers don’t interfere with the steering shaft. For advice on the specific tools you’ll need for these modifications, check out our recommended gear for pro-level builders.
The First Startup and Break-in
The moment of truth arrives when you turn the key for the first time. Before that happens, run through a rigorous pre-flight checklist. Verify that you have oil pressure by priming the system without spark. Check for fuel leaks at every fitting under full pressure. Once the engine fires, monitor the coolant temperature and oil pressure gauges like a hawk. Perform several initial heat cycles, allowing the engine to reach operating temperature before cooling down completely. This process allows gaskets to set and helps you identify any minor leaks before they become major failures. It’s the final bridge between a project and a finished machine. To ensure you don’t miss a single step in this complex journey, download our The Ultimate Restomod Guide and start your build with total confidence.
Refining Your Restomod for 2026 Reliability
You must also address the increased mechanical stress on your chassis. If you’ve followed this classic car modern engine swap guide to install a high-torque engine, your original drivetrain is now the weakest link. Factory driveshafts and universal joints from the 1960s weren’t designed to handle 400 plus pound-feet of torque. Upgrade to a balanced aluminum or steel driveshaft and consider a stronger rear axle assembly, such as a Ford 9-inch or a GM 12-bolt, to ensure you can actually put that new power to the pavement without a catastrophic failure. This systemic approach is what transforms a simple swap into a reliable daily driver.
Documentation is your final gift to your future self. Your car is now a hybrid of different eras, and a standard repair manual no longer applies. Create a comprehensive build book that lists every part number, from the serpentine belt to the specific spark plugs and fuel filters you used. If you ever need a roadside repair, you won’t have to guess which year of donor vehicle the alternator came from. This level of detail is what defines a high-value restomod and ensures that maintenance remains a straightforward task rather than a mechanical mystery.
Post-Swap Drivetrain Harmonization
Harmonizing the drivetrain means matching your gear ratios to the new engine’s power band. Modern engines like the LS or Coyote love to rev, and an old set of 2.73 freeway gears will make the car feel sluggish and unresponsive. Aim for a ratio that balances brisk acceleration with comfortable highway cruising. While you’re at it, your brakes and suspension must evolve to match your speed. Increased power demands increased stopping capability. For a deep dive into the parts that make these transitions possible, browse our category product reviews to see which components the community trusts for 2026 builds.
Education and Community Support
Your journey as a builder doesn’t end when the car leaves the garage. The restomod community thrives on shared data and collective problem-solving. We encourage you to contribute your build notes and successes to the enthusiast community to help the next person starting their project. If you’re looking for the next step in your education, our what is a restomod resource offers a broader look at the movement’s philosophy. For those ready to commit to a professional-level build from day one, explore The Ultimate Restomod Guide for our most comprehensive digital resources and Premium Project Blueprints. This is your chance to transition from a passive admirer to an active creator, leaving a lasting legacy on the road.
Build Your Legacy on the Open Road
Completing a modern heart transplant is the ultimate milestone for any dedicated enthusiast. You’ve learned that a successful project requires more than just mechanical fitment; it demands a precise integration of digital electronics, high-pressure fuel systems, and refined drivetrain harmonization. By following this classic car modern engine swap guide, you’ve moved past the initial intimidation of EFI complexity and toward the rewarding reality of a turn-key classic. This journey transforms your vintage machine from a garage ornament into a reliable performer that’s ready for any adventure in 2026 and beyond.
Don’t let the momentum stop here. You can access expert guidance from Restomod Academy founder Brook Walsh and secure your project’s success with our premium project blueprints and technical modules. Join a community of dedicated restomod builders who value precision and craftsmanship as much as you do. Download The Ultimate Restomod Guide to start your project roadmap today and avoid the costly mistakes that stall so many builds. The road is waiting, and with the right roadmap in hand, your vision is well within reach.
Frequently Asked Questions
How much does a modern engine swap typically cost in 2026?
A complete modern engine swap typically costs between $8,000 and $15,000 for most projects. This range includes the engine, specialized mounting kits, and the high-pressure fuel systems required for modern performance. For instance, a new Chevrolet LS3 crate engine is currently priced at approximately $10,317. If you’re hiring a professional, expect labor costs to range from $600 to $4,000 depending on the complexity of the vehicle.
Do I need to upgrade my transmission when swapping a modern engine?
You’ll almost certainly need to upgrade your transmission to handle the increased torque and modern powerband of a new engine. Older factory gearboxes often lack the structural integrity and the necessary gear ratios to keep a modern engine in its sweet spot. Furthermore, modern automatic transmissions require electronic controllers that must communicate directly with the engine’s computer for precise shifting and longevity.
Is an LS swap really the easiest option for a beginner?
The LS series is widely considered the most accessible entry point for builders using a classic car modern engine swap guide. Its compact pushrod design fits into nearly any engine bay without requiring extensive structural modifications. You don’t have to worry about hunting for obscure parts because the immense aftermarket support provides a bolt-in solution for almost every challenge you’ll face during the build.
Will a modern engine swap ruin the value of my classic car?
Swapping a modern engine usually increases the real-world value and desirability of common classic models. While it might detract from the price of an ultra-rare, numbers-matching museum piece, most buyers in 2026 prioritize turn-key reliability and modern performance. A well-executed restomod is often more valuable than an original car because it offers a superior driving experience that owners can enjoy every day.
What is the most common mistake made during an engine swap project?
The most common mistake is failing to plan for the integration of the fuel and cooling systems. Many builders focus entirely on the mechanical fitment but overlook the fact that modern EFI engines require a consistent 58 psi of fuel pressure and significantly more cooling capacity than a vintage V8. Using a detailed project roadmap ensures you account for these critical systems before you ever turn a wrench.
Can I keep my original manual gauges with a modern fuel-injected engine?
You can keep your original gauges by using specialized signal converters and mechanical adapters. Modern engines output digital signals, but aftermarket modules can translate that data into the analog signals your vintage speedometer and tachometer need. It’s a perfect way to maintain the heritage aesthetics of your dashboard while benefiting from the precision of a modern engine control unit.
How long does a typical professional engine swap take to complete?
A straightforward professional swap can take between 8 and 10 hours for the primary mechanical installation. However, more complex vehicles often require 12 to 20 hours or more to properly integrate the wiring and custom plumbing. Don’t rush the process; the refinement and troubleshooting phase is what ensures your car is reliable enough to start every time you turn the key.
Do modern engines require special fuel or maintenance in a vintage chassis?
Modern engines require high-octane pump gas and specific maintenance to keep their electronic sensors functioning correctly. You must use PTFE-lined fuel hoses to prevent the corrosive effects of modern ethanol-blended gasoline from damaging your lines. Regular maintenance is straightforward, but you’ll need to pay closer attention to your electrical system’s health to ensure the ECU receives a steady, clean voltage at all times.