Saving a few hundred dollars on a home-grade blaster can cost you thousands in specialized bodywork when a warped quarter panel refuses to ever take a straight line again. You have likely spent months dreaming of that perfect, glass-like finish, and you know the journey to a show-quality build begins with a perfectly clean slate. There is a definite pull toward the hands-on approach of stripping your own project to bare metal, fueled by the pride of personal labor and the hum of a high-volume compressor. However, the line between a successful weekend project and a garage-wide disaster is thinner than the 18-gauge steel on your classic car.
This guide reveals the cold, hard truth about diy media blasting vs professional services so you can choose the right path for your restoration budget and your sanity. We will examine the actual costs of high-volume air requirements, the impact of 2026 OSHA safety standards regarding respirable crystalline silica, and the specific techniques required to avoid irreversible heat damage. You will learn how to maximize your project budget without sacrificing the structural integrity of your vehicle, ensuring your metal is ready for a high-quality epoxy primer rather than the scrap heap.
Key Takeaways
- Understand why reaching a true bare-metal surface is the essential foundation for ensuring modern epoxy primers and performance coatings bond correctly to your vintage steel.
- Identify the hidden costs and technical demands of home equipment, specifically the high CFM air requirements and moisture filtration needed to prevent immediate flash rust.
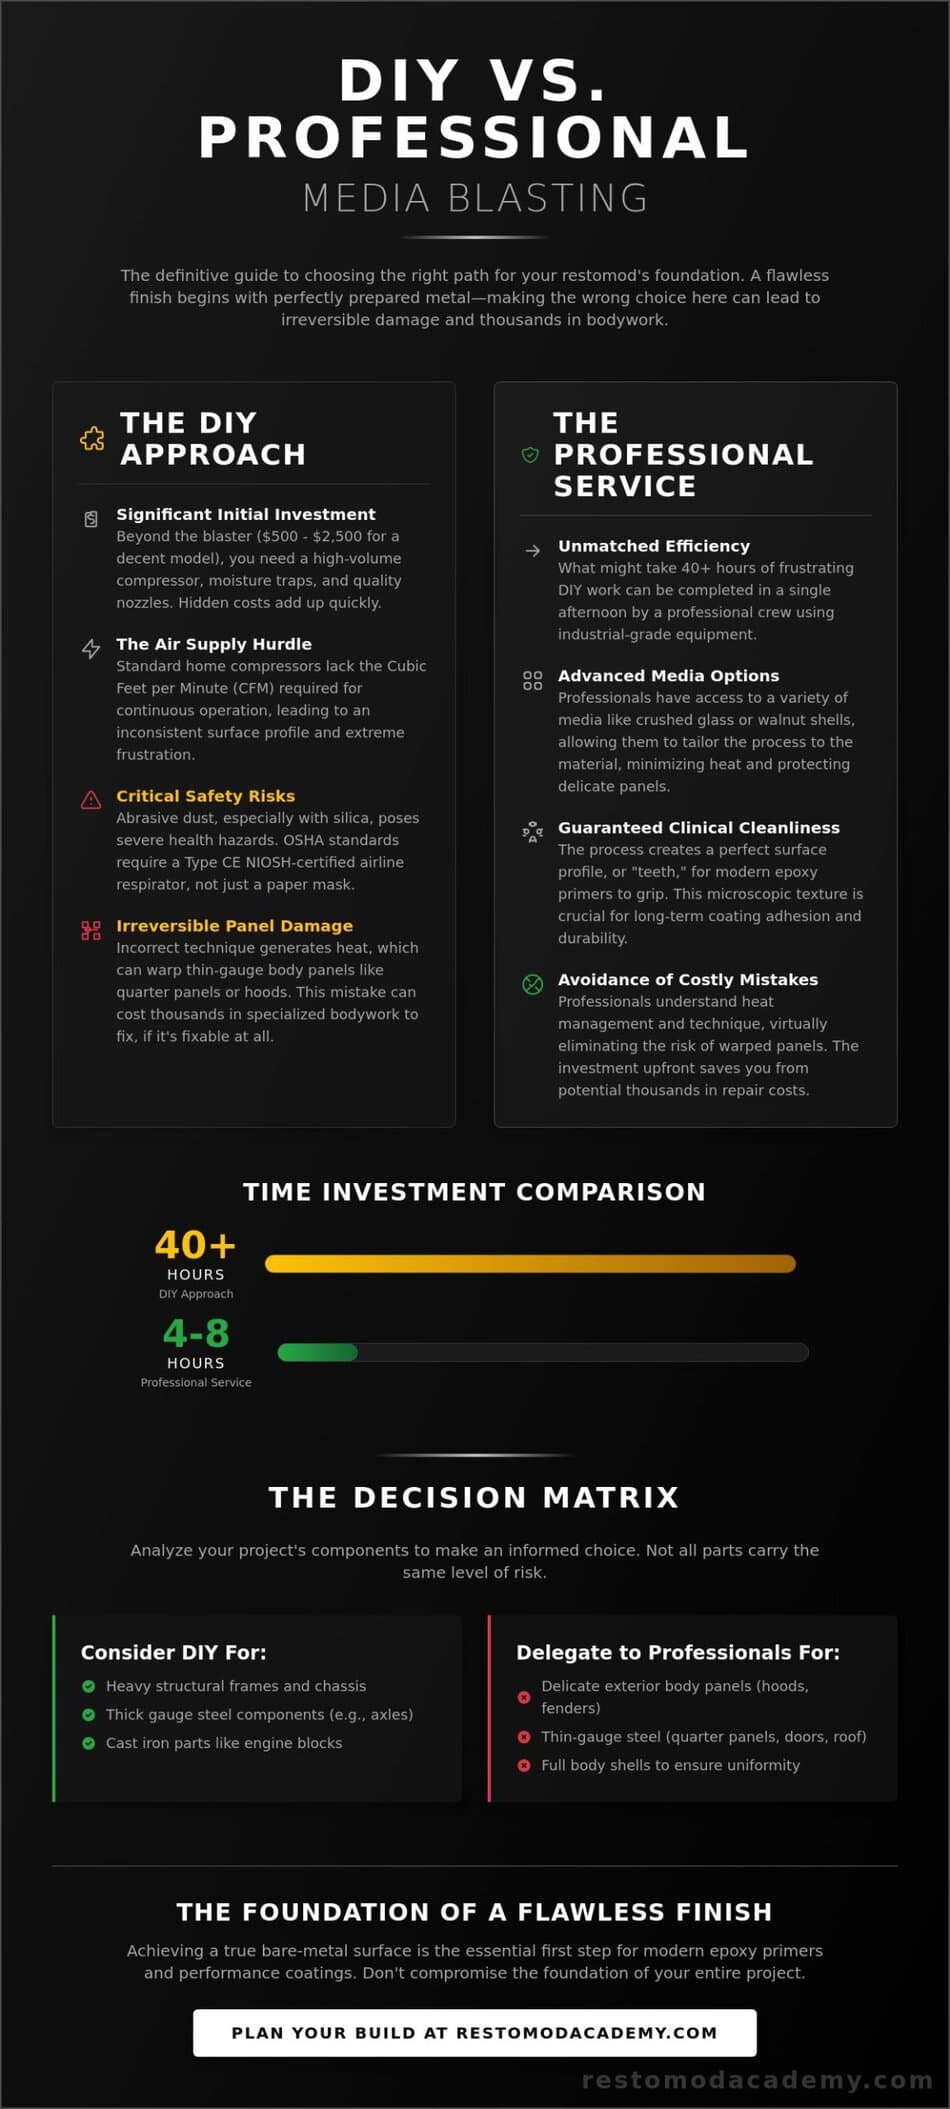
- Navigate the diy media blasting vs professional choice by analyzing the risk profile of heavy structural frames versus delicate, heat-sensitive exterior body panels.
- Discover how professional industrial-grade media choices like walnut shells or crushed glass can reduce a forty-hour DIY struggle into a single afternoon of precision work.
- Learn to coordinate your stripping schedule with your broader restoration roadmap to protect your metalwork and ensure a seamless transition into the fabrication phase.
The Critical Role of Media Blasting in a Modern Restomod
Strip your project down to its core. Abrasive blasting is more than just a cleaning step; it’s a high-pressure mechanical stripping process that scours away decades of history to reveal the raw potential of your vintage steel. In a modern restomod, the goal isn’t just to make the car look good for a season; it’s to build a machine that outlasts its original assembly line life. When you evaluate diy media blasting vs professional options, you must realize that reaching bare metal is the only way to ensure modern epoxy primers and high-performance coatings bond correctly.
To better understand this concept and see how a basic setup operates, watch this helpful video:
Beyond simple paint removal, this process addresses the microscopic rust pits that a standard wire wheel or sanding disc will simply skip over. These tiny pockets of oxidation are the seeds of future failure. By using high-pressure media, you create a specific surface profile. This texture, often described as “teeth,” provides the mechanical grip necessary for modern primers to anchor themselves. Without this clinical level of cleanliness, your expensive paint job is essentially floating on a layer of invisible contamination.
Why Traditional Sanding Falls Short for Restomods
Relying on chemical strippers or hand sanding often leaves you with a half-finished foundation. Chemical agents are notorious for hiding in tight crevices and body seams, only to bleed out months later and ruin your finish. Mechanical sanding can actually be counterproductive; the friction can smear metal over existing rust, trapping it beneath the surface. Our philosophy prioritizes long-term reliability, which means removing every trace of the past rather than just covering it up.
Setting the Foundation for Modern Performance
Clean metal is essential for the precision fabrication that defines a high-end build. If you’re following the Restomod Academy guide to LS swaps, you know that welding new engine mounts or reinforcing a chassis requires a clinical environment. Contaminants in the metal lead to porous, weak welds that can’t handle the torque of a modern drivetrain. Whether you choose diy media blasting vs professional work, the outcome must be a chassis that is surgically clean and ready for the precision of 21st-century engineering.
The DIY Media Blasting Reality Check: Equipment and Costs
Tackling the stripping process in your own driveway feels like a rite of passage for any serious builder. It is the moment you finally confront the history of your machine. However, the hardware required for a successful outcome goes far beyond a basic pressure pot and a bag of grit. To achieve a professional-grade finish, you need a system that includes high-quality nozzles, efficient moisture traps, and a pressure vessel capable of maintaining consistent flow. When weighing diy media blasting vs professional services, the most significant hurdle is often the air supply. A standard home compressor usually lacks the Cubic Feet per Minute (CFM) necessary to keep a blasting nozzle running without constant pauses for the tank to refill. This leads to uneven surface profiles and immense frustration.
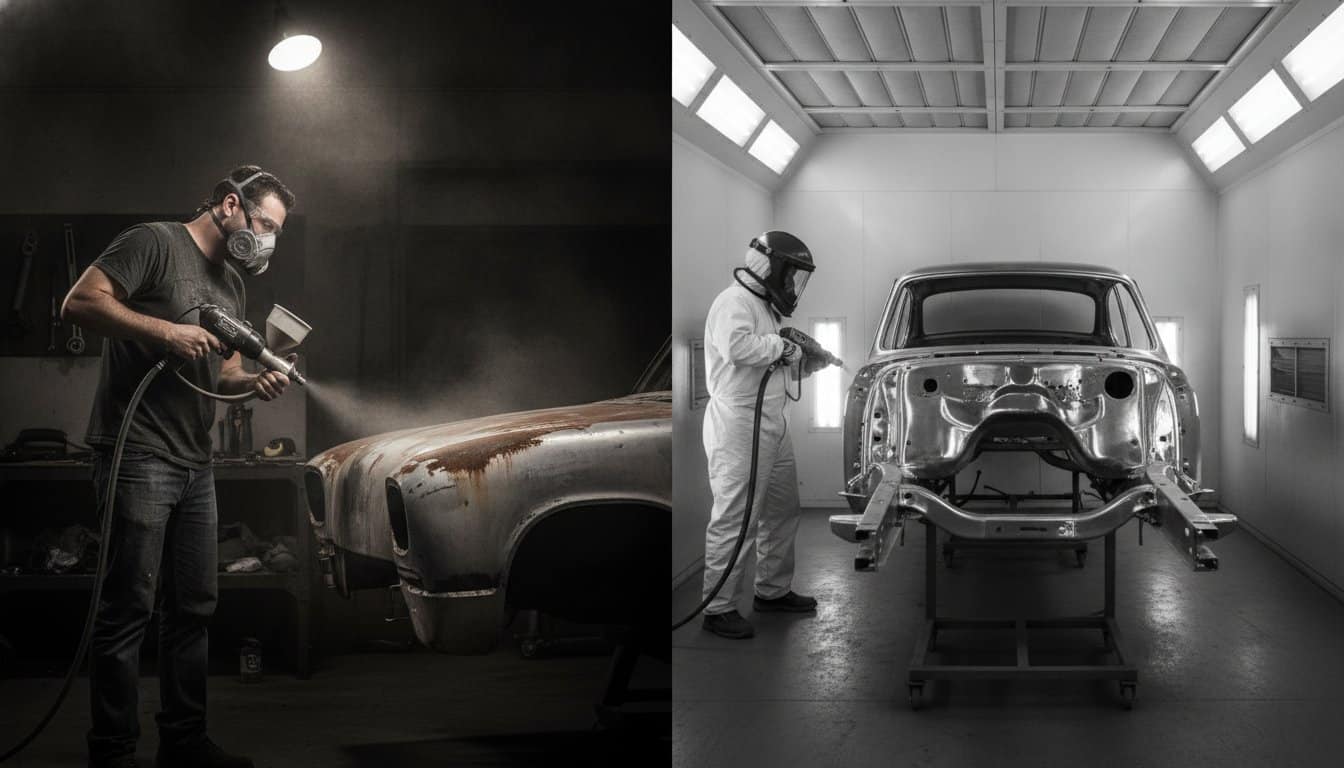
Safety is the next non-negotiable factor. You cannot overlook the significant health and safety risks associated with abrasive dust. As of 2026, OSHA standards maintain a Permissible Exposure Limit (PEL) of 50 µg/m³ for respirable crystalline silica. Protecting yourself requires more than a simple paper mask. You need a Type CE NIOSH-certified blasting airline respirator with a positive pressure helmet. When you factor in the cost of portable blasting machines, which range from $500 to $2,500 for decent DIY models, the initial investment starts to rival the cost of outsourcing the job entirely.
The Hidden Costs of Blasting at Home
The price of media adds up faster than most builders anticipate. With media costs ranging from $0.20 to $3.00 per pound, stripping a full vehicle frame can require hundreds of pounds of material. Without a professional recovery system, this media is typically a one-time use expense. You must also account for the heavy energy consumption of running a high-output compressor for hours on end. If you are renting equipment, expect to pay between $70 and $200 per day, which puts immense pressure on your project timeline. If you want to ensure your workshop is prepared for these demands, review our recommended gear for DIY builders for a realistic look at the necessary kit.
Managing the Mess: Containment and Cleanup
The dust generated by media blasting is incredibly invasive. It will find its way into garage door tracks, attic insulation, and even the internal components of engines stored nearby. Building a temporary containment tent using heavy-duty plastic sheeting is essential if you value your relationship with your neighbors and your own sanity. Cleanup often takes twice as long as the blasting itself, involving hours of sweeping and vacuuming to recover spent grit. If the logistics of managing this mess feel like a distraction from your creative goals, considering professional help might be the smartest move for your project timeline.
Why Professional Blasting is Worth the Investment
Choosing to outsource this phase of your build isn’t an admission of defeat; it’s a strategic move to preserve the integrity of your vintage steel. Professional shops don’t just use larger versions of the equipment you find in a catalog. Their systems are built around industrial-grade refrigerated air dryers that eliminate moisture entirely. This is a critical distinction in the diy media blasting vs professional comparison. Moisture in a home air line is the primary cause of flash rust, a microscopic layer of oxidation that can ruin your primer bond before you even pull the car out of the garage.
Professional operators also possess the muscle memory to manage heat through distance and pressure. They understand how to keep a nozzle moving to prevent localized friction from warping thin exterior panels. While a DIY setup might struggle to maintain a consistent 90 PSI, a professional industrial compressor provides a steady, high-volume flow that allows for a softer touch. This precision ensures that your car’s character lines remain crisp and its surfaces stay flat, avoiding the oil-canning effect that plagues many home-blasted projects. The speed advantage is equally staggering; a professional crew can achieve in four hours what typically takes a solo builder forty hours of grueling labor.
Specialized Media for Sensitive Sheet Metal
Diversity in media is where professional services truly shine. While most home setups are limited to whatever grit is available at the local hardware store, a pro shop can pivot between materials based on the specific needs of your restomod. Soda blasting is a prime example, providing a non-destructive way to strip delicate aluminum trim or thin roof skins without generating any heat. For heavier work, many shops now use crushed glass, which is an eco-friendly, recycled media that provides a superior surface profile without the risks of silica. If you are cleaning internal engine components or fragile intake manifolds, walnut shell blasting offers a gentle alternative that removes carbon and old paint without etching the underlying metal.
The Professional Workflow: From Blast to Primer
The true advantage of a professional shop is the seamless transition from raw metal to protected surface. The window for coating bare steel is measured in minutes, especially in humid environments. A professional facility is designed to move your vehicle directly from the blast booth into a clean spray environment for an immediate application of epoxy primer. This efficiency is a core part of a successful classic car bodywork guide. By the time you would have finished setting up your containment tent at home, a pro has already secured your investment under a layer of high-quality protection, ensuring the foundation of your build remains clinical and rust-free.
DIY vs Professional Media Blasting: The Decision Matrix
Deciding between diy media blasting vs professional services requires a cold, clinical look at your project’s specific needs. It isn’t a matter of skill alone; it’s a matter of risk management and resource allocation. You must weigh the structural thickness of the part against the potential for heat-induced disaster. While a heavy-duty chassis can withstand a novice’s hand and a lower-tier pressure pot, a rare roof skin or a hood from a limited-production classic offers zero margin for error. If you find yourself questioning your equipment’s capability, you can find a breakdown of essential workshop tools in our recommended gear guide.
Time is the most expensive resource in any restomod. A professional facility can often strip a complete vehicle in roughly four hours, whereas a solo builder might spend over forty hours fighting the mess and limited air supply of a home setup. If your air compressor is a standard 20-gallon unit, you will spend more time waiting for the tank to recover than actually removing paint. This bottleneck often pushes the DIY timeline into weeks of grueling labor. When you calculate the cumulative cost of specialized media, high-volume nozzles, and the rental of industrial compressors, the total investment often rivals or exceeds a professional quote.
When to DIY: Small Parts and Rugged Components
Direct your energy toward components where the risk is low and the satisfaction of personal labor is high. Brackets, suspension arms, and thick-gauge frames are ideal candidates for home blasting. A small blasting cabinet is one of the best investments you can make for a long-term build, allowing you to clean small hardware and engine accessories as you go. When tackling a frame, follow this checklist to ensure a safe and effective result:
- Remove all grease and heavy sludge with a degreaser before blasting to prevent clogging your media.
- Use a coarser media like aluminum oxide for heavy rust on structural steel.
- Seal all threaded holes and internal cavities to prevent grit from being trapped where it can’t be removed.
When to Go Pro: Large Surfaces and Rare Metal
Large, flat surfaces like hoods, roofs, and quarter panels demand professional intervention. The heat generated by the friction of the media can cause large panels to “oil-can” or warp permanently. The cost of replacing a rare roof skin far outweighs the price of a professional blasting service. When vetting a shop, ask specifically about their automotive experience. A company that blasts industrial bridge beams might be too aggressive for your vintage sheet metal. Look for a partner who understands the nuances of restomodding and can guarantee they won’t leave your car’s body in a distorted, unworkable state.
Next Steps: Integrating Blasting into Your Build Plan
Stripping your machine to its skeleton is a profound moment of clarity. It reveals every past repair, every hidden patch of oxidation, and the true structural health of your investment. You must view this process as a single, coordinated step within a much larger project roadmap. Whether you have decided on diy media blasting vs professional services, the work doesn’t end when the dust settles; it simply transitions into the most critical phase of your build. This is where your clinical preparation meets the precision of modern fabrication.
Document every inch of that bare-metal surface. High-quality photographs of the stripped chassis and body panels serve as a permanent record for your restomod. They provide undeniable proof of the metal’s integrity, which adds significant value should you ever decide to sell the vehicle. Buyers look for transparency; nothing is more honest than a clean, blasted shell before the primer covers the history. This documentation also helps you identify areas that require immediate structural attention before you begin the assembly of modern performance components.
Planning Your Restoration Timeline
Coordinate your stripping phase with your fabrication schedule. Use restomod project planning to ensure you aren’t leaving bare metal exposed for too long. If you are transporting a bare frame back from a professional blaster, have your epoxy primer ready for immediate application. In humid environments, flash rust can begin to form in under an hour. Plan your logistics so the metal is sealed before the environment has a chance to undo your hard work. Moving a bare frame requires a covered trailer or a dry day, as even a light drizzle can trigger a cleaning nightmare on freshly blasted steel.
Level Up Your Build Skills
Take command of your project’s future by investing in specialized knowledge. If you want to move beyond the basics, explore the Ultimate Restomod Guide for pro-level blueprints that outline every stage of a high-end build. For those high-stakes decisions where the wrong choice could cost thousands, our Restomod Consulting Services provide the expert mentorship you need to stay on track. We believe in the philosophy of personal labor over commercial acquisition, and we are here to provide the educational framework you need to succeed. Join the community of creators at Restomod Academy and transition from a passive admirer to an active creator of automotive art.
Secure the Future of Your Build
Stripping your car to bare metal is the first step toward a show-quality finish that lasts for decades. You have seen that the choice between diy media blasting vs professional services depends on your tolerance for the mess and the fragility of your vehicle’s sheet metal. Remember that industrial-grade air drying is the only reliable way to stop flash rust before it starts. Focus your personal labor on rugged components like frames and brackets; however, consider leaving the large, heat-sensitive exterior panels to the specialists to avoid irreversible warpage.
Founded by restomod enthusiast Brook Walsh, Restomod Academy provides the comprehensive project blueprints you need to navigate these high-stakes decisions with confidence. Whether you require expert-led consulting for a complex build or a structured roadmap for your fabrication, our resources ensure you build it right the first time. Start your journey with The Ultimate Restomod Guide today and join a community of creators dedicated to precision and heritage. Every mechanical hurdle is simply a valuable learning opportunity. With a methodical plan and the right guidance, your vision of a high-performance modern classic is well within reach.
Frequently Asked Questions
Is it cheaper to media blast a car yourself?
Doing the work yourself is rarely cheaper when you account for the total investment in high-volume equipment and specialized media. While a professional service might cost between $1,500 and $12,500 for a full vehicle, a DIY builder must pay for equipment rentals at $70 to $200 per day plus media costs that reach up to $3.00 per pound. When comparing diy media blasting vs professional results, the time you spend on containment and cleanup often outweighs the perceived savings on labor.
Will sandblasting warp my car body panels?
Yes, improper technique will cause permanent thermal expansion and warping in thin sheet metal. The friction generated by high-pressure media creates localized heat that distorts the metal’s surface, leading to a ruined panel that no amount of filler can fix. Professionals prevent this by using lower pressures and maintaining a specific distance from the surface. They also choose softer media types for large, flat areas like hoods and roofs to keep temperatures under control.
What is the best media for DIY car restoration?
Crushed glass is the most versatile choice for the home builder because it is eco-friendly and provides an excellent surface profile for epoxy primer. It is effective at removing rust and old paint without the extreme health risks associated with older materials. For structural components like frames or suspension arms, aluminum oxide is a superior choice. It is expected to be the most used media in 2026 because it can be recycled several times in a blasting cabinet.
Do I need a special air compressor for media blasting?
You need a compressor with a high Cubic Feet per Minute (CFM) rating rather than just high pressure. Most blasting nozzles require a steady flow of at least 15 to 20 CFM at 90 PSI to work effectively. A standard home garage compressor with a 20-gallon tank will run out of air in seconds, forcing you to stop and wait for the tank to refill. This cycle leads to inconsistent stripping and puts immense strain on your compressor’s motor.
How do I prevent flash rust after media blasting?
Apply a high-quality epoxy primer to the bare metal within minutes of finishing the blast. Flash rust is a microscopic layer of oxidation that forms almost instantly in humid environments or if you touch the metal with bare hands. Keep the vehicle in a dry, climate-controlled space and avoid using any water-based cleaners on the raw steel. Securing the surface immediately is the only way to ensure your restoration foundation remains clinical and stable.
Can I use play sand for DIY media blasting?
Never use play sand for any abrasive blasting project. It contains crystalline silica, which breaks down into a fine dust that causes silicosis, a permanent and fatal lung disease. OSHA regulations in 2026 strictly prohibit the use of silica sand in professional settings for this reason. Play sand also contains moisture and irregular grains that will clog your pressure pot and leave an inconsistent finish on your vintage steel.
What is the difference between sandblasting and soda blasting?
Sandblasting is an abrasive process that etches the metal to create a profile; soda blasting is a non-destructive method that cleans without removing any metal. Soda is ideal for delicate aluminum trim, fiberglass, or thin panels where you don’t want to change the surface texture. However, soda leaves a film that must be chemically neutralized before you can apply primer. Abrasive blasting is better for heavy rust where you need the primer to have a mechanical grip.
How much does it cost to have a professional blast a car frame?
Professional blasting for a standard car frame typically costs between $1.50 and $7.00 per square foot depending on the level of rust. Most shops charge an hourly rate between $45 and $80 for this type of rugged work. Since frames are made of thicker steel, operators can use more aggressive media and higher pressures to finish the job quickly. This makes professional frame blasting one of the most cost-effective ways to jumpstart a restomod project.