
You can spend $4,500 on the most advanced coilover system available, but if your frame twists like a wet noodle, those upgrades are practically useless. It’s a frustrating reality for builders who find that vintage steel simply cannot keep up with modern tire grip or high-output engine swaps. We’ve all experienced that unsettling steering drift or the agonizing groan of a body panel under stress during a hard corner. Mastering the art of chassis stiffening classic car projects is the only way to bridge the gap between 1960s manufacturing and 21st-century performance.
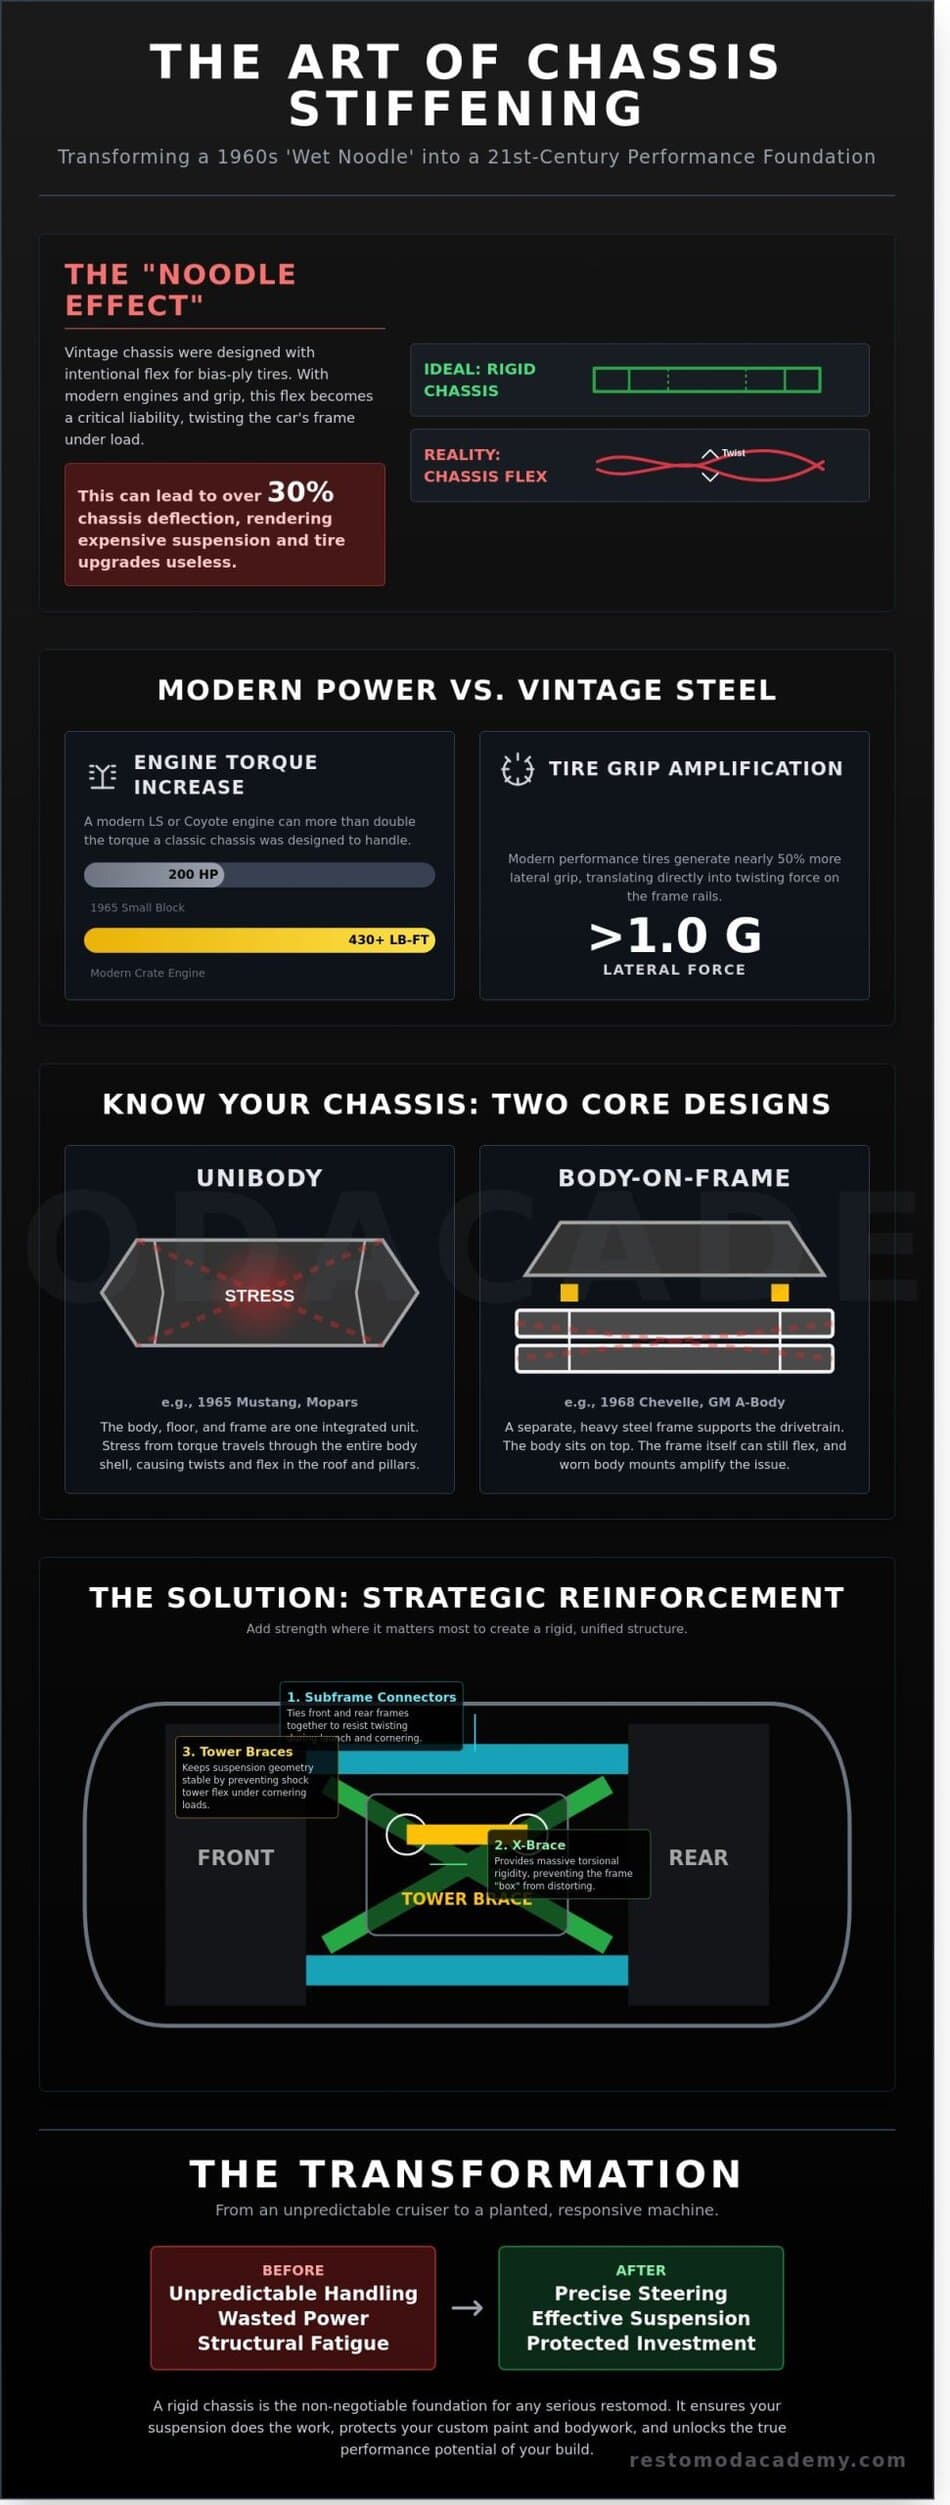
You shouldn’t have to fear cracking your fresh paint or misaligning your doors because of structural flex. This guide will show you exactly how to eliminate the 30% chassis deflection common in factory unibodies to create a truly rigid foundation. We’ll walk through the essential fabrication steps, from subframe connectors to X-braces, that transform a nervous cruiser into a planted masterpiece. Let’s dive into the technical details and give your car the structural integrity it deserves for the road ahead.
Key Takeaways
- Stop the “noodle effect” by learning how vintage engineering struggles against modern tire grip and high-performance demands.
- Master a chassis stiffening classic car strategy tailored to your specific build, whether you’re bracing a unibody Mustang or a body-on-frame Chevelle.
- Pinpoint the most effective hardware upgrades, including subframe connectors and tower braces, to create a rigid foundation for your suspension.
- Follow our professional order of operations to inspect for hidden stress fractures and execute structural welds with precision and confidence.
- Discover how cutting-edge fabrication tech and aftermarket clip systems can replace outdated components with modern, CAD-designed geometry.
Why Your Classic Car Needs Chassis Stiffening
Imagine you are carving through a canyon road in a 1967 fastback. You turn the wheel, but there is a split second of hesitation before the nose follows your lead. This lag is the “Noodle Effect.” It happens because your car is twisting under the pressure of the turn. In the 1960s, automotive engineers designed frames with a specific amount of flex to compensate for the stiff, unforgiving bias-ply tires of the era. By 2026 performance standards, this structural movement is a liability that compromises both handling and safety. When you invest in chassis stiffening classic car projects, you are essentially creating a stable foundation for every other component you install.
Historical engineering relied on heavy steel but lacked the computer-aided design (CAD) tools we use today to maximize torsional rigidity. Before you start welding or bolting on upgrades, understanding vehicle frames and their original load paths is critical for a successful build. If your chassis twists just 2 or 3 degrees during a hard corner, your suspension geometry is effectively useless. Your carefully tuned camber and caster settings vanish as the frame bows, leaving you with unpredictable steering and a car that feels disconnected from the road. A rigid platform ensures that your suspension does the work, not your floor pans.
You can often see the evidence of a weak chassis without even driving. Look for paint cracks at the base of the A-pillars or along the roof rails. These are signs that the metal is stretching and compressing beyond its limits. If your doors are difficult to close when the car is parked on an uneven surface, your frame is flexing. You might also notice “ghost” rattles that appear and disappear depending on the road surface. These symptoms indicate that your classic is literally pulling itself apart under its own weight and power.
The Restomod Factor: More Power, More Problems
Dropping a modern LS or Coyote engine into a vintage bay changes the math of your build instantly. A stock 1965 small block might have pushed 200 horsepower; a modern crate engine easily doubles that torque to 430 lb-ft or more. This massive increase in rotational force puts unprecedented stress on factory spot welds and thin-gauge frame rails. To handle this, you must understand what is a restomod and how it prioritizes the marriage of vintage style with modern structural integrity. Modern sticky tires also play a role. A 2026-spec performance tire can generate over 1.0g of lateral force, which is nearly 50% more grip than original rubber. Without chassis stiffening classic car techniques, that extra grip will simply twist your frame rails like a wet towel.
Safety and Longevity of the Build
Beyond performance, stiffening your chassis is an investment in the longevity of your craftsmanship. Rigid frames prevent “oil-canning,” where flat sections of sheet metal pop in and out, eventually leading to metal fatigue and structural failure. If you have spent $15,000 on a custom paint job, the last thing you want is stress cracks appearing because the body is moveing independently of the frame. From a safety perspective, a reinforced chassis acts as a superior safety cell. In the event of a collision, a stiffened frame manages impact energy more predictably than a soft, decaying factory structure. You are building a legacy, and that legacy needs a solid backbone to survive the decades to come.
Unibody vs. Body-on-Frame: Tailoring Your Strategy
Before you spark the welder, you must identify the skeleton of your project. A 1965 Mustang and a 1968 Chevelle might both look like muscle cars, but their structural DNA is worlds apart. The Mustang uses unibody construction, where the floor pan, roof, and body panels are welded together to form a single load-bearing unit. In contrast, the Chevelle utilizes a body-on-frame design, featuring a heavy steel perimeter frame that supports the drivetrain while the body simply sits on top. Understanding these differences dictates your chassis stiffening classic car strategy.
Unibody cars are notorious for twisting during high-torque launches. Because they lack a continuous longitudinal frame, the force from the rear tires travels through the leaf springs and hits the floor pan. This causes the “A-pillars” and roof to absorb massive stress. If you’ve ever seen a classic Mopar with “wrinkles” in the quarter panels, you’re looking at the physical evidence of chassis flex. Identifying load paths is your first priority. You want to direct energy through reinforced steel rather than letting it distort your exterior sheet metal. This chassis stiffening for better handling guide highlights how connecting these disparate sections transforms the car’s predictability on the road.
Mid-century GM and Ford full-frame cars suffer from a different ailment: the “wet noodle” effect of open C-channel rails. These frames were designed for a soft, Cadillac-style ride, not for 1.0g lateral cornering. The perimeter rails often lack cross-bracing in the center, allowing the frame to bow outward or twist along its length. If you’re building a restomod, you’re likely adding 200% more horsepower than the original engineers ever intended. You must bridge the gap between the front and rear suspension points to keep the geometry stable.
Reinforcing the Unibody Platform
Focus your efforts on the torque boxes. These 14-gauge steel reinforcements tie the rocker panels to the frame rails, acting as the primary anchor for the suspension. Early Mustangs often lacked a passenger-side front torque box until the 1967 model year; adding one is a mandatory first step. Beyond welding, modern builders use structural adhesives in non-critical seams. These 3M-backed chemicals can increase joint fatigue resistance by 15% compared to spot welds alone. Subframe connectors are your best friend here, as they bridge the gap under the floor pan to create a simulated full frame.
Stiffening Body-on-Frame Vehicles
Transform your flimsy C-channels by boxing the rails. By welding 1/8-inch steel plate over the open side of the frame, you create a rigid box section that can increase torsional rigidity by up to 40%. Don’t overlook the body mounts. Swapping 50-year-old compressed rubber for polyurethane or solid aluminum mounts turns the body into a stressed member of the chassis. This reduces the “independent” movement between the frame and the cabin. If you want to learn the specific weld patterns for these plates, our advanced fabrication courses provide the step-by-step blueprints you need.
Every modification you make shifts the load to a new location. When you stiffen the center of the car, the stress moves toward the shock towers and the rear crossmember. Always work from the middle outward. This methodical approach ensures that your classic doesn’t just look fast, but stays straight and true when you finally floor it. Trust the engineering, do the work, and the results will show in your lap times.
Essential Hardware: Subframe Connectors, Braces, and Cages
You’ve identified the flex points in your vintage steel. Now it’s time to choose the hardware that transforms your ride from a shaky relic into a precision instrument. Every component you bolt or weld onto your frame serves a specific purpose in the chassis stiffening classic car process. You aren’t just adding weight; you’re creating a structural skeleton that allows your modern suspension to do its job without the car’s body interfering.
Subframe connectors represent the most effective upgrade for any unibody restomod. These steel rails bridge the gap between the front and rear subframes, effectively turning a two-piece floor pan into a rigid ladder frame. Researching chassis stiffening for better handling shows that these connectors can reduce floor pan deflection by as much as 50% during hard launches. Without them, your car’s midsection acts like a giant spring, absorbing energy that should be going to the rear tires.
Subframe Connectors: Bolt-on vs. Weld-in
Weld-in connectors are the gold standard for permanent rigidity. While bolt-on kits offer a weekend-friendly installation, they rely on the shear strength of a few fasteners. A fully perimeter-welded connector becomes a literal part of the car’s structure. If you’re building a high-horsepower machine, grab your MIG welder and commit to the permanent bond. Ensure you have the right recommended gear for the task, as clean, deep-penetrating welds are vital for structural integrity.
Ground clearance is your main trade-off when selecting a design. Under-the-floor connectors are easy to install but can scrape on speed bumps if your car is lowered more than 2 inches. Through-the-floor designs require cutting the floor pan, but they offer superior stiffness and tuck the hardware up out of harm’s way. This method maintains a clean profile while providing the most direct load path between the suspension mounting points.
Tower Braces and Triangulation
Moving to the engine bay, strut and shock tower braces address the “tower lean” that occurs during high-G cornering. Under heavy lateral loads, the tops of the shock towers want to migrate toward each other. A simple cross-brace prevents this movement, maintaining your alignment settings when you’re carving through a canyon. For classic Fords, the Monte Carlo bar and export brace remain iconic solutions that provide immediate feedback through the steering wheel.
Triangulation is the secret to professional-grade handling. A single bar is good, but tying that bar back to the firewall creates a triangle that is nearly impossible to deform. When choosing hardware, fixed braces are generally superior to adjustable ones. While adjustable rods are easier to fit on a tweaked chassis, the threaded ends introduce potential failure points and slight movement. A solid, one-piece brace offers the most uncompromising chassis stiffening classic car enthusiasts can buy.
The Roll Cage Debate: Street vs. Track
For those seeking the ultimate in structural rigidity, a roll bar or cage is the final frontier. A 4-point roll bar ties the rear shock mounts to the main floor hoop, which drastically stiffens the rear of the car. If you plan on running faster than 11.49 seconds in the quarter-mile, NHRA rules will mandate a 5-point or 6-point bar anyway. It’s a safety requirement that doubles as a massive handling upgrade.
Safety is a serious concern with full cages in street-driven cars. In a collision, your unprotected head can strike the steel tubing, leading to fatal injuries even in minor accidents. If your project is primarily for the street, stick to a 4-point bar that sits behind the seats. Modern builders often utilize “stealth” cages that hide behind the A-pillar trim and headliner. These systems provide the stiffness of a race car without compromising the vintage interior aesthetics or daily-driver safety.
The Pro’s Order of Operations: Where to Start
Building a high-performance machine requires a methodical approach. You can’t just throw parts at a 50-year-old frame and expect modern handling. To achieve successful chassis stiffening classic car results, you must follow a logical sequence that builds strength from the inside out. This prevents you from chasing alignment issues or mysterious squeaks later in the build process.
This “inside-out” philosophy mirrors the principles of human biomechanics, where a stable core is essential for strength and preventing injury—something every builder leaning over an engine bay understands. For those applying the same dedication to their own well-being, the functional training approach at Reformer Fitness Studio offers a way to build that same foundational stability.
Step 1: Baseline Inspection. Clean the underside of your car thoroughly. Use a wire wheel to strip away decades of road grime and undercoating. You’re looking for hairline stress fractures around factory spot welds and hidden rust in the torque boxes. If the metal is thin or cracked, any bracing you weld on will eventually tear away. Repair these structural defects first.
Step 2: Install Subframe Connectors. This is the single most impactful modification for unibody vehicles like Mustangs or Camaros. These steel rails bridge the gap between the front and rear subframes. Weld-in connectors provide roughly 45 percent more torsional rigidity than bolt-on alternatives. They create a solid backbone that prevents the car from twisting under heavy acceleration.
Step 3: Reinforce Mounting Points. Suspension components exert massive leverage on the chassis. Focus on boxing in shock towers and reinforcing leaf spring hangers with 1/8-inch steel plate. These areas often flex by as much as 0.25 inches during hard cornering, which ruins your carefully dialed-in alignment settings.
Step 4: Add Triangulation. Install a strut tower brace and firewall supports. By connecting the tops of the shock towers to each other and to the firewall, you create a rigid triangular structure. This prevents the front “horns” of the frame from moving independently when you dive into a corner.
Step 5: Final Validation. Perform the “jack test.” Place a floor jack under one front corner and lift the car until the tire is off the ground. If you can’t open the door or if the gaps change by more than 2 millimeters, you still have work to do. For high-end builds, consider a professional laser chassis scan to ensure the frame is perfectly square within a 0.5-millimeter tolerance.
Prioritizing Upgrades Based on Use Case
Your build’s purpose dictates your priority list. A “Street Cruiser” package focuses on subframe connectors and basic shock tower bracing to improve ride quality and door alignment. However, a “Pro-Touring” build requires full frame boxing and X-bracing to handle modern 200-treadwear tires. If you’re planning an LS engine swap, your priorities shift toward reinforcing the front crossmember and torque boxes to handle the 400-plus pound-feet of torque that modern aluminum V8s produce.
Managing NVH: Keeping the ‘Classic’ in Classic Car
Stiffness is a double-edged sword. As you eliminate flex, you also eliminate the chassis’s ability to absorb vibration. This can lead to a resonant “drone” at highway speeds, typically around 70 to 80 Hz. To keep the car drivable, use 80-mil butyl rubber sound deadening on large flat floor panels. Don’t go overboard with solid bushings everywhere; use high-durometer polyurethane in strategic spots to maintain a bridge between performance and comfort. The rule of diminishing returns usually hits once you move from bolt-on bracing to a full roll cage. Unless you’re racing, stop when the “jack test” shows a stable structure. Master your fabrication skills today by exploring our advanced restomod build guides.
Modern Fabrication Tech and Finishing the Build
The frontier of chassis stiffening classic car projects has moved from the trial-and-error of the 1990s into a world of digital precision. Today, elite builders use handheld 3D scanners like the Artec Leo to capture 1.2 million data points per second. This creates a digital twin of your vintage floor pan with an accuracy within 0.02mm. By importing this data into CAD software, you can design custom X-braces or torque boxes that contour perfectly to the existing steel. This eliminates the “hammer to fit” philosophy that plagued older builds. If you’re aiming for a pro-touring masterpiece, digital design ensures your reinforcements don’t interfere with exhaust routing or ground clearance.
Once the fabrication is complete, you must address the vulnerability of fresh steel. Welding burns away factory coatings, leaving the metal susceptible to oxidation within 48 hours in humid environments. Don’t leave your hard work to rust from the inside out. Clean every weld with a wax and grease remover before applying a high-quality 2K epoxy primer. For maximum durability, many builders choose powder coating for removable subframes. This provides a 3-mil thick barrier that resists rock chips and chemicals far better than standard rattle-can paint. If you’re welding directly to the main unibody, use a weld-through primer on overlapping joints to stop “crevice corrosion” before it starts.
The final step in your structural journey is a professional performance alignment. A stock 1960s alignment spec is designed for bias-ply tires and massive frame deflection; it won’t work for a rigid restomod. Now that your chassis holds its shape under load, you can utilize aggressive settings. Aim for these targets to maximize your new rigidity:
- Caster: Increase to 4 or 6 degrees positive to improve high-speed stability.
- Camber: Set to 0.5 degrees negative to keep the tire contact patch flat during hard cornering.
- Toe: 1/16th of an inch toe-in for a street-driven car that tracks straight.
Aftermarket Chassis and Subframes
Sometimes, the original factory rails are too far gone or too weak for 600 horsepower. In these cases, 7 out of 10 high-end builders opt for a full perimeter frame from companies like Roadster Shop or Art Morrison. These units can reduce torsional flex by over 50% compared to a stock C10 or Chevelle frame. If a full swap is outside your budget, a “bolt-in” front clip is a fantastic middle ground. These systems replace the entire front suspension geometry with modern rack-and-pinion steering. You can find detailed breakdowns of these systems in our product reviews category.
The Final Inspection: Testing Your Work
Before you hit the track, perform the “door gap” test. Place your car on a level surface and measure the gaps between the door and the quarter panel. Now, jack up one front corner by the lower control arm. If your chassis stiffening classic car efforts were successful, those gaps shouldn’t change by more than 1mm. On the road, the car should feel “planted.” You’ll notice the steering feels more direct because the frame isn’t absorbing your inputs. This is the soul of a restomod: vintage looks with modern confidence. Join the Restomod Academy community today and share photos of your reinforced build. We’re here to help you turn that vision into a high-performance reality.
Transform Your Vision Into a High Performance Reality
Turning a vintage cruiser into a precision machine starts with structural integrity. You’ve seen how 50 year old steel requires a modern touch to handle today’s horsepower. By prioritizing subframe connectors and strategic bracing, you eliminate the flex that compromises your chassis stiffening classic car project. Master builder Brook Walsh emphasizes that safety and performance synergy isn’t accidental; it’s the result of following a proven 5 step order of operations. This meticulous approach ensures your fabrication work supports every cornering load and hard launch with confidence.
Don’t leave your legacy to guesswork or outdated methods. Pro shops across the country rely on these exact techniques to bridge the gap between 1960s style and 21st century handling. You have the tools and the drive to elevate your build from a simple restoration to a true restomod masterpiece. Take the next step in your fabrication journey today. Download our Premium Project Blueprints for Chassis Fabrication to access the same step by step guides used by professional builders. Your garage is the birthplace of something legendary, so keep welding, keep learning, and build it right the first time.
Frequently Asked Questions
Will stiffening my chassis make the ride too harsh for daily driving?
Stiffening your chassis improves ride quality because it allows the suspension components to do their job without the frame acting like an uncontrolled spring. When you eliminate cowl shake and mid-body flex, your springs and shocks can manage road imperfections more effectively. A 15% increase in torsional rigidity often results in a car that feels more planted and less rattly on 1960s-era unibody platforms.
Can I stiffen my car’s chassis without a welder?
You can absolutely improve rigidity using bolt-on components like strut tower braces, X-braces, and bolt-in subframe connectors. These parts utilize existing factory mounting points to tie the front and rear of the car together. While a weld-in kit offers maximum strength, high-quality Grade 8 hardware can reduce floor pan deflection by 20% on a typical 1967 Mustang or Camaro compared to a stock setup.
Do subframe connectors really make a difference on a street car?
Subframe connectors are essential for street-driven unibody cars because they bridge the gap between the front and rear subframes. This modification prevents the chassis from twisting under torque, which protects your body panels from stress cracks. Without them, high-torque engines can cause 1/8-inch shifts in door alignment; installing them ensures your chassis stiffening classic car project yields a car that stays straight for decades.
What is the difference between a strut bar and a sway bar?
A strut bar links the tops of your shock towers to prevent the chassis from pinching during hard cornering, while a sway bar connects the lower suspension arms to control body roll. Strut bars target the 3mm of flex often found at the upper towers during high-load turns. In contrast, a 1-inch sway bar can reduce body lean by 30%, keeping your tires flat on the pavement for better grip.
How much does it cost to professionally stiffen a classic car chassis?
Professional chassis stiffening typically costs between $1,500 and $5,000 depending on the complexity of the fabrication. A shop will usually charge for 4 to 6 hours of labor at a standard $125 hourly rate just to install subframe connectors. If you’re looking for a full 10-point roll cage or a custom X-frame, the materials and labor will easily exceed the $4,500 mark at most specialized restomod shops.
Will chassis stiffening increase the resale value of my restomod?
Documented chassis upgrades can increase your car’s resale value by 10% to 15% because they signal a high-quality, performance-oriented build. Buyers in the restomod market prioritize structural integrity and modern handling characteristics. Recent sales data from 2023 indicates that reinforced 1960s muscle cars often command a $5,000 premium over stock examples because the hard work of fabrication and engineering is already finished.
Does a convertible need more chassis stiffening than a coupe?
Convertibles require significantly more reinforcement because they lack a fixed roof, which provides roughly 50% of a coupe’s total torsional strength. Without that upper structure, the car is prone to scuttle shake and significant floor pan twist. Adding a 4-point low-profile roll bar or heavy-duty rocker reinforcements can reclaim that lost rigidity and make your chassis stiffening classic car efforts feel much more effective.
Can I use structural foam to stiffen my classic car frame?
You can use specialized two-part structural epoxy foams to fill hollow frame rails and pillars to increase localized stiffness by 30%. These foams, like those produced by Sika, offer a compressive strength of 2,000 psi once cured. It’s a clever way to add rigidity without the weight of steel. Just ensure you’ve finished all welding first, as the foam is highly flammable and will melt at temperatures above 300 degrees.