A “restored” vintage ride often hides 20 pounds of plastic filler beneath a glossy exterior, masking structural failures that compromise both safety and soul. You’ve likely felt that pit in your stomach when a simple sanding session reveals layers of hidden rust or a previous owner’s “Bondo-filled” hack job. We agree that your project deserves better than a temporary fix. This classic car bodywork guide is designed to help you move past the frustration of discovery and into the precision of true craftsmanship.
You’re going to master our expert-led framework to transform a 50 year old shell into a precision-engineered restomod masterpiece. We’ll show you exactly which modern TIG welders and English wheels are worth your 2024 budget and which tools are just expensive shelf ornaments. You’ll learn how to achieve laser-straight body lines and a structurally sound chassis that handles like a modern performance machine. From custom metal fabrication to final panel alignment, we’re breaking down the complex art of the build into logical, achievable steps. Let’s pick up the torch and start building your legacy.
Key Takeaways
- Shift your mindset from basic restoration to high-performance fabrication by blending iconic classic lines with modern structural integrity.
- Navigate our classic car bodywork guide to assemble a professional-grade toolkit that empowers you to shape metal with surgical precision.
- Stop structural “cancer” in its tracks by learning how to evaluate metal health and execute permanent, metal-first repairs that last a lifetime.
- Master the art of custom “slick” modifications, from shaving drip rails to installing mini-tubs for high-performance modern rubber.
- Unlock the professional secrets of guide coating and filler application to transform raw fabrication into a laser-straight, show-winning finish.
The Restomod Bodywork Philosophy: Beyond Basic Restoration
Pick up your grinder and clear your mind. This classic car bodywork guide begins with a fundamental truth: a restomod is not a time capsule. While traditional restoration focuses on returning a vehicle to its exact assembly-line state, the restomod philosophy demands more. We fuse the timeless silhouette of the 1960s or 70s with the structural integrity required for 21st-century performance. You aren’t just fixing dents; you’re re-engineering a legacy.
Understanding the Restomod Bodywork Philosophy requires recognizing that “perfectly straight” is merely the baseline. In a high-performance build, the metal must accommodate wider 335mm tires, modern independent rear suspensions, and cooling systems that the original factory designers never imagined. It’s a balance of preserving the soul of the machine while upgrading its skeleton to handle 500 or more horsepower safely. Every cut you make should serve the dual purpose of aesthetic beauty and modern functionality.
To better understand the precision required during the preparation phase, watch this helpful video on foundational metal prep:
Restoration vs. Restomod Bodywork
A concours restoration is a history lesson, but a restomod is a personal manifesto. You have the creative liberty to shave door handles, tuck bumpers, or flare fenders to create an aggressive stance. However, this freedom requires meticulous planning. You must account for modern components before you strike an arc. If you’re dropping in a modern crate engine, your firewall might need a 2-inch recess for clearance. Understanding What is a Restomod? means realizing that the body must be as capable as the drivetrain it houses.
Setting Your Standards: Driver Level vs. Show Quality
Decide your finish line before you strip the first panel. A “Driver Level” build focuses on durability and 20-foot aesthetics; it’s meant for the open road and the occasional rock chip. A “Show Quality” build demands perfection, where panel gaps are measured to a precise 3/16th of an inch across the entire car. Your choice dictates your timeline and your budget.
- The Garage Builder: Focuses on structural soundness and clean lines. Expect to spend 400 to 700 hours on metal work and prep.
- The Professional Shop: Targets laser-straight reflections and hidden welds. These builds often exceed 1,500 hours in the body shop alone.
- The “Built, Not Bought” Mentality: This is about the pride of craftsmanship. It’s the 2:00 AM sessions with a shrinking hammer and the patience to block sand a quarter panel for the fourth time until it’s flawless.
Patience is your most valuable tool. Achieving a legacy-worthy finish doesn’t happen in a weekend. It happens in the quiet moments of repetition, checking your work against a straightedge, and refusing to settle for “good enough.” This classic car bodywork guide serves as your roadmap for that journey. Respect the metal, and it’ll reward you with a finish that stands the test of time.
The Essential Toolkit for Precision Fabrication
Every legendary restomod starts with a single strike of a hammer, but finishing one requires a sophisticated arsenal. While a basic body hammer and dolly set can handle minor dings, precision fabrication demands tools that allow for extreme accuracy. You aren’t just fixing a car; you’re reshaping history. Moving beyond the basics means investing in equipment that manages heat, controls metal movement, and ensures your panels are laser-straight before the first drop of primer hits the surface.
Safety is the most critical part of your automotive arsenal. Don’t compromise here. A high-quality respirator with P100 particulate filters is mandatory when grinding decades of old lead filler or rust. Protecting your lungs is just as important as protecting the metal. Before you spend a dime on hardware, Check out our Recommended Gear for builders to ensure you’re investing in gear that keeps you in the shop for years to come.
Power Tools for the Modern Garage
Choosing between pneumatic and electric tools often comes down to your shop’s infrastructure. Pneumatic tools are lighter and usually last longer under heavy use, but they require a compressor capable of delivering at least 10 to 15 CFM at 90 PSI. Electric brushless tools have closed the gap, offering incredible torque without the tether of a hose. A 6-inch Dual Action (DA) sander is your workhorse for surface prep, providing a random orbital pattern that prevents deep swirl marks in the substrate. For the final stages, a variable-speed polisher is non-negotiable. You need the ability to drop down to 600 RPM for delicate finishing or crank it up to 3000 RPM for aggressive cutting. For those seeking a deep dive into specific techniques, this classic car bodywork restoration guide offers a masterclass in traditional and modern methods.
Metal Shaping and Welding Essentials
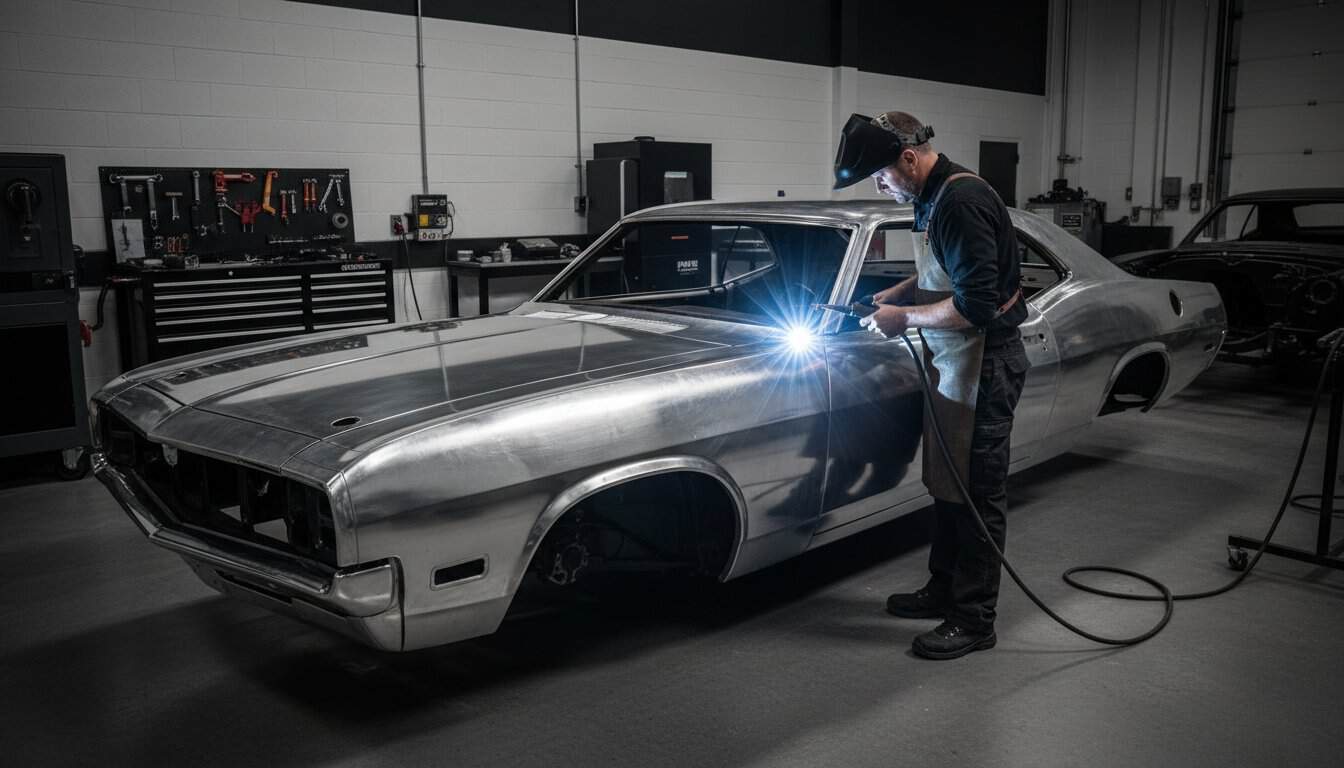
When it comes to joining 18 or 20-gauge sheet metal, the MIG vs. TIG debate is central to any classic car bodywork guide. MIG welding is faster and easier to learn, making it ideal for floor pans or structural braces. TIG welding offers superior heat control and a much smaller heat-affected zone, which is vital for exterior panels where you want to minimize metal warping. Beyond welding, your bench should feature specialized shaping tools. Shrinker-stretchers allow you to create complex curves in patch panels, while an English wheel helps you crown flat sheets into flowing fenders.
Metal memory is the physical property of a steel panel to return to its original stamped shape when the internal stresses from a dent are properly relieved. Understanding this concept allows you to work with the metal rather than against it. If you’re unsure which welder fits your current skill level, browse our detailed product reviews to see what the pros are using in their own bays.

Rust Remediation and Structural Reinforcement
Rust is often called the cancer of vintage iron for a reason; it’s a relentless chemical reaction that doesn’t stop until the host is consumed. If you’re following this classic car bodywork guide, you’ve likely encountered the “bubbling paint” trap. Sanding down a rust spot and covering it with body filler is a temporary mask, not a fix. Moisture remains trapped in the porous iron oxide, continuing to eat the metal from the inside out. To truly save a car, you must adopt a zero-tolerance policy toward rot.
Many builders panic when they see daylight through their floorboards, asking if the project is too far gone. In the modern restomod era, the answer is almost always no. You can now purchase 100% of the sheet metal for popular platforms like the 1969 Camaro or the 1965 Mustang. If the roof pillars and the VIN-stamped cowl remain straight, you have a foundation. You’re not just fixing a car; you’re performing a structural transplant. We prioritize replacing entire panels over small patches because it reduces the number of seams and ensures the 18-gauge cold-rolled steel provides the factory-spec protection you need.
The Anatomy of Rust Repair
Effective repair starts with a plasma cutter or an angle grinder. Cut at least 2 inches past the visible rust to reach virgin metal. Once the rot is gone, you face a choice: butt-welding or lap-welding. Professionals always choose butt-welding. While lap-welding is easier, it creates a double layer of steel that traps moisture and leads to future corrosion. Butt-welding involves fitting the new patch perfectly flush with the original metal. Use a 0.030-inch welding wire and take your time with “tack” welds to manage heat. This meticulous approach prevents panel warping and results in a seam that disappears after a light grind. If you’re prepping the shell for a high-performance heart, check out the definitive guide to an LS engine swap to understand how your metalwork must support increased torque.
Chassis Stiffening and Performance Prep
Restomods demand more from a chassis than vintage engineers ever intended. When you add modern tires with high lateral grip, an old unibody will flex like a wet noodle. Take advantage of the stripped body to install subframe connectors. These steel bars bridge the gap between the front and rear subframes, effectively turning a unibody into a full-frame car. This single modification can reduce chassis twist by 25% to 30% under hard acceleration.
- Seam Welding: Run short, 1-inch beads along factory pinch welds to increase torsional rigidity by up to 15%.
- Wheel Tubbing: If you plan on running 315mm or wider tires, now is the time to widen the inner wheel wells.
- Torque Boxes: Reinforce these critical suspension mounting points with 1/8-inch steel plates to prevent the frame from tearing under heavy loads.
Integrating these reinforcements during the classic car bodywork guide phase ensures your project handles like a modern sports car while retaining its iconic silhouette. It’s about building a legacy that’s as strong as it is beautiful.
Custom Body Modifications: The Art of the Restomod
Restomodding isn’t just about preservation. It’s about transformation. This stage of your classic car bodywork guide focuses on the “Built, Not Bought” philosophy, where you trade factory limitations for a custom vision. You aren’t just fixing old steel; you’re sculpting a machine that performs like a modern supercar while retaining its vintage soul. This requires a shift from simple panel replacement to advanced metal fabrication and creative engineering. It’s the moment where your project stops looking like a restoration and starts looking like a statement.
Shaving and Smoothing Techniques
Achieving a “slick” profile starts by removing visual clutter like door handles, emblems, and drip rails. To prevent “ghosting,” where the outline of the old hole reappears through the paint months later, you must weld 18-gauge steel patches flush with the surrounding metal. Don’t just tack them. Use a series of small, intermittent TIG welds to manage heat and minimize distortion. While electronic door poppers offer a clean look, always install a mechanical emergency release hidden in a wheel well. High-end builds are defined by 1/8-inch consistent gaps across every panel, a feat that requires adding or grinding metal until the lines are laser-straight.
Aggressive Stance: Flares and Tubs
Modern performance rubber demands space that factory wheel wells don’t provide. If you want to fit 315mm or 335mm wide tires on a vintage muscle car, you’ll likely need mini-tubs. This involves cutting the inner wheel houses and widening them toward the frame rails, often gaining 3 inches of additional clearance. For the exterior, you can choose between stretching factory arches for a subtle look or installing bolt-on flares for a track-ready aesthetic. Proper fitment is a game of millimeters. Always measure your backspacing three times before cutting. This mechanical grip works best when paired with modern Suspension Upgrades for Cars to ensure the chassis can handle the increased lateral G-forces.
Integrating 21st-century technology into vintage steel completes the evolution. Flush-mount glass kits eliminate bulky chrome trim and thick rubber gaskets, which can reduce wind noise by up to 15 percent at highway speeds. LED lighting conversions provide 3,000 lumens of clarity compared to the dim 700-lumen output of original sealed beams. These upgrades ensure your build is as functional at midnight as it is beautiful at noon. Every cut and weld is a lesson in the Restomod Academy of craftsmanship. You’re building a legacy, one panel at a time.
The Road to a Show-Quality Finish
You’ve finished the heavy lifting. The patches are welded, the welds are ground flush, and the structural integrity of your project is solid. Now you enter the phase that separates a driver from a trailer queen. This stage of our classic car bodywork guide focuses on the meticulous refinement of surfaces. Precision here determines whether your paint looks like a deep pool of water or a rippled mess. You aren’t just fixing a car; you’re sculpting a legacy. Don’t rush the process.
Mastering Body Filler and Block Sanding
Body filler is a precision tool, not a crutch for poor metalwork. Professional builders follow the 1/8th inch rule: filler should never exceed 3 millimeters in thickness. If you need more than that, go back to the hammer and dolly. Start with a high-quality polyester filler and apply it in thin, tight coats to eliminate air bubbles. This stage is about leveling, not layering. You’ll spend 90 percent of your time sanding away what you just applied.
Follow a strict grit progression to achieve a laser-straight surface. Start with 80 grit to knock down the high spots and define the body lines. Transition to 180 grit to remove the heavy scratches left by the initial pass. Finally, finish with 320 grit to prep the surface for primer. Always use a sanding block that matches the contour of the panel. Short blocks are for tight curves; long boards are for expansive hoods and doors. Use a 50 percent overlap on every stroke to ensure you don’t create new low spots.
The guide coat is your most honest critic. Mist a light, contrasting color of aerosol “dry guide coat” over your primer. As you sand, the dark powder stays in the low spots, revealing every microscopic imperfection. If the guide coat remains in a certain area, you have a low spot that needs attention. It’s a simple, foolproof method that eliminates guesswork.
The Final Countdown to Paint
Before you even think about the color booth, you must choose your foundation. Epoxy primer is the gold standard for rust prevention and adhesion. It seals the metal and provides a chemical bond that high-build primers can’t match. Apply two coats of epoxy, let it outgas for 48 hours, and then follow up with a high-build urethane primer. This thicker layer acts as a “liquid sander” that fills the final 320-grit scratches.
While you wait for the primer to cure, start planning your aesthetic. Check out these Restomod Paint Ideas for 2026 to see how modern finishes can transform vintage steel. Once you’re ready for the final prep, clean the entire vehicle with a wax and grease remover. Use a fresh microfiber towel for every panel. Any skin oils or stray dust particles will cause “fish eyes” in your clear coat.
Perform the “sunlight test” as your final inspection. Roll the car out of the garage and into the natural light. Fluorescent shop lights are notorious for hiding subtle ripples that become glaringly obvious under the sun. Walk the length of the car and look at the reflections of straight lines, like a fence or a roofline, in the primer. If those lines stay straight as you move, your classic car bodywork guide journey is a success. You’ve earned the right to spray the color.
Bring Your Vision to the Garage Floor
Mastering the metalwork on your project is the defining moment between a simple repair and a true restomod masterpiece. You’ve learned that precision fabrication requires more than just a welder; it demands a strategic approach to rust remediation and structural reinforcement. By following this classic car bodywork guide, you are prioritizing the craftsmanship that ensures your build stands the test of time. Every cut and weld is a step toward a show-quality finish that honors the past while embracing modern performance.
The Restomod Academy was founded by enthusiast Brook Walsh to bridge the gap between dreaming and doing. We provide comprehensive project blueprints and community-focused DIY mentorship to ensure you never hit a dead end in your garage. You don’t have to navigate these technical hurdles alone when you have access to proven systems. Your journey from admirer to master fabricator starts with the right blueprint. Download The Ultimate Restomod Guide today and start shaping your legacy one panel at a time. The road is waiting, and your car is ready to find its soul.
Frequently Asked Questions
How much does classic car bodywork typically cost for a DIY project?
Expect to invest between $2,500 and $6,000 to equip your home garage for a comprehensive restoration. This budget covers a quality MIG welder for $800, a professional set of body hammers for $150, and roughly $500 in consumables like grinding discs and welding wire. You’ll save approximately 60% on labor costs by doing the work yourself, as professional shop rates currently average $100 per hour.
Can I learn to weld on my classic car body or should I hire a pro?
You should absolutely learn to weld yourself because it’s the core skill of any true builder. Dedicate at least 40 hours to practicing on 18-gauge scrap steel before you touch your car’s actual panels. While a professional should handle 100% of structural frame repairs to ensure safety, you can master floor pans and quarter panels with steady practice. It’s a rewarding journey that builds your legacy as a craftsman.
What is the best way to remove old paint and rust from a classic car?
Media blasting with crushed glass or garnet is the most efficient method for stripping a project to bare metal. For smaller sections, use a DA sander with 80-grit sandpaper to reveal the steel’s condition without causing heat damage. This classic car bodywork guide recommends avoiding traditional sand blasting on large, flat surfaces like hoods, as the process causes 30% more surface distortion than modern chemical stripping or orbital sanding.
How do I prevent rust from coming back after I fix a panel?
Seal the bare metal with two wet coats of epoxy primer within 24 hours of cleaning to prevent flash rust. This creates a non-porous barrier that successfully blocks oxygen and moisture from reaching the steel. For internal structures like rocker panels, apply 3M Cavity Wax Plus after the paint is dry. This treatment provides a 10 year corrosion resistance layer in hidden areas where your spray gun cannot reach.
Is it better to repair an original fender or buy a reproduction panel?
Repair the original panel if more than 75% of the factory steel remains structurally sound. Original factory metal usually fits better than reproduction pieces, which often require 10 hours of trimming and relief cuts to align correctly. If rust has consumed more than 25% of the component, buy a high-quality 19-gauge replacement. This ensures you aren’t welding into thin, compromised metal that’s prone to blowing through.
What are the most common mistakes beginners make in classic car bodywork?
The most frequent error is overheating the metal, which leads to permanent panel warping. Beginners often try to weld a continuous 4 inch bead instead of using small, staggered tack welds to manage the heat. Another common pitfall is skipping the panel alignment phase. You must spend 20% of your total project time on fitment before you strike an arc, or your door gaps will never look uniform.
How do I ensure my custom body modifications don’t ruin the car’s value?
Maintain a detailed build book with 100 or more photos to prove the quality of your metalwork to future buyers. Data from 2023 auction results shows that documented restomods hold 40% more value than those with undocumented histories. Focus on modifications that improve the driving experience, such as updated suspension geometry or modern braking systems. High-quality craftsmanship always commands a premium price, regardless of how far you stray from the original design.