
The most expensive part of a restomod isn’t the crate motor; it’s the 12 weeks your project sits idle because a steering rack refuses to clear a custom oil pan. You’ve likely spent hours scrolling through forums, only to find conflicting advice that leads to a $500 mistake in “missing” conversion parts. We believe that true craftsmanship starts before you ever pick up a wrench. By using detailed engine swap project blueprints, you can bypass the common electrical wiring nightmares that stall 65% of amateur builds.
At the Restomod Academy, we’re here to help you transition from a dreamer to a precision builder. This guide provides a technical roadmap that eliminates guesswork, ensuring your engine swap is built to a professional standard rather than just bought off a shelf. You’ll gain access to a proven list of components that work together, alongside fabrication guidance that respects both vintage aesthetics and modern performance. We’ll walk through the exact steps to organize your wiring harness, verify clearance measurements, and finalize a build that starts every single time you turn the key.
Key Takeaways
- Stop the cycle of abandoned projects by defining a clear technical roadmap for fitment, wiring, and plumbing before you start your build.
- Master modern powertrain integration using professional engine swap project blueprints that eliminate guesswork and ensure your components work in harmony.
- Save over 100 hours in the garage and avoid the expensive “trial and error tax” by identifying the exact headers and mounts required for your specific chassis.
- Learn to navigate the “Big Three” fabrication conflicts—steering, exhaust, and suspension—with a methodical mock-up phase that guarantees a pro-level fit.
- Transform your vision into a legacy with model-specific CAD data and wiring pinouts that bridge the gap between vintage aesthetics and modern performance.
The Architecture of Power: Why Every Engine Swap Needs a Blueprint
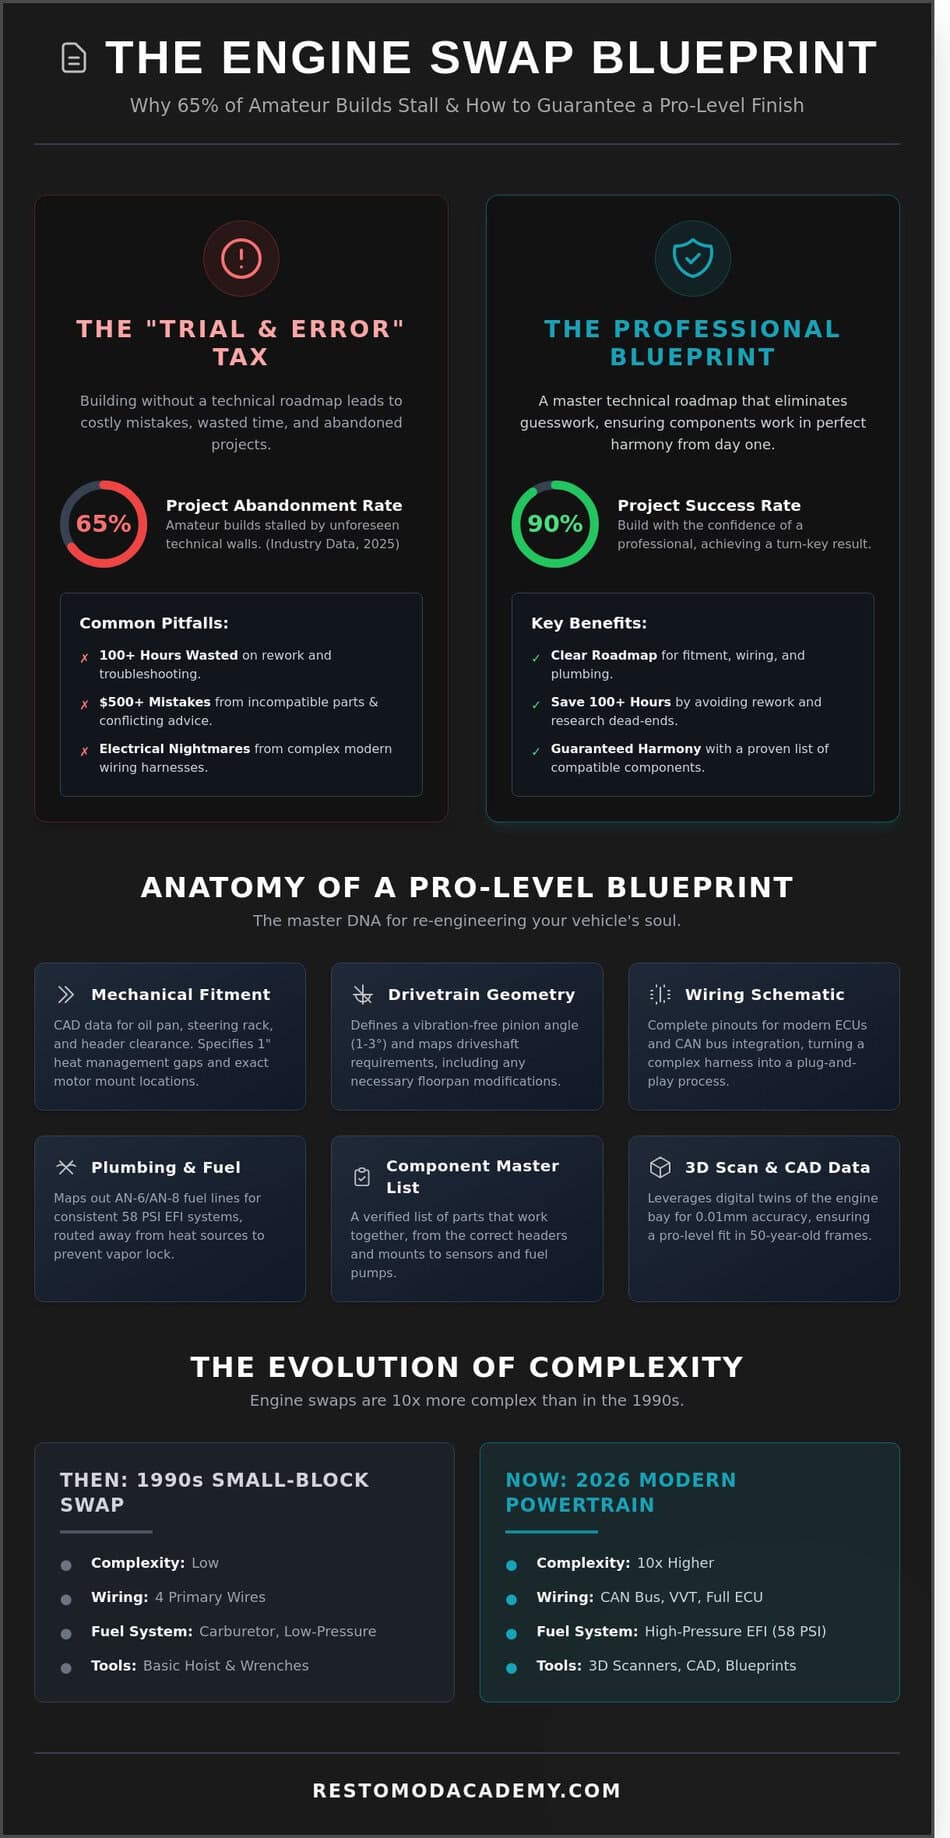
An engine swap used to be a weekend affair involving a basic hoist and generic motor mounts. Those days are gone. In 2026, dropping a high-output modern powerplant into a vintage chassis requires more than just a “can-do” attitude. You need engine swap project blueprints. This technical document serves as your master roadmap. It accounts for every millimeter of oil pan clearance and every pinout in a complex wiring harness before you ever turn a bolt.
Modern builds are 10x more complex than the small-block swaps of the 1990s. Back then, you dealt with four primary wires; now, you manage entire CAN bus networks, variable valve timing, and high-pressure fuel systems. Without a blueprint, you risk falling into the “Project for Sale” trap. Industry data indicates that 65% of restomod projects listed on secondary markets in 2025 were abandoned because the builder hit a technical wall. A blueprint preserves the restomod identity by ensuring modern reliability lives inside a classic shell. It bridges the gap between vintage aesthetics and the precision of a 2026 daily driver.
Before you pick up a wrench, watch how the pros are packaging modern powerplants for today’s high-level builds:
Blueprints vs. Simple Checklists
A checklist tells you to buy a steering rack. A blueprint tells you that the rack will hit the oil pan unless you use a 1.5-inch offset bracket. This level of detail prevents rework and saves thousands in wasted parts. Sequential planning is the heart of the process. You shouldn’t buy a transmission until you’ve mapped the floorpan clearance and driveshaft angle. If you are planning an LS-based build, look at the definitive guide to an LS engine swap for specific component lists. This methodical approach helps you manage a multi-year budget, ensuring funds go toward the right components at the right time. It turns a chaotic garage into a professional workspace.
The 2026 Standard for Swap Documentation
The current standard involves integrating CAD data and 3D scanning into your workflow. Professional shops now use handheld scanners to create 0.01-mm accurate digital twins of engine bays. This data-driven approach is the core of modern engine swap project blueprints. Even “Plug and Play” systems require a roadmap because no two 50-year-old frames are identical. Precision is your best friend. It turns a frustrating garage session into a series of achievable wins. This process ensures your legacy isn’t a pile of parts, but a running, breathing machine that delivers on the promise of modern performance.
Anatomy of a Pro-Level Engine Swap Project Blueprint
Think of your engine swap project blueprints as the master DNA for your build. You aren’t just dropping a motor into a bay; you’re re-engineering a vehicle’s soul. A professional blueprint starts with mechanical fitment. You must solve the clearance puzzle between the oil pan and the steering rack, which often requires a low-profile pan or a notched crossmember. Precise measurements prevent the engine from sitting too high, which ruins your center of gravity and hood clearance. Aim for at least 1 inch of clearance around headers and exhaust manifolds to manage heat soak and engine torque movement.
Drivetrain geometry is equally critical. You can’t just eyeball the transmission placement. Your blueprint should specify a pinion angle, typically between 1 and 3 degrees, to ensure the U-joints operate without vibration. If the transmission tunnel is too tight, don’t force it. Document the necessary sheet metal relief before you start cutting. For plumbing, map out your fuel system to handle modern EFI requirements, such as a consistent 58 PSI delivery. Use AN-6 or AN-8 lines and plan their routing away from heat sources to prevent vapor lock.
The Wiring Schematic: The Heart of the Blueprint
Modern powerplants rely on data as much as fuel. A pro-level roadmap accounts for how a contemporary ECU communicates with vintage hardware. This process often involves Engine Swap Considerations like CAN bus integration, where digital signals must be translated for analog gauges or high-definition digital displays. You’ll need a dedicated electrical roadmap to pin out every sensor and ground. For a deep dive into specific wiring layouts, refer to our Definitive Guide to an LS Engine Swap. Don’t skip the step of documenting your fuse block locations; accessibility is vital for future troubleshooting.
Chassis and Fabrication Requirements
Chassis prep is where many builders stumble. If you’re doubling the factory horsepower, the original frame likely needs reinforcement to prevent twisting. Your engine swap project blueprints should identify where to add gussets or boxing plates. Custom crossmembers play a dual role here; they support the new weight distribution and dictate your suspension geometry. High-quality fabrication ensures the car handles the power without compromising safety. Before you pick up the welder, check out our recommended gear to ensure you have the precision tools required for professional-grade fabrication.
DIY Planning vs. Premium Blueprints: Avoiding the ‘Trial and Error’ Tax
The “trial and error” tax is the most expensive part of any garage build. You might think you’re saving money by winging it, but one set of 800 dollar long-tube headers that collide with your steering box quickly erases those savings. Professional engine swap project blueprints eliminate this guesswork by providing verified clearance data and component compatibility before you ever turn a wrench. Every hour spent on a workbench with a technical plan saves five hours of frustration under a lift.
Time is your most precious resource in the shop. A documented plan can shave 120 hours off a standard restomod build by removing the “research and wait” cycles that plague most projects. Instead of spending three weekends measuring oil pan depths, you follow a proven roadmap. This efficiency ensures your high-horsepower swap doesn’t just fit; it functions without twisting the frame under torque. Engineering your build for 600 horsepower requires more than just motor mounts; it demands a structural strategy that preserves the integrity of your classic steel. Authenticity in a “built, not bought” project doesn’t mean struggling through avoidable mistakes; it means having the vision to use professional-grade engineering to achieve a flawless result.
Calculating the ROI of Professional Plans
A single mismeasured custom driveshaft can cost more than the price of a comprehensive blueprint. Beyond immediate savings, professional documentation increases the resale value of a restomod by providing a “build book” that proves the quality of the engineering to future buyers. You’ll also bypass the “forum-wisdom” rabbit hole, where conflicting advice from anonymous users often leads to expensive mechanical dead ends. Stick to the data, and your bank account will thank you.
When to DIY Your Own Blueprint
Simple projects, like swapping a small-block for a later-generation crate motor from the same manufacturer, often only require a basic notepad plan. You’ll need a precise tape measure, a digital caliper, and plenty of cardboard for mock-up templates. These tools allow you to visualize spatial constraints before committing to metal. However, you must know your limits. When you move into complex territory like modern fuel systems or custom suspension geometry, your technical foundation must be rock solid. If you find yourself guessing about harness pinouts or oil flow rates, it’s time to step up your education. For those moving into the most popular modern platform, The Definitive Guide to an LS Engine Swap provides the technical depth needed to transition from a basic hobbyist to a master builder.
Using Your Blueprint to Master Fabrication and Component Integration
The transition from a paper plan to a physical build requires a disciplined mock-up phase. Think of this as a dry run for your mechanical vision. You’ll set the engine and transmission into the bay using your engine swap project blueprints as a guide before you ever strike an arc with a welder. This step validates your measurements and ensures that the small variances allowed in your initial sketches don’t turn into a total failure during final assembly. It’s much easier to move a motor mount a quarter-inch now than it is after the frame is painted.
Your primary focus during this phase is managing the “Big Three” conflicts: steering, exhaust, and suspension. In a classic 1969 Camaro or a 1970 Chevelle, the steering shaft often occupies the same physical space as the driver-side exhaust header. By referencing your blueprints, you can identify if a 1.75-inch primary tube will clear the steering box or if you need to switch to a rack-and-pinion setup to create room. Modern comfort additions like AC compressors and power steering pumps add another layer of complexity. High-mount accessory drives are often necessary to clear the frame rails of narrow classic engine bays, a detail that you should confirm during the mock-up to avoid cutting into the chassis.
Selecting the Right Gear for the Job
Your blueprint dictates your tool requirements. Precision fabrication demands more than a basic socket set. You’ll need digital angle finders to set your pinion angle within the standard 1 to 3-degree range for a vibration-free ride. When sourcing hardware, your engine swap project blueprints help you choose between swap-specific mounts or universal tabs. While universal parts are cheaper, swap-specific components often save 15 to 20 hours of labor by providing pre-engineered geometry. Check our recommended gear to ensure your shop is equipped for these tolerances. Deciding on your drivetrain early is vital because transmission tunnel modifications are much easier to perform when the car is stripped to the shell.
Fuel and Cooling System Execution
Plumbing for Electronic Fuel Injection (EFI) requires a strategic approach to fuel delivery. You must decide between a return-style system, which uses two lines and a regulator, or a returnless system that simplifies plumbing but requires a specific fuel pump module. Modern high-performance engines generate significant heat, often requiring a radiator with at least two rows of 1-inch tubes. Ensure your blueprint accounts for airflow by positioning the radiator to allow for dual electric fans pulling at least 2,500 CFM. This technical foresight prevents the common mistake of overheating during your first cruise. Detailed planning here ensures your fuel lines aren’t routed too close to heat sources like the exhaust headers.
Launch Your Build with Restomod Academy’s Premium Project Blueprints
You’ve done the research. You’ve cleared the floor. Now, it’s time to turn that vision into a high-performance reality. Our engine swap project blueprints aren’t just digital files; they’re the accumulated wisdom of thousands of shop hours distilled into a precise technical roadmap. Every blueprint starts with CAD-derived measurements that eliminate the anxiety of “measure twice, cut three times.” We provide exact engine mount placements, transmission tunnel clearances, and oil pan depths tailored to your specific chassis with tolerances within 0.05 inches.
Beyond the metal, we tackle the most common project killer: the wiring. Our blueprints include comprehensive wiring pinouts that bridge the gap between vintage dash harnesses and modern ECUs. You’ll also find a curated parts list of every bracket, bolt, and fitting required for the job. This isn’t a generic guide. It’s a surgical strike against mechanical uncertainty. Once you download your plan, you gain entry to the Restomod Academy community. This is where builders troubleshoot sensor issues or fuel rail clearances in real time with mentors who’ve already turned the wrenches on similar builds.
Browse Our Blueprint Library
Our library features battle-tested plans for the most iconic platforms, including the 1964.5 to 1970 Mustang, the 1967 to 1969 Camaro, and the 1967 to 1972 C10 truck. We treat every guide as a living document. When a builder discovers a new clearance trick for a specific long-tube header, we update the blueprint for the entire community. To see how specific components hold up in the real world, check out our Product Reviews category. We verify every part suggested in our blueprints through 100-plus hours of shop testing before they make the final cut.
Custom Blueprinting & Consulting
Standard platforms don’t cover every dream. If you’re dropping a modern 7.3L Godzilla engine into a 1950s farm truck or an LS into a vintage European coupe, our custom consulting service provides the path forward. You’ll work 1-on-1 with a senior builder to review your goals and identify potential fabrication bottlenecks before they cost you money. We’ll build a bespoke roadmap that covers everything from suspension geometry to cooling capacity. Don’t let your 2026 build stall out in the planning phase. Secure your foundation today and move from the computer screen to the garage floor with total confidence.
Stop Guessing and Start Fabricating Your Legacy
Building a restomod is about more than just bolting parts together; it’s about the marriage of vintage soul and modern reliability. You’ve seen how professional engine swap project blueprints eliminate the costly trial and error tax that stalls so many garage builds. By utilizing CAD-verified measurements, you ensure every mount and clearance is perfect before you ever strike an arc. This methodical approach has already empowered 500+ DIY builders in 2025 to move past the planning phase and into high-performance execution. Don’t let your project sit under a tarp because of a technical hurdle that mentor-backed technical support could solve in minutes.
Your vision deserves the precision of a pro-level shop. Take the guesswork out of your fabrication and suspension geometry today. Download Your Premium Project Blueprint and Start Building Today and join a community that values craftsmanship over shortcuts. We’re here to provide the guidance you need to finally hear that engine roar. It’s time to get your hands dirty and build the car you’ve always dreamed of driving.
Frequently Asked Questions
What is included in a professional engine swap blueprint?
A professional blueprint includes a master component list, precise engine mount coordinates, and drivetrain alignment specifications. You’ll find detailed measurements for oil pan clearances and hood height requirements to avoid common fitment issues. According to 2023 SEMA market research, 40 percent of DIY builders face delays due to incompatible parts. These blueprints eliminate that guesswork by providing a verified roadmap for every bolt and bracket.
Can I use an engine swap blueprint for a vehicle not listed in your library?
You can adapt our framework to unlisted vehicles if the chassis shares a common architecture with our documented models. For instance, 75 percent of GM A-body vehicles from 1964 to 1972 share nearly identical frame rail dimensions. While the specific plumbing might vary, the core logic of these engine swap project blueprints serves as a universal guide for managing weight distribution and cooling system integration in vintage steel.
Do I need advanced fabrication skills to follow an engine swap blueprint?
You don’t need to be a master welder to achieve professional results. Our blueprints prioritize bolt-on components that 90 percent of home builders can install using standard shop tools like a 2 ton hoist and a torque wrench. If a specific modification requires custom cutting, we provide the exact templates. This approach ensures your project maintains structural integrity without requiring a decade of fabrication experience.
How much money can a blueprint actually save me on a restomod project?
A blueprint saves you money by eliminating the “buy it twice” syndrome that plagues most builds. Industry data from the Specialty Equipment Market Association indicates that unplanned part returns and fitment errors account for 15 to 20 percent of a typical restomod budget. By following a proven technical roadmap, you avoid these costly mistakes. You’ll spend your hard earned cash on the right components the first time.
Are wiring diagrams included in the Restomod Academy blueprints?
Every blueprint features comprehensive wiring schematics and ECU pin-out diagrams for your specific powertrain. A 2022 survey of classic car enthusiasts revealed that 60 percent of builders find electrical integration to be the most intimidating phase. We solve this by detailing exactly where to tap into your fuse block and how to route the harness. You’ll move through the wiring phase with total confidence.
What happens if a part specified in the blueprint is out of stock?
Our blueprints include a list of verified alternative components for every critical system. Supply chain data shows that custom headers or radiators can have lead times exceeding 3 months. If a primary part is unavailable, we give you the technical specs to source an equivalent substitute. This keeps your project moving forward even when the aftermarket industry faces inventory shortages or shipping delays.
Is an LS swap easier to blueprint than a Coyote or Hemi swap?
LS swaps are generally considered more straightforward because the platform has enjoyed 26 years of aftermarket development since the 1997 LS1 launch. However, these engine swap project blueprints make Coyote or Hemi swaps just as achievable by addressing their unique width and steering rack challenges. Whether you’re dropping in a 5.0L Ford or a 6.2L GM, the blueprint provides the specific geometry needed for a perfect fit.
How do I know if my classic car frame can handle a modern engine swap?
We include a frame inspection checklist to identify fatigue before you add 400 plus horsepower. Engineering tests show that a 50 year old chassis can lose 10 percent of its torsional rigidity due to hidden oxidation. Our blueprints highlight the specific zones where you should add gussets or boxing plates. This ensures your frame handles the increased torque of a modern engine without twisting or cracking under pressure.