What if the greatest threat to your vintage project isn’t chassis rust, but the 2,500 individual parts currently sitting in your digital shopping cart? Analysis paralysis is a build killer, and it’s the main reason many projects never leave the garage. You want that timeless 1960s silhouette, but you also want a machine that fires up on the first turn of the key. Learning how to restomod a classic car is a high-stakes balancing act between preserving a legacy and embracing modern fuel injection. It’s about making sure your vision doesn’t become an undriveable, unsafe money pit.
We agree that a car is meant to be driven hard, not just admired from a distance. Stop guessing and start measuring; it’s time to trade vague ideas for professional-grade fabrication and precise suspension geometry. This guide promises to help you master the phased architecture of blending vintage soul with modern performance through a mentor-led roadmap. We’ll navigate the 2026 build environment for engine swaps and wiring harnesses, ensuring you avoid the 40% budget overruns typical of unplanned builds. From selecting high-performance disc brakes to dialing in your stance, you’ll gain the confidence to build a vehicle that handles like a modern sports car.
Key Takeaways
- Define your vision and embrace the “Built, Not Bought” mindset to create a legacy that balances vintage soul with modern reliability.
- Prioritize structural integrity by upgrading safety systems first, ensuring your classic frame can safely handle the demands of 2026 performance levels.
- Master the essential technical phases of how to restomod a classic car, from selecting the right modern engine swap to transitioning to high-pressure EFI.
- Learn to integrate “Invisible Upgrades” like modern wiring harnesses and HVAC systems to transform your cockpit into a comfortable, year-round driving environment.
- Execute a flawless build completion using a professional “First Start” checklist and a critical 500-mile break-in strategy to protect your craftsmanship.
The Restomod Philosophy: Planning Your Vision and Budget
Building a car is more than a mechanical exercise; it’s a statement of intent. You’re taking a piece of history and breathing 21st-century fire into its lungs. Learning how to restomod a classic car requires you to balance the soul of the past with the safety of the present. When you research what is a restomod, you’ll find it sits at the intersection of heritage and high performance. This isn’t just about shiny paint; it’s about fuel injection that starts every time, disc brakes that actually stop, and suspension that doesn’t feel like a boat in a storm.
Adopt the “Built, Not Bought” mindset early in the process. Buying a finished car gives you a ride, but committing to 500 or more hours of labor in your own garage creates a lasting legacy. You’ll know every weld, every wire, and every quirk. This intimate knowledge is what keeps you safe and confident when you’re cruising at 70 mph on a rain-slicked highway. It transforms the vehicle from a mere machine into an extension of your own craftsmanship.
Before you turn a single wrench, define your Mission Profile. A car designed for 500-mile weekend road trips needs different cooling systems and ergonomic seating than a 600-horsepower track weapon intended for 20-minute high-intensity heat cycles. Be honest about your goals. If you build a stiff race car for the street, your spine will regret it after 15 minutes of driving. Understanding how to restomod a classic car starts with a clear vision of where that car will actually spend its time.
Budgeting is where most projects stall out. The 20% Golden Rule is your financial lifeline. If your detailed spreadsheet says the build will cost $40,000, you must set aside $48,000 before you begin. Unseen floorboard rot, shipping delays, or a backordered wiring harness will eat that margin faster than you expect. Having this buffer ensures the project stays in the garage and doesn’t end up as a half-finished “basket case” listing on a classifieds site.
Restomod vs. Restoration: Choosing Your Path
A pure restoration aims for a 100-point factory finish, but 1960s drum brakes and bias-ply tires are often dangerous in modern 75 mph traffic. Restomodding prioritizes safety and drivability. Decide now if you’ll make permanent cuts to the firewall for a modern transmission or stick to reversible bolt-on upgrades. Learn more about the fundamental restomod meaning to ensure your path aligns with your long-term resale goals and personal driving style.
Phase 0: The Donor Car and Documentation
Don’t buy the first car you see. Whether you’re browsing online classifieds or checking the inventory at a dealership like 585 Cars LLC, spend at least 10 hours researching common rust points for your specific model. Surface patina is a badge of honor, but structural rot in the frame rails can add $5,000 to your metalwork bill instantly. Once the car is in your shop, clear at least 200 square feet of floor space for parts storage. A typical tear-down involves over 1,200 individual components. Use heavy-duty freezer bags and permanent markers to label every bolt and bracket. Your future self, trying to remember where a specific clip went 24 months from now, will thank you for the meticulous documentation.
Phase 1: The Foundation-Safety and Structural Integrity
Don’t build a 500-horsepower house on a 100-horsepower foundation. It’s the most common mistake enthusiasts make when learning how to restomod a classic car. You might dream of the aggressive lope of a high-performance camshaft, but your project must begin with the bones. If your chassis cannot handle the massive torque of a modern crate engine, you’ll twist the frame or crack the body seams before you ever reach third gear. Safety and structural rigidity are not just checkboxes; they are the prerequisites for performance.
Driving a vintage machine in 2026 traffic is a calculated risk that requires modern solutions. A standard 2024 family SUV can stop from 60 mph in roughly 120 feet. Your factory 1960s drum brakes might need 200 feet or more on a good day. This 80-foot discrepancy is where accidents happen. While your car was built in a different era, it must now exist within the Federal Motor Vehicle Safety Standards that govern modern road safety. Upgrading the foundation ensures your classic isn’t just a museum piece, but a viable, safe participant in modern transportation.
Begin by identifying the weak points inherent in vintage metallurgy. Inspect your frame rails and torque boxes for scale rot or stress fractures. A 50-year-old unibody often suffers from metal fatigue that isn’t visible to the naked eye. Adding subframe connectors or a custom X-brace can increase torsional rigidity by 30 percent or more. This stiffening prevents the car from flexing under load, which allows the suspension to do its job rather than the body acting as a giant, unpredictable spring.
Brake Conversions: From Drums to Discs
Single-reservoir master cylinders are a dangerous single point of failure. If one brake line leaks, you lose pressure to all four wheels instantly. You must switch to a dual-circuit system to isolate the front and rear lines. For a standard street build, a basic 11-inch disc conversion provides a 40 percent improvement in heat dissipation over drums. If you’re building a pro-touring monster, move to 14-inch rotors and six-piston calipers to handle repeated high-speed stops. A proportioning valve is a pressure-regulating component that balances braking force between the front and rear wheels to prevent premature rear-wheel lockup.
Suspension Geometry and Handling
Rubber bushings dry out and crack after two decades of service. Replace them with polyurethane or Delrin to reduce suspension deflection by 50 percent, which provides much crisper feedback through the steering wheel. Modern coilover systems are a game-changer; they allow you to drop the ride height by 2 inches while maintaining a comfortable, controlled ride. Swapping a vague, recirculating-ball steering box for a 14:1 ratio rack-and-pinion kit turns a wandering vintage boat into a precision instrument. These changes are fundamental to how to restomod a classic car that actually feels athletic on a winding road.
There is a massive psychological win when your project finally moves under its own power and stops with confidence. It transforms from a static pile of parts into a living vehicle. This early momentum carries you through the more tedious fabrication stages that follow. If you are feeling overwhelmed by the mechanical choices, our restomod planning resources can help you map out your specific parts list before you turn a single wrench.

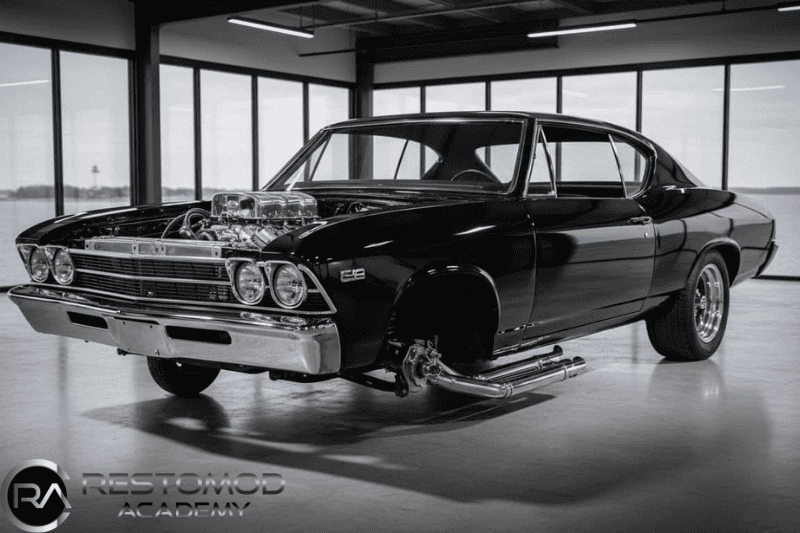
Phase 2: The Heart of the Beast, Modern Engine and Drivetrain Swaps
Choosing your power plant is the most critical decision you will make when learning how to restomod a classic car. You aren’t just replacing an engine; you’re redefining the vehicle’s personality and performance ceiling. Whether you choose a 430-horsepower GM LS3, a high-revving Ford 5.0L Coyote, or a 485-horsepower Gen III Mopar Hemi, each choice dictates your fabrication path. These modern crate engines offer 100,000-mile reliability and instant cold starts, features that were unthinkable in 1969.
Your old mechanical fuel pump cannot handle modern demands. Transitioning to Electronic Fuel Injection (EFI) requires a high-pressure system, typically 58 PSI for most modern engines. Install an in-tank pump to prevent vapor lock and ensure consistent flow. Likewise, your original copper radiator will fail to dissipate the heat generated by a high-output 21st-century engine. Upgrade to a multi-pass aluminum radiator paired with dual electric fans pulling at least 2,500 CFM to keep your build cool in 95-degree summer traffic.
Fabrication often becomes a game of inches in a cramped engine bay. Custom headers are usually required to clear steering boxes and suspension components. Use ceramic coatings to reduce under-hood temperatures by up to 300 degrees, protecting your sensitive wiring harness from heat soak. Aligning the drivetrain is equally vital. Ensure your engine sits at a 3-degree downward angle to maintain proper U-joint geometry and prevent driveline vibration at 75 MPH.
The LS Swap: The Gold Standard for Reliability
The GM LS platform remains the most popular choice for builders because of its compact size and massive aftermarket support. It’s a lightweight, all-aluminum solution that fits into almost anything from a 1950s pickup to a nimble European coupe. To ensure success, follow our definitive guide to an LS engine swap. You’ll need a vehicle-specific oil pan, engine mount adapters, and a standalone wiring harness to make the integration feel factory-fresh and reliable.
Transmission and Gearing
Modern power requires modern gears. Throwing a vintage 3-speed automatic behind a 500-horsepower engine wastes the car’s potential and ruins the driving experience. A Tremec T56 6-speed manual or a 6L80E automatic provides the overdrive needed for comfortable 2,100 RPM cruising at highway speeds. Many modern restomod trends focus on this specific balance of raw acceleration and long-distance drivability.
Don’t forget the rear end. If you’re running a 0.67 overdrive ratio, a 3.73 rear gear provides a perfect snap off the line without sacrificing your top-end fuel economy. This synergy is how to restomod a classic car that actually gets driven rather than sitting in a garage. Choose a transmission that fits your mission profile. If you want a visceral connection to the road, go manual. If you want a effortless grand tourer, a modern electronic automatic is your best friend. Every component must work in harmony to handle the increased torque of your new heart.
Phase 3: The Modern Cockpit: Interior, Wiring, and Comfort
Step inside your project and you’ll quickly realize that the cabin is where your hard work either shines or fails. While the engine provides the soul, the interior provides the connection. Learning how to restomod a classic car means mastering the “Invisible Upgrade.” This starts with a complete electrical overhaul. You’re not just replacing old copper; you’re building a foundation for 21st-century reliability. A modern 21-circuit wiring harness is the single most important component you’ll never see. It eliminates the 90% of electrical failures caused by brittle, 50-year-old factory insulation and corroded terminals.
Year-round drivability requires more than just a heater. Integrating a modern HVAC system, such as those from Vintage Air or Restomod Air, transforms a seasonal cruiser into a daily-capable machine. These compact units replace bulky factory boxes with high-efficiency blowers and electronic controls. To make that climate control effective, you must address the “tin can” effect. Applying 80-mil butyl rubber sound deadener across the floor pans and roof skins can reduce interior noise levels by as much as 15 decibels. This turns a vibrating metal box into a luxury grand tourer where you can actually hear your passenger speak at 70 mph.
Wiring and Electrical Systems
Don’t trust 50-year-old factory wiring to power modern fuel injection or high-draw electric fans. You’ll want to swap those glass tube fuses for a modern power distribution center using blade-style fuses. This provides faster circuit protection and easier troubleshooting. Focus heavily on your grounding strategy. Use a dedicated 10-gauge ground wire for your EFI system and ensure the engine, frame, and body share a common ground point. Poor grounding is the primary cause of phantom electrical gremlins that plague amateur builds.
Gauges and Infotainment
Precision meets nostalgia in the dashboard. GPS-driven analog gauges offer the classic needle-sweep look without the headache of mechanical cables that bounce or whine. If you want a cleaner look, digital dashes provide real-time data for every sensor in the car. For audio, keep the dash uncut. Use a hidden Bluetooth receiver or a “retro-look” head unit that hides 2026-level sound quality behind a vintage faceplate. When you’re figuring out how to restomod a classic car, don’t overlook seating. Procar or Recaro buckets provide the lateral support needed for modern suspension upgrades while maintaining a period-correct silhouette.
Executing the Build: From First Bolt to the Open Road
The moment of truth arrives when you finally turn the key. Learning how to restomod a classic car isn’t just about the physical assembly; it’s about the technical precision of the initial startup. Before you engage the starter, verify your “First Start” checklist with zero compromises:
- Verify fuel pressure is between 45 and 60 PSI with no visible leaks at the rails.
- Check that the battery maintains a minimum of 12.6 volts for consistent ECU power.
- Ensure the cooling system is fully bled and topped with a fresh 50/50 mixture.
- Confirm all ground straps are clean, unpainted, and secured tightly to the chassis.
Once the engine breathes to life, monitor the oil pressure gauge immediately. If you don’t see a needle sweep within 5 seconds, shut it down to investigate. This careful approach prevents catastrophic failure before your project even leaves the garage. It’s the difference between a successful build and an expensive setback.
The first 500 miles determine the total longevity of your build. This isn’t the time for full-throttle pulls or high-speed highway cruising. Use this window to heat-cycle the engine at least three times, letting it reach an operating temperature of 190 degrees Fahrenheit before cooling completely. Change your break-in oil and filter after the first 50 miles to catch any microscopic assembly debris. It’s a methodical process, but it protects your five-figure investment from premature wear.
Beyond the physical tools, lean into the restomod community. Sharing your build progress on specialized forums, or following builds on sites like Robots Project, provides the external motivation needed to push through the “90% finished” slump that stalls so many projects. Your journey can inspire the next builder to start their own legacy.
The Essential Restomod Tool Kit
Modern restomods bridge the gap between vintage iron and digital precision. You’ll need a high-quality multimeter capable of measuring 0.1v increments to troubleshoot complex EFI wiring harnesses. A calibrated torque wrench is non-negotiable for securing suspension components to factory specifications. For specialty fabrication like roll cages or custom brackets, consider renting a hydraulic tubing bender for one-off tasks. If you’re building for the long haul, browse our deep-dive product reviews for the best builder tools to find equipment that lasts a lifetime.
Final Tuning and Safety Inspection
Don’t trust your eyes for the final chassis setup. A professional four-wheel alignment is mandatory to dial in the specific caster and camber settings required for modern rack-and-pinion systems. Perform a full nut-and-bolt check every 50 miles during the initial break-in period. Re-torquing every fastener ensures that road vibrations haven’t loosened critical suspension links or engine mounts. The ultimate sensory reward is that first successful shakedown run. The smell of new leather and the crisp response of a fuel-injected V8 prove that your vision has finally become a road-ready reality.
A project of this magnitude requires intense focus and precision, much like a grandmaster’s chess match. When it’s time to step back from the garage, many builders find that the strategic thinking and appreciation for fine craftsmanship translate well to other hobbies. For those who value heritage and design, the world of handcrafted chess sets from specialists like Official Staunton offers a similar sense of timeless quality.
Claim Your Place on the Open Road
Building a restomod isn’t just a mechanical project; it’s a commitment to legacy and craftsmanship. You’ve learned that the 2026 roadmap begins with a rock-solid structural foundation and moves into the high-performance realm of LS and Coyote engine swaps. We’ve covered why modern wiring harnesses and precision suspension geometry are non-negotiable for a safe, daily-drivable vintage machine. Mastering how to restomod a classic car requires patience, but you don’t have to navigate the fabrication complexities alone.
The difference between a project that stalls and one that crosses the finish line is the quality of your roadmap. You can access the exact step-by-step blueprints Brook Walsh uses for world-class builds while joining a community of 10,000+ active builders who share your “built, not bought” obsession. Don’t let your dream car sit under a dusty tarp for another season.
Download The Ultimate Restomod Guide and start your project with a pro-level roadmap
The garage is waiting, and that first turn of the key is closer than you think. Keep your eyes on the vision and your hands on the tools. You’ve got the drive to make this masterpiece a reality.
Frequently Asked Questions
How much does it cost to restomod a classic car in 2026?
Expect to invest between $45,000 and $150,000 to restomod a classic car in 2026, depending on your choice of powertrain and finish quality. A high-end crate engine like the GM LT4 alone costs $16,500 today. When you factor in a 15% inflation rate for specialized parts over the next two years, a budget-friendly build starts at $45,000. This covers the donor vehicle, basic suspension upgrades, and a modern EFI conversion.
Is it cheaper to build a restomod myself or have a shop do it?
Building a restomod yourself is typically 60% cheaper than hiring a professional shop, as labor rates often exceed $135 per hour. A professional shop build can easily surpass $200,000 for 1,500 hours of specialized labor. By tackling the assembly in your own garage, you eliminate the massive overhead of a commercial facility. You’ll trade your weekends for equity; this ensures every dollar goes directly into high-performance components rather than a shop’s monthly rent.
What are the best cars to use for a first-time restomod project?
The 1964 to 1972 Chevrolet Chevelle and the 1979 to 1993 “Fox Body” Ford Mustang are the premier choices for first-time builders due to massive aftermarket support. These platforms offer over 10,000 unique bolt-on components, making it easier to learn how to restomod a classic car without custom fabrication. You can source a decent Fox Body donor for under $8,500. Their simple chassis designs allow you to master suspension geometry before moving on to more complex projects.
Does restomodding a car ruin its resale value?
Restomodding generally increases a car’s resale value by 30% to 50% over a standard restoration, provided you use name-brand components. While purists prefer “numbers-matching” originals, 75% of modern buyers prioritize reliability and air conditioning over factory authenticity. A 1969 Camaro with a modern LS3 engine and Wilwood brakes frequently fetches $85,000 at auction. This is significantly higher than the $55,000 average for a stock equivalent with an original 307 small block.
How long does a typical home-built restomod project take to complete?
A typical home-built restomod project takes between 1,000 and 2,500 hours to complete, which spans roughly 2 to 5 years for most enthusiasts. If you commit 10 hours every weekend, you’ll reach the finish line in about 3 years. Remember that 40% of your time will be spent on research and sourcing parts. Don’t rush the process; the craftsmanship found in a patient build is what defines a true legacy vehicle and ensures your safety on the road.
Do I need a special license or insurance for a restomodded vehicle?
You don’t need a special driver’s license for a restomod, but you must secure “Agreed Value” insurance to protect your investment. Standard policies only cover the “Actual Cash Value,” which might be as low as $3,500 for a vintage shell. Companies like Hagerty or Grundy offer policies for a $60,000 valuation for approximately $650 per year. Ensure your registration reflects any engine displacement changes to stay compliant with local 2026 emissions regulations and safety standards.
What is the most difficult part of a restomod build for a beginner?
Integrating a modern EFI wiring harness into a vintage electrical system is the most difficult challenge for 65% of beginner builders. Modern ECUs require stable voltage and specific grounding points that 50-year-old chassis often lack. You’ll likely spend 100 hours just pinning connectors and routing looms. Master the multimeter early in your journey. Success depends on your ability to translate a complex 12-page wiring diagram into a functional, tidy engine bay that performs reliably.
Can I daily drive a restomod classic car?
You can absolutely daily drive a restomod if you prioritize 21st-century cooling systems and overdrive transmissions. Swapping a 3-speed automatic for a Tremec T-56 6-speed manual improves fuel economy by 35% and reduces highway RPMs. Install a high-capacity aluminum radiator with dual electric fans to handle stop-and-go traffic in 95-degree heat. With modern disc brakes and rack-and-pinion steering, your classic will handle the morning commute with the same poise as a 2025 performance sedan.