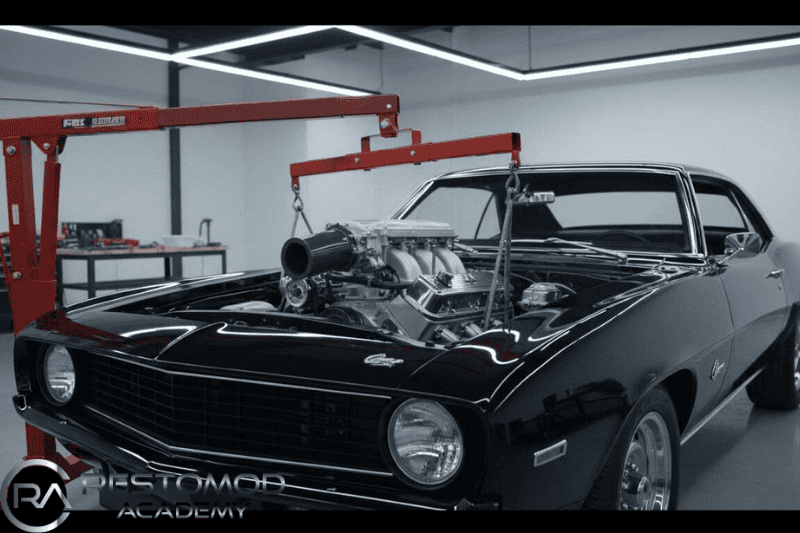
The most expensive mistake in any restomod project isn’t buying the wrong engine; it’s stalling out halfway through because of a $500 wiring harness you didn’t see coming. You’ve likely spent hours staring at your vintage engine bay, dreaming of the 430 horsepower and modern fuel economy that comes with a fuel-injected V8. You want that “built, not bought” pride, but the sheer volume of choices between a 1999 5.3L truck engine and a crate LS3 can feel like a mechanical minefield. This ls swap guide for classic cars is your definitive 2026 blueprint to master those complexities without draining your bank account.
At The Restomod Academy, we’ve distilled over 2,000 hours of shop experience into a roadmap that solves the three biggest hurdles: wiring, fuel system integration, and generation-specific component selection. We agree that the technical leap from a carburetor to an ECU is daunting, but every challenge is just a learning opportunity in disguise. You’ll learn exactly how to source your donor, mount the block, and wire the harness for a reliable, turn-key finish. It’s time to stop researching and start turning wrenches on your vision.
Key Takeaways
- Discover why the LS platform remains the gold standard for restomods, offering a perfect marriage of vintage soul and modern power density.
- Learn to navigate the physical constraints of your engine bay by mastering motor mount positioning and oil pan clearance for a seamless fit.
- Demystify the “nervous system” of your build with a simplified approach to wiring harnesses and high-pressure EFI fuel systems.
- Use this ls swap guide for classic cars to identify and solve often-overlooked cooling issues like the “steam port trap” before they sideline your project.
- Execute a flawless “pre-flight” checklist and first-start sequence to hear your project roar to life for the first time with total confidence.
Why the LS is the Gold Standard for 2026 Restomods
The LS swap isn’t just a popular trend. It’s the backbone of the modern performance movement. When you follow an ls swap guide for classic cars, you’re transitioning from the heavy, inefficient iron of the past to the high-tech GM LS engine family. This architecture, spanning Gen III, IV, and the direct-injected Gen V, offers a power-to-weight ratio that vintage engines simply can’t match. A stock 5.3L LM7 from a 2004 Silverado can reliably produce 295 horsepower for 200,000 miles, making it a favorite for 2026 builders who value longevity as much as speed.
You’ll find that the massive aftermarket ecosystem is the real secret sauce for these builds. Whether you need specific motor mounts for a 1969 Camaro or a standalone wiring harness for a 1950s pickup, the parts are available and affordable. This accessibility turns a daunting mechanical overhaul into a manageable project for the dedicated DIY enthusiast. The LS platform has become the universal language of the garage, bridging the gap between old-school style and new-school reliability.
To better understand the components required for this transformation, watch this helpful video:
The Restomod Identity
Successful builds start with a clear vision. Understanding what is a restomod is crucial because it defines the balance between classic aesthetics and 2026 performance standards. You aren’t just replacing an engine; you’re preserving the soul of a vintage vehicle while injecting it with modern DNA. The “Built, Not Bought” mentality drives this community, where every weld and wire represents a commitment to craftsmanship and your personal legacy.
Choosing Your Donor Engine
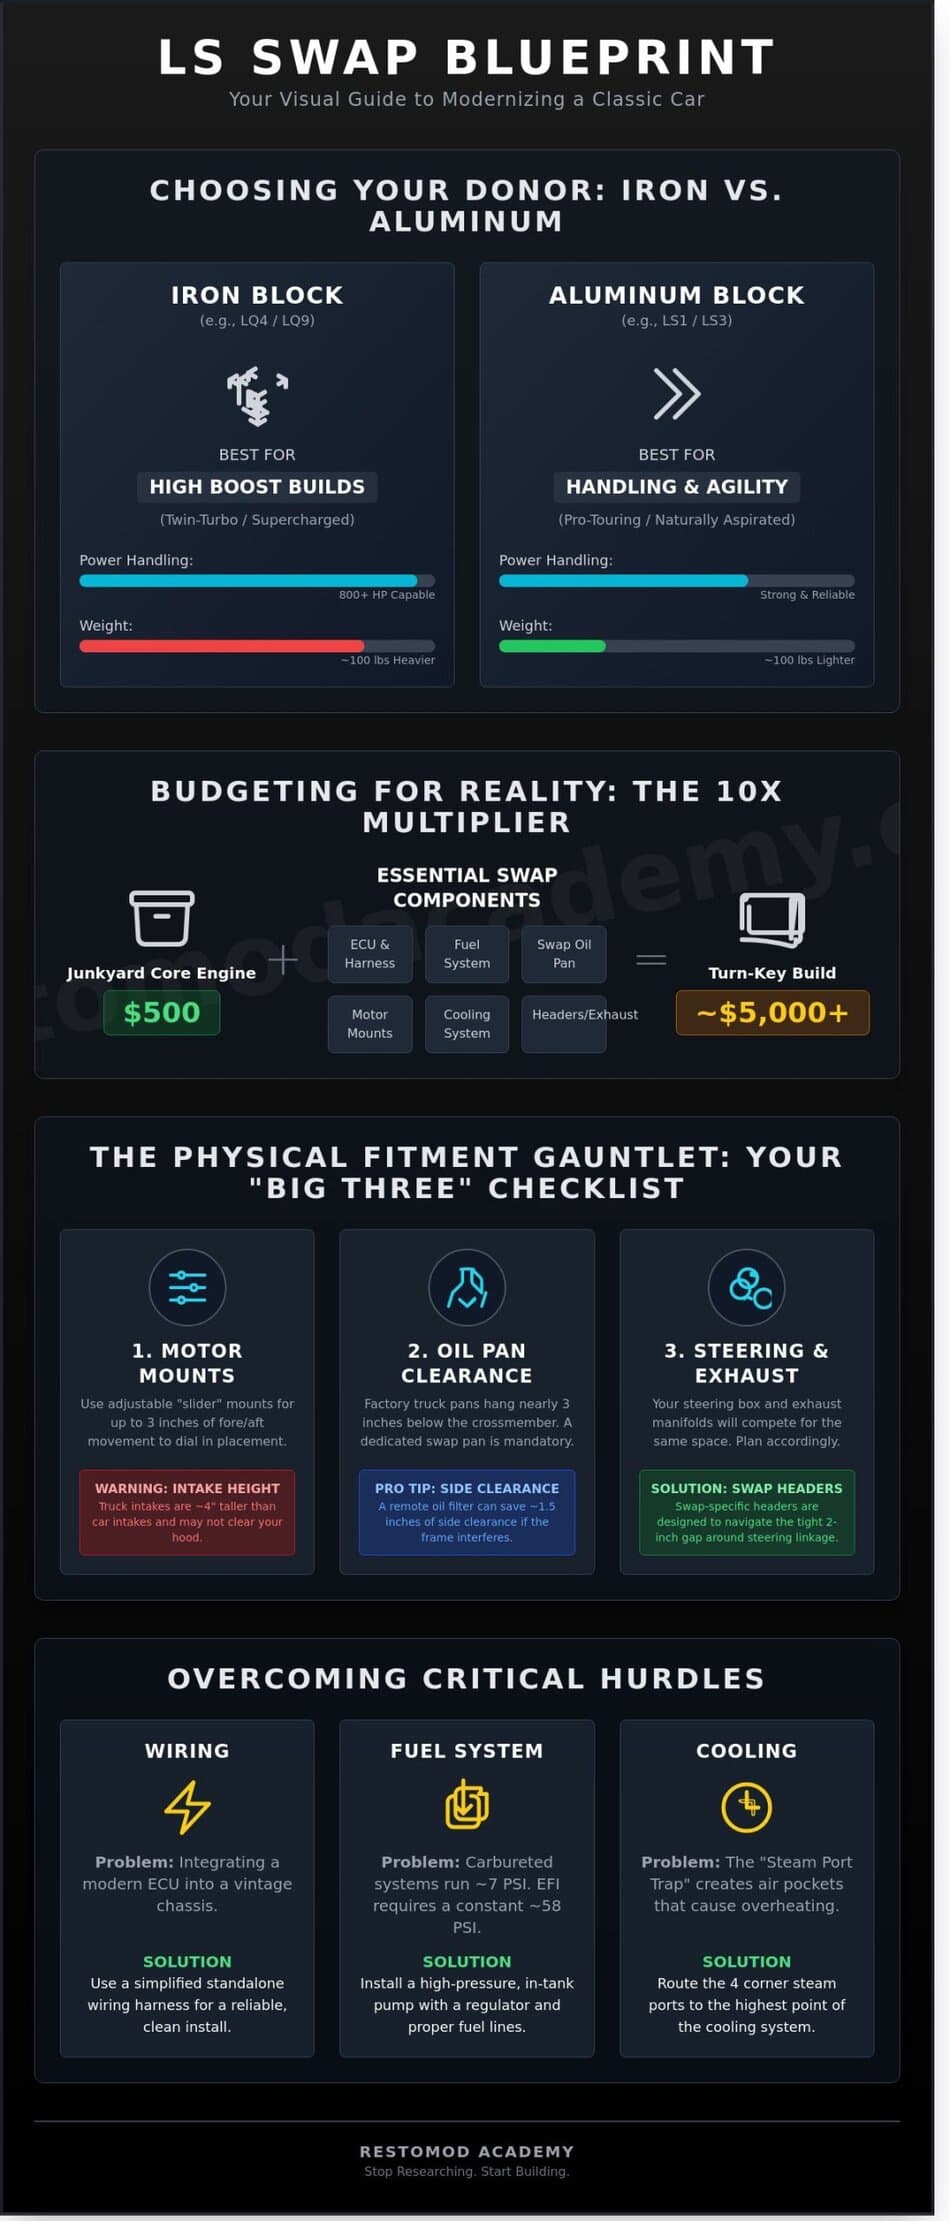
Your choice of block depends on your ultimate goal. Aluminum blocks like the LS1 or LS3 save roughly 100 pounds off the front nose, which transforms handling in tight corners. If you plan on adding a twin-turbo setup, the iron-block LQ4 or LQ9 provides the structural rigidity to handle 800+ horsepower. Always source your donor from reputable salvage yards or specialized pullers who offer a 30-day warranty. Before the engine ever touches your frame rails, perform a compression test and a leak-down test to verify the internal health of the cylinders.
Budgeting for Reality
Don’t let the “cheap” price tag of a $500 junkyard core fool you. By the time you add a high-flow fuel pump, a custom oil pan to clear your crossmember, and a modern ECU, your total investment will likely hit the $5,000 mark. This 10x multiplier is the reality of a quality build. Budgeting for the “hidden” components like cooling systems and exhaust headers ensures your project reaches the finish line. This ls swap guide for classic cars aims to keep your expectations grounded so your results can soar.
The Physical Fit: Mounts, Clearance, and Fabrication
Every successful build begins with the “Big Three” of physical fitment: motor mounts, oil pan clearance, and firewall depth. You’re trying to shove a 21st-century powerhouse into a chassis designed in the mid-1960s. It won’t just drop in without a fight. You’ll need to decide early if you’re moving the engine forward to save your heater box or pushing it back to improve weight distribution. This decision dictates everything from your driveshaft length to your radiator fan clearance, making it the cornerstone of any ls swap guide for classic cars.
Chassis and Mount Strategy
Adjustable slider mounts are your best friend during the mock-up phase. These brackets allow for up to 3 inches of fore-and-aft movement, giving you the precision needed to clear the firewall while keeping the engine centered. Don’t overlook the intake manifold height. A stock truck intake stands roughly 4 inches taller than an LS3 car intake, which can lead to a crushed hood if you aren’t careful. Steering linkage is another common battlefield. In many GM A-body cars, the steering box sits exactly where the driver-side exhaust manifold wants to be. You’ll likely need specific swap headers to navigate this tight 2-inch gap without sacrificing flow.
Oil Pan and Ground Clearance
The factory truck oil pan is a disaster for most classic muscle cars. It typically hangs nearly 3 inches below the front crossmember, making it the first thing to hit a speed bump or manhole cover. Use a dedicated muscle car swap pan, such as the Holley 302-2, which offers a recessed profile. These designs provide the necessary sump clearance while keeping the oil safely above the frame rails. If your frame still interferes with the oil filter location, a remote oil filter mount can save you about 1.5 inches of side clearance. Getting these dimensions right is vital before you start worrying about the intricacies of LS engine wiring systems and engine management.
Modern gearboxes like the 6L80E automatic or the T56 Magnum six-speed are significantly bulkier than the vintage Powerglides or Muncie four-speeds they replace. Expect to cut metal. You might need to enlarge the transmission tunnel by 2 to 4 inches in height to maintain a proper 3-degree driveline angle. This isn’t just about making the parts fit; it’s about preventing high-speed vibrations that can destroy your U-joints. Precision in fabrication today ensures a smooth ride tomorrow. For more help choosing the right components, check out our definitive guide to an LS engine swap.
- Motor Mounts: Use 1-inch setback plates for most GM muscle cars to maintain original transmission locations.
- Oil Pans: Avoid truck pans; stick to F-Body or specialized swap pans for ground clearance.
- Transmission: Be prepared to reconstruct the tunnel for modern 6-speed units.
Mastering the physical installation is the first major hurdle of your ls swap guide for classic cars. Once the engine is sitting level and the hood closes, you’ve earned the right to move on to the more technical aspects of the build.
The Nervous System: Wiring, Fueling, and EFI
Think of the wiring and fuel delivery as the nervous system and circulatory track of your project. This is where many builders stall, but modern technology has simplified the process significantly. To demystify the harness, remember that a standalone LS engine only requires four basic connections to fire: constant battery power, switched ignition power, a solid ground, and a fuel pump relay trigger. Whether you use a salvaged truck harness or a custom unit, the goal is to isolate the engine’s vitals from the rest of the car’s vintage electrical system.
Choosing your brain is the next hurdle. A factory ECU “re-flashed” to remove the anti-theft software is the budget-friendly path. However, for those seeking peak performance, aftermarket systems like the Holley Terminator X provide real-time self-tuning and integrated wideband oxygen sensors. This choice often dictates your throttle setup. Drive-by-Cable (DBC) offers the tactile response of a traditional linkage, while Drive-by-Wire (DBW) utilizes an electronic pedal that simplifies cruise control integration. This LS Swap Guide provides a deeper look at how these components interact with your specific transmission choice.
Modern Fuel Delivery
Your classic mechanical pump cannot provide the 58 PSI required by LS injectors. Transitioning to a high-pressure system requires a dedicated EFI fuel tank. Professional builders choose tanks with internal baffles and fuel trays to prevent starvation during hard cornering. For a streamlined setup, use a Corvette-style regulator and filter assembly. This unit mounts near the tank and regulates pressure internally, allowing you to run a single fuel line forward to the engine rail. Ensure you use PTFE-lined hoses. These are mandatory for 2026 ethanol-blend fuels, which can degrade standard rubber lines in less than 24 months. This is a vital step in any ls swap guide for classic cars to ensure long-term reliability.
Wiring and Integration
Success in an ls swap guide for classic cars depends on how well modern data talks to your vintage dashboard. Integrating an OBD-II port allows you to plug in digital gauges or diagnostic scanners instantly. For those who prefer the original look, companies like Dakota Digital offer modules that convert electronic signals into analog needle sweeps. You can find detailed circuit diagrams in the definitive guide to an ls engine swap to ensure every sensor is pinned correctly. Never overlook your grounding strategy. Use a minimum of three heavy-gauge ground straps: engine to frame, frame to battery, and engine to firewall. Poor grounding accounts for 85% of “ghost” electrical issues in restomod builds.
The Supporting Cast: Cooling, Drivetrain, and Exhaust
Your LS engine is the heart of the build, but it won’t beat for long without a robust support system. Your original 1960s radiator was designed to handle the thermal output of a low-compression 283 or 301. Dropping in a 430-horsepower LS3 increases the heat rejection requirements by over 50 percent. Throw away the old copper-brass unit. You need a modern aluminum crossflow radiator with at least two rows of 1-inch tubes to keep temperatures stable during a July cruise.
Don’t fall into the steam port trap. The LS cylinder heads feature cooling vents at the highest point of the water jacket. If you cap these off or fail to bleed the air properly, you’ll create localized steam pockets that lead to catastrophic head warping. Plumb these ports back to a pressurized surge tank or directly into the top of the radiator water box. This ensures constant coolant flow and prevents the air-lock issues that plague many amateur builds.
When you reach the exhaust phase, you’ll face the classic dilemma of manifolds versus headers. Cast iron manifolds from a Trailblazer SS or a late-model Camaro offer a tight, “set it and forget it” fit. They’re quiet and won’t leak. However, if you’re chasing every last bit of torque, long-tube headers are the answer. Expect a gain of 25 to 35 horsepower, but be prepared to spend extra time clearancing the steering shaft and frame rails. This ls swap guide for classic cars prioritizes reliability; if you aren’t racing, high-quality manifolds often provide the cleanest installation.
Cooling and Airflow
Ditch the mechanical, belt-driven fan. A high-cfm electric fan paired with a full-coverage shroud is the only way to survive stop-and-go traffic. Modern LS engines are designed to run hot for efficiency, typically utilizing a 195°F or 210°F thermostat. Set your fan controller to trigger at 205°F. Additionally, keep your air intake away from the radiator’s exit air. A “hot air intake” sucking in 150°F air will cause the ECU to pull ignition timing, robbing you of the performance you just paid for.
Transmission and Driveline
Selecting the right gearbox is critical for driveability. You should match your power levels to these modern restomod transmission options to ensure the gear ratios complement your rear-end torque. If you’re running an electronic automatic like the 4L60E or 6L80E, the Vehicle Speed Sensor (VSS) is non-negotiable. Without a clean VSS signal, the transmission won’t know when to shift, leading to “limp mode” frustrations.
Finally, inspect your geometry. High-speed vibrations are usually caused by mismatched U-joint angles. Aim for a working angle of less than 3 degrees, ensuring the transmission output and differential pinion are parallel within 1 degree. If you’re still rocking a factory 10-bolt rear end, consider an upgrade to an 8.8-inch or 9-inch housing. A stock 10-bolt rarely survives the first hard burnout with a modern LS. This is a vital step in your ls swap guide for classic cars to ensure your project stays on the road instead of on a trailer.
Ready to upgrade your gear? Check out our recommended drivetrain components here.
First Start, Tuning, and the Road Ahead
You’ve spent months in the garage. The wiring is tucked, the plumbing is tight, and the moment of truth has arrived. Before you twist the key, perform a rigorous “Pre-Flight” inspection. Check your oil levels; a standard LS swap usually requires 5 to 6 quarts of 5W-30, depending on your oil pan choice. Verify that your fuel system is pressurized to exactly 58 psi. Check every ground wire again. Most electrical gremlins in a restomod stem from a poor ground-to-chassis connection. If your continuity tests pass, it’s time to fire the engine.
The first 30 seconds are critical. Listen for the fuel pump prime when the key hits the “On” position. Once it fires, keep your eyes on the oil pressure gauge. You should see pressure within 3 to 5 seconds. Listen for any rhythmic knocking or sharp metallic sounds. Don’t panic if you hear a slight tick; hydraulic lifters often take a minute to bleed air and quiet down. Watch your coolant temperature closely. LS engines are notorious for air pockets, so use a vacuum filler or keep the nose of the car elevated to ensure the system burps properly. This ls swap guide for classic cars is designed to get you to this milestone, but the work doesn’t stop at the first idle.
The Tuning Process
Modern EFI systems like the Holley Terminator X or Haltech Nexus offer self-learning capabilities, but don’t rely on them for everything. These systems use a Wideband Oxygen sensor to adjust fuel maps, yet they can’t fix a mechanical issue or a poor base configuration. You need to monitor your Air-Fuel Ratio (AFR) constantly. Aim for a 14.7:1 ratio at idle and roughly 12.8:1 at Wide Open Throttle. A lean condition under load can melt a piston in seconds.
For a true factory-quality drive, you’ll need to dive into the software tables. Adjust your fan trigger temperatures to turn on at 205 degrees and off at 195 degrees. Fine-tuning the Idle Air Control (IAC) counts ensures the car doesn’t stall when you drop it into gear or turn on the air conditioning. While street tuning gets you close, a professional dyno session is the only way to optimize ignition timing for maximum longevity and power.
Your Academy Roadmap
Success in the garage requires the right tools. Using recommended gear like high-quality crimpers and digital multimeters prevents the “no-start” frustrations that plague many DIY builds. As you move forward, remember to upgrade your suspension and brakes. Doubling the horsepower of a 1960s chassis without improving its stopping power is a recipe for disaster. Install a big brake kit and firm up the bushings to handle the 300 to 400 plus horsepower your LS now provides.
Document every step of your build. Keep a binder with your wiring diagrams, part numbers, and torque specs. This adds significant resale value and makes future maintenance easier. The project is never truly finished; it only evolves. Whether you’re chasing more displacement or better aerodynamics, this ls swap guide for classic cars has given you the foundation to build your legacy. Welcome to the elite club of builders who don’t just buy history, they rewrite it.
Claim Your 2026 Restomod Legacy
Turning a vintage chassis into a modern performance machine requires more than just parts; it demands a clear vision and a methodical approach. You now understand that the secret to a reliable build lies in the harmony between the physical mounts and the complex EFI nervous system. By following this ls swap guide for classic cars, you’re bypassing the trial and error that often costs average builders thousands of dollars in wasted fabrication time. Precision in your wiring and cooling choices today ensures you won’t be stranded on the side of the road tomorrow.
Authored by Brook Walsh, these strategies come from a proven track record of over 500 successful project blueprints delivered to enthusiasts just like you. You have the technical foundation to transition from an admirer to a master builder while gaining exclusive access to the Restomod Academy community. Don’t let your project sit under a dusty tarp for another season when the solution is within reach. Every successful turn of the key starts with a commitment to quality craftsmanship and the right mentorship.
Start Your Transformation with The Ultimate Restomod Guide
The road ahead is paved with the sound of a high-revving V8 and the confidence of modern reliability. Pick up your tools, trust the process, and bring your vision to life. We’ll see you on the pavement.
Frequently Asked Questions
How much does a basic LS swap cost in 2026?
Expect to invest between $3,500 and $6,000 for a reliable DIY project. While you can find a high-mileage 5.3L Vortec for $850, supporting components like fuel systems and headers add up quickly. This total reflects a 12% increase in parts costs compared to 2024 pricing. Always set aside a 10% contingency fund for those unexpected hardware store runs that happen during every build.
Can I keep my original manual transmission with an LS engine?
You can definitely retain your vintage Muncie or T10 gearbox by using a specific conversion flywheel and pilot bearing. For example, the Sachs NFW1050 flywheel allows an LS engine to bolt up to a classic 10-spline input shaft. This setup preserves the mechanical connection to your car’s history while delivering modern power. Just ensure your mechanical linkage has enough clearance for the new block’s casting marks.
What is the best LS engine for a budget-friendly swap?
The 5.3L LM7 iron-block remains the gold standard for any ls swap guide for classic cars focused on value. These engines were produced in over 3.8 million GM trucks between 1999 and 2007, making them incredibly affordable at roughly $900. They handle 10 pounds of boost reliably if you decide to add a turbo later. It’s the perfect foundation for a builder’s first restomod project.
Do I need to cut my classic car’s hood to fit an LS?
You won’t need to cut your hood if you swap the tall truck intake manifold for a low-profile LS1 or LS6 unit. This change reduces the engine’s total height by 3.5 inches, allowing it to tuck under a stock 1969 Camaro or Chevelle hood. Combine this with a Holley 302-2 oil pan to ensure the engine sits low enough in the frame cradle for perfect alignment and weight distribution.
How do I handle the power steering and A/C pump on an LS swap?
Mount your accessories using a dedicated bracket kit from manufacturers like ICT Billet or Holley. These kits reposition the A/C compressor and power steering pump to clear the narrow frame rails of classic muscle cars. By moving the alternator to the top-driver side, you avoid 90% of common interference issues with the steering box. It’s a clean solution that looks professional and saves hours of custom fabrication.
Is an LS swap legal for street use in all states?
Street legality varies by state, so check your local DMV requirements before turning a wrench. In California, you must follow CARB guidelines, which often require an E-ROD kit priced at $9,500 to meet 2026 emissions standards. Most other states only require cars older than 1975 to pass a basic visual safety inspection. Always verify if your specific county requires an OBD-II plug-in test for engine changes.
What is a “steam port” and why is it vital for an LS?
A steam port is a small cooling passage at the top of the cylinder heads that vents trapped air back to the radiator. Without this 1/4-inch line, air pockets form in the upper water jackets, leading to localized overheating and cracked heads. This is a non-negotiable step for any ls swap guide for classic cars. Connect it to a pressurized surge tank or tap it directly into your water pump.
Should I use a stock harness or buy a standalone wiring kit?
Buy a standalone wiring kit like the Holley Terminator X to save yourself 20 hours of tedious labor. While a free junkyard harness seems tempting, you’ll spend weeks removing 40 unnecessary wires and VATS security protocols. A dedicated kit provides a plug-and-play experience with a handheld tuner for immediate startup. It’s the smartest investment you can make to ensure your project actually hits the road this season.