The most expensive mistake in your garage isn’t a blown engine; it’s a build that starts without a blueprint. According to a 2023 industry survey, over 60 percent of custom car projects stall indefinitely because owners underestimate the complexity of restomod project planning. You want the timeless curves of a classic paired with the turn-key reliability of a modern daily driver, but the fear of exploding costs and mismatched parts often keeps the hood closed. We’ve all felt that hesitation when staring at a bare frame and a pile of high-tech crates.
Success requires more than just passion; it demands a professional-grade framework. This roadmap will help you balance your creative vision with rigorous engineering, ensuring your budget remains as stable as your new suspension geometry. We’ll break down the technical sequence for engine swaps and wiring harnesses so you can lead your build with total confidence. Whether you’re managing a professional shop or DIYing the fabrication, you’re about to learn how to turn that stationary project into a high-performance legacy. Let’s get to work.
Key Takeaways
- Define your primary use case—from daily driver to track-day weapon—to ensure every modern upgrade serves a clear, cohesive vision.
- Navigate the “Holy Trinity” of quality, speed, and price to establish a professional-grade framework for your restomod project planning.
- Evaluate the “Drivetrain Dilemma” between crate engines and donor swaps while learning why modern power demands a total rethink of suspension geometry.
- Perform a critical skills audit to determine when to leverage your own fabrication talents and when to seek professional support for complex engineering.
- Follow a structured, phased execution strategy that protects your investment from the initial teardown through the critical metalwork stage.
Defining Your Vision: The First Step in Restomod Project Planning
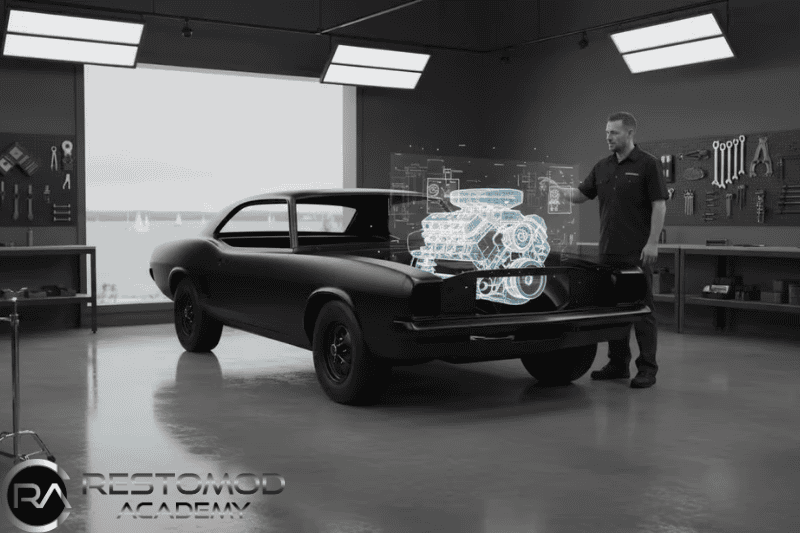
Successful restomod project planning begins with a fundamental mindset shift. You aren’t just fixing an old car; you’re engaging in a complex systems engineering challenge. When you drop a modern fuel-injected engine into a chassis designed in 1965, every existing component becomes a potential weak link. You’ve got to think about how 450 pound-feet of torque affects frame rigidity and whether factory drum brakes can safely stop a vehicle at modern highway speeds. Before you turn a single wrench, decide on your primary use case. A daily driver requires reliable air conditioning and modern sound deadening, while a track-day weapon prioritizes suspension geometry and weight reduction.
Embrace the “Built, Not Bought” philosophy. This doesn’t mean you must perform every TIG weld or wire every sensor yourself, but it does mean you’re the lead architect of the project. You’re balancing personal craftsmanship with professional results to create a machine that reflects your personality. Define the “Soul of the Build” early. Identify which vintage aesthetics are non-negotiable. Perhaps it’s the original thin-rimmed steering wheel or the specific roar of a naturally aspirated V8. These elements ground the project in its heritage while the modern components provide the reliability you crave.
Restomod vs. Restoration: Choosing Your Path
Choosing between a factory-correct restoration and a modern upgrade path is the most critical decision you’ll make. A numbers-matching restoration preserves history, but it often leaves you with 1960s-era handling and frequent maintenance hurdles. Understanding what is a restomod helps you build a parts procurement strategy that prioritizes modern performance over period-correct bolt heads. While a perfect stock classic is a blue-chip investment, 2023 auction data shows that high-quality restomods frequently command 25% higher prices because they’re actually usable in modern traffic conditions.
The Driving-First Planning Model
Start at the finish line by reverse-engineering your build from your performance goals. If your vision includes a 500-horsepower engine, you must plan for a cooling system that handles 210-degree operating temperatures and a drivetrain that won’t snap under pressure. Setting these expectations early prevents project creep, which is the leading cause of unfinished builds sitting in garages. Draft a one-page “Mission Statement” for your car. If a potential upgrade doesn’t serve that specific mission, don’t buy it. This discipline keeps your restomod project planning focused and ensures your budget is spent on components that actually improve the driving experience.
- Daily Driver: Focus on fuel injection, overdrive transmissions, and cabin comfort.
- Weekend Cruiser: Prioritize paint quality, stance, and a high-end audio system.
- Track Weapon: Focus on brake cooling, roll cages, and adjustable coilover systems.
The Logistics of the Build: Budgeting, Timelines, and Donor Selection
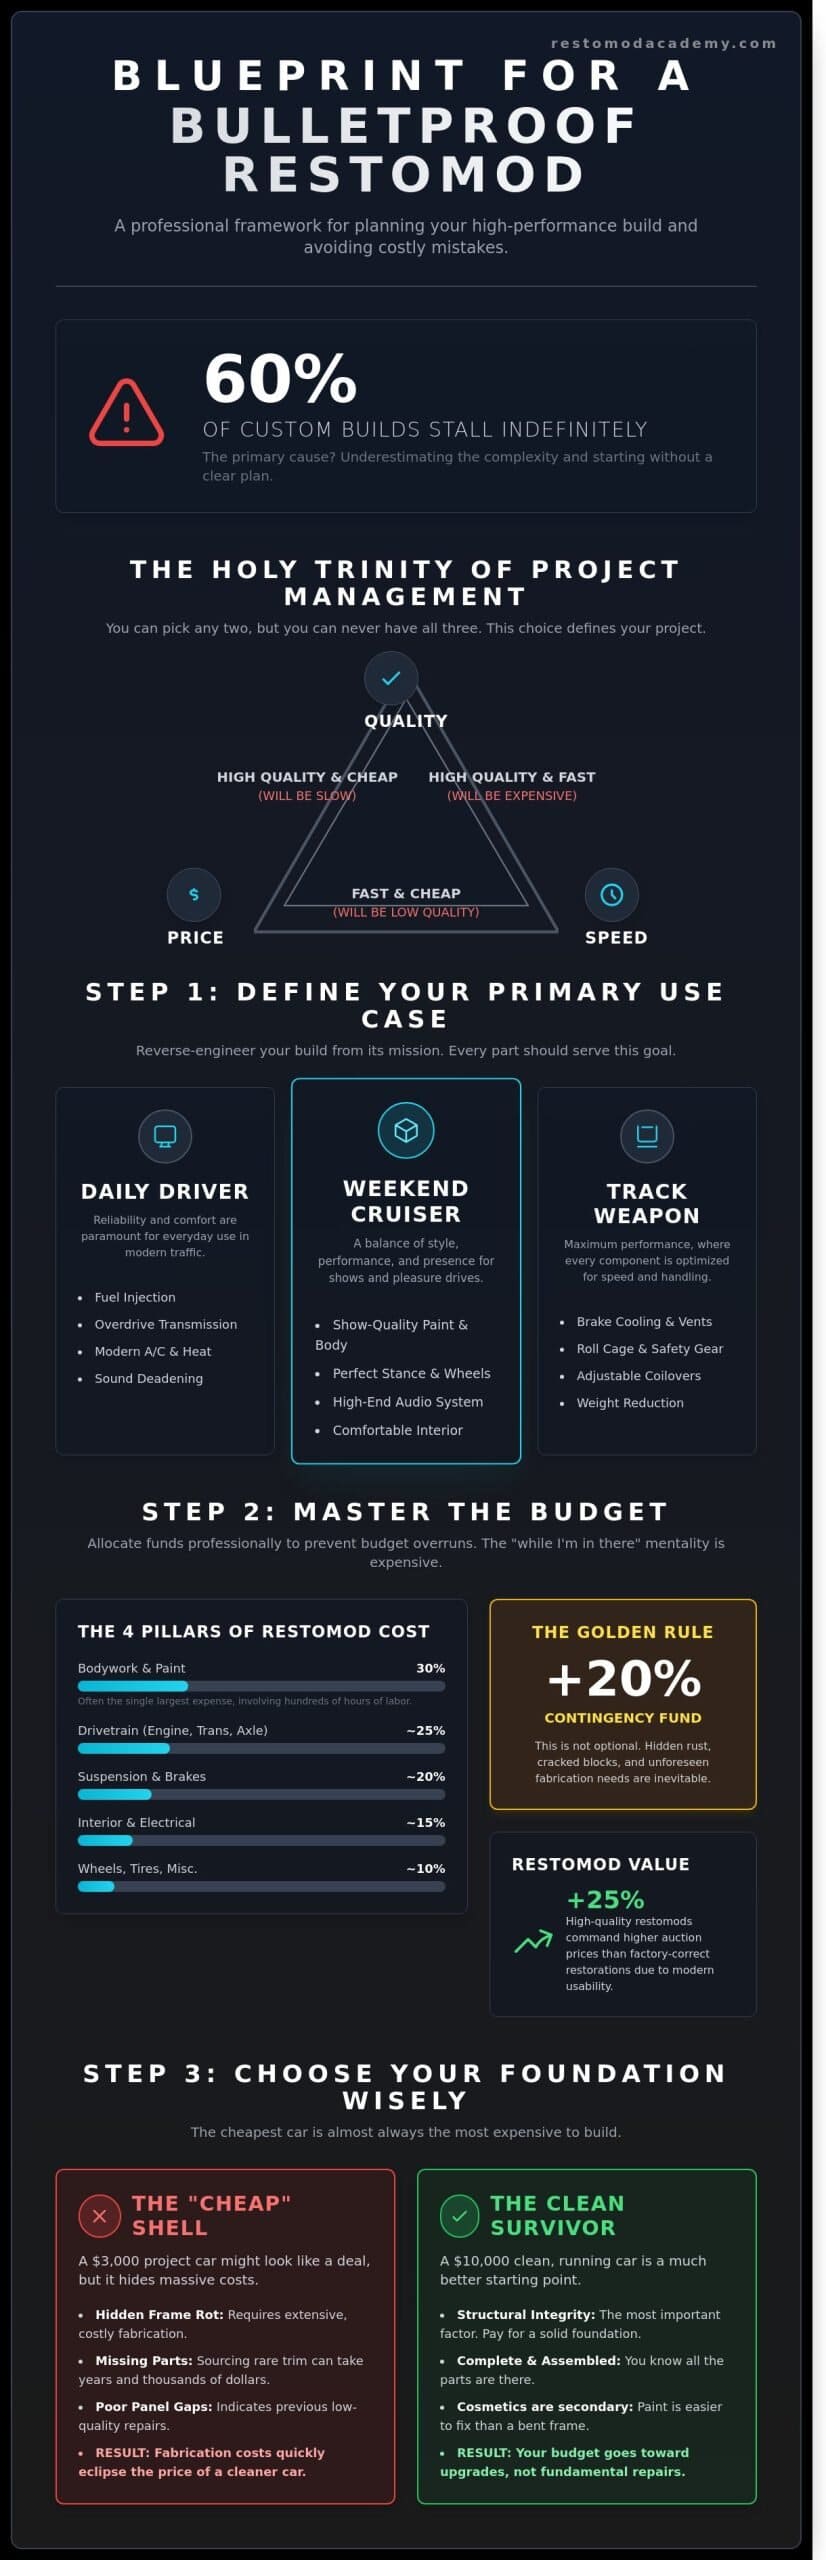
Successful restomod project planning starts with a hard truth known as the Holy Trinity: quality, speed, and price. You can pick any two, but you’ll never have all three. If you want a show-quality build on a budget, prepare to spend five years in your garage. If you need it done for next season’s show circuit at a high standard, your bank account will take a hit. Understanding this balance early prevents the frustration that leads to half-finished cars sitting under tarps for a decade.
Mastering the Restomod Budget
Don’t guess your costs based on forum rumors. Professional builders allocate funds across four primary pillars: the drivetrain, suspension, interior, and bodywork. According to industry averages from professional restoration shops, bodywork and paint often consume 30 percent of the total spend. Use a restomod budget calculator to track every component down to the fuel lines and wiring clips. Always set aside a 20 percent contingency fund. Unforeseen mechanical hurdles, such as a cracked engine block or hidden frame rot, are inevitable once you strip a classic to bare metal.
Finding the Right Donor Car
The cheapest car on the market is almost always the most expensive to build. A $3,000 shell riddled with rust requires hundreds of hours of specialized metal fabrication that quickly eclipses the cost of a $10,000 clean survivor. Focus on structural integrity over cosmetic perfection. Faded paint and torn seats are manageable DIY fixes. A twisted frame or rotted cowl torque boxes will drain your spirit and your wallet before you even buy a single performance part. For those seeking high-ROI platforms, consult our guide on the best cars to restomod in 2026 to ensure you’re investing in a desirable foundation.
Managing Timelines and Project Creep
Effective restomod project planning requires a disciplined approach to time management. Most builds take 2 to 3 times longer than the initial estimate because of “Project Creep.” This is the habit of adding “while I’m at it” upgrades. You start by replacing a master cylinder and end up installing a full Wilwood big brake kit. While these upgrades improve the final product, they stack weeks onto your schedule and thousands onto your bill. Be disciplined. Stick to your initial roadmap to ensure you actually get to drive the car. If you’re planning a major power boost, start by reading the definitive guide to an LS engine swap to understand the scope of modern drivetrain integration before you turn the first wrench.
Engineering the Modern Soul: Mapping Performance and Comfort Upgrades
You’ve stripped the shell and assessed the metal. Now comes the most exhilarating phase of restomod project planning: selecting the components that will define your car’s character. This isn’t just about speed; it’s about creating a cohesive machine where every part communicates effectively. You’re building a bridge between 1960s aesthetics and 2024 reliability. Don’t settle for a mismatched collection of parts that fight each other on the open road.
The Engine Swap Blueprint
The heart of your build dictates everything from your fuel system to your hood clearance. You must choose between the raw personality of a period-correct rebuild and the turn-key reliability of a modern powerplant. Crate engines like the LS3 offer a staggering 430 horsepower right out of the box, often doubling the output of a factory 289 or 350 small block. Before you pull the trigger, read our definitive guide to an LS engine swap to see if this platform aligns with your goals. If you’re a Ford or Mopar purist, the Coyote and Hemi platforms offer similar leaps in efficiency. Remember that modern torque curves require robust transmissions; a vintage three-speed won’t survive the 400 lb-ft of torque generated by a Gen V engine. You’ll also need to upgrade to an EFI-ready fuel tank capable of maintaining a steady 58 psi to keep that modern injectors happy.
Suspension and Braking Integration
Power is useless if you can’t plant it or stop it. Most vintage muscle cars rely on antiquated leaf springs and recirculating ball steering that feel vague at highway speeds. To transform the handling, look toward independent rear suspensions (IRS) or coilover conversions that allow for precise dampening adjustments. Safety is your primary objective here. Ditch the 10-inch factory drums immediately. A modern restomod requires at least 12-inch or 13-inch vented rotors paired with multi-piston calipers to handle the increased kinetic energy. This upgrade can reduce 60-0 mph stopping distances by over 40 feet. While you’re under the car, prioritize chassis stiffening. Adding subframe connectors prevents the frame twist that occurs when you drop high-performance engines into 50-year-old unibody structures.
Your restomod project planning must also account for the “brain” of the vehicle. Throw away that brittle, 40-year-old factory wiring. Integrate a modern 21-circuit harness and a dedicated ECU to manage your engine’s vitals. This ensures your fans kick on at exactly 195 degrees and your fuel pump primes every time you turn the key. It’s the difference between a car that sits in the garage and one that’s ready for a cross-country trek at a moment’s notice.
- Drivetrain: Match your gear ratios to your engine’s power band for optimal cruising.
- Braking: Use a tandem master cylinder to ensure front and rear systems operate independently.
- Electrical: Route wiring away from heat sources like headers to prevent signal interference.
Assessing the Gap: Tools, Skills, and Professional Support
You’ve got the vision and the donor car. Now, look at your hands and your workspace. Are they ready for 500 hours of intensive fabrication? Effective restomod project planning requires a brutal, honest audit of your current skillset versus the technical demands of a modern build. You might be a master at basic maintenance, but grafting a modern multi-link suspension or wiring a standalone ECU requires a different level of precision. Don’t let your ego drive the build into a permanent state of disassembly. Acknowledge what you can do well and identify where you need to grow or outsource.
The Essential Restomod Tool Kit
A standard socket set won’t get you to the finish line. To modernize a classic, you need a 220V MIG or TIG welder for structural reinforcements and a plasma cutter for clean metal removal. In a 2024 survey of hobbyist builders, 65% of projects stalled because the owner lacked specialized fabrication tools. Diagnostic software is now as vital as a torque wrench for tuning modern fuel injection systems. Review our recommended gear to ensure your shop is equipped for the task. Safety is your foundation; a fire suppression system and a ventilated welding area are mandatory. High-quality PPE reduces fatigue and prevents the 15% of shop accidents caused by improper eye protection.
Leveraging Professional Consulting
Every builder eventually hits “The Wall.” This is the point where the wiring diagram looks like a bowl of spaghetti or the body lines won’t align after a quarter-panel replacement. Seeking expert advice isn’t an admission of defeat; it’s a strategic move to protect your investment. Professional consulting helps you bypass these stalls, often saving thousands in wasted parts and rework. If you’re planning a complex powertrain transplant, read the definitive guide to an LS engine swap to see if your current plan meets professional standards. Expert guidance ensures your restomod project planning accounts for the small details that keep a car on the road rather than on jack stands.
Know when to call in the specialists. Engine calibration, show-quality paint, and custom upholstery are specialized trades for a reason. Professional paint shops often spend 100+ hours on block sanding alone to achieve a mirror finish. Let the pros handle the aesthetic perfection while you focus on the mechanical soul. Leverage the “Built, Not Bought” community by joining forums and local clubs where 90% of technical hurdles have already been solved by someone else. This camaraderie provides the vetted shop recommendations you need for high-level fabrication. Success isn’t just about doing it all yourself; it’s about ensuring the job is done right the first time.
The Phased Execution Strategy: From Teardown to First Fire
Execution is the stage where your restomod project planning transitions from a vision on paper to a physical reality in the garage. This journey requires a disciplined, five-phase approach to avoid the common pitfalls that leave cars unfinished for years. Data from the 2023 SEMA State of the Industry report highlights that while the restoration market is worth billions, nearly 45 percent of DIY builders struggle with the transition from teardown to assembly. You must treat your build like a professional shop would; follow the sequence and respect the process to ensure your legacy hits the road.
- Phase 1: The Meticulous Teardown. This isn’t just about demolition. It’s about cataloging history. Every fastener, bracket, and trim piece must be bagged, tagged, and organized.
- Phase 2: Metalwork and Foundation. Address the “cancer” first. Rust repair and chassis reinforcement ensure your modern horsepower doesn’t twist the vintage frame.
- Phase 3: The Mock-up. Fit your drivetrain and suspension before the body goes to paint. If you’re following the definitive guide to an LS engine swap, this is the time to verify oil pan and firewall clearances.
- Phase 4: Final Assembly and Wiring. This is the “patience phase.” Wiring a modern EFI system or a digital dash can easily consume 50 to 80 hours of focused labor.
- Phase 5: Shakedown and Tuning. Your first drive shouldn’t be a cross-country road trip. It’s a series of controlled heat cycles and leak checks to ensure total reliability.
The Importance of Documentation
Memory is your worst enemy in a long-term build. “I’ll remember where that goes” is a lie every builder has told themselves at least once. Use your smartphone to take hundreds of photos from every angle before removing a single bolt. Create a “Project Bible,” which is a physical or digital binder containing every part number, wiring schematic, and torque specification used in the build. Digital tools like Trello or specialized automotive build apps help you stay on schedule by breaking the restomod project planning into manageable weekly tasks. This level of detail is what separates a professional build from a garage headache.
The First Fire and Beyond
The first time that engine breathes is a massive milestone, but it requires a strict pre-start checklist. Verify your electrical grounds first; 90 percent of modern EFI issues stem from poor grounding. Check fluid levels twice and prime the oil system to prevent dry starts. For new engines, follow a specific break-in procedure, such as a 20-minute cycle at varying RPMs, to seat the rings properly. Remember that a restomod is never truly “finished.” It’s a living piece of craftsmanship that requires ongoing tuning and maintenance to keep that modern performance sharp. This is the “Academy” way: learn from the machine and refine it over time.
Ignite Your Build and Claim the Road
Transforming a vintage relic into a high-performance machine requires more than just passion; it demands a disciplined 5-phase execution strategy. You’ve now seen how rigorous restomod project planning prevents the common pitfalls of budget overruns and stalled timelines. By defining your vision and mapping out every suspension upgrade before the first bolt turns, you ensure your project moves steadily from the initial teardown to that triumphant first fire.
Brook Walsh founded the Restomod Academy to provide the authoritative mentorship every builder needs to succeed. Our community offers comprehensive blueprints for specific vehicle models, ensuring your wiring harnesses and fabrication work meet professional standards. You’re not just assembling parts; you’re engineering a legacy of craftsmanship that balances nostalgic soul with modern reliability. This journey is about the “built, not bought” philosophy that defines our community of dedicated enthusiasts.
Download The Ultimate Restomod Guide to start your build roadmap today
The garage is waiting, and your vision is ready to take shape. Grab your tools, trust the process, and let’s get that classic back on the pavement where it belongs.
Frequently Asked Questions
How much does a restomod project typically cost in 2026?
Budgeting for 2026 requires a minimum of $50,000 for an entry-level build, while professional commissions often exceed $200,000 according to SEMA market trends. These figures account for the 5% annual increase in high-quality component costs. You’ll spend roughly 40% of your budget on the powertrain and suspension alone. Map out your restomod project planning with a 15% contingency fund to handle unexpected metalwork or fabrication needs.
Is it cheaper to DIY a restomod or buy one already built?
DIY builds are 35% cheaper on average because you aren’t paying professional shop rates that currently hover between $125 and $200 per hour. However, buying an existing project saves you 2,000 hours of labor. If you have the tools and patience, building it yourself ensures every bolt meets your personal standards. You’ll gain invaluable technical skills while preserving the soul of the machine through your own craftsmanship.
What is the best classic car to start with for a first-time restomod build?
The 1964 to 1970 Ford Mustang is the gold standard for first-time builders due to its massive aftermarket support. Over 50 different companies manufacture every single part for these cars, from floor pans to complete wiring harnesses. This availability eliminates the need for custom fabrication, which can consume 20% of a more complex build’s timeline. Start here to ensure your vision becomes a reality without hitting a parts-sourcing wall.
How long does a full restomod project take from start to finish?
A comprehensive restomod project typically requires 1,500 to 2,500 man-hours to complete from the first teardown to the final shakedown. If you work 10 hours every weekend, expect the journey to span 3 to 5 years. Professional shops with multiple technicians can shorten this to 12 months. Your restomod project planning must account for these timelines to keep your motivation high and your garage from becoming a graveyard of unfinished dreams.
Can I restomod a car that has significant rust damage?
You can restomod a car with rust as long as the structural integrity of the frame remains intact or you’re prepared to replace 60% of the sheet metal. Modern reproduction bodies allow you to replace entire quarters, floors, and cowls using plug-welding techniques. If the rust has consumed more than 40% of the original steel, consider if the car’s VIN and history justify the 300 extra hours of metal fabrication.
Do I need a special license or insurance for a restomod vehicle?
You don’t need a special driver’s license, but you must secure “Agreed Value” insurance to protect your investment. Standard policies only cover the “Actual Cash Value” of the base vintage car, which might be 90% less than your build’s total worth. Ensure your policy includes an appraisal that reflects the 2026 market value of your modern drivetrain and custom interior. This protects the craftsmanship and capital you’ve poured into the project.
What is the most difficult part of the restomod planning process?
Managing component compatibility is the most grueling stage where 70% of builders encounter major roadblocks. You’ve got to ensure the suspension geometry clears the new oil pan and that the steering column aligns with the modern rack and pinion. This technical puzzle requires you to visualize the entire assembly before a single wrench turns. Take your time during this phase to avoid the “buy it twice” trap that plagues unorganized builds.
How do I choose between an LS swap and keeping the original engine architecture?
Choose an LS swap if you want 400 plus horsepower with turn-key reliability and 20 miles per gallon fuel economy. Keep the original engine architecture if the car’s 1-of-500 rarity makes matching numbers essential for its $80,000 resale floor. Modernizing an original small block with EFI and overdrive transmissions costs 20% more than a crate LS swap but maintains the vintage character. Decide if your goal is pure performance or historical preservation.