
Back in my younger days, I was beyond a car audio enthusiast. I actually competed in the International Auto Sound Challenge Association (IASCA) with a bit of success. After purchasing my 1969 Chevrolet Camaro Restomod, I decided to upgrade my audio system. I thought many people in a similar situation may be aided by a guide to help them along their way. That said, I created the ultimate guide to upgrading the audio system in your restomod and hope you enjoy it.
Let me give you a sneak peek though. The audio system doesn’t have to be the loudest, with the most bass, or the most austenaceous install. Rather, the ideal car audio system is one that meets all of your needs. It’s really that simple but we’ll break down the parts of an audio system in a much more detailed manner throughout this guide.
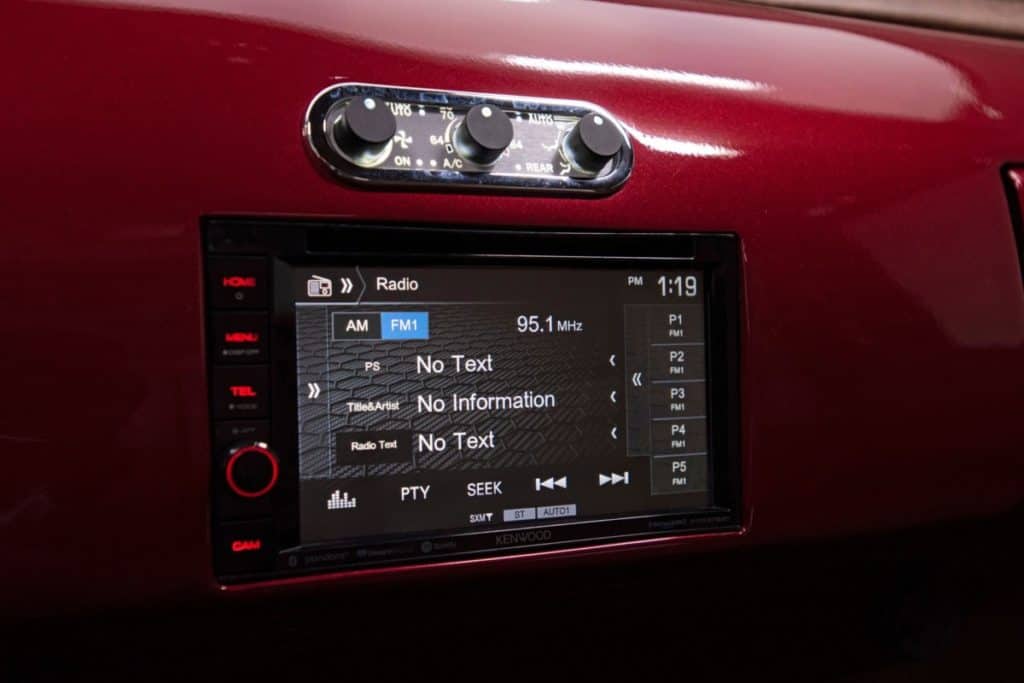
Head Units
Generally speaking, there are two types of head units as follows:
- Single DIN. A single DIN head unit is about two inches tall. And, you can (usually) replace a single DIN head unit with another single DIN head unit fairly easily. There are a few exceptions to this rule. So, if you have two inches of space directly above or below the head unit then you can remove the head unit for closer inspection.
- Double DIN. A double DIN head unit is about 4 inches tall. If your car has a double DIN head unit or at least four inches of space then you have a lot more head unit options.
If you don’t technically have room for a double-DIN radio then you can always have a professional shop help. They can fabricate or customize a special place for you to mount the head unit. One of my favorite customizations is to build a custom console and install the head unit into it along with giving it a slight angle toward the dome light.
Head Unit Functions
The head unit provides a user interface for the vehicle’s information and entertainment media components. Specifically, a head unit performs the following functions:
- Source. The source is the button or function that lets us choose what we want to hear. Examples are standard AM/FM radio, DVD player, satellite radio, iPod, or USB input.
- Preamp. The preamp is where all of the adjustments are made and gives us control of the sound before it gets amplified. The preamp functions include volume, balance, fader, tonal adjustments, equalization, and time correction.
- Amplifier. The amplifier is what amplifies or boosts the sound that is sent to the speakers. Most head units have an internal amplifier though I rarely recommend using them as amplification is such an important part of a vehicle’s sound – unless someone is working on a tight budget.
Head Unit Features
Now that you know what will fit into your car, and probably thought about your budget, let’s get to the nitty-gritty. How will you use your head unit? What features are important to you and how often you drive the car may also play a role. Regardless, here are a few features you might want to look for or at least have the option to use in the future if current plans don’t require them:
- HD Radio. HD Radio is a pretty significant upgrade to normal radio and may be worth having. If you live in an area with HD radio, or may eventually someday, this may be worthy of your consideration.
- Satellite Radio. This is a great option but does require a monthly subscription fee. If you are driving the car a lot then you can even get things like traffic and weather added to the subscription. Even sports channels can be added.
- MP3 Player. This is one of the most common needs in a head unit. And, before you say you don’t have one if you have a modern smartphone or tablet you do. The key may be to discern whether the input cable is in front of the radio or behind it.
- Bluetooth Connectivity. This is a must-have feature in my opinion. The blue-tooth connection will provide a wireless interface with a smartphone, tablet, hands-free driving, and many other types of technologies – both now and in the future.
Additional Head Unit Features
- GPS Navigation. This may not be a must-have as many smartphones have this capability. However, stand-alone units just add clutter to the car so having it combined with the head unit can be more aesthetically pleasing. Also, it allows for multitasking on the phone without interruptions.
- DVD Playback. While primarily speaking about double DIN units, the ability to playback DVDs is a nice option. In fact, you can also connect additional rear seat monitors to most head units that allow for DVD playback.
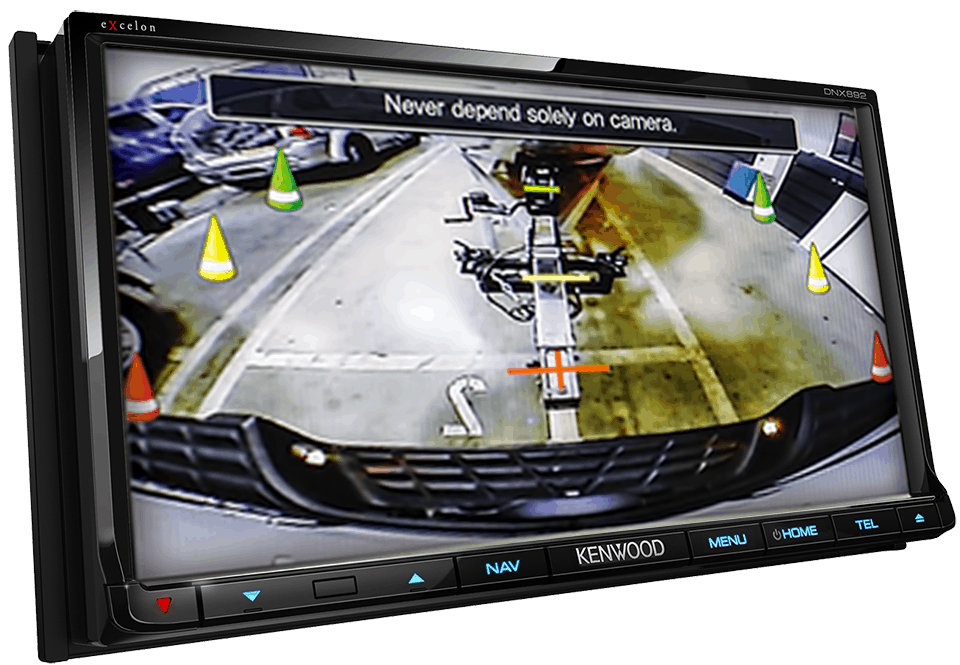
- Backup Camera. Backup cameras have been mandated in all new vehicles so it’s worth a debate if you should install one in your restomod or not. I believe classic cars are excluded from the new law but they are absolutely an important safety consideration. Even if you don’t want to add one now, having the ability to do so in the future may be a good option.
- Expandability. Auxiliary inputs and audio/video outputs let you expand your system with external amplifiers, rear-seat video screens, and powered subwoofers.
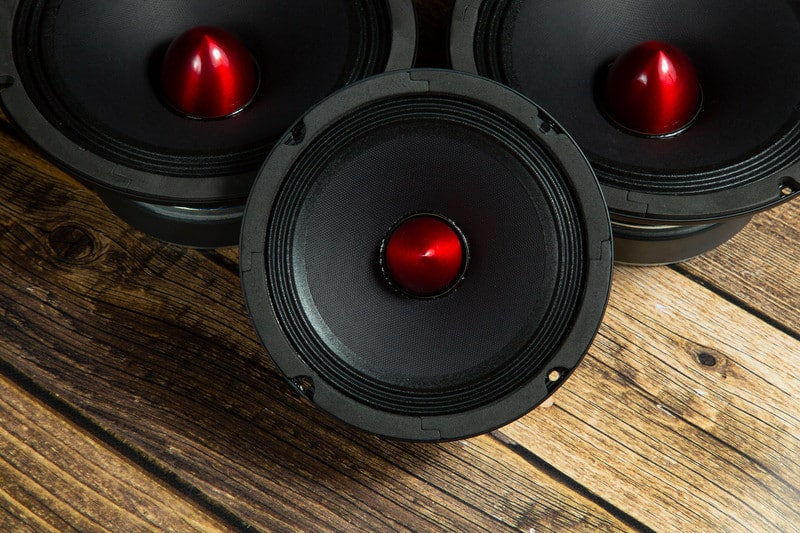
Speakers
The speakers are a very key consideration in any audio system. In this section, we’re going to look at the various types of speakers, how to install them, and considerations for vehicles.
Different Types of Speakers
- Tweeters. A tweeter produces the highest frequency, commonly referred to as “highs.” Tweeters are the smallest of speakers.
- Midrange. Just like it sounds, a midrange speaker produces frequencies in the 250-2,500hz range. Oftentimes, the midrange is considered the most important speaker to audiophiles. The reason is that the human ear is most responsive to sounds in this frequency range. For example, a piano, the human voice, and natural sounds occur in this range.
- Mid-bass. Mid-bass speakers tend to fill in the gap between subwoofer and mid-range drivers. They focus on frequencies in the 75-250hz. This is one of the most challenging areas to get right. Installation and speaker quality shine in this respect (or they don’t). Phase cancellation and distortion from mid-bass speakers can really disrupt an otherwise good-sounding system.
- Subwoofer. A subwoofer gets most of the attention with some, I dare say most, car audio enthusiasts. A subwoofer focuses on the “low” end of the frequency spectrum and they do not focus on midrange or high frequencies. Subwoofers are the largest speakers in a car audio system and require enclosures.
Keep in mind, that subwoofers without an enclosure cannot deliver the frequencies in an ideal fashion because the sound from the back of the speaker can cancel out sound from the front of the speaker.
Subwoofer Enclosures
Sealed Enclosure
A sealed enclosure is just like it sounds, an airtight enclosure housing your subwoofer(s). The benefit of this scenario is it provides clean and precise sound. These boxes tend to be smaller and offer more installation flexibility. The downside is they tend to require more power.

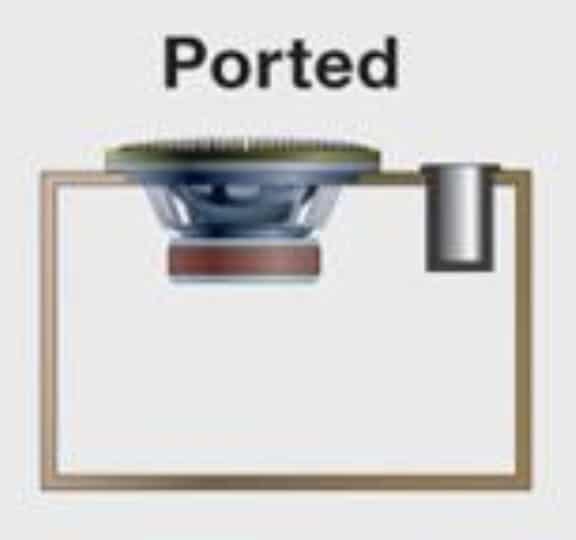
Ported Enclosure
Ported boxes use a vent (commonly called a port) to play low frequencies. You get more bang for your buck with a ported enclosure, relative to a sealed enclosure, as the enclosure doesn’t require as much amplification. The downside of a ported enclosure is they require considerably more space than a sealed enclosure.
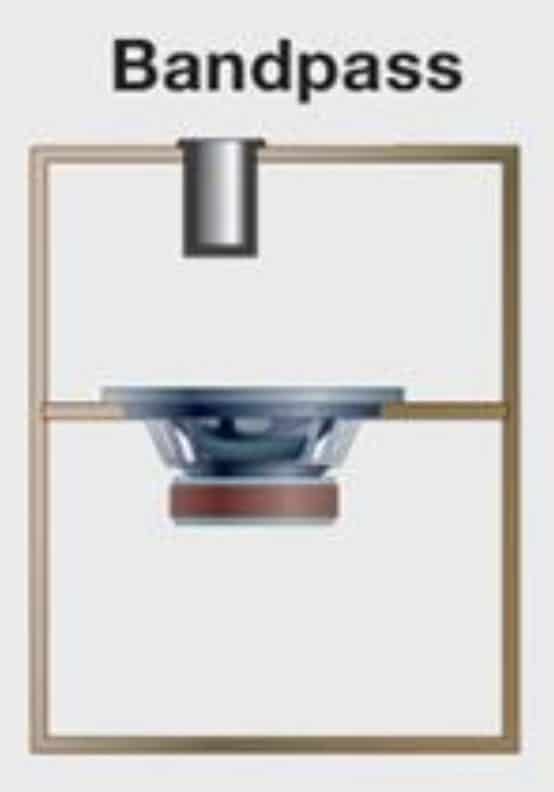
Bandpass Enclosure
Bandpass enclosures are a very special type of enclosure that leverages the best of a sealed enclosure and a ported enclosure. Essentially, the subwoofer is mounted inside a dual-chamber box (one chamber sealed, the other ported). The sound waves originate from the ported enclosure and are extra loud within a narrow frequency range. Because they are so efficient, they tend to really boom. Keep in mind, that not all subwoofers work well in this setup so be sure to consult the owner’s manual before using this setup.
Crossovers
A crossover is a piece of equipment that takes a single radio frequency and divides up different frequencies for different speakers. Usually, a crossover will direct the “highs” to the tweeters, “lows” to the subwoofer, and “Mids” to the mid-bass and mid-range speakers.
Different Types of Crossovers
There are two types of crossovers as follows: passive and active.
- Passive Crossovers. Passive crossovers do not need any power to filter the frequencies. However, there are two different types of passive crossovers as follows:
- Component Crossovers. These crossovers step into the signal path after the amplifier.
- In-Line Crossovers. These crossovers operate on speaker-level signals and connection between your amp and your speakers. These crossovers make sure your amplifier doesn’t waste energy amplifying signals you don’t want, like amplifying low frequencies to tweeters.
- Component Crossovers. These crossovers step into the signal path after the amplifier.
- Active Crossovers. Active crossovers require power and ground. A system is deemed actively crossed over when each driver (sub, woofer, tweeter), has its own channel of amplification. An active crossover is wired between the receiver and amplifier and cuts out unwanted frequencies before the amplifier wastes energy trying to boost them.
Imaging
Imaging is a bit more of an advanced conversation than many classic car enthusiasts are familiar with. I like to think of imaging as the recreation of a live concert in a performance hall. How did you hear the music, the voices, the instruments, etc…? Primarily, most of the music was in front of you with a little bit coming from the back, right?
A more formal definition of imaging is that it describes the extent to which a stereo system produces the timbre and location of the individual instruments accurately and realistically. In a system with superior staging, you can close your eyes and envision where the music is coming from like on a stage. The soundstage, or staging, is where you hear the music. In an ideal world, the music is directly in front of you, filling your ears left, center, and right.
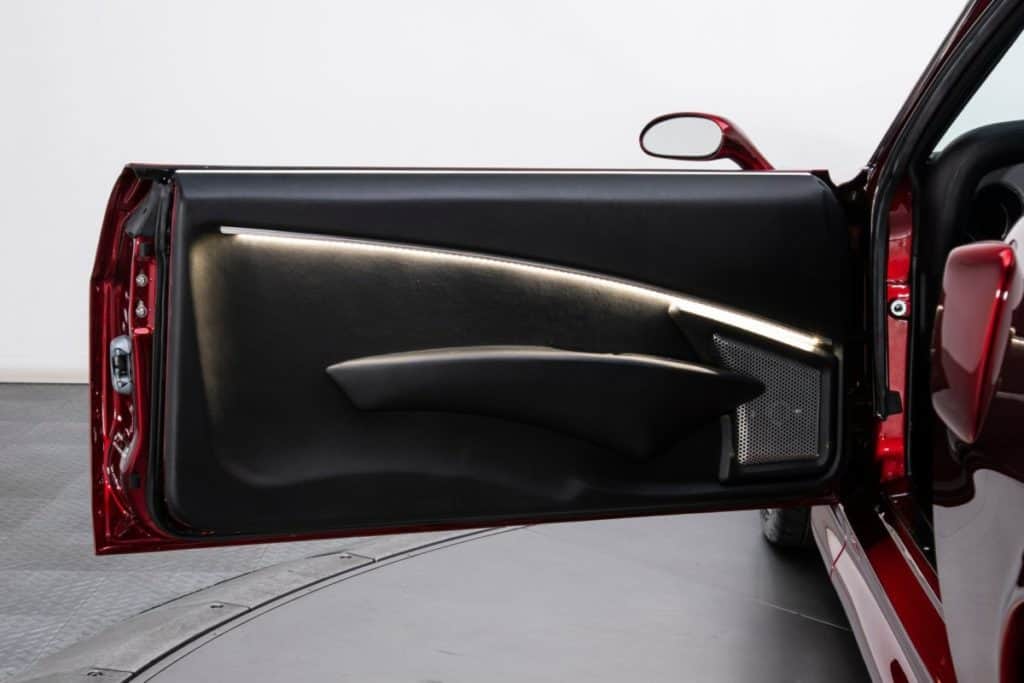
Midrange speakers, which are very directional by their nature, are commonly installed in the doors. However, since the driver’s door is much closer than the passenger door, digital timing correction can be used to delay the timing of one speaker so they both hit your ears at the same time. My gut tells me most people won’t focus too heavily on this but I’ll give some higher-level general guidelines on imaging below.
Imaging – Front Stage Consideration
These are your most important speakers for imaging. In an ideal world, a three-way set of components work best. If you don’t have the room you can always get a solid pair of coaxials that will fit into your door panel quite easily.
Imaging – Rear Stage Consideration
Unless you have a convertible, the rear stage really isn’t all that important. The most common mistake is to place large speakers in the rear deck, like 6×9’s. That is like going to a concert and sitting backward, who does that? So, some people avoid the rear stage altogether, but I don’t recommend that. Rather, I use either a smaller set of speakers for rear fill or just use the fader, or rear level output, to back the rear speakers down a bit.
Imaging – Low-End Consideration
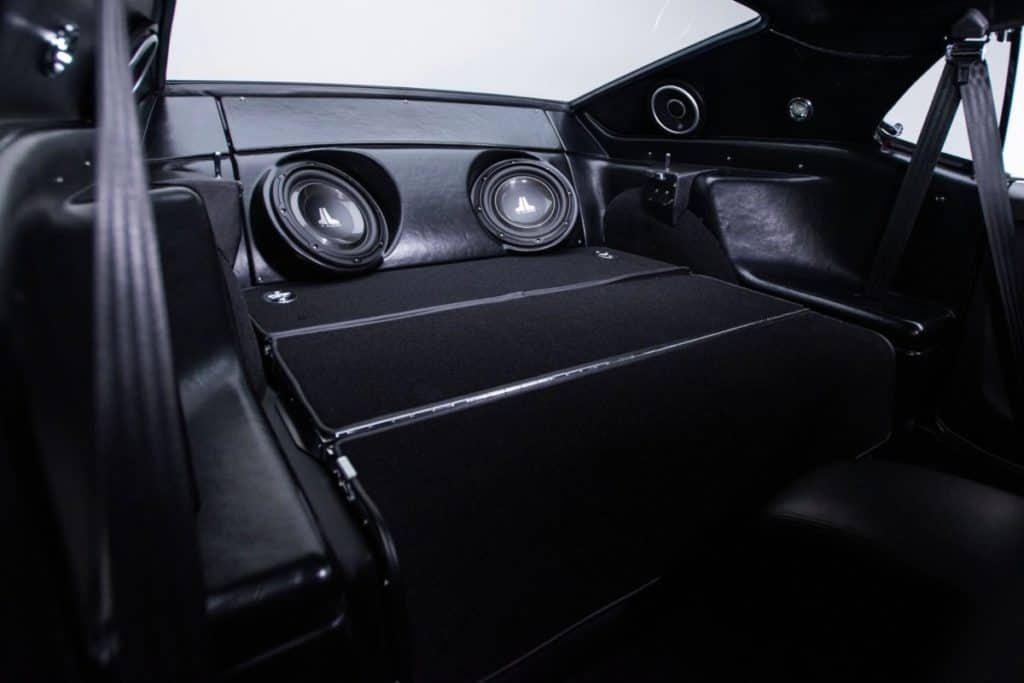
Subwoofers, in my opinion, are needed to truly play music the way it was produced. That said, the decision is do you need two or one. We all have issues and one of my issues, amongst the many, is I like symmetry. So, one subwoofer in a trunk doesn’t work for me. Sonically, though one probably sounds just as good as two.
It should be noted, that some people will correctly argue one subwoofer is easier to tune than two because there is no chance for noise cancellation. Yup, I can’t argue with proven science but it just looks odd to me so I go with two. The only caveat here is on a pickup truck restomod. One subwoofer is more than enough to fill up the truck and, when mounted in the middle, you can achieve symmetry and it sounds great.
Sound Deadening
Adding sound-deadening material to a car is a very important step in aiding the car audio listening experience. But, how do you know if sound-deadening material is necessary? Well, if you’re like most people, your car sounds great when it’s in a parking lot. However, once you start driving around town something suddenly changes. You probably notice the overall volume has dropped considerably, the highs get a bit muddy, and the bass practically disappears. As a result, you turn up the radio.

To make matters worse, once you get on a highway, the process continues to exacerbate. So, you turn up the radio, even more, trying to hear your favorite tunes. Then, when you get home, you may have a slight headache. Or, when you hop in the car the next day, you’re shocked at how loud the radio is. There are all kinds of noise when traveling in a car as follows:
- Exhaust
- Tire hum
- Engine whine
- Wind
- Body rattles
From a very practical perspective, outside noises generate vibration which in turn creates noise in your car that competes with your listening pleasure. A way to stop that noise is to apply sound-deadening material. The idea is for the sound-deadening material to absorb sound-causing vibrations, eliminate speaker resonance, and baffle out the excessive sound.
Digital Signal Processing
Digital Signal Processing (DSP) is the process of analyzing and modifying a signal to optimize or improve its efficiency or performance. It involves applying various mathematical and computational algorithms to analog and digital signals to produce a signal that’s of higher quality than the original signal.
A DSP is not for newby audiophiles. Once your system is built, I strongly recommend taking your car to a professional. For the cost of about an hour’s worth of labor, the results will more than pay for themselves. Said differently, do you tune your own engine?
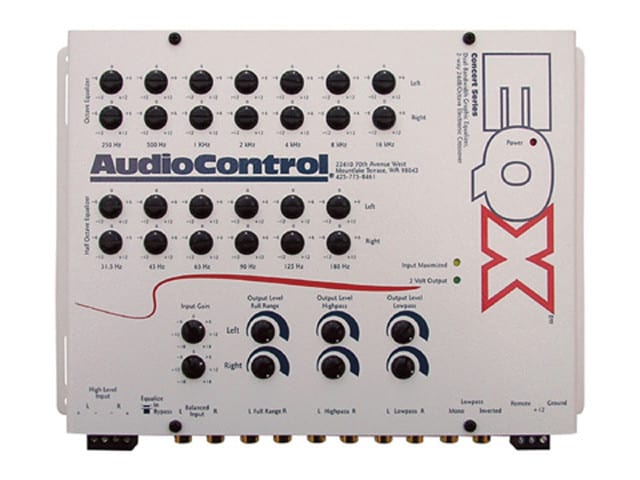
Admittedly, restomod people are mostly doing it yourself-ers, I get it. So, take it to the professional, save their settings, and then start messing around with it. That way, if you screw it up, just revert back to how it was. And, there is a TON of information online for using DPSs. My favorite brand of DSP, and equalizer for that matter, is Audio Control, and they are the best, period. Audio Control has tutorials to use their products and there are tons of YouYube videos to learn how to use them.
Disclaimer
I understand there are many many good equalizers and DSP products. I’ve used Audio Control products for thirty years and have watched many entrants into this industry fail. Simply put, Audio Control’s staying power, innovation, and product quality are just unmatched, in my opinion.
Amplifiers
Amplifiers are very misunderstood in terms of the role they play in a car audio experience. An amplifier doesn’t just make a system play louder. The reality is an amplifier makes your car stereo sound incrementally better.
Just like anything else, amplifiers come in a variety of price points. There are flea-market grade products to eccentric hand-built products. There are a variety of amplifiers as follows:
- Mono Amps. Mono amplifiers or “monoblock amps” are single-channel amplifiers that offer maximum bang for your buck when used on subwoofers. These amps play at lower impedances which allows for more power at less cost.
- 2-channel Amps. These amplifiers are used to drive two speakers. Sometimes, it can be switched to be a monoblock amplifier.
- 4-channel Amps. These amplifiers are very flexible as they can power four different speakers, often two front and two rear. In many cases, they can be used as a 3 channel, with two channels going to the front speakers (left and right) and one channel going to the subwoofer.
- 5-channel Amps. These amps are designed to give you full system capability in one amplifier. So, you can have four channels power the left and right speakers for both front and back. And, there is one monoblock channel for the subwoofer(s). Trucks are great for a 5 channel amp.
- 6-8 Channel Amps. These amplifiers are out and provide the ultimate flexibility for car audio enthusiasts. However, I rarely see the need for 6-8 channel amplifiers in 99% of the restomods I’ve seen.
Electrical System
Car audio systems dramatically can impact the power needed for the electrical system. In fact, the car audio system directly competes with the car’s other systems so thinking through these considerations is critical. Less critical for small/basic systems and incredibly critical for larger systems.
Electrical Systems Considerations
- Altenator. The alternator is the part of an engine that charges the battery and runs the electrical system. Very few factory alternators are designed for truly high-quality audio systems. A symptom of an underpowered alternator will be a dimming dash or headlights, especially when a subwoofer(s) hits a low note.
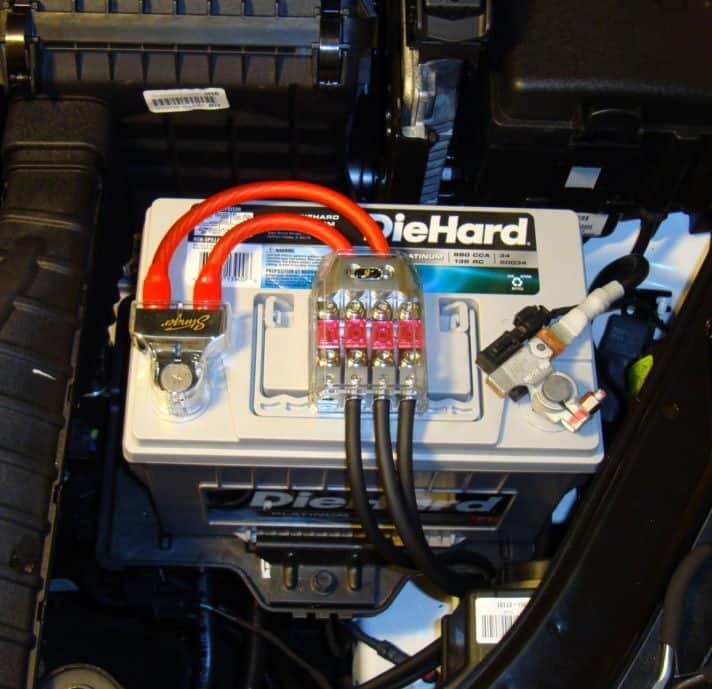
To determine the number of amps you need in your alternator, there is a pretty easy formula as follows: amps x volts = watts. So, if you had 1,000 watts then you’d need ~75 amps. Then, take how much amps are drawn by the rest of the car and combine the two. - Battery. Having a powerful car audio system in your car can quickly run down your car’s battery. So, in some cases, adding a battery designed for heavy accessory utilization will help avoid long-term problems.
- Stiffening Capacitor. A stiffening capacitor, or a large outboard capacitor, is used to prevent dimming of the lights when loud bass notes are played. In effect, they store up energy and make it available to the system on an as-needed basis. A general rule of thumb is 1 farad of capacitance for 1,000 watts of RMS power.
Power Cabling Considerations
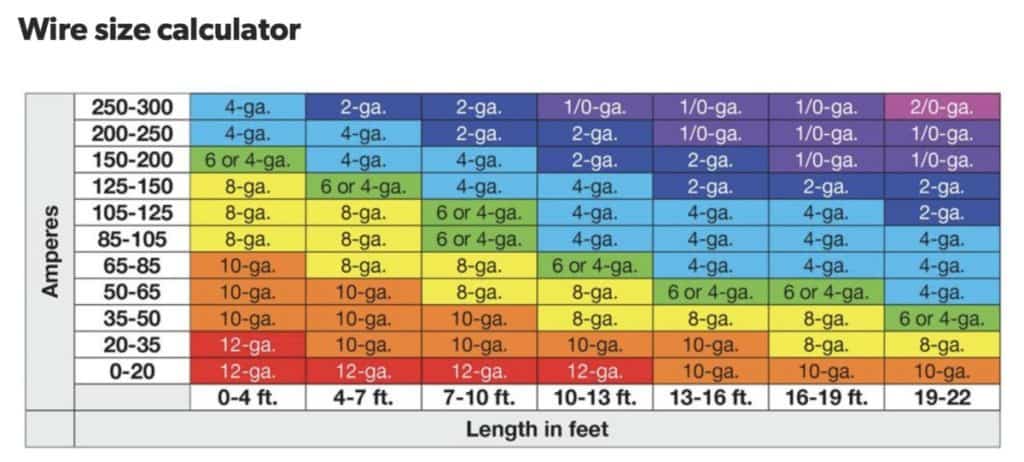
An amplifier needs its power and grounding wire to be large enough to handle the car audio system’s demand for electrical current. What gauge (read “thickness”) to use for power cabling depends on how much current your system is demanding and for how long you will run it. The smaller the gauge the bigger the wire is. For example, a “one-aught” gauge is commonly called 0-gauge.
To determine the draw-in amperes of your amplifier, you must calculate the total power of the system. This is accomplished by multiplying the number of channels by the RMS wattage per channel. If you have multiple amplifiers, just combine these amounts. The final number is the approximate maximum draw. Please use the chart below for the appropriate size and length of cable.
Installation
Once you have a well-designed system, you need a shop that can do a great-looking, reliable installation. The team will work with you on everything from wire colors, upholstery themes, custom enclosures and amp racks, and anything else your heart desires. They should build with metal, wood, and composites and are well-versed in all interior materials.
The best fabricators are honestly masters in fiberglass as well. While this may age me a bit, I also like a small amount of neon and the new LED neons are fun to mildly highlight an amplifier install. So, custom-formed subwoofer enclosures and false floor amplifier racks, with a touch of neon, is a fun combination for the trunk.
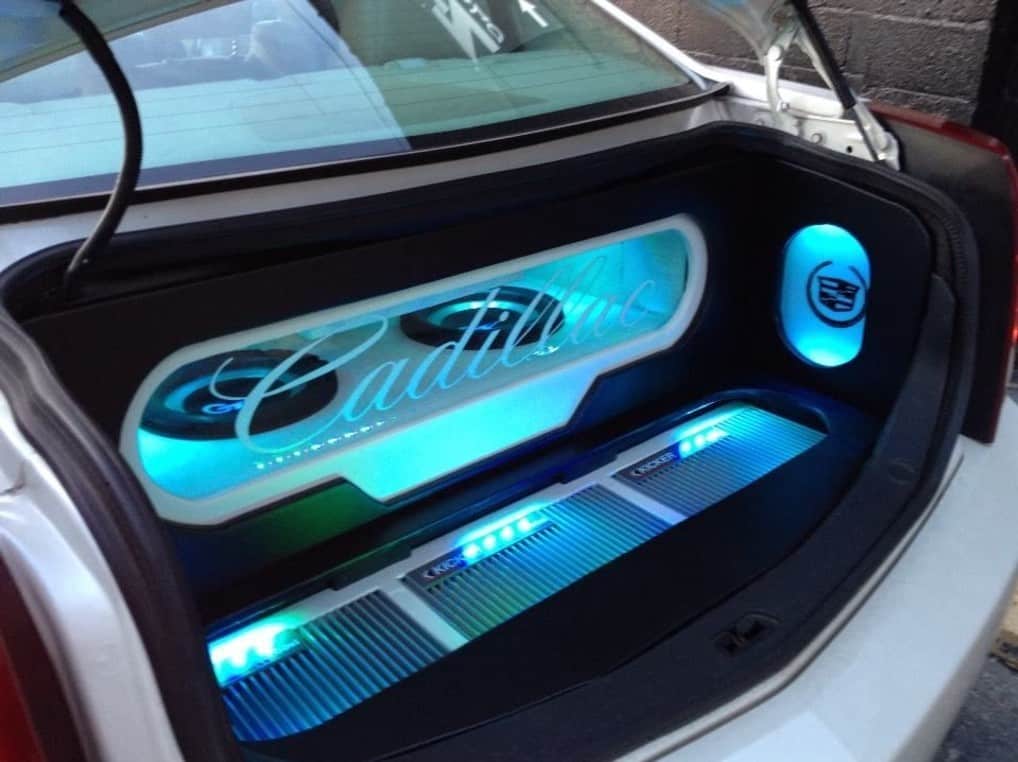
Here are a few of the better installations I’ve seen.
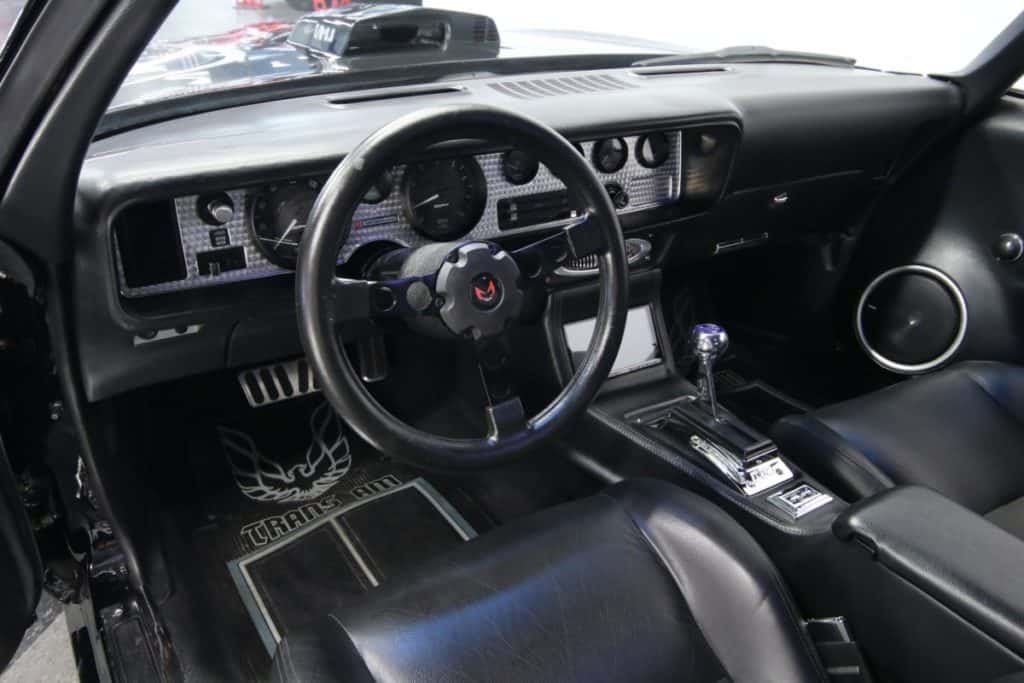
The Ultimate 1967 Chevy Camaro Restomod
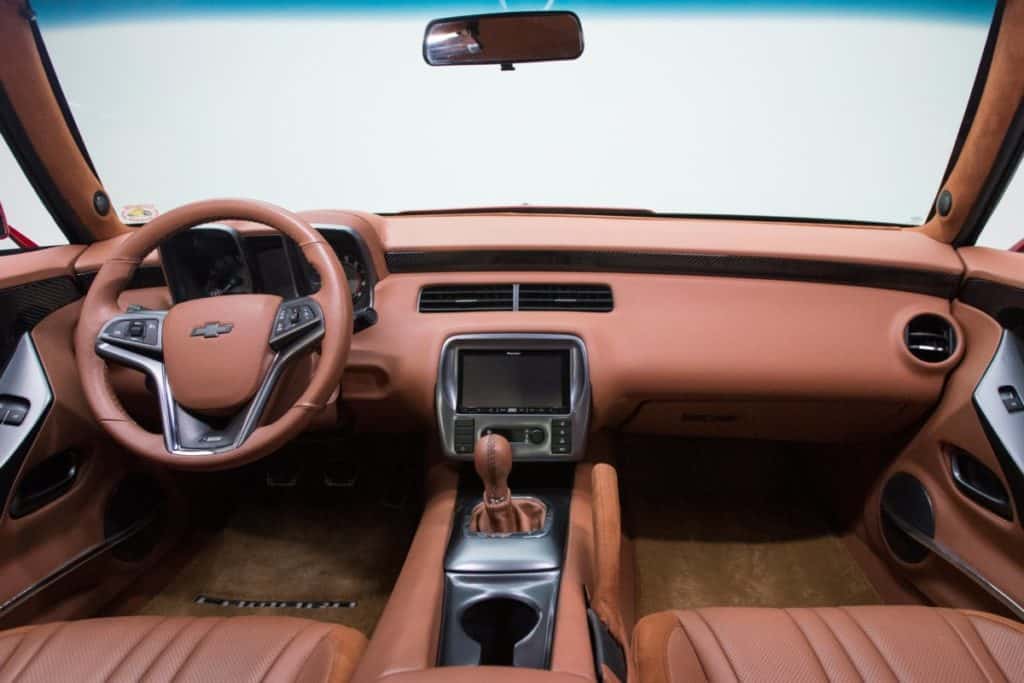
The audio system begins with a Pioneer head unit masterfully installed in a custom console. Front speakers were installed in the door and tweeters were installed in the A-pillars. Six by nine speakers were installed in the rear deck. (yup, that’s a no-no as we discussed but maybe he has them dialed down a bit?)
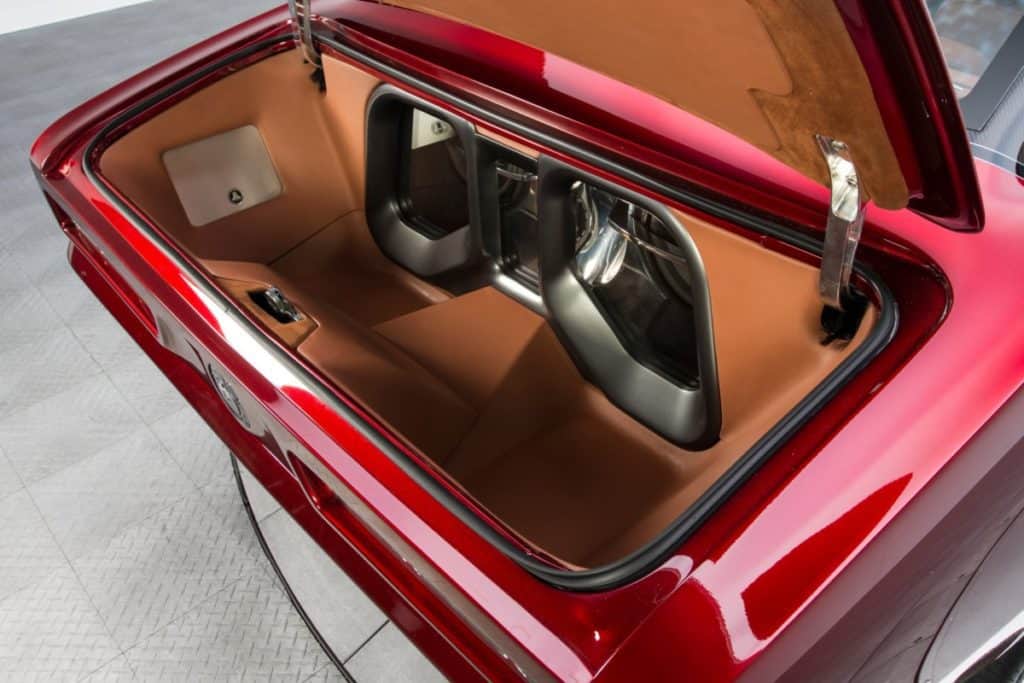
The trunk is a masterful installation of JL Audio subwoofers and amplifiers. The car audio installation was so clean it was as if the factory installed the system.
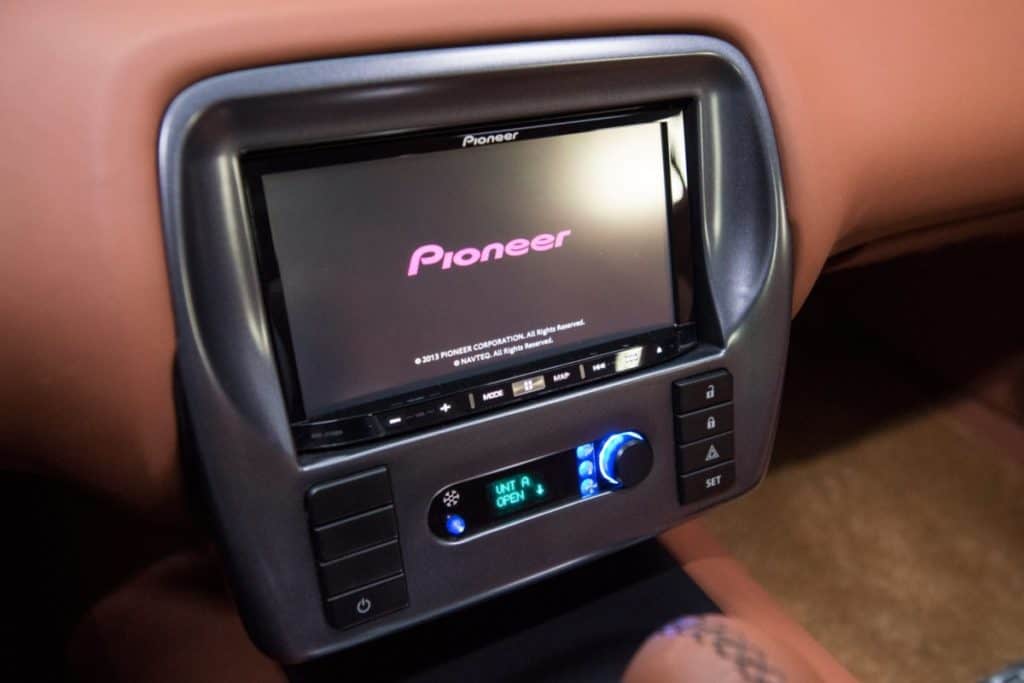
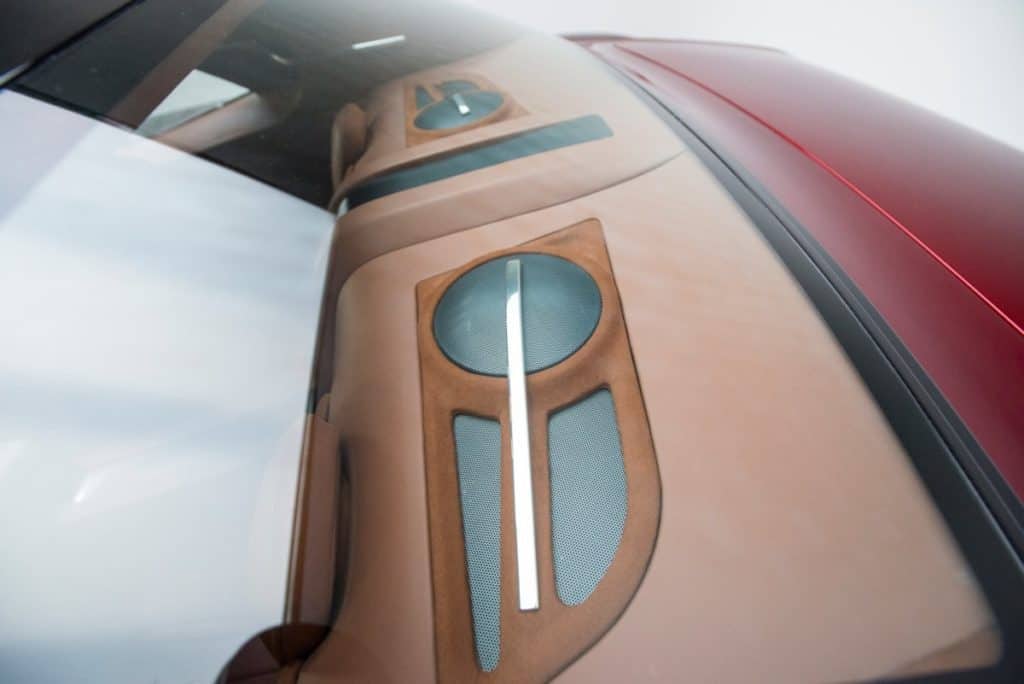
1969 Ford Mustang Restomod
The Ford Mustang audio system also starts with a head unit masterfully installed in another custom console. Front speakers were installed with a custom grill built into the door. The rear speakers were coaxial-tuned to fit the car.
The trunk area houses two JL Audio subwoofers and they add a great low-end response.
Related Questions
Yes, you can put a touch screen radio in a classic car. You have 2 choices and they are limited by the space left on the dash after you remove your old stereo. Usually, older cars only have space for a small-size car stereo (usually single DIN size), in which case you can look for a folding touchscreen display. The whole screen will drop down and goes neatly inside the unit, but when it is on, you have all kinds of options displayed on the screen.
But if space is bigger, or commonly called double-DIN size, then you’re in luck because there are a lot more choices including and up to dedicated Carplay or Android Auto receivers, from the cheap to high-end units.
Yes, you can absolutely install car play in an older car. These systems can be made to function in older vehicles, thanks to aftermarket kits and gadgets. Apple’s CarPlay, for instance, lets you connect an iPhone and use iOS apps on the dashboard display.
Yes, you can easily add Bluetooth to an older car. The easiest and most common way to add Bluetooth to a vehicle’s radio is by using a Bluetooth receiver. With a Bluetooth receiver, you pair your phone to the receiver and stream audio to it. Because every car is different, Bluetooth receivers come in several different models.