
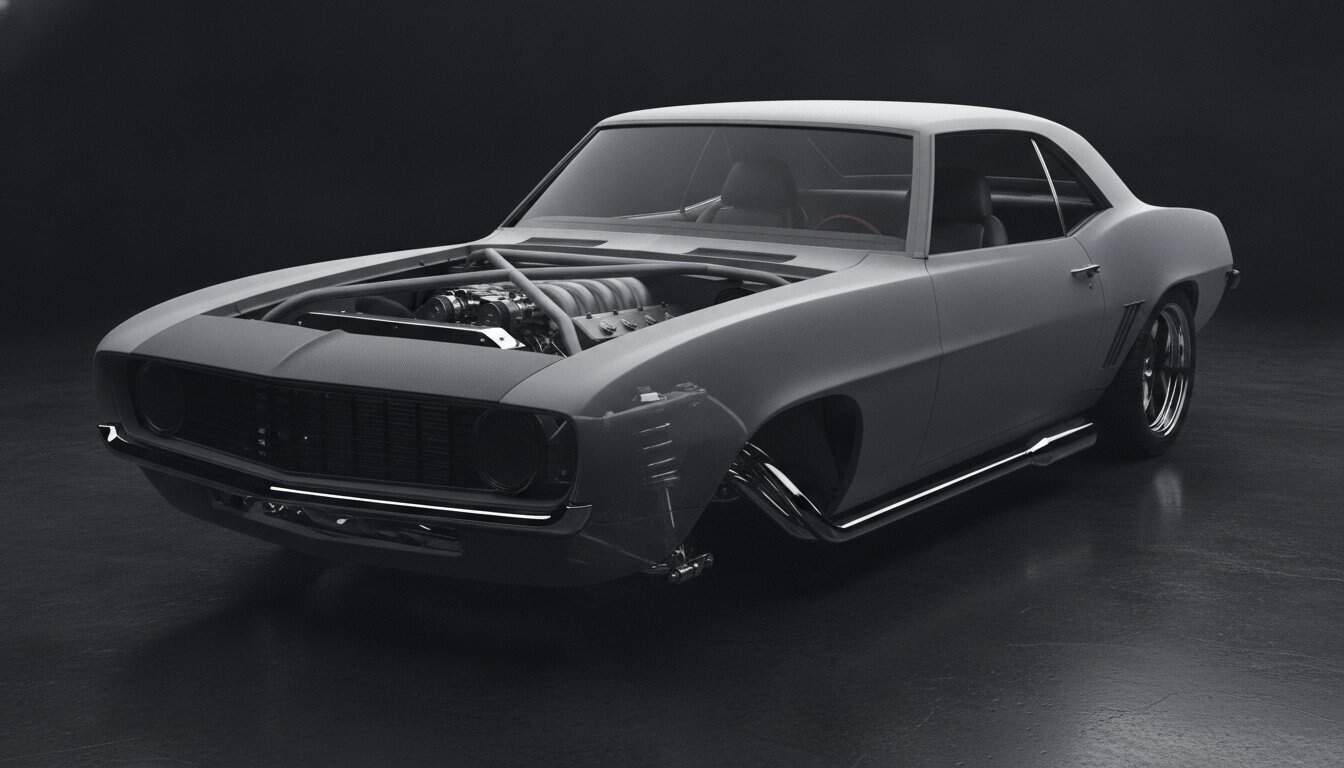
Your high-dollar suspension upgrade is only as effective as the metal it is bolted to. If you are still running a stock frame, you are likely experiencing the frustrating reality of chassis flex every time you dive into a corner. You have probably noticed your body panels misaligning during hard maneuvers or heard those unsettling rattles that suggest your car is twisting under pressure. It is a common hurdle for those of us dedicated to the art of the restomod; we want the power and grip of 2026, but we are often working with structural designs from sixty years ago.
I recognize the frustration of installing premium parts only to have the car feel unpredictable at high speeds. This chassis stiffening classic car guide is the essential bridge between heritage aesthetics and modern performance. I will show you how to transform that flexible platform into a rigid, predictable foundation that supports your upgrades. We will explore the engineering principles behind structural rigidity and walk through practical techniques like frame boxing and triangulation to ensure your project handles with precision. It is time to eliminate the squeaks and build a machine that truly honors its legacy through superior mechanical integrity.
Key Takeaways
- Understand why vintage steel and 1960s engineering cannot support the high grip levels of 2026 tires without significant structural reinforcement.
- Identify the specific weak points in your vehicle architecture, whether you are working with a flexible unibody or a traditional body-on-frame design.
- Master the installation of subframe connectors and strut tower braces to achieve immediate chassis stiffening classic car results that improve steering response.
- Learn advanced fabrication techniques like seam welding and frame boxing to transform a collection of spot-welded panels into a rigid, high-performance machine.
- Ensure your new structural rigidity works in harmony with modern coilovers and bushings for a driving experience that is both safe and predictable.
Understanding Chassis Flex and Its Impact on Restomod Performance
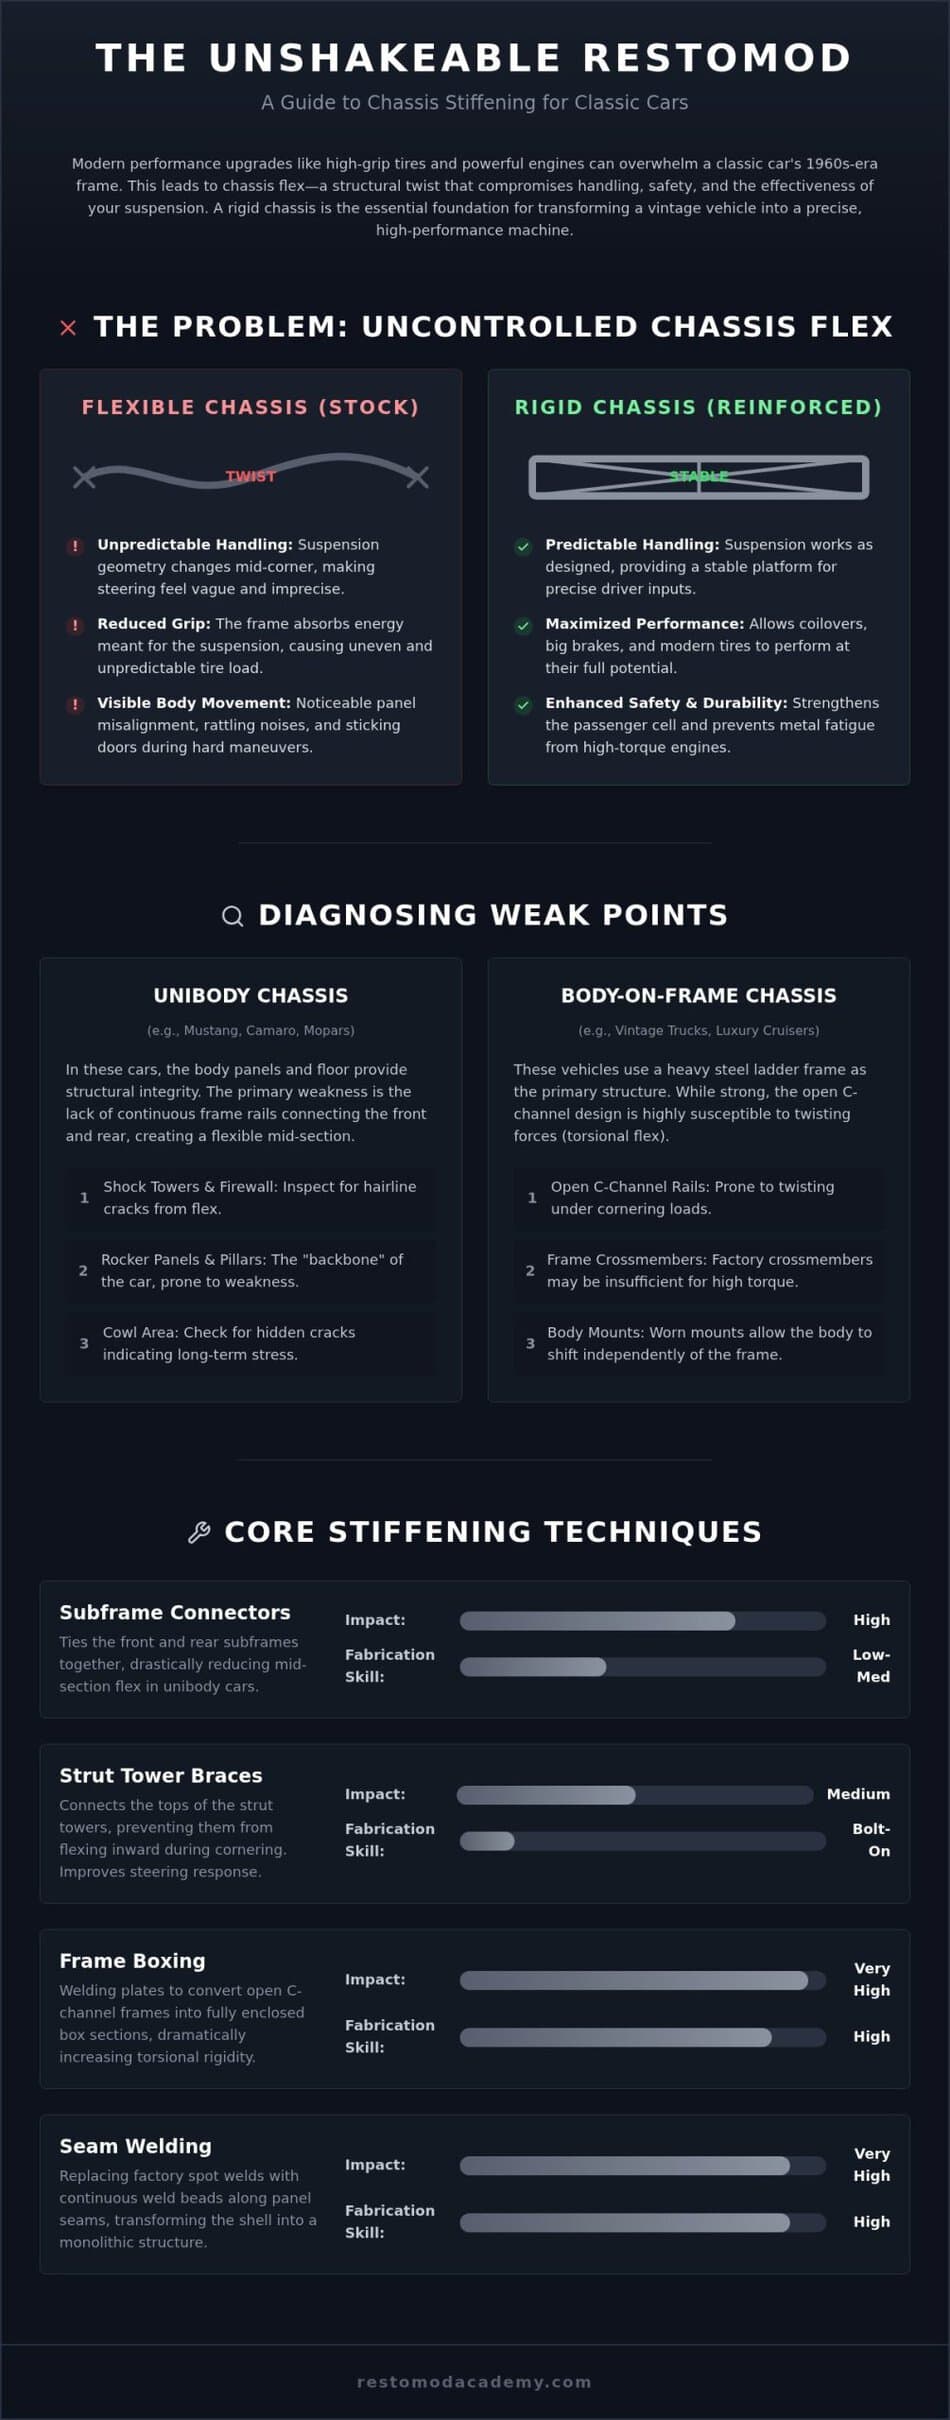
Chassis flex is the unintended movement of your vehicle’s structure when it is under load. It happens during hard cornering, heavy braking, or aggressive acceleration. While a small amount of compliance was acceptable in the 1960s, it is a performance killer today. Understanding Chassis Flex is the first step toward building a car that actually goes where you point it. Your vintage steel was engineered for a time when tire grip was limited; it simply cannot handle the massive lateral forces generated by 2026 performance tires.
When your frame twists, your suspension geometry changes mid-corner. This means your alignment settings, which you spent hours perfecting, become useless as the car bends. You can feel this through the steering wheel as a lack of precision. You’ve likely heard the dashboard squeak or felt the door latches shift in their strikes. These are clear indicators that your project requires a focused chassis stiffening classic car strategy to reach its full potential.
The Physics of Flex: Why Rigid is Better
Think of your chassis as a fifth spring that is impossible to tune. When the frame is soft, it absorbs energy that should be handled by your shocks and springs. A rigid platform ensures that your suspension components do their actual job. It provides a stable base for weight transfer, which is critical for maintaining traction. If the chassis is twisting, the load on your tires becomes uneven and unpredictable. By eliminating this flex, you allow the car to respond instantly to your inputs, making the driving experience far more rewarding and consistent.
Restomod Goals: Safety vs. Performance
Structural rigidity is about more than just lap times. A reinforced platform significantly improves occupant safety by maintaining the integrity of the passenger cell during a collision. It also enhances the efficiency of modern big brake kits. If the front of the car dives and twists under heavy braking, your stopping distances will suffer. You’ll also find that if you are planning an engine upgrade, such as the definitive guide to an LS engine swap, you must reinforce the platform to prevent metal fatigue caused by high torque. A stiff chassis is the mandatory foundation for any high-performance build.
Diagnosing Weak Points in Unibody and Full-Frame Classics
Before you pick up a welder, you must understand the architecture beneath your floorboards. Classic vehicles generally fall into two categories: unibody or body-on-frame. Unibody cars, like the Mustang, Camaro, or Dart, rely on the external sheet metal and floor pans for structural integrity. In contrast, body-on-frame vehicles, common in vintage trucks and older luxury cruisers, use a heavy steel ladder as the primary load-bearing member. Identifying where your specific car is prone to twisting is the cornerstone of an effective chassis stiffening classic car project. Modern high-grip tires available in 2026 put far more stress on these old joints than the bias-ply tires of the past ever could.
A simple way to visualize this flex is the floor jack test. Raise one front corner of your car using a floor jack and try to open and close the doors. If they stick or the door gaps change visibly, your car is twisting under its own weight. This exercise highlights the need for reinforcement, especially in areas like the torque boxes and leaf spring mounts. These components often suffer from metal fatigue after years of spirited driving and high-torque launches. If you see signs of movement here, it’s a clear signal that the factory engineering is no longer sufficient for your performance goals.
Unibody Vulnerabilities: Mustangs, Camaros, and Mopars
In unibody construction, the rocker panels and pillars act as the backbone. However, these cars often lack a continuous frame rail connecting the front and rear subframes. This creates a weak middle section that behaves like a hinge under load. Inspect the shock towers and firewall for hairline cracks, which indicate excessive movement. A common sign of long-term structural stress is visible cracking in the cowl area, often hidden beneath the fender line. If you find these issues, don’t panic. Our Ultimate Restomod Guide provides a structured framework to help you plan these essential repairs and upgrades.
Full-Frame Challenges: Trucks and Luxury Cruisers
Full-frame vehicles face a different set of obstacles. Most vintage frames use C-channel rails, which are excellent for carrying vertical loads but poor at resisting torsional twist. This is why a classic truck might feel like it’s shivering over bumps. Don’t overlook your body mounts; aging rubber or crushed poly mounts can make even a solid frame feel sloppy and disconnected. Check your crossmembers for any signs of bowing or fatigue, as these components are vital for keeping the frame rails parallel. To ensure you have the right fabrication equipment for these reinforcements, take a look at our recommended gear for essential workshop tools.
Core Stiffening Techniques: From Bolt-Ons to Basic Fabrication
Once you have identified the structural weaknesses in your project, it is time to move from diagnosis to action. The most effective starting point for any unibody chassis stiffening classic car project is the installation of subframe connectors. These components bridge the gap between the front and rear subframes, effectively turning your car into a single, cohesive unit. By implementing a strategic chassis stiffening classic car plan, you are not just adding parts; you are engineering a better driving experience. While the center of the vehicle is often overlooked, adding X-braces or reinforced K-members provides the lateral support needed to keep the floor pan from buckling under high cornering loads. To get started with these installations, ensure you have the proper wrenches and high-lift jacks ready in your workshop.
Subframe Connectors: Bolt-On vs. Weld-In
You will face a choice between bolt-on kits and weld-in units. Bolt-on connectors are excellent for enthusiasts who want a reversible modification or don’t have access to a welder. They offer a significant improvement over stock, but they can eventually develop play at the mounting points. For high-performance restomod builds, welding is the gold standard. A welded connector becomes a permanent part of the car’s structure, eliminating any chance of shifting. If you choose the bolt-on route, make it a habit to check the bolt torque after your first 500 miles of driving to ensure everything remains seated correctly.
Engine Bay Bracing for Precision Steering
The front end of a classic car is prone to shock tower lean during aggressive driving. By tying the shock towers together with a brace or a Monte Carlo bar, you prevent the towers from migrating inward. This keeps your alignment settings stable and your steering feel sharp. The most effective designs use triangular bracing that connects the towers back to the firewall, creating a rigid structure that resists twisting in three dimensions. When selecting your braces, consider the trade-offs between materials. Mild steel is cost-effective and easy to weld, while chromoly offers superior strength-to-weight ratios for those looking to keep their front end as light as possible.
Advanced Reinforcement: Seam Welding and Frame Boxing
When you’re ready to move beyond basic bolt-ons, you enter the realm of permanent metal fabrication. This is where you truly separate the casual builds from the professional-grade machines. Seam welding is one of the most effective ways to increase structural rigidity without adding significant weight. Factory engineers used spot welds every few inches because it was fast and cheap on the assembly line. By cleaning those seams and adding a series of short stitch welds, you turn those individual panels into a single, monolithic structure. This level of chassis stiffening classic car work ensures that your body panels don’t shift under the high-G loads of 2026 performance tires.
Taking your chassis stiffening classic car project to this advanced stage requires patience and a steady hand with a welder. You must ensure the vehicle is perfectly level and supported before you begin. Welding introduces intense heat, and if the chassis isn’t properly jigged, that heat can pull the entire frame out of alignment. Always work in small sections and jump from side to side to manage the thermal expansion of the metal.
The Process of Boxing Your Frame
Boxing a frame is a transformative process for any vehicle with an open C-channel rail. These rails are designed to carry vertical weight, but they twist easily when you apply torque or lateral force. To fix this, you’ll follow a methodical three-step process. First, strip the frame rails to bare metal and verify they are straight. Second, cut and fit steel plates to close the open side of the rail, creating a rigid box section. Finally, use stitch welding techniques rather than continuous long beads. This prevents heat from warping the frame and ensures the metal retains its structural integrity. If you need to upgrade your fabrication kit before starting, check our recommended gear for the right tools.
Structural Roll Cages and Harness Bars
Don’t view a roll cage as just safety gear. In a serious restomod, a 6-point or 8-point cage acts as a structural skeleton that ties the roof, floor, and suspension mounting points together. There is a massive difference between a cosmetic roll bar bolted to thin sheet metal and a structural cage welded directly to the frame or subframe connectors. You can design a cage that provides immense stiffness while still allowing for a comfortable interior. Focus on tucked-away bars that follow the A-pillar and removable door bars to maintain accessibility while reaping the performance rewards of a rigid passenger cell.
If you’re ready to plan these advanced reinforcements and want a professional roadmap for your build, I suggest starting with the resources at Restomod Academy to ensure every weld counts toward your performance goals.
Integrating Your Stiffened Chassis with Modern Suspension
Your foundation is finally solid, and that means your suspension can do the job it was designed for. In a stock, flexible car, high-performance coilovers often feel unnecessarily harsh. This happens because the impact energy isn’t being managed solely by the springs; it is being absorbed and released by the twisting metal of the body. Once you complete your chassis stiffening classic car project, you can move toward more aggressive spring rates without destroying your ride quality. The chassis no longer acts as an uncontrolled fifth spring, ensuring your suspension geometry remains true even under the highest lateral loads we see in 2026.
Don’t ignore the connection points during this integration phase. High-quality poly-graphite or spherical bushings are the ideal partners for a rigid frame. They eliminate the deflection found in factory rubber, providing a direct path for road feedback to reach your hands. You will notice the steering feels sharper and more communicative, allowing you to place the car with surgical precision through every apex. This newfound clarity in the steering wheel is the reward for all that meticulous welding and bracing.
Re-Tuning Your Shocks and Springs
You might discover that your previous damper settings are now too stiff for the street. With a rigid platform, the shocks are doing more of the heavy lifting, so you can often back off the compression settings to find a better balance. This structural rigidity ensures your tire contact patch remains consistent, giving you the confidence to push the car to its limits. I recommend taking your car to a familiar road or a local skid pad to feel the transformation. The difference in how the car takes a set in a corner will be immediately apparent, as the delay between steering input and chassis response virtually disappears.
Next Steps in Your Restomod Journey
Always document every structural modification you’ve made with clear photos and notes. High-quality records of your welds and reinforcements are not just for your own pride; they add immense value to the vehicle’s history and future resale. As you move forward, let the Ultimate Restomod Guide serve as your comprehensive roadmap for the rest of the project. This journey requires patience and a commitment to precision. Don’t rush the fabrication phase, as the care you take in the workshop translates directly to safety on the road. If you are ready to dial in your alignment and corner weights, revisit our recommended gear to ensure you have the precision measuring tools required for a professional setup.
Take Command of Your Build’s Future
Building a world-class restomod is a journey of precision and patience. You now understand that structural rigidity is not just an upgrade; it is the mandatory foundation that allows every other component to function at its peak. By identifying your vehicle’s specific vulnerabilities and applying a strategic chassis stiffening classic car plan, you have taken the most important step toward modern handling and safety. Whether you started with simple subframe connectors or progressed to the meticulous artistry of seam welding and frame boxing, the result is a machine that finally matches your vision.
It’s time to transition from planning to execution. Join thousands of other builders in our community and benefit from the expert mentorship of Brook Walsh. We provide the step-by-step blueprints you need to ensure your vintage steel meets the demands of modern performance. Download The Ultimate Restomod Guide to plan your perfect build today and start creating a legacy that handles as beautifully as it looks. Your project deserves a platform that won’t compromise under pressure. Keep pushing, keep building, and enjoy the satisfaction of a job done right.
Frequently Asked Questions
Does chassis stiffening make the ride of a classic car too harsh for the street?
Stiffening the chassis actually improves ride quality by allowing your suspension to handle bumps instead of the body. When the frame is rigid, your springs and dampers can be tuned with precision. A flexible car often feels crashy because the energy isn’t controlled. By removing the frame twist, you eliminate the secondary vibrations and rattles that make a classic car feel old and tired on the street.
Can I stiffen my chassis without a welder using only bolt-on parts?
You can achieve significant gains using high-quality bolt-on components if you don’t have access to a welder. Subframe connectors, strut tower braces, and Monte Carlo bars are often available as direct-fit kits. While welding provides the ultimate structural bond, a properly torqued bolt-on kit will still transform the handling of your vehicle. Always check the hardware periodically to ensure nothing has shifted during aggressive driving sessions.
What is the most cost-effective first step for chassis stiffening classic car projects?
Subframe connectors are the most cost-effective first step for any unibody chassis stiffening classic car project. These components offer the highest return on investment by bridging the structural gap between the front and rear suspension. For full-frame vehicles, replacing worn body mounts with poly-graphite versions provides a similarly impactful and budget-friendly improvement. These initial steps create a stable foundation for every other performance modification you plan to install later.
Will adding subframe connectors affect the ground clearance of my classic car?
Most modern subframe connectors are designed to tuck tightly against the floor pans to preserve your ground clearance. Manufacturers understand that restomods are often lowered, so they engineer these braces to stay above the lowest point of the frame or exhaust system. You should look for low-profile or through-floor designs if your car is exceptionally low. This ensures you gain structural rigidity without risking damage from speed bumps or driveway inclines.
Do I need to strip the interior of my car before welding on chassis braces?
You must strip the interior in any area where you plan to perform welding to prevent fire hazards. Heat from the welding process can easily ignite carpet, sound deadening, or seat foam on the other side of the sheet metal. While it adds labor to the project, removing the interior also gives you a chance to inspect the floor pans for hidden rust or stress cracks that need attention before the braces are installed.
How much weight does a typical chassis stiffening kit add to a vintage vehicle?
A typical comprehensive stiffening kit usually adds between 30 and 60 pounds to your vehicle. While we always aim for lightness in performance builds, this is a small price to pay for the massive improvement in handling and safety. The weight is usually concentrated low in the car, which helps maintain a favorable center of gravity. The performance gains from a stable suspension geometry far outweigh the minor weight penalty of the extra steel.
Is a roll cage necessary for a street-driven restomod car?
A roll cage is not strictly necessary for a street-driven machine, but it provides the ultimate level of structural reinforcement. If you choose to install one, focus on a design that keeps the bars away from your head to ensure safety without a helmet. For most street restomods, a well-engineered 4-point roll bar or a set of subframe connectors provides plenty of stiffness without compromising the interior comfort or accessibility of the cabin.
How can I tell if my classic car chassis is already too fatigued to stiffen?
Look for extensive structural rust or large stress cracks in the torque boxes and shock towers as signs of terminal fatigue. If the metal is thin and flaky, it won’t provide a solid foundation for new braces. You can also use the floor jack test mentioned earlier in this guide to see if the body twists excessively. If the doors won’t close when one corner is raised, you must address the underlying metal health first.
Your high-dollar suspension upgrade is only as effective as the metal it is bolted to. If you are still running a stock frame, you are likely experiencing the frustrating reality of chassis flex every time you dive into a corner. You have probably noticed your body panels misaligning during hard maneuvers or heard those unsettling rattles that suggest your car is twisting under pressure. It is a common hurdle for those of us dedicated to the art of the restomod; we want the power and grip of 2026, but we are often working with structural designs from sixty years ago.
I recognize the frustration of installing premium parts only to have the car feel unpredictable at high speeds. This chassis stiffening classic car guide is the essential bridge between heritage aesthetics and modern performance. I will show you how to transform that flexible platform into a rigid, predictable foundation that supports your upgrades. We will explore the engineering principles behind structural rigidity and walk through practical techniques like frame boxing and triangulation to ensure your project handles with precision. It is time to eliminate the squeaks and build a machine that truly honors its legacy through superior mechanical integrity.
Key Takeaways
- Understand why vintage steel and 1960s engineering cannot support the high grip levels of 2026 tires without significant structural reinforcement.
- Identify the specific weak points in your vehicle architecture, whether you are working with a flexible unibody or a traditional body-on-frame design.
- Master the installation of subframe connectors and strut tower braces to achieve immediate chassis stiffening classic car results that improve steering response.
- Learn advanced fabrication techniques like seam welding and frame boxing to transform a collection of spot-welded panels into a rigid, high-performance machine.
- Ensure your new structural rigidity works in harmony with modern coilovers and bushings for a driving experience that is both safe and predictable.
Understanding Chassis Flex and Its Impact on Restomod Performance
Chassis flex is the unintended movement of your vehicle’s structure when it is under load. It happens during hard cornering, heavy braking, or aggressive acceleration. While a small amount of compliance was acceptable in the 1960s, it is a performance killer today. Understanding Chassis Flex is the first step toward building a car that actually goes where you point it. Your vintage steel was engineered for a time when tire grip was limited; it simply cannot handle the massive lateral forces generated by 2026 performance tires.
When your frame twists, your suspension geometry changes mid-corner. This means your alignment settings, which you spent hours perfecting, become useless as the car bends. You can feel this through the steering wheel as a lack of precision. You’ve likely heard the dashboard squeak or felt the door latches shift in their strikes. These are clear indicators that your project requires a focused chassis stiffening classic car strategy to reach its full potential.
The Physics of Flex: Why Rigid is Better
Think of your chassis as a fifth spring that is impossible to tune. When the frame is soft, it absorbs energy that should be handled by your shocks and springs. A rigid platform ensures that your suspension components do their actual job. It provides a stable base for weight transfer, which is critical for maintaining traction. If the chassis is twisting, the load on your tires becomes uneven and unpredictable. By eliminating this flex, you allow the car to respond instantly to your inputs, making the driving experience far more rewarding and consistent.
Restomod Goals: Safety vs. Performance
Structural rigidity is about more than just lap times. A reinforced platform significantly improves occupant safety by maintaining the integrity of the passenger cell during a collision. It also enhances the efficiency of modern big brake kits. If the front of the car dives and twists under heavy braking, your stopping distances will suffer. You’ll also find that if you are planning an engine upgrade, such as the definitive guide to an LS engine swap, you must reinforce the platform to prevent metal fatigue caused by high torque. A stiff chassis is the mandatory foundation for any high-performance build.
Diagnosing Weak Points in Unibody and Full-Frame Classics
Before you pick up a welder, you must understand the architecture beneath your floorboards. Classic vehicles generally fall into two categories: unibody or body-on-frame. Unibody cars, like the Mustang, Camaro, or Dart, rely on the external sheet metal and floor pans for structural integrity. In contrast, body-on-frame vehicles, common in vintage trucks and older luxury cruisers, use a heavy steel ladder as the primary load-bearing member. Identifying where your specific car is prone to twisting is the cornerstone of an effective chassis stiffening classic car project. Modern high-grip tires available in 2026 put far more stress on these old joints than the bias-ply tires of the past ever could.
A simple way to visualize this flex is the floor jack test. Raise one front corner of your car using a floor jack and try to open and close the doors. If they stick or the door gaps change visibly, your car is twisting under its own weight. This exercise highlights the need for reinforcement, especially in areas like the torque boxes and leaf spring mounts. These components often suffer from metal fatigue after years of spirited driving and high-torque launches. If you see signs of movement here, it’s a clear signal that the factory engineering is no longer sufficient for your performance goals.
Unibody Vulnerabilities: Mustangs, Camaros, and Mopars
In unibody construction, the rocker panels and pillars act as the backbone. However, these cars often lack a continuous frame rail connecting the front and rear subframes. This creates a weak middle section that behaves like a hinge under load. Inspect the shock towers and firewall for hairline cracks, which indicate excessive movement. A common sign of long-term structural stress is visible cracking in the cowl area, often hidden beneath the fender line. If you find these issues, don’t panic. Our Ultimate Restomod Guide provides a structured framework to help you plan these essential repairs and upgrades.
Full-Frame Challenges: Trucks and Luxury Cruisers
Full-frame vehicles face a different set of obstacles. Most vintage frames use C-channel rails, which are excellent for carrying vertical loads but poor at resisting torsional twist. This is why a classic truck might feel like it’s shivering over bumps. Don’t overlook your body mounts; aging rubber or crushed poly mounts can make even a solid frame feel sloppy and disconnected. Check your crossmembers for any signs of bowing or fatigue, as these components are vital for keeping the frame rails parallel. To ensure you have the right fabrication equipment for these reinforcements, take a look at our recommended gear for essential workshop tools.
Core Stiffening Techniques: From Bolt-Ons to Basic Fabrication
Once you have identified the structural weaknesses in your project, it is time to move from diagnosis to action. The most effective starting point for any unibody chassis stiffening classic car project is the installation of subframe connectors. These components bridge the gap between the front and rear subframes, effectively turning your car into a single, cohesive unit. By implementing a strategic chassis stiffening classic car plan, you are not just adding parts; you are engineering a better driving experience. While the center of the vehicle is often overlooked, adding X-braces or reinforced K-members provides the lateral support needed to keep the floor pan from buckling under high cornering loads. To get started with these installations, ensure you have the proper wrenches and high-lift jacks ready in your workshop.
Subframe Connectors: Bolt-On vs. Weld-In
You will face a choice between bolt-on kits and weld-in units. Bolt-on connectors are excellent for enthusiasts who want a reversible modification or don’t have access to a welder. They offer a significant improvement over stock, but they can eventually develop play at the mounting points. For high-performance restomod builds, welding is the gold standard. A welded connector becomes a permanent part of the car’s structure, eliminating any chance of shifting. If you choose the bolt-on route, make it a habit to check the bolt torque after your first 500 miles of driving to ensure everything remains seated correctly.
Engine Bay Bracing for Precision Steering
The front end of a classic car is prone to shock tower lean during aggressive driving. By tying the shock towers together with a brace or a Monte Carlo bar, you prevent the towers from migrating inward. This keeps your alignment settings stable and your steering feel sharp. The most effective designs use triangular bracing that connects the towers back to the firewall, creating a rigid structure that resists twisting in three dimensions. When selecting your braces, consider the trade-offs between materials. Mild steel is cost-effective and easy to weld, while chromoly offers superior strength-to-weight ratios for those looking to keep their front end as light as possible.
Advanced Reinforcement: Seam Welding and Frame Boxing
When you’re ready to move beyond basic bolt-ons, you enter the realm of permanent metal fabrication. This is where you truly separate the casual builds from the professional-grade machines. Seam welding is one of the most effective ways to increase structural rigidity without adding significant weight. Factory engineers used spot welds every few inches because it was fast and cheap on the assembly line. By cleaning those seams and adding a series of short stitch welds, you turn those individual panels into a single, monolithic structure. This level of chassis stiffening classic car work ensures that your body panels don’t shift under the high-G loads of 2026 performance tires.
Taking your chassis stiffening classic car project to this advanced stage requires patience and a steady hand with a welder. You must ensure the vehicle is perfectly level and supported before you begin. Welding introduces intense heat, and if the chassis isn’t properly jigged, that heat can pull the entire frame out of alignment. Always work in small sections and jump from side to side to manage the thermal expansion of the metal.
The Process of Boxing Your Frame
Boxing a frame is a transformative process for any vehicle with an open C-channel rail. These rails are designed to carry vertical weight, but they twist easily when you apply torque or lateral force. To fix this, you’ll follow a methodical three-step process. First, strip the frame rails to bare metal and verify they are straight. Second, cut and fit steel plates to close the open side of the rail, creating a rigid box section. Finally, use stitch welding techniques rather than continuous long beads. This prevents heat from warping the frame and ensures the metal retains its structural integrity. If you need to upgrade your fabrication kit before starting, check our recommended gear for the right tools.
Structural Roll Cages and Harness Bars
Don’t view a roll cage as just safety gear. In a serious restomod, a 6-point or 8-point cage acts as a structural skeleton that ties the roof, floor, and suspension mounting points together. There is a massive difference between a cosmetic roll bar bolted to thin sheet metal and a structural cage welded directly to the frame or subframe connectors. You can design a cage that provides immense stiffness while still allowing for a comfortable interior. Focus on tucked-away bars that follow the A-pillar and removable door bars to maintain accessibility while reaping the performance rewards of a rigid passenger cell.
If you’re ready to plan these advanced reinforcements and want a professional roadmap for your build, I suggest starting with the resources at Restomod Academy to ensure every weld counts toward your performance goals.
Integrating Your Stiffened Chassis with Modern Suspension
Your foundation is finally solid, and that means your suspension can do the job it was designed for. In a stock, flexible car, high-performance coilovers often feel unnecessarily harsh. This happens because the impact energy isn’t being managed solely by the springs; it is being absorbed and released by the twisting metal of the body. Once you complete your chassis stiffening classic car project, you can move toward more aggressive spring rates without destroying your ride quality. The chassis no longer acts as an uncontrolled fifth spring, ensuring your suspension geometry remains true even under the highest lateral loads we see in 2026.
Don’t ignore the connection points during this integration phase. High-quality poly-graphite or spherical bushings are the ideal partners for a rigid frame. They eliminate the deflection found in factory rubber, providing a direct path for road feedback to reach your hands. You will notice the steering feels sharper and more communicative, allowing you to place the car with surgical precision through every apex. This newfound clarity in the steering wheel is the reward for all that meticulous welding and bracing.
Re-Tuning Your Shocks and Springs
You might discover that your previous damper settings are now too stiff for the street. With a rigid platform, the shocks are doing more of the heavy lifting, so you can often back off the compression settings to find a better balance. This structural rigidity ensures your tire contact patch remains consistent, giving you the confidence to push the car to its limits. I recommend taking your car to a familiar road or a local skid pad to feel the transformation. The difference in how the car takes a set in a corner will be immediately apparent, as the delay between steering input and chassis response virtually disappears.
Next Steps in Your Restomod Journey
Always document every structural modification you’ve made with clear photos and notes. High-quality records of your welds and reinforcements are not just for your own pride; they add immense value to the vehicle’s history and future resale. As you move forward, let the Ultimate Restomod Guide serve as your comprehensive roadmap for the rest of the project. This journey requires patience and a commitment to precision. Don’t rush the fabrication phase, as the care you take in the workshop translates directly to safety on the road. If you are ready to dial in your alignment and corner weights, revisit our recommended gear to ensure you have the precision measuring tools required for a professional setup.
Take Command of Your Build’s Future
Building a world-class restomod is a journey of precision and patience. You now understand that structural rigidity is not just an upgrade; it is the mandatory foundation that allows every other component to function at its peak. By identifying your vehicle’s specific vulnerabilities and applying a strategic chassis stiffening classic car plan, you have taken the most important step toward modern handling and safety. Whether you started with simple subframe connectors or progressed to the meticulous artistry of seam welding and frame boxing, the result is a machine that finally matches your vision.
It’s time to transition from planning to execution. Join thousands of other builders in our community and benefit from the expert mentorship of Brook Walsh. We provide the step-by-step blueprints you need to ensure your vintage steel meets the demands of modern performance. Download The Ultimate Restomod Guide to plan your perfect build today and start creating a legacy that handles as beautifully as it looks. Your project deserves a platform that won’t compromise under pressure. Keep pushing, keep building, and enjoy the satisfaction of a job done right.
Frequently Asked Questions
Does chassis stiffening make the ride of a classic car too harsh for the street?
Stiffening the chassis actually improves ride quality by allowing your suspension to handle bumps instead of the body. When the frame is rigid, your springs and dampers can be tuned with precision. A flexible car often feels crashy because the energy isn’t controlled. By removing the frame twist, you eliminate the secondary vibrations and rattles that make a classic car feel old and tired on the street.
Can I stiffen my chassis without a welder using only bolt-on parts?
You can achieve significant gains using high-quality bolt-on components if you don’t have access to a welder. Subframe connectors, strut tower braces, and Monte Carlo bars are often available as direct-fit kits. While welding provides the ultimate structural bond, a properly torqued bolt-on kit will still transform the handling of your vehicle. Always check the hardware periodically to ensure nothing has shifted during aggressive driving sessions.
What is the most cost-effective first step for chassis stiffening classic car projects?
Subframe connectors are the most cost-effective first step for any unibody chassis stiffening classic car project. These components offer the highest return on investment by bridging the structural gap between the front and rear suspension. For full-frame vehicles, replacing worn body mounts with poly-graphite versions provides a similarly impactful and budget-friendly improvement. These initial steps create a stable foundation for every other performance modification you plan to install later.
Will adding subframe connectors affect the ground clearance of my classic car?
Most modern subframe connectors are designed to tuck tightly against the floor pans to preserve your ground clearance. Manufacturers understand that restomods are often lowered, so they engineer these braces to stay above the lowest point of the frame or exhaust system. You should look for low-profile or through-floor designs if your car is exceptionally low. This ensures you gain structural rigidity without risking damage from speed bumps or driveway inclines.
Do I need to strip the interior of my car before welding on chassis braces?
You must strip the interior in any area where you plan to perform welding to prevent fire hazards. Heat from the welding process can easily ignite carpet, sound deadening, or seat foam on the other side of the sheet metal. While it adds labor to the project, removing the interior also gives you a chance to inspect the floor pans for hidden rust or stress cracks that need attention before the braces are installed.
How much weight does a typical chassis stiffening kit add to a vintage vehicle?
A typical comprehensive stiffening kit usually adds between 30 and 60 pounds to your vehicle. While we always aim for lightness in performance builds, this is a small price to pay for the massive improvement in handling and safety. The weight is usually concentrated low in the car, which helps maintain a favorable center of gravity. The performance gains from a stable suspension geometry far outweigh the minor weight penalty of the extra steel.
Is a roll cage necessary for a street-driven restomod car?
A roll cage is not strictly necessary for a street-driven machine, but it provides the ultimate level of structural reinforcement. If you choose to install one, focus on a design that keeps the bars away from your head to ensure safety without a helmet. For most street restomods, a well-engineered 4-point roll bar or a set of subframe connectors provides plenty of stiffness without compromising the interior comfort or accessibility of the cabin.
How can I tell if my classic car chassis is already too fatigued to stiffen?
Look for extensive structural rust or large stress cracks in the torque boxes and shock towers as signs of terminal fatigue. If the metal is thin and flaky, it won’t provide a solid foundation for new braces. You can also use the floor jack test mentioned earlier in this guide to see if the body twists excessively. If the doors won’t close when one corner is raised, you must address the underlying metal health first.