
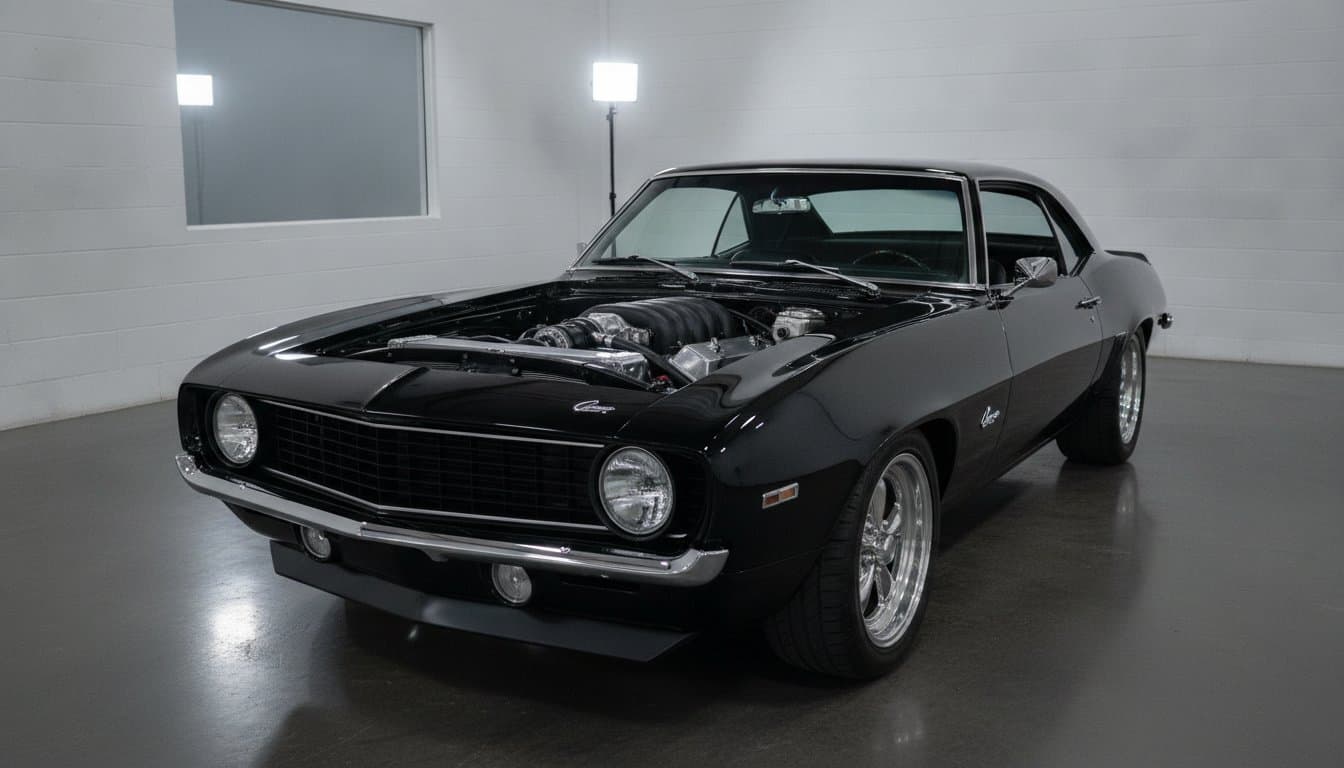
What if the soul of your classic car isn’t found in its original, temperamental carburetor, but in the confidence that it will roar to life every single time you turn the key? You’ve likely spent hours staring at your engine bay, caught between the desire for modern power and the fear that a messy wiring harness or a budget swap will turn your dream into a permanent garage ornament. It’s a common hurdle for any builder who values both performance and heritage. If you need a more functional space to bring your vision to life, visit Builders Group And Design for professional garage construction and remodeling solutions. This ls swap guide for classic cars is designed to strip away the intimidation, providing you with a clear roadmap to integrate modern GM performance without sacrificing the vintage aesthetic you love.
You deserve a machine that offers modern horsepower alongside vintage style. We’ll master the complexities of the LS engine together, ensuring you avoid the hidden costs and project creep that plague so many builds. We will examine the essential components, from fuel systems to electronic fuel injection, to help you approach the wiring with precision while maintaining the character of your engine bay.
Key Takeaways
- Identify the technical differences between Gen III and Gen IV blocks to select the right foundation for your performance and weight requirements.
- Discover how to conceal modern components like coil packs to maintain the timeless aesthetic of your vintage engine bay.
- Master the critical transition from mechanical systems to modern EFI by following this ls swap guide for classic cars to ensure your project starts every time.
- Solve clearance challenges early by measuring for oil pan and steering box interference to prevent costly mid-project setbacks.
- Align your transmission selection with your engine’s power output to transform your classic into a precision-engineered machine built for the long haul.
Why the LS Platform Dominates the Classic Car Restomod Scene
The LS engine isn’t just a power plant; it’s a cultural shift in the automotive world. When we discuss an ls swap guide for classic cars, we’re talking about the bridge between the golden age of American steel and the precision of the digital era. At its core, an LS swap involves replacing an outdated, carbureted engine with a Gen III or Gen IV GM small block. This transition replaces temperamental cold starts and oil leaks with modern electronic fuel injection and bulletproof internals. You aren’t just changing an engine; you’re upgrading the very soul of your vehicle to handle the demands of modern traffic.
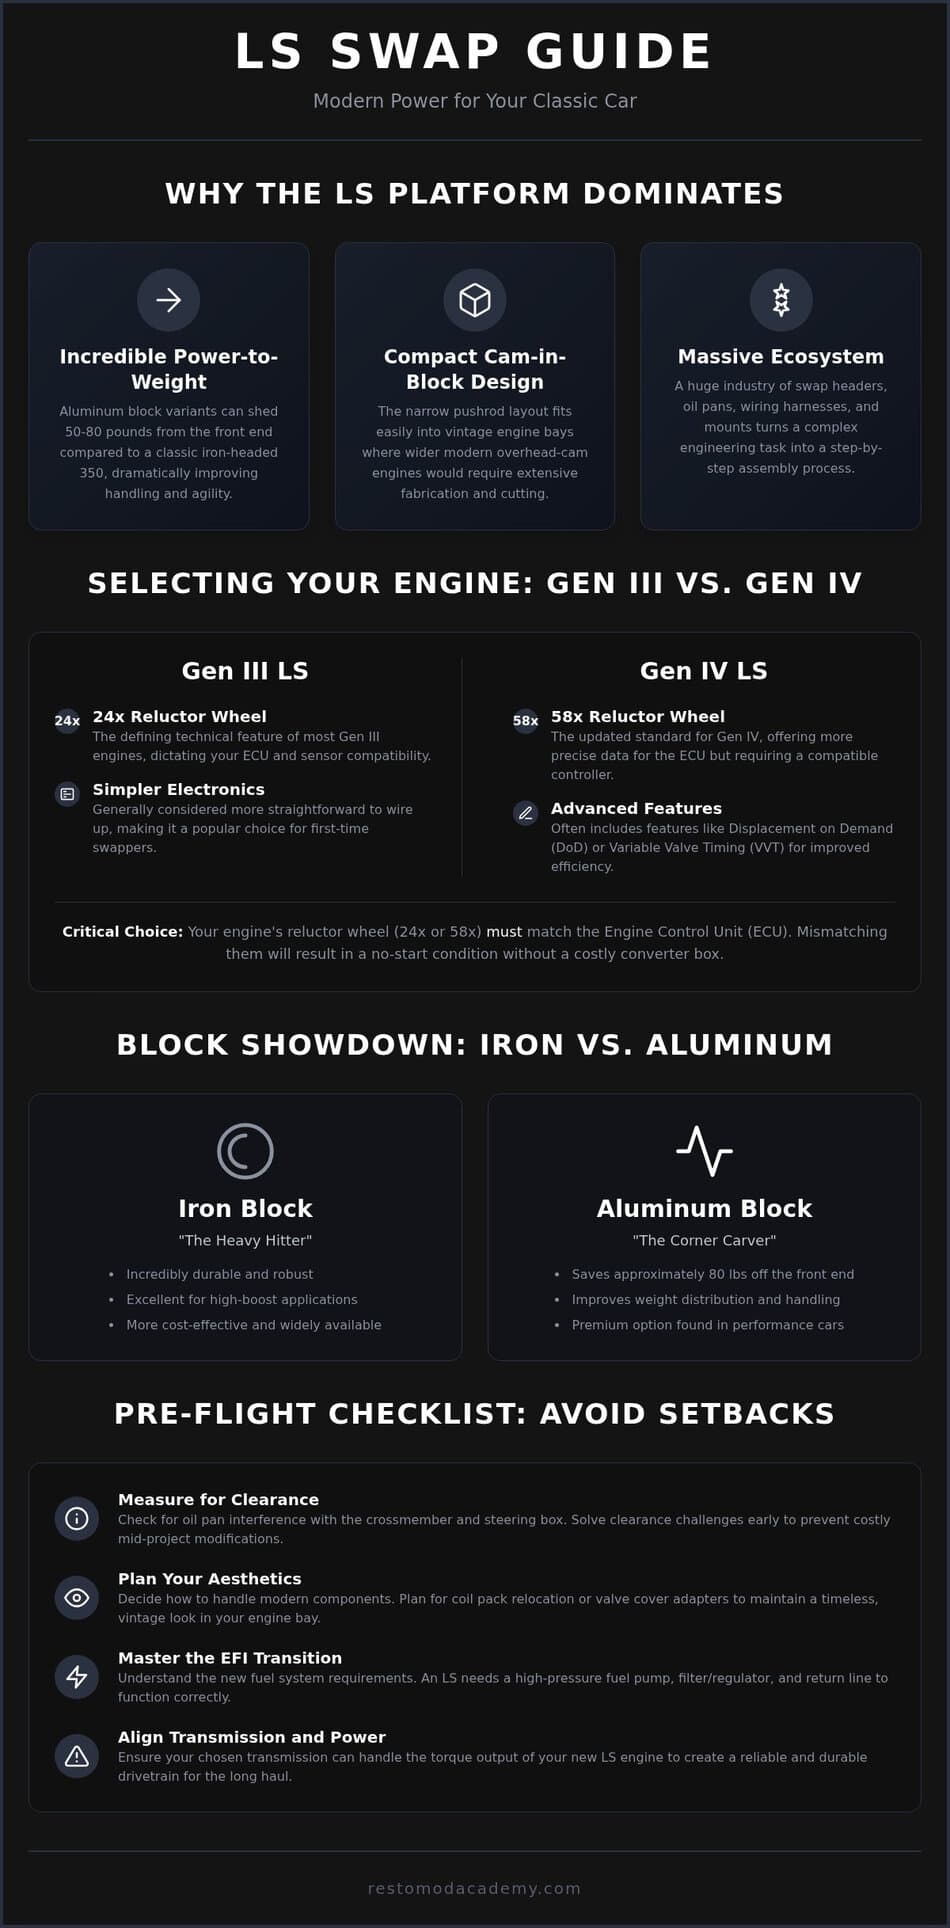
The small-block design remains the undisputed champion because of its incredible power-to-weight ratio. While modern overhead-cam engines are bulky and wide, the LS keeps its cam in the block, allowing for a narrow profile that fits between narrow frame rails. If you opt for an aluminum block variant, you can often shed fifty to eighty pounds off the front end compared to an old iron-headed 350. This improvement in weight distribution transforms how your classic handles into corners, making the car feel nimble rather than nose-heavy.
To better understand the fundamental steps of this process, watch this helpful video:
One of the greatest advantages for any builder is the massive ecosystem that has grown around this platform. You won’t have to fabricate every bracket or mount from scratch. Thousands of companies produce specific swap headers, oil pans, and wiring harnesses tailored to your specific make and model. This availability of knowledge and parts turns a daunting engineering task into a logical, step-by-step assembly. It makes your classic a true candidate for a daily driver, offering fuel economy and reliability that was unimaginable in the 1960s.
The Evolution of the Small Block
The journey from the original Gen I small block to the Gen III revolution was a leap in efficiency. Engineers kept the compact pushrod layout but introduced cross-bolted mains and vastly superior cylinder head flow. This cam-in-block design is the secret to why an LS fits so easily into tight engine bays where a Ford Coyote or a Hemi would require cutting the inner fenders. The LS architecture’s primary advantage in 2026 is its ability to deliver high-performance reliability through a compact design that fits where modern overhead-cam engines cannot.
Understanding the Restomod Philosophy
Restomodding is about more than just speed; it’s about balance. You want the car to look like a vintage masterpiece but drive like a modern sports sedan. By performing an LS swap, you significantly increase the vehicle’s usability and its eventual market value because buyers prioritize a car they can actually drive. To truly appreciate this blend of eras, start by understanding what is a restomod and how it prioritizes the driving experience over strict trailer-queen originality.
Selecting Your Engine: A Guide to LS Generations and Variants
Selecting the right heart for your build requires a balance of budget, power goals, and technical patience. It is the most critical decision in your ls swap guide for classic cars journey. You will primarily choose between Gen III and Gen IV architectures. The easiest way to tell them apart is by identifying the reluctor wheel. Gen III engines typically use a 24x wheel, while Gen IV moved to a 58x wheel. This choice is vital because it determines which engine control unit (ECU) you must use. Mixing these up without an expensive converter box will leave you with a project that refuses to fire.
While displacement ranges from the rev-happy 4.8L to the torque-heavy 6.2L LS3, you must also consider the block material. Iron blocks are the heavy hitters of the community. They are incredibly durable and cost-effective for those on a budget. Aluminum blocks, found in many cars and premium trucks, save roughly 80 pounds off the nose of the car. If you are building a corner-carving machine, that weight savings is worth the extra investment to improve your vehicle’s center of gravity.
One often overlooked hurdle is the 2017 cutoff. As we move further into the decade, many builders are tempted by the newest wreckage in the salvage yard. However, engines produced after 2017 often feature complex direct injection and sophisticated communication protocols that make them significantly harder to integrate into a vintage chassis. Stick to the classic Gen III or Gen IV LS architecture for a smoother path to a running, reliable machine.
The Truck Engine Secret (LQ4, LQ9, and 5.3L)
Don’t overlook the humble workhorse. The LQ4 and LQ9 6.0L truck engines, along with the ubiquitous 5.3L Vortec, are the backbone of the DIY community. These engines are plentiful in salvage yards across the country. Look for donor vehicles like the Silverado or Suburban from the early 2000s. While these iron blocks add weight, their strength is legendary. They provide a massive jump in performance over a tired original engine without breaking the bank.
Crate Engines vs. Junkyard Pulls
Deciding between a fresh crate engine and a junkyard pull comes down to your tolerance for risk and your desire for a warranty. A GM Connect and Cruise system offers a turnkey solution that is perfect for builders who want to avoid the troubleshooting phase. Conversely, a high-mileage pull can be a bargain, but it often requires a full teardown and refresh. If you’re feeling stuck on which path fits your specific build, our consulting services can help you navigate these mechanical crossroads and keep your project moving forward.
Modern Power vs. Vintage Style: The Aesthetic Challenge
Opening the hood of a 1969 Camaro only to find a sea of black plastic and tangled wires is a jarring experience for any enthusiast. The visual clash between a mid-century masterpiece and a modern engine bay is the primary reason many purists hesitate to modernize. This ls swap guide for classic cars prioritizes the belief that you don’t have to sacrifice your vehicle’s soul for the sake of performance. Integrating a modern power plant requires an artistic eye and a commitment to detail that goes beyond simple bolt-on parts.
The most offensive element in a modern engine bay is the factory plastic intake manifold. These components were designed for efficiency and mass production; not for beauty. To fix this, many builders opt for a vintage LS approach by using a single-plane, carb-style aluminum intake manifold. When paired with a traditional round air cleaner, the engine takes on the silhouette of a classic small block while hiding high-pressure fuel injectors underneath. Painting the engine block in a period-correct color, such as Chevy Orange or Ford Blue, further bridges the gap between eras.
Coil packs are another aesthetic hurdle. In their factory configuration, they sit prominently on top of the valve covers, creating a cluttered look that screams modern commuter car. You can solve this by using relocation kits to move the coils to the firewall or even inside the car under the dashboard. By using custom spark plug wires and finned aluminum valve covers, you can trick the casual observer into thinking they are looking at a high-performance vintage engine rather than a computer-controlled modern marvel.
Hiding the Rats Nest of Wires
Precision wiring is the hallmark of a professional build. Don’t settle for the messy, over-length harnesses that come with many budget kits. Route your wiring harness through the firewall in a discrete location, keeping the main trunk hidden behind the engine or under the fenders. Avoid the cheap look of plastic corrugated tubing at all costs. Instead, use high-quality braided loom or heat-shrink tubing to create a harness that looks like it belongs in a high-end restoration. A smoothed and painted intake manifold can also provide a clean canvas that makes your meticulous wire tucking truly stand out.
Accessory Drive Systems
Your choice of accessory drive determines both the look of your engine and whether your hood will actually close. Low-mount alternators and A/C compressors offer a sleek, tucked appearance, but they often interfere with classic steering boxes or frame rails. High-mount systems provide better clearance but can dominate the visual space of the engine bay. Integrating modern A/C compressors with your vintage interior kits requires specific brackets that maintain the proper belt alignment. If you are struggling to choose between different pulley setups, you can find detailed analysis in our accessory drive reviews to ensure your components work in harmony.
Solving the Three Pillars: Fuel, Cooling, and Electrical
Successfully mounting the engine is a major milestone, but the real magic happens when you integrate the supporting systems that bring the machine to life. This ls swap guide for classic cars focuses on the three pillars of a reliable build: fuel, cooling, and electrical. You’re moving from 1960s simplicity to 21st-century precision. It’s a leap that requires a methodical approach to ensure your classic doesn’t just look fast, but actually runs with modern consistency. Each system must be treated as a critical component of a larger, holistic network.
Your original mechanical pump provided roughly 6 psi to a carburetor. An LS engine demands a steady 58 psi to keep the fuel injectors happy. This jump in pressure necessitates a complete overhaul of your lines and tank. Don’t try to reuse old, crusty steel lines that might burst under the increased load. High-performance LS engines also generate significant heat, especially in the cramped engine bays of vintage coupes. Your original radiator was designed for a different era and a different thermal profile. Upgrade to a high-flow aluminum radiator with integrated electric fans controlled directly by the PCM to maintain optimal operating temperatures.
Electrical integration is where many projects stall. You’ll need to have your Powertrain Control Module (PCM) re-flashed to remove the Vehicle Anti-Theft System (VATS) and adjust for your specific gear ratio. Mount an OBD-II port under your dash during this process. It is your window into the engine’s brain, allowing you to diagnose sensors or check live data without the guesswork of traditional mechanical troubleshooting. This diagnostic capability is what transforms a temperamental project into a reliable daily driver.
Fuel Delivery and Return Lines
In-tank pumps are the gold standard for a quiet, reliable build because the fuel acts as a natural coolant for the pump motor. External pumps are easier to install but often suffer from noise and heat soak issues. Use the Corvette-style fuel filter and regulator assembly to simplify your plumbing; it handles the pressure regulation and return line in one compact unit near the tank. LS fuel injectors require a consistent 58 psi of pressure to maintain the correct spray pattern and atomization for efficient combustion.
Wiring: Standalone vs. Modified Factory Harnesses
You have two paths for the electrical system. The DIY route involves thinning out a factory truck harness, which is a great way to learn every circuit but can easily consume forty hours of meticulous labor. If you value your time and want a cleaner engine bay, a standalone harness is a superior investment. These harnesses are brand new, labeled, and designed to connect with just a few simple wires. For a deeper look into the technical nuances of these circuits, explore our definitive guide to an ls engine swap. If the wiring feels like a mountain you can’t climb alone, consider our Restomod Consulting Services to get your project back on track.
Planning Your LS Swap: From Blueprint to Turnkey Reality
Precision is your best friend. Before you even think about dropping the engine into the frame, grab your tape measure and a notepad. This phase of your ls swap guide for classic cars journey is where a dream becomes a functional machine. You’ll need to address clearance issues that the shiny marketing brochures often overlook. Truck oil pans, for instance, typically hang far too low for a classic car chassis, risking a catastrophic failure on the first speed bump you encounter. Swap it for a low-profile F-body or aftermarket pan before the engine is bolted down.
Steering box interference and firewall clearance are the next hurdles. You might need to massage the firewall with a hammer or select specific engine mounts that allow for fore-and-aft adjustment. Don’t force the fit. If the engine sits too far forward, you’ll ruin the handling; too far back, and you’ll be cutting into your heater box. Your transmission choice also dictates the amount of floor pan surgery required. A 4L60E automatic usually fits with minor tweaks, but a beefy T56 six-speed manual often demands a completely new, larger transmission tunnel to clear its massive case.
Driveline geometry is the silent killer of many builds. You can’t just slap a driveshaft in and call it a day. Use a digital angle finder to ensure your engine and pinion angles are parallel, ideally within a three-degree range. Failure here leads to nasty vibrations that will shred your U-joints. Most swaps require a custom-length driveshaft to bridge the gap between modern output shafts and vintage rear ends. Once the mechanicals are set, follow a strict first-start checklist. Verify fuel pressure, prime the oiling system, and keep a laptop connected to monitor sensor data the moment the engine fires.
The Drivetrain Connection
Deciding whether to adapt your old transmission or swap in a modern unit is a fork in the road. While adapters exist, matching an LS with its intended electronic transmission is almost always the smarter play for reliability. You must integrate a Vehicle Speed Sensor (VSS) into the system. Without this signal, the PCM won’t know when to shift or how to manage idle air when you’re coming to a stop. For more technical details on these connections, consult our definitive guide to an ls engine swap to ensure your drivetrain functions as a single, cohesive unit.
Budgeting for the ‘Hidden’ Costs
Be honest about your finances. That $500 junkyard engine pull is a great start, but it’s rarely the final price tag. By the time you buy a harness, fuel system, headers, and an accessory drive, that budget can easily climb toward $5,000. If you are looking to scale your income to fund these high-ticket passions, you can learn more about MG Affiliate and their business growth resources. You’ll also need specific tools like an EFI-capable fuel pressure gauge and a high-quality OBD-II scanner. Don’t let project creep stall your progress. To stay on track, download The Ultimate Restomod Guide for a complete build roadmap that covers every dollar and every bolt of your transformation.
Ignite Your Modern Performance Journey
You now hold the conceptual blueprint to transform your vintage machine into a reliable powerhouse. By understanding the nuances of engine generations and mastering the three pillars of fuel, cooling, and electrical integration, you’ve moved past the intimidation that stops most builders. This ls swap guide for classic cars has shown you that a successful project is rooted in precision planning and a commitment to maintaining heritage aesthetics. It’s time to stop researching and start wrenching on a car that starts every time and handles with modern confidence.
Success in the garage requires more than just a set of wrenches; it demands a proven strategy. With expert guidance from Brook Walsh and our step-by-step project blueprints, you can avoid the expensive trial and error that plagues many DIY builds. We provide comprehensive gear recommendations to ensure every component works in harmony. Get The Ultimate Restomod Guide and start your build today. Your classic car deserves a second life on the open road, and you have the capability to make it happen. Grab your tools and begin the transformation.
Frequently Asked Questions
How much does a typical LS swap cost for a classic car?
Costs for a DIY swap typically land between $5,000 and $10,000 depending on your choice of donor and supporting parts. While a junkyard engine pull might only cost a few hundred dollars, you’ll invest significantly more in the high-pressure fuel system, standalone wiring harness, and cooling upgrades. Don’t forget the small items like sensors and fluids; they add up quickly. Planning your budget early prevents your project from sitting unfinished on jack stands for months.
Can I keep my original manual transmission with an LS engine?
You can certainly adapt your original manual transmission to an LS block using specific adapter plates and a conversion flywheel. It’s a popular choice for those who love the feel of a vintage Muncie or T10. However, you must ensure the input shaft reaches the pilot bearing correctly. Keep in mind that modern LS torque can easily overwhelm older gearboxes, so consider your power goals before committing to a vintage drivetrain.
Is an LS swap legal in states with strict emissions like California?
An LS swap is legal in California and other strict emissions states if you follow the specific guidelines set by the state’s Air Resources Board. You must use a complete emissions-legal crate engine system or transfer all emissions equipment from a newer donor vehicle. This includes the catalytic converters, charcoal canisters, and the correct PCM tune. Always consult a certified Referee before you start cutting wires to ensure compliance with local regulations.
What is the best LS engine for a budget-friendly swap?
The 5.3L Vortec truck engine, specifically the LM7 or L59 variants, is the best choice for a budget-friendly build. These engines are incredibly plentiful in salvage yards, making them easy to find for a reasonable price. They offer a great balance of power and reliability with an iron block that handles high mileage with ease. For anyone following an ls swap guide for classic cars on a tight budget, the 5.3L is the logical starting point.
Do I need to change my fuel tank for an LS swap?
You aren’t required to buy a brand-new fuel tank, but you must modify your existing one to support a high-pressure EFI pump. Most builders choose to install an in-tank pump module that provides the steady 58 psi required by the fuel injectors. This setup is quieter and runs cooler than external pumps. If your original tank is rusty or damaged, upgrading to a dedicated EFI-ready tank is a wise investment for long-term reliability.
Will an LS swap fit in my car without cutting the hood or firewall?
Most classic cars have plenty of room for an LS engine without requiring any modifications to the hood or firewall. The compact pushrod design makes it much narrower than modern overhead-cam engines. You might need to swap the tall truck intake for a lower-profile car manifold to gain hood clearance. Steering box and crossmember interference are more common hurdles, but these are easily solved with the right oil pan and engine mount combination.
How do I make my LS engine look like a vintage small block?
You can achieve a vintage look by using a single-plane aluminum intake manifold designed for a four-barrel throttle body. Relocate the coil packs to a hidden location, such as the firewall or under the dashboard, to clean up the valve covers. Paint the engine block in a classic color and add finned aluminum valve covers to complete the illusion. This approach allows you to enjoy modern reliability while keeping the engine bay’s traditional character intact.
What is the difference between drive-by-wire and drive-by-cable?
Drive-by-cable uses a traditional physical cable between your pedal and the throttle body, while drive-by-wire uses an electronic sensor and motor. Gen III engines often feature the cable setup, which many builders find simpler to install in older cars. Gen IV engines moved to electronic throttle control, which requires a specific pedal and wiring. Electronic throttle control offers smoother idle management and easier integration for modern cruise control systems in a restomod build.
What if the soul of your classic car isn’t found in its original, temperamental carburetor, but in the confidence that it will roar to life every single time you turn the key? You’ve likely spent hours staring at your engine bay, caught between the desire for modern power and the fear that a messy wiring harness or a budget swap will turn your dream into a permanent garage ornament. It’s a common hurdle for any builder who values both performance and heritage. If you need a more functional space to bring your vision to life, visit Builders Group And Design for professional garage construction and remodeling solutions. This ls swap guide for classic cars is designed to strip away the intimidation, providing you with a clear roadmap to integrate modern GM performance without sacrificing the vintage aesthetic you love.
You deserve a machine that offers modern horsepower alongside vintage style. We’ll master the complexities of the LS engine together, ensuring you avoid the hidden costs and project creep that plague so many builds. We will examine the essential components, from fuel systems to electronic fuel injection, to help you approach the wiring with precision while maintaining the character of your engine bay.
Key Takeaways
- Identify the technical differences between Gen III and Gen IV blocks to select the right foundation for your performance and weight requirements.
- Discover how to conceal modern components like coil packs to maintain the timeless aesthetic of your vintage engine bay.
- Master the critical transition from mechanical systems to modern EFI by following this ls swap guide for classic cars to ensure your project starts every time.
- Solve clearance challenges early by measuring for oil pan and steering box interference to prevent costly mid-project setbacks.
- Align your transmission selection with your engine’s power output to transform your classic into a precision-engineered machine built for the long haul.
Why the LS Platform Dominates the Classic Car Restomod Scene
The LS engine isn’t just a power plant; it’s a cultural shift in the automotive world. When we discuss an ls swap guide for classic cars, we’re talking about the bridge between the golden age of American steel and the precision of the digital era. At its core, an LS swap involves replacing an outdated, carbureted engine with a Gen III or Gen IV GM small block. This transition replaces temperamental cold starts and oil leaks with modern electronic fuel injection and bulletproof internals. You aren’t just changing an engine; you’re upgrading the very soul of your vehicle to handle the demands of modern traffic.
The small-block design remains the undisputed champion because of its incredible power-to-weight ratio. While modern overhead-cam engines are bulky and wide, the LS keeps its cam in the block, allowing for a narrow profile that fits between narrow frame rails. If you opt for an aluminum block variant, you can often shed fifty to eighty pounds off the front end compared to an old iron-headed 350. This improvement in weight distribution transforms how your classic handles into corners, making the car feel nimble rather than nose-heavy.
To better understand the fundamental steps of this process, watch this helpful video:
One of the greatest advantages for any builder is the massive ecosystem that has grown around this platform. You won’t have to fabricate every bracket or mount from scratch. Thousands of companies produce specific swap headers, oil pans, and wiring harnesses tailored to your specific make and model. This availability of knowledge and parts turns a daunting engineering task into a logical, step-by-step assembly. It makes your classic a true candidate for a daily driver, offering fuel economy and reliability that was unimaginable in the 1960s.
The Evolution of the Small Block
The journey from the original Gen I small block to the Gen III revolution was a leap in efficiency. Engineers kept the compact pushrod layout but introduced cross-bolted mains and vastly superior cylinder head flow. This cam-in-block design is the secret to why an LS fits so easily into tight engine bays where a Ford Coyote or a Hemi would require cutting the inner fenders. The LS architecture’s primary advantage in 2026 is its ability to deliver high-performance reliability through a compact design that fits where modern overhead-cam engines cannot.
Understanding the Restomod Philosophy
Restomodding is about more than just speed; it’s about balance. You want the car to look like a vintage masterpiece but drive like a modern sports sedan. By performing an LS swap, you significantly increase the vehicle’s usability and its eventual market value because buyers prioritize a car they can actually drive. To truly appreciate this blend of eras, start by understanding what is a restomod and how it prioritizes the driving experience over strict trailer-queen originality.
Selecting Your Engine: A Guide to LS Generations and Variants
Selecting the right heart for your build requires a balance of budget, power goals, and technical patience. It is the most critical decision in your ls swap guide for classic cars journey. You will primarily choose between Gen III and Gen IV architectures. The easiest way to tell them apart is by identifying the reluctor wheel. Gen III engines typically use a 24x wheel, while Gen IV moved to a 58x wheel. This choice is vital because it determines which engine control unit (ECU) you must use. Mixing these up without an expensive converter box will leave you with a project that refuses to fire.
While displacement ranges from the rev-happy 4.8L to the torque-heavy 6.2L LS3, you must also consider the block material. Iron blocks are the heavy hitters of the community. They are incredibly durable and cost-effective for those on a budget. Aluminum blocks, found in many cars and premium trucks, save roughly 80 pounds off the nose of the car. If you are building a corner-carving machine, that weight savings is worth the extra investment to improve your vehicle’s center of gravity.
One often overlooked hurdle is the 2017 cutoff. As we move further into the decade, many builders are tempted by the newest wreckage in the salvage yard. However, engines produced after 2017 often feature complex direct injection and sophisticated communication protocols that make them significantly harder to integrate into a vintage chassis. Stick to the classic Gen III or Gen IV LS architecture for a smoother path to a running, reliable machine.
The Truck Engine Secret (LQ4, LQ9, and 5.3L)
Don’t overlook the humble workhorse. The LQ4 and LQ9 6.0L truck engines, along with the ubiquitous 5.3L Vortec, are the backbone of the DIY community. These engines are plentiful in salvage yards across the country. Look for donor vehicles like the Silverado or Suburban from the early 2000s. While these iron blocks add weight, their strength is legendary. They provide a massive jump in performance over a tired original engine without breaking the bank.
Crate Engines vs. Junkyard Pulls
Deciding between a fresh crate engine and a junkyard pull comes down to your tolerance for risk and your desire for a warranty. A GM Connect and Cruise system offers a turnkey solution that is perfect for builders who want to avoid the troubleshooting phase. Conversely, a high-mileage pull can be a bargain, but it often requires a full teardown and refresh. If you’re feeling stuck on which path fits your specific build, our consulting services can help you navigate these mechanical crossroads and keep your project moving forward.
Modern Power vs. Vintage Style: The Aesthetic Challenge
Opening the hood of a 1969 Camaro only to find a sea of black plastic and tangled wires is a jarring experience for any enthusiast. The visual clash between a mid-century masterpiece and a modern engine bay is the primary reason many purists hesitate to modernize. This ls swap guide for classic cars prioritizes the belief that you don’t have to sacrifice your vehicle’s soul for the sake of performance. Integrating a modern power plant requires an artistic eye and a commitment to detail that goes beyond simple bolt-on parts.
The most offensive element in a modern engine bay is the factory plastic intake manifold. These components were designed for efficiency and mass production; not for beauty. To fix this, many builders opt for a vintage LS approach by using a single-plane, carb-style aluminum intake manifold. When paired with a traditional round air cleaner, the engine takes on the silhouette of a classic small block while hiding high-pressure fuel injectors underneath. Painting the engine block in a period-correct color, such as Chevy Orange or Ford Blue, further bridges the gap between eras.
Coil packs are another aesthetic hurdle. In their factory configuration, they sit prominently on top of the valve covers, creating a cluttered look that screams modern commuter car. You can solve this by using relocation kits to move the coils to the firewall or even inside the car under the dashboard. By using custom spark plug wires and finned aluminum valve covers, you can trick the casual observer into thinking they are looking at a high-performance vintage engine rather than a computer-controlled modern marvel.
Hiding the Rats Nest of Wires
Precision wiring is the hallmark of a professional build. Don’t settle for the messy, over-length harnesses that come with many budget kits. Route your wiring harness through the firewall in a discrete location, keeping the main trunk hidden behind the engine or under the fenders. Avoid the cheap look of plastic corrugated tubing at all costs. Instead, use high-quality braided loom or heat-shrink tubing to create a harness that looks like it belongs in a high-end restoration. A smoothed and painted intake manifold can also provide a clean canvas that makes your meticulous wire tucking truly stand out.
Accessory Drive Systems
Your choice of accessory drive determines both the look of your engine and whether your hood will actually close. Low-mount alternators and A/C compressors offer a sleek, tucked appearance, but they often interfere with classic steering boxes or frame rails. High-mount systems provide better clearance but can dominate the visual space of the engine bay. Integrating modern A/C compressors with your vintage interior kits requires specific brackets that maintain the proper belt alignment. If you are struggling to choose between different pulley setups, you can find detailed analysis in our accessory drive reviews to ensure your components work in harmony.
Solving the Three Pillars: Fuel, Cooling, and Electrical
Successfully mounting the engine is a major milestone, but the real magic happens when you integrate the supporting systems that bring the machine to life. This ls swap guide for classic cars focuses on the three pillars of a reliable build: fuel, cooling, and electrical. You’re moving from 1960s simplicity to 21st-century precision. It’s a leap that requires a methodical approach to ensure your classic doesn’t just look fast, but actually runs with modern consistency. Each system must be treated as a critical component of a larger, holistic network.
Your original mechanical pump provided roughly 6 psi to a carburetor. An LS engine demands a steady 58 psi to keep the fuel injectors happy. This jump in pressure necessitates a complete overhaul of your lines and tank. Don’t try to reuse old, crusty steel lines that might burst under the increased load. High-performance LS engines also generate significant heat, especially in the cramped engine bays of vintage coupes. Your original radiator was designed for a different era and a different thermal profile. Upgrade to a high-flow aluminum radiator with integrated electric fans controlled directly by the PCM to maintain optimal operating temperatures.
Electrical integration is where many projects stall. You’ll need to have your Powertrain Control Module (PCM) re-flashed to remove the Vehicle Anti-Theft System (VATS) and adjust for your specific gear ratio. Mount an OBD-II port under your dash during this process. It is your window into the engine’s brain, allowing you to diagnose sensors or check live data without the guesswork of traditional mechanical troubleshooting. This diagnostic capability is what transforms a temperamental project into a reliable daily driver.
Fuel Delivery and Return Lines
In-tank pumps are the gold standard for a quiet, reliable build because the fuel acts as a natural coolant for the pump motor. External pumps are easier to install but often suffer from noise and heat soak issues. Use the Corvette-style fuel filter and regulator assembly to simplify your plumbing; it handles the pressure regulation and return line in one compact unit near the tank. LS fuel injectors require a consistent 58 psi of pressure to maintain the correct spray pattern and atomization for efficient combustion.
Wiring: Standalone vs. Modified Factory Harnesses
You have two paths for the electrical system. The DIY route involves thinning out a factory truck harness, which is a great way to learn every circuit but can easily consume forty hours of meticulous labor. If you value your time and want a cleaner engine bay, a standalone harness is a superior investment. These harnesses are brand new, labeled, and designed to connect with just a few simple wires. For a deeper look into the technical nuances of these circuits, explore our definitive guide to an ls engine swap. If the wiring feels like a mountain you can’t climb alone, consider our Restomod Consulting Services to get your project back on track.
Planning Your LS Swap: From Blueprint to Turnkey Reality
Precision is your best friend. Before you even think about dropping the engine into the frame, grab your tape measure and a notepad. This phase of your ls swap guide for classic cars journey is where a dream becomes a functional machine. You’ll need to address clearance issues that the shiny marketing brochures often overlook. Truck oil pans, for instance, typically hang far too low for a classic car chassis, risking a catastrophic failure on the first speed bump you encounter. Swap it for a low-profile F-body or aftermarket pan before the engine is bolted down.
Steering box interference and firewall clearance are the next hurdles. You might need to massage the firewall with a hammer or select specific engine mounts that allow for fore-and-aft adjustment. Don’t force the fit. If the engine sits too far forward, you’ll ruin the handling; too far back, and you’ll be cutting into your heater box. Your transmission choice also dictates the amount of floor pan surgery required. A 4L60E automatic usually fits with minor tweaks, but a beefy T56 six-speed manual often demands a completely new, larger transmission tunnel to clear its massive case.
Driveline geometry is the silent killer of many builds. You can’t just slap a driveshaft in and call it a day. Use a digital angle finder to ensure your engine and pinion angles are parallel, ideally within a three-degree range. Failure here leads to nasty vibrations that will shred your U-joints. Most swaps require a custom-length driveshaft to bridge the gap between modern output shafts and vintage rear ends. Once the mechanicals are set, follow a strict first-start checklist. Verify fuel pressure, prime the oiling system, and keep a laptop connected to monitor sensor data the moment the engine fires.
The Drivetrain Connection
Deciding whether to adapt your old transmission or swap in a modern unit is a fork in the road. While adapters exist, matching an LS with its intended electronic transmission is almost always the smarter play for reliability. You must integrate a Vehicle Speed Sensor (VSS) into the system. Without this signal, the PCM won’t know when to shift or how to manage idle air when you’re coming to a stop. For more technical details on these connections, consult our definitive guide to an ls engine swap to ensure your drivetrain functions as a single, cohesive unit.
Budgeting for the ‘Hidden’ Costs
Be honest about your finances. That $500 junkyard engine pull is a great start, but it’s rarely the final price tag. By the time you buy a harness, fuel system, headers, and an accessory drive, that budget can easily climb toward $5,000. If you are looking to scale your income to fund these high-ticket passions, you can learn more about MG Affiliate and their business growth resources. You’ll also need specific tools like an EFI-capable fuel pressure gauge and a high-quality OBD-II scanner. Don’t let project creep stall your progress. To stay on track, download The Ultimate Restomod Guide for a complete build roadmap that covers every dollar and every bolt of your transformation.
Ignite Your Modern Performance Journey
You now hold the conceptual blueprint to transform your vintage machine into a reliable powerhouse. By understanding the nuances of engine generations and mastering the three pillars of fuel, cooling, and electrical integration, you’ve moved past the intimidation that stops most builders. This ls swap guide for classic cars has shown you that a successful project is rooted in precision planning and a commitment to maintaining heritage aesthetics. It’s time to stop researching and start wrenching on a car that starts every time and handles with modern confidence.
Success in the garage requires more than just a set of wrenches; it demands a proven strategy. With expert guidance from Brook Walsh and our step-by-step project blueprints, you can avoid the expensive trial and error that plagues many DIY builds. We provide comprehensive gear recommendations to ensure every component works in harmony. Get The Ultimate Restomod Guide and start your build today. Your classic car deserves a second life on the open road, and you have the capability to make it happen. Grab your tools and begin the transformation.
Frequently Asked Questions
How much does a typical LS swap cost for a classic car?
Costs for a DIY swap typically land between $5,000 and $10,000 depending on your choice of donor and supporting parts. While a junkyard engine pull might only cost a few hundred dollars, you’ll invest significantly more in the high-pressure fuel system, standalone wiring harness, and cooling upgrades. Don’t forget the small items like sensors and fluids; they add up quickly. Planning your budget early prevents your project from sitting unfinished on jack stands for months.
Can I keep my original manual transmission with an LS engine?
You can certainly adapt your original manual transmission to an LS block using specific adapter plates and a conversion flywheel. It’s a popular choice for those who love the feel of a vintage Muncie or T10. However, you must ensure the input shaft reaches the pilot bearing correctly. Keep in mind that modern LS torque can easily overwhelm older gearboxes, so consider your power goals before committing to a vintage drivetrain.
Is an LS swap legal in states with strict emissions like California?
An LS swap is legal in California and other strict emissions states if you follow the specific guidelines set by the state’s Air Resources Board. You must use a complete emissions-legal crate engine system or transfer all emissions equipment from a newer donor vehicle. This includes the catalytic converters, charcoal canisters, and the correct PCM tune. Always consult a certified Referee before you start cutting wires to ensure compliance with local regulations.
What is the best LS engine for a budget-friendly swap?
The 5.3L Vortec truck engine, specifically the LM7 or L59 variants, is the best choice for a budget-friendly build. These engines are incredibly plentiful in salvage yards, making them easy to find for a reasonable price. They offer a great balance of power and reliability with an iron block that handles high mileage with ease. For anyone following an ls swap guide for classic cars on a tight budget, the 5.3L is the logical starting point.
Do I need to change my fuel tank for an LS swap?
You aren’t required to buy a brand-new fuel tank, but you must modify your existing one to support a high-pressure EFI pump. Most builders choose to install an in-tank pump module that provides the steady 58 psi required by the fuel injectors. This setup is quieter and runs cooler than external pumps. If your original tank is rusty or damaged, upgrading to a dedicated EFI-ready tank is a wise investment for long-term reliability.
Will an LS swap fit in my car without cutting the hood or firewall?
Most classic cars have plenty of room for an LS engine without requiring any modifications to the hood or firewall. The compact pushrod design makes it much narrower than modern overhead-cam engines. You might need to swap the tall truck intake for a lower-profile car manifold to gain hood clearance. Steering box and crossmember interference are more common hurdles, but these are easily solved with the right oil pan and engine mount combination.
How do I make my LS engine look like a vintage small block?
You can achieve a vintage look by using a single-plane aluminum intake manifold designed for a four-barrel throttle body. Relocate the coil packs to a hidden location, such as the firewall or under the dashboard, to clean up the valve covers. Paint the engine block in a classic color and add finned aluminum valve covers to complete the illusion. This approach allows you to enjoy modern reliability while keeping the engine bay’s traditional character intact.
What is the difference between drive-by-wire and drive-by-cable?
Drive-by-cable uses a traditional physical cable between your pedal and the throttle body, while drive-by-wire uses an electronic sensor and motor. Gen III engines often feature the cable setup, which many builders find simpler to install in older cars. Gen IV engines moved to electronic throttle control, which requires a specific pedal and wiring. Electronic throttle control offers smoother idle management and easier integration for modern cruise control systems in a restomod build.