
The LS engine isn’t just a motor; it is the universal key to unlocking 21st-century reliability within a vintage chassis. Since the LS1 debuted in 1997, this platform has become the gold standard for builders who refuse to choose between classic soul and modern precision. You understand the appeal of an ls swap because it transforms a temperamental project into a machine that fires up instantly every time you turn the key. It is the bridge between the grit of your garage and the artistry of a world-class restomod build.
You probably agree that while your original engine has history, the constant carburetor adjustments and persistent oil leaks are holding your vision back. This guide will help you master the LS family tree and identify the exact components needed for a professional installation. We’ll provide a clear roadmap of the necessary hardware, explain how to conquer wiring harness anxiety, and show you how to avoid the common financial pitfalls that stall most projects. It’s time to stop being a passive admirer and start building the high-performance legacy your car deserves.
Key Takeaways
- Identify the specific Gen III and Gen IV architectures to choose the right heart for your build’s unique requirements and power goals.
- Master the “Big Four” systems of a successful ls swap to ensure your mounting, fueling, cooling, and electronics function with modern precision.
- Learn how to make 1960s needles talk to a 2026 computer, preserving your car’s vintage soul while completely upgrading its mechanical brain.
- Uncover the hidden costs of restoration and learn how to navigate junkyards and marketplaces to find the perfect donor motor at the right price.
- Gain the confidence to begin your project with a methodical roadmap that breaks down complex fabrication and wiring into achievable steps.
The LS Swap Phenomenon: Why It’s the Gold Standard for Restomods
In the garage, we call the ls swap the Great Equalizer. This process involves installing a General Motors Gen III or Gen IV small-block V8 into a vehicle it was never intended to power. Since the first LS1 arrived in the 1997 Corvette, this engine family has rewritten the rules of automotive performance. The LS Swap Phenomenon has grown from a niche hobby into a global industry because these engines offer a level of efficiency and power that 1960s iron simply cannot match.
To visualize the scale and impact of these builds, watch this breakdown of the fundamentals:
Reliability Meets Performance: The Restomod Philosophy
At its core, a restomod is about the marriage of vintage aesthetics and modern capability. You don’t have to sacrifice the classic silhouette of a 1969 Camaro just to have a car that starts on a freezing morning. Transitioning from temperamental carburetors to modern Electronic Fuel Injection (EFI) provides a turn-key experience that traditional restorations lack. There is a deep, earned pride in the “built, not bought” philosophy; it’s the satisfaction of knowing your hands bridged the gap between 1965 and 2026.
SBC vs. LS: Why the Old School is Making Way
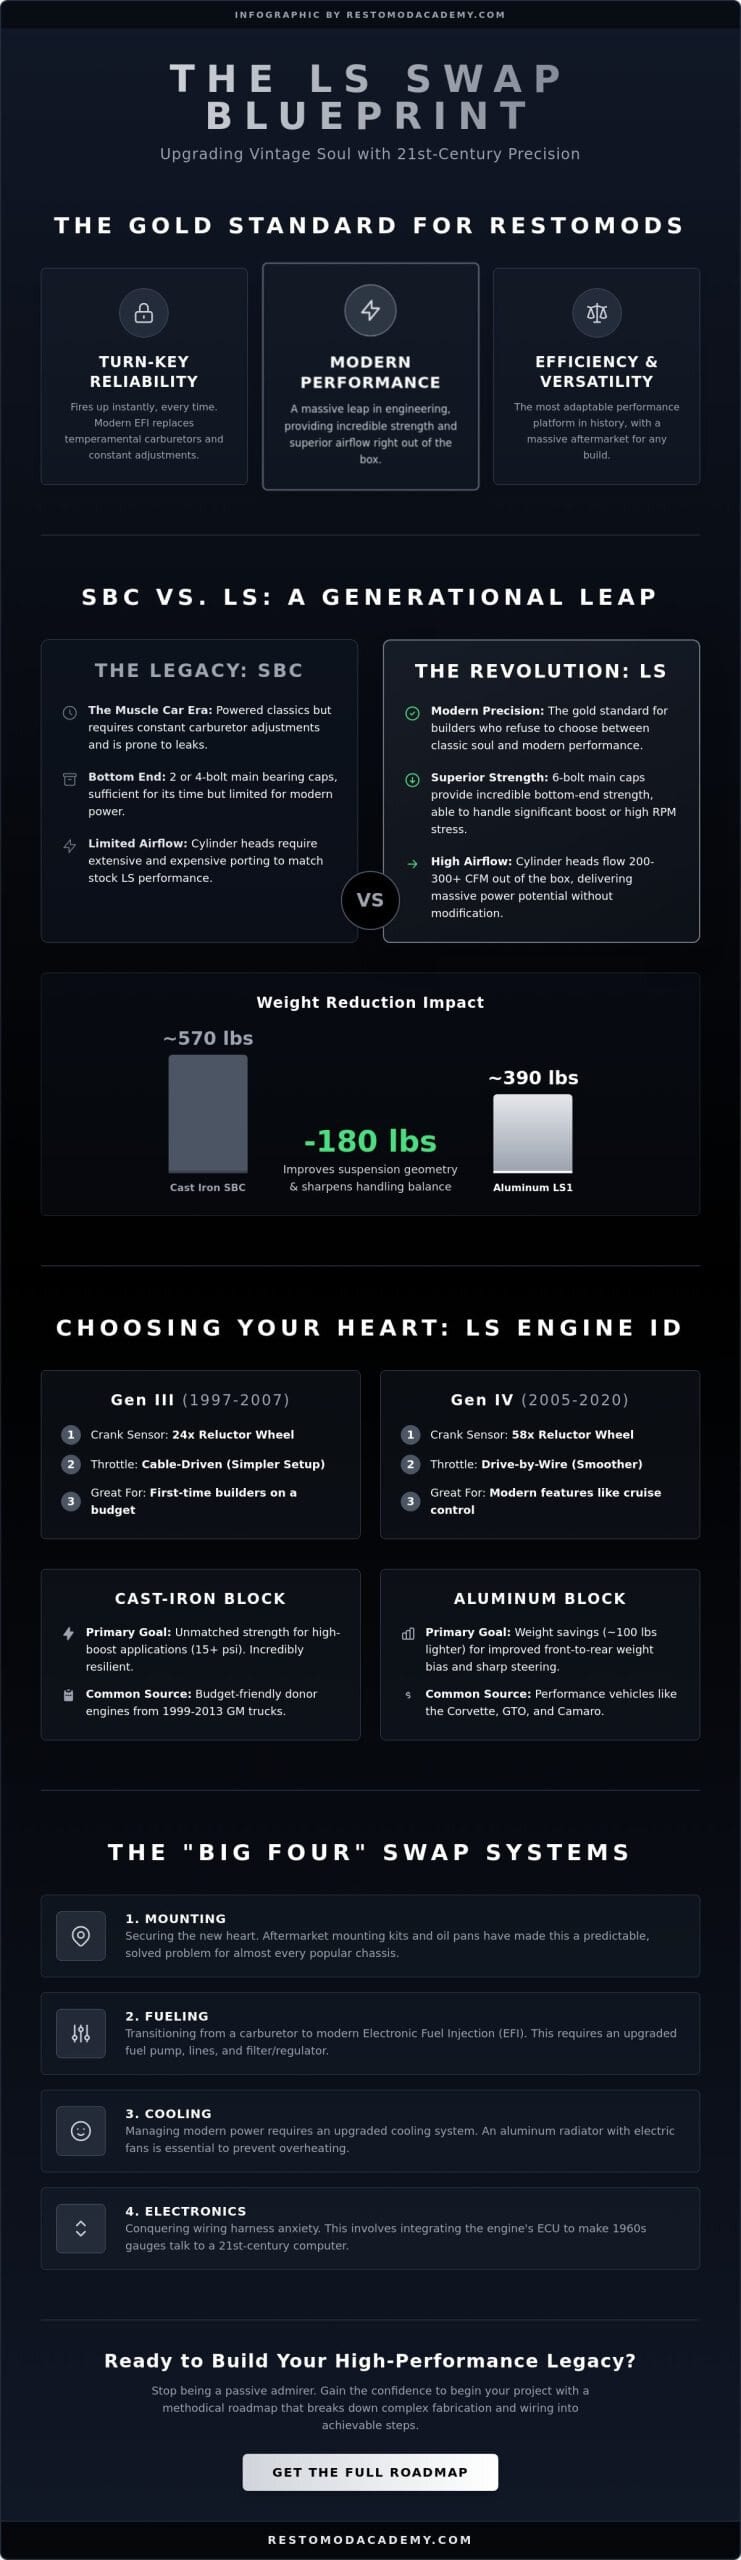
While the traditional Small Block Chevy (SBC) powered the muscle car era, the LS architecture represents a massive leap in engineering. The LS platform uses a 6-bolt main bearing cap design that provides incredible bottom-end strength, allowing even stock bottom-end engines to handle significant boost or high-RPM stress. Physically, an all-aluminum LS1 weighs about 390 pounds, which is roughly 180 pounds lighter than a cast-iron SBC. This weight reduction improves your car’s suspension geometry and handling balance immediately.
- Airflow: LS cylinder heads flow 200 to 300+ CFM right out of the box, whereas vintage heads often require extensive porting to reach those numbers.
- Standardization: Aftermarket companies have developed dedicated mounting kits and wiring harnesses for almost every popular platform, making the ls swap a predictable, solved problem.
- Versatility: The LS engine is the most versatile and adaptable performance platform in automotive history.
LS Engine Identification: Choosing the Right Heart for Your Build
Success begins with picking the right foundation. You can’t just grab any V8 from a scrapyard and expect it to fit your vision without a clear strategy. LS Engine Identification is the first hurdle every builder must clear. From the high-revving 4.8L variants to the 6.2L torque monsters, the displacement you choose dictates how your car feels on the street. If you’re building a cruiser, a 5.3L is plenty. If you’re chasing track times, look toward the 6.0L or 6.2L platforms.
Gen III vs. Gen IV: Understanding the Evolutionary Leap
Identify the generation of your engine by looking at the crank sensor and throttle body. Gen III engines, produced between 1997 and 2007, use a 24x reluctor wheel. Gen IV engines, which appeared in 2005 and ran through 2020, moved to a 58x wheel. This distinction is vital because your ECU must speak the same language as the crankshaft. Most first-time builders prefer Gen III motors because they often feature a simple cable-driven throttle; however, Gen IV engines utilize Drive-by-Wire (DBW) systems. While DBW requires a specific pedal assembly, it offers smoother throttle mapping and easier cruise control integration.
Iron Block vs. Aluminum: Weight, Strength, and Purpose
Choose your block material based on your performance goals and your restomod project plan. Aluminum blocks found in the Corvette or GTO save approximately 100 pounds off the nose of the car. This reduction improves your front-to-rear weight bias and sharpens steering response. On the other hand, cast-iron blocks from 1999-2013 trucks are incredibly resilient. If you plan to run more than 15 pounds of boost with a turbocharger, the iron block’s rigidity is a major advantage. Match your donor to your goal:
- Iron Block Donors: Look for 1999-2013 Silverado, Sierra, or Suburban models (LM7, LQ4, LQ9, LY6).
- Aluminum Block Donors: Source from 1997-2013 Corvette, Camaro, GTO, or Trailblazer SS (LS1, LS2, LS3, L92).
Be aware of Displacement on Demand (DOD) and Variable Valve Timing (VVT) found on many Gen IV engines. Roughly 80% of enthusiasts choose to delete these systems during an ls swap to simplify the build and ensure long-term reliability. Removing these components allows you to install a more aggressive camshaft, giving your classic that iconic muscle car idle. If you’re still weighing your options, take a look at our product reviews for the best delete kits and performance parts on the market today.
The Anatomy of the Swap: Critical Components and Systems
Successful builds aren’t just about dropping an engine into a hole. Success in an ls swap requires mastering the “Big Four” systems: Mounting, Fueling, Cooling, and Electronics. If one of these pillars is weak, your project will likely stall on its first test drive. Planning Your LS Project with these systems in mind prevents the hidden costs from ballooning your budget later on. Treat each system as a separate phase of the build to maintain your focus and precision.
Mounting and Clearance: Making it Fit Your Chassis
Most truck engines come with deep oil pans that will scrape on the first speed bump you encounter. You’ll need a “muscle car” style pan to keep the sump safely above the crossmember. Mounting your engine requires choosing between two distinct paths. Adapter plates allow you to use your original motor mounts, while dedicated swap crossmembers provide a more integrated fit and often offer better exhaust clearance. Check out our LS swap guide for classic cars for specific measurements on popular A-body and F-body frames. Don’t forget to check your steering box clearance; older Fords and Chevys often require specialized headers to clear the steering shaft or a full rack and pinion conversion.
Your vintage fuel tank was designed for 5 to 7 PSI. An LS requires a steady 58 PSI to function correctly. This means you’ll need an EFI-ready tank with an internal pump or an external high-pressure pump paired with a Corvette-style regulator. Cooling is another area where you can’t cut corners. A 50-year-old brass radiator was never meant to dissipate the heat of a modern high-compression engine. Invest in a dual-pass aluminum radiator and high-cfm electric fans to ensure your temperature stays stable during a summer cruise.
The Wiring Hurdle: Harnesses, ECUs, and Modern Control
Electronics often intimidate traditional builders, but a standalone harness simplifies the integration process significantly. These harnesses remove the complexity of the donor vehicle’s body control modules, leaving you with just a few essential wires to connect: power, ground, ignition, and fuel pump. Modern wiring is logical, not magical, when approached step-by-step. For tuning your ls swap, you have two primary choices. Using an OEM ECU with HP Tuners software is cost-effective but requires a steep learning curve. Aftermarket systems like the Holley Terminator X offer self-learning capabilities that can get your engine idling smoothly in minutes without a professional tuner.
- Mounting: Use adapter plates or dedicated crossmembers to set the engine’s setback.
- Fueling: Upgrade to a 58 PSI high-pressure system with a return line.
- Cooling: Swap the old brass radiator for a modern aluminum unit with electric fans.
- Electronics: Choose between a modified factory harness or a user-friendly aftermarket ECU.
The Restomod Integration: Beyond the Engine Bay
Completing your ls swap involves more than just bolting the block to the frame. To achieve a truly professional build, you must integrate that modern power with the rest of your vehicle’s systems. If you’ve ever driven a car with 400 horsepower but a vague, 60-year-old steering box and no overdrive, you know that power alone doesn’t make a great car. A successful restomod requires a holistic approach where every component, from the rear gears to the dashboard needles, works in harmony with the new heart under the hood.
Transmission Mating: Row Your Own or Modern Auto?
Upgrade your drivetrain to handle the increased torque and RPM range of the LS platform. While you can adapt an old Muncie 4-speed or TH350, you’ll likely regret missing out on an overdrive gear. The T56 6-speed manual remains the gold standard for those who want total control, while the 4L60E or heavy-duty 4L80E automatics provide effortless highway cruising. Remember that vintage transmissions use a mechanical cable for the speedometer, whereas modern GM units output an electronic Vehicle Speed Sensor (VSS) signal. You can solve this with an electronic-to-mechanical converter box or by upgrading to modern gauges that accept a digital signal.
- Overdrive Benefits: Dropping your cruising RPM from 3,500 to 2,100 at 70 mph significantly reduces engine wear and cabin noise.
- Driveshaft Geometry: Most swaps require a custom-length driveshaft and a specific slip yoke to match the modern transmission output shaft.
- Torque Conversion: Ensure your rear-end gearing matches your transmission’s overdrive ratio to stay within the engine’s power band.
Modern Comforts: Integrating AC and Digital Gauges
Preserving the vintage silhouette while enjoying modern amenities is the essence of the restomod movement. Integrating restomod interior ideas often starts with the dashboard. You don’t have to cut your original dash to monitor your engine; modern CAN-bus gauges can plug directly into your ECU to provide pinpoint accuracy for temperature, oil pressure, and RPM. This eliminates the need for bulky analog sensors and simplifies your wiring even further.
Don’t overlook your accessory drive. Factory truck brackets often sit too high for car hoods, and Corvette brackets can interfere with steering boxes. High-end accessory drive kits, such as the Holley Mid-Mount system, pull the alternator, power steering pump, and AC compressor tight against the block. This creates a clean, professional aesthetic that highlights your craftsmanship rather than a mess of hoses and belts. Finally, remember that an ls swap adds significant stress to your chassis. You must prioritize restomod suspension upgrades to ensure your car can actually put that new power to the pavement safely.
Ready to select the hardware that will bring your vision to life? Explore our recommended gear for the most reliable integration components in the industry.
Planning Your LS Project: Budgeting, Sourcing, and Next Steps
Your vision is clear and your technical roadmap is set. Now, you must transition from the role of a builder to that of a project manager. A successful ls swap often lives or dies in the planning phase, specifically during the sourcing and budgeting stages. You don’t want your car sitting on jack stands for three years because you overlooked a few hundred dollars in custom hoses or sensors. Approach this final stage with the same meticulous attention to detail you’ve applied to your fabrication and wiring.
Junkyard Gold vs. Crate Engine: Sourcing Your Power
Sourcing your engine requires a balance between your budget and your tolerance for risk. If you’re hunting through a local yard or Facebook Marketplace, you must perform a thorough inspection before handing over your cash. Bring a borescope to check cylinder walls and always perform a leak-down test; you’re looking for less than 10% variance between cylinders. Pull the oil pan if the seller allows it to check for metallic “glitter” that indicates bearing failure. While a used LM7 might save you money upfront, a brand-new crate engine offers a manufacturer’s warranty and the peace of mind that comes with zero miles on the clock.
- Inspection Checklist: Verify the crank rotates freely, check for milky residue under the oil cap, and ensure the block isn’t cracked near the motor mount bosses.
- Mandatory New Parts: Never reuse old knock sensors, water pumps, or crank sensors. These components are difficult to reach once the engine is in the car; replace them now to ensure long-term reliability.
- Sourcing Strategy: 2003-2007 Silverado and Sierra trucks remain the most abundant sources for affordable Gen III iron blocks.
The Realistic LS Swap Budget: Avoiding Hidden Costs
Don’t fall into the trap of believing you can finish a high-quality build for the price of the engine alone. Based on industry data from 2024 and 2025, most successful swaps fall into three distinct tiers. A “Budget” build utilizing a junkyard motor and DIY wiring often lands around $3,000. A “Mid-Range” project with an aftermarket harness and upgraded accessory drive typically reaches $7,000. “Pro-Level” builds featuring high-horsepower crate engines and T56 transmissions can easily exceed $15,000. Regardless of your tier, always set aside a 20% contingency fund for the “hidden” costs like custom fuel lines, fluids, and unexpected hardware store runs.
Before you turn the key for the first time, follow a strict “first fire” checklist. Prime the oil system by cranking the engine with the spark plugs removed until you see pressure on the gauge. Check every fuel fitting at 58 PSI for leaks and ensure your cooling system is fully burped of air pockets. This methodical approach protects your investment and ensures your first drive is a victory, not a disaster. If you’re ready to move from theory to reality, Download our Engine Swap Blueprints to start your project with a pro-level plan. Join our community of builders at the Academy to share your progress and get expert advice whenever you hit a mechanical hurdle.
Ignite Your Vision: The Path to Modern Power
The LS engine is the ultimate tool for preserving the soul of your classic while ensuring it remains a reliable, high-performance machine for decades to come. By identifying the right Gen III or Gen IV platform and meticulously planning your “Big Four” systems, you’ve already cleared the biggest hurdles. Remember that a successful ls swap is about more than just raw horsepower; it’s about the craftsmanship required to marry vintage aesthetics with 21st-century technology. Your car deserves a legacy that includes both the roar of a V8 and the precision of modern EFI.
You don’t have to navigate this complex journey alone. Get the step-by-step guidance you need from master builder Brook Walsh and join a community of 10,000+ restomod enthusiasts who are building their dreams right now. Our resources help you avoid $1,000s in common beginner mistakes that often stall ambitious projects. The Academy is here to ensure your build is a triumph of engineering and style.
Start Your Transformation: Get The Ultimate LS Swap Blueprint
Your project is waiting in the garage. Pick up your tools, trust the process, and let’s get that engine firing.
Frequently Asked Questions
What is the cheapest LS engine to swap?
The 4.8L and 5.3L (LM7) truck engines from 1999 to 2007 are consistently the most affordable options. These cast-iron blocks are abundant in salvage yards because GM produced millions of them for Silverados and Sierras. You can often find a complete pull-out engine with accessories for under $1,000. These “truck motors” provide a nearly indestructible foundation for a budget-friendly ls swap without sacrificing the performance of their aluminum counterparts.
Will an LS engine fit in my classic car without cutting the hood?
Yes, an LS engine will fit under most stock hoods if you select the correct intake manifold. While the factory truck intake manifold stands about 3 inches taller than car versions, swapping to an LS1, LS2, or LS6 low-profile intake solves most clearance issues. Your oil pan selection is also a priority. Using a “muscle car” pan ensures the engine sits low enough in the chassis to clear the hood line without modification.
Do I need a special transmission for an LS swap?
You don’t strictly need a modern transmission, but using one simplifies the entire build. You can adapt a vintage Muncie or TH350 using a specific crank spacer and flexplate. Mating your engine to a 4L60E or 4L80E electronic automatic provides better fuel economy and highway drivability. These modern units talk directly to your ECU, allowing you to tune shift points and line pressure with a laptop for a more refined driving experience.
Can I keep my original gauges with a modern LS engine?
You can absolutely keep your original gauges by using specialized adapter fittings or signal converters. Install a mechanical-to-electronic converter box to drive your original cable-driven speedometer. For oil pressure and water temperature, you can drill and tap the LS block or use brass adapters to fit your vintage 1/8-inch NPT analog sensors. This preserves your interior’s period-correct look while benefiting from the accuracy of a modern ls swap.
How much does a typical LS swap cost in 2026?
A typical conversion in 2026 ranges from $3,000 for a DIY budget build to over $15,000 for a pro-touring setup. Based on current market data, the average enthusiast spends approximately $7,500 to complete a reliable, street-ready conversion. This middle-tier budget covers a refreshed 5.3L engine, a standalone wiring harness, an EFI fuel system, and necessary cooling upgrades. Always include a 20% contingency fund to cover unexpected hardware or fabrication needs.
What is the difference between an LS and an LT engine?
The primary difference lies in the fuel delivery system and cylinder head design. LS engines use traditional port injection, while the newer LT engines (Gen V) utilize Direct Injection (DI). LT engines also feature a high-pressure mechanical fuel pump driven by the camshaft and a different bellhousing bolt pattern. While LTs offer better fuel atomization, the LS remains the preferred choice for most swappers due to its simplicity and massive aftermarket support.
Is an LS swap legal for street use in all states?
Legality depends entirely on your local emissions laws and the year of your vehicle. In states like California, a swap is legal only if the engine is from a vehicle of the same year or newer and retains all original emissions equipment. Many states exempt vehicles older than 25 years from testing. Verify your local regulations before beginning fabrication to ensure your restomod remains fully street-legal and registrable in your specific jurisdiction.
Which LS engine is the most reliable for a daily driver?
The iron-block 5.3L LM7 and the 6.0L LQ4 are the gold standards for daily driver reliability. These engines commonly reach 300,000 miles in their original truck applications with only basic maintenance. Their cast-iron construction handles heat cycles exceptionally well, making them ideal for long-distance cruising. Choose an engine with a documented service history and perform a preventative trunnion kit upgrade to ensure your valvetrain stays quiet and durable for years of trouble-free driving.