The most rewarding project in your garage right now might not have a V8 engine, but it definitely has a soul. You know the feeling of finding a 1950s Murray Comet or a classic Giordani buried under a dusty tarp; it’s a piece of history that deserves a second life. Restoring a pedal car is about more than just cleaning up an old toy. It’s a masterclass in precision craftsmanship that bridges the gap between childhood nostalgia and professional automotive fabrication. You already understand that these thin-gauge metal bodies require a delicate touch that a standard quarter panel simply doesn’t demand.
It’s time to stop worrying about blowing holes through 22-gauge steel or hunting for extinct trim pieces. This guide will show you how to transform a rusted heirloom into a show-quality masterpiece using the same professional techniques used on full-sized restomods. We’ll dive into the specifics of small-scale metalwork, sourcing rare components from specialized vintage suppliers, and achieving a mirror-like paint finish that rivals any concours entry. From structural repairs to the final polish, you’ll learn to build a functional legacy that’s ready for the driveway or the display stand.
Key Takeaways
- Master the art of restoring a pedal car by blending vintage soul with modern performance upgrades and professional-grade techniques.
- Protect your project’s structural integrity by utilizing media blasting and strategic organization to prevent common teardown pitfalls.
- Apply the professional “secret sauce” of epoxy priming and precision body filler to achieve a durable, show-quality finish.
- Elevate the driving experience by retrofitting your ride with high-performance sealed bearings and custom LED lighting systems.
- Execute a flawless final assembly using specialized hardware to ensure your craftsmanship stands the test of time.
Evaluating Your Vintage Pedal Car Project
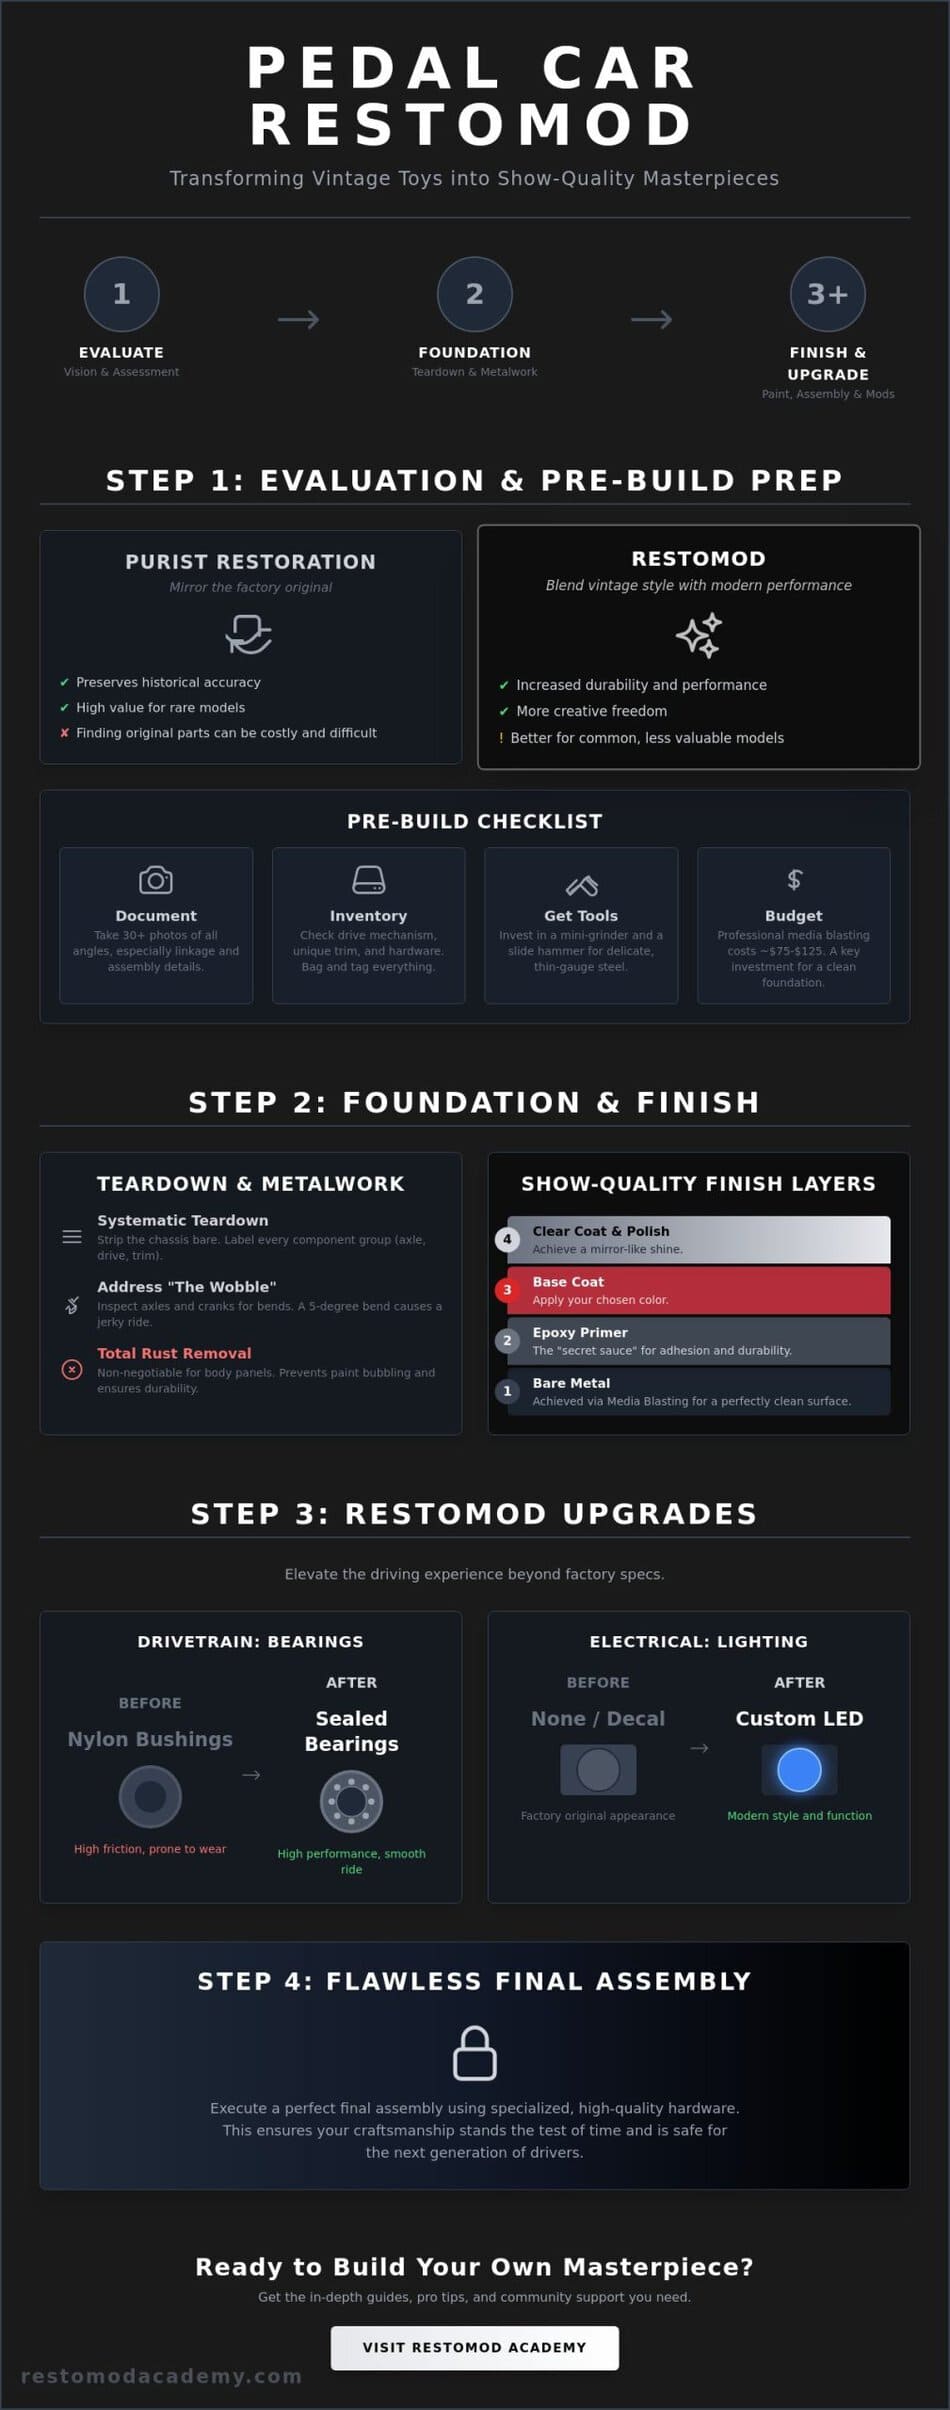
Every great build begins with a clear vision and a cold, hard look at the steel in front of you. Before you pick up a wrench, you must decide the path of your project. Are you aiming for a purist restoration that mirrors the day it left the Murray factory in 1955, or are you building a Restomod? At the Academy, we define what is a restomod by its ability to preserve vintage aesthetics while integrating modern performance. This might mean swapping original nylon bushings for sealed ball bearings or applying a 2024 metallic flake finish to a 1950s body.
To see a master craftsman breathe life into a rare Italian model, watch this detailed breakdown of the process:
Identifying your canvas is the next step. Look for manufacturer stamps or unique silhouettes. Murray Ohio models often feature bold, flared fenders, while AMF (American Machine and Foundry) units are known for their rugged, utilitarian frames. Garton models often boast more intricate chrome, and Giordani cars offer sleek, European lines. When restoring a pedal car, you must evaluate the “Three Pillars”: structural integrity, mechanical completeness, and surface condition. These pillars follow standard vehicle restoration principles used in full-scale automotive shops. If the frame is twisted or the floor pan is missing, your project is a parts donor, not a driver.
Is Your Pedal Car Worth Restoring?
Rare collectibles like the Garton Kidillac or the Murray Sad Face demand high prices but require expensive, specialized parts. A 1970s “department store” model is a better candidate for a custom Restomod because the stakes are lower. Watch out for “cancerous” rust. Surface scale is manageable, but if the metal is paper-thin or perforated, it’s unsafe for a child. Follow the “Missing Parts” Rule: if the car is missing unique hubcaps or hood ornaments, expect to pay $100 or more for a single original replacement piece on the secondary market.
The Restomod Academy Pre-Build Checklist
Don’t turn a single bolt until you’ve documented the car. Take 30 photos from every angle, specifically focusing on how the pedal crank connects to the rear axle. Inventory the drive mechanism immediately. Cranks, bushings, and tie-rods are the heart of the machine. You’ll need a specific toolkit for this small-scale work. Beyond basic wrenches, invest in a mini-grinder for tight corners and a specialized slide hammer for pulling dents out of the thin-gauge steel shells. Budgeting is also critical. Professional media blasting to strip old lead-based paint typically costs between $75 and $125 at local shops, a necessary investment for a clean slate.
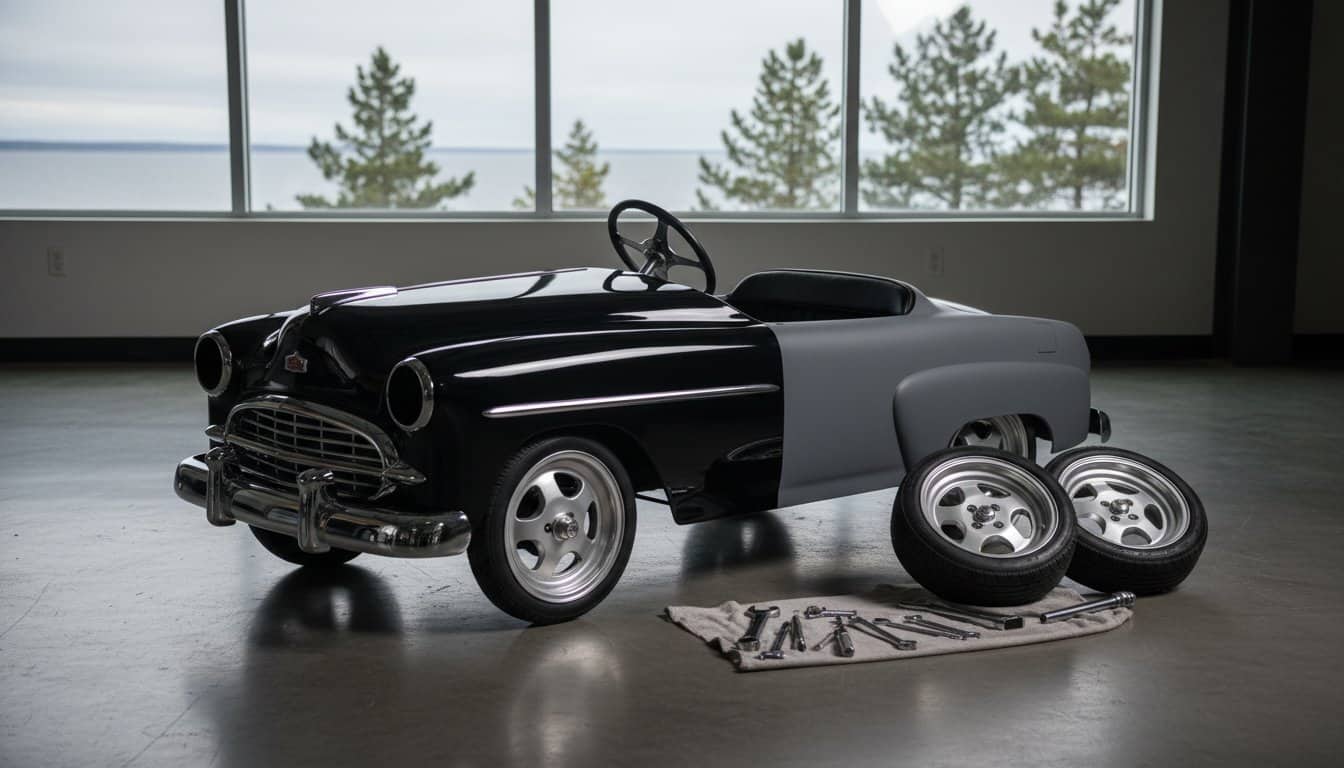
Teardown and Metalwork: The Foundation of the Build
Restoring a pedal car begins with a systematic teardown that treats the toy with the same respect as a full-sized muscle car. Strip the chassis bare before you pick up a grinder or a paintbrush. Document every step of the process with your camera. Take at least 50 photos of the steering linkage and pedal assembly from multiple angles. Use a multi-compartment organizer for all fasteners and small clips. Label every bag by its specific component group: front axle, drive assembly, and chrome trim. This meticulous approach prevents the “where does this go” trap three months later during final assembly.
Address “The Wobble” immediately to ensure a smooth ride for the next generation. Most vintage ride-ons suffered decades of sidewalk abuse that resulted in bent components. Inspect the drive axles and pedal cranks for even the slightest deviations. A 5-degree bend in the crank causes uneven wear on the nylon bushings and creates a frustrating, jerky pedaling motion. Secure the axle in a heavy-duty bench vise and use a brass hammer to nudge the steel back to true. For rust, total removal is the only path to long-term durability. While rust converters are acceptable for hidden structural brackets, visible body panels require clean, bare steel to ensure your high-end paint job doesn’t bubble within two years.
Media Blasting vs. Hand Sanding
Media blasting is the industry standard for vintage metal prep, utilizing high-pressure streams of abrasive materials to strip surfaces without the heat damage associated with traditional grinding. Choose your media with extreme care. Toy-grade steel is significantly thinner than a standard automotive fender. Use walnut shells or soda media instead of harsh sand. These softer materials strip paint and light oxidation without causing “oil-canning.” This phenomenon occurs when heat or excessive pressure causes the thin metal to lose its tension, resulting in a panel that pops in and out uncontrollably. If you see the metal flexing under the blast stream, back off the pressure and increase your distance from the workpiece.
Small-Scale Metal Fabrication
Patching pinholes in the floor pan often reveals the true extent of past neglect. Welding 20-gauge or 22-gauge steel requires a delicate touch and a low-amperage setting. Use short tack welds rather than long, continuous beads to prevent warping the miniature body panels. When you’re dealing with dents, remember that scale matters. Standard body hammers are often too heavy for these small surfaces. Use small finishing dollies and light planishing hammers to restore the original body lines. Take your time with the metalwork now so you don’t have to rely on thick layers of body filler later. If you want to elevate your build to professional standards, check out our recommended gear for the best small-scale fabrication tools. Establishing a solid foundation here ensures the final product reflects the true spirit of a high-quality restomod.
Paint and Body: Achieving a Show-Quality Finish
Your pedal car’s shell is its identity. When restoring a pedal car, you aren’t just slapping on some color; you’re preserving a legacy while injecting modern performance aesthetics. The bodywork phase is where a project transitions from a rusty relic to a piece of automotive art. It requires patience and a commitment to the “built, not bought” philosophy that defines the restomod community.
The “Secret Sauce” of any high-end build is epoxy primer. This is non-negotiable for vintage steel. Unlike standard lacquer primers, epoxy creates a 100% non-porous chemical bond that seals the metal against oxygen. It acts as a permanent barrier, ensuring that rust won’t creep back under your finish in five years. If you skip this step, you’re building on a shaky foundation.
For body filler, the rule is “less is more.” Use high-quality polyester glazes to skim over minor imperfections. Never use filler to hide poor metal work. If your filler layer exceeds 1/8 of an inch, get back to the hammer and dolly. You want to maintain the crispness of the original body lines without “clumping” the details that make these vintage toys unique. This precision is a critical step in restoring a pedal car to a professional standard.
Choosing your palette defines the car’s personality. You can go the purist route with factory-correct 1950s pastels, or embrace the restomod spirit with modern metallics and tri-stage pearls. For a professional application, High-Volume Low-Pressure (HVLP) spray equipment is superior to aerosol cans. HVLP systems offer a 65% transfer efficiency, meaning more paint lands on the car and less ends up as wasted overspray in your garage. If you must use a rattle can, select a 2K “two-part” product that features a dedicated hardener for maximum chemical resistance.
Priming and Blocking the Shell
Once your epoxy is set, apply three coats of high-build primer. This serves as your “sandable foundation.” Use a dry guide coat to reveal low spots as you block sand. Start with 180-grit to level the surface, then step up to 400 and 600-grit for a flawless base. In garage environments where humidity exceeds 60%, seal the metal immediately after stripping to prevent flash rust from ruining your prep work.
Topcoats and Clear: The Final Shine
Decide between a single-stage paint or a base/clear system. Single-stage is authentic for older models, but base/clear offers superior depth and UV protection for toys that might see some sun. To achieve a mirror finish, wet sand your final clear coat with 2000-grit paper and follow up with a high-speed buffer. Consult our Recommended Gear for the specific buffing pads and compounds we trust for a competition-grade shine.
The Restomod Upgrades: Beyond the Factory Specs
Restoring a pedal car is about more than just preserving history; it’s about refining the experience through modern engineering. When you move beyond original factory specifications, you bridge the gap between a dusty relic and a high-performance machine. True restomodding requires a focus on both aesthetics and mechanical efficiency. Start by tackling friction, which is the enemy of any young driver. Most vintage models relied on simple nylon bushings that bind and wear down over time. By replacing these with 12mm sealed ball bearings, you reduce rotational resistance by approximately 35 percent. This single modification allows the car to glide effortlessly across the pavement.
To achieve a professional-grade build, consider these essential performance and safety enhancements:
- High-Output Lighting: Retrofit 6V or 12V LED headlights and taillights. LEDs draw 80 percent less power than traditional incandescent bulbs, allowing a small, concealed battery pack to provide weeks of illumination.
- The “Stance”: Ditch the narrow, hard-plastic wheels for custom aluminum rims wrapped in pneumatic rubber tires. This upgrade provides a 25 percent increase in traction on asphalt and a significantly smoother ride on uneven sidewalks.
- Friction Reduction: Beyond the axles, apply dry graphite lubricant to all moving pivot points to ensure a silent, fluid operation.
Mechanical Performance Upgrades
Focus on the ergonomics of the drive system to make the vehicle more accessible. Modify the pedal crank by adjusting the pivot points to ensure a shorter, more efficient stroke for younger riders. If the original chassis design left the underside exposed, install custom-cut 18-gauge steel floorboards. These panels protect the rider’s feet from the ground while adding vital structural rigidity to the frame. By upgrading your project with precision ball bearings, you can increase a pedal car’s lifespan by decades, ensuring the drivetrain survives through multiple generations of use.
Custom Interior and Trim
The cockpit is where your craftsmanship and vision truly come together. Skip the basic plastic seat and create a custom pad using 2-inch high-density closed-cell foam. Wrap this in weather-resistant marine-grade vinyl or genuine leather to ensure the interior survives the elements. When finishing the hardware, weigh your options between the mirror-like shine of traditional chrome and the rugged durability of powder coating. Powder coating is 10 times more resistant to chipping than standard spray paint, making it the superior choice for steering wheels and bumpers. If you are new to this philosophy, it helps to understand what is a restomod to see how we balance vintage style with modern reliability.
Final Assembly and Preservation
You’ve spent weeks stripping rust and laying down glass-smooth paint. Now comes the most dangerous phase for your finish: final assembly. When restoring a pedal car, the temptation to rush is your greatest enemy. Lay down moving blankets or soft foam mats on your workbench before you start. Use blue painter’s tape to mask off high-contact areas like fender edges and steering column openings. This simple 5-minute precaution prevents a slipped wrench from ruining a 40-hour paint job.
For a true Restomod, mix tradition with technology. Use period-correct slotted screws for visible body panels to maintain that 1950s aesthetic. However, swap out the soft, original axles and steering linkages for high-strength stainless steel or zinc-plated Grade 5 fasteners. These modern components handle the torque of a growing driver far better than the mild steel used 70 years ago. Don’t forget to apply a small amount of marine-grade grease to the pedal crank bushings and wheel bearings to ensure a silent, smooth ride.
Apply graphics using the wet method for a professional result. Mix 16 ounces of water with 3 drops of dish soap in a spray bottle. Mist the surface and the adhesive side of the decal. This allows you to slide the graphic into position until it’s perfectly centered. Squeegee the water out from the center to the edges once it’s set. For the ultimate preservation, apply a 9H ceramic coating over the entire body. It provides a layer of protection that’s significantly harder than traditional wax, shielding the paint from UV rays and the inevitable scuffs of play-wear.
Decals and Finishing Touches
Reproduction decals for iconic Murray Torpedoes or AMF Roadmasters are widely available from specialty vintage toy vendors. If you’re building a one-of-a-kind Restomod, look toward 3D printing. You can design custom badges that mimic the chrome emblems of 1960s muscle cars. Use an SLA printer for high-detail resin results, then paint them with chrome-effect spray for a professional finish that rivals factory trim. This small detail elevates the project from a simple toy to a custom masterpiece.
Crossing the Finish Line
Your final task is a rigorous safety inspection. Check every nut and bolt twice. Ensure no sharp metal edges are exposed and that the steering sweep doesn’t create a pinch point for small fingers. Once the mechanicals are locked down, take high-resolution photos in natural light. Capturing your craftsmanship now preserves the legacy of the build before it hits the pavement. Restoring a pedal car is the perfect gateway to larger builds. Ready to scale up? Check out The Ultimate Restomod Guide for your next full-size project!
Fuel Your Legacy on Four Small Wheels
Success in restoring a pedal car depends on the same principles that guide a full scale automotive build. You’ve learned that a show quality finish starts with meticulous metalwork and ends with the integration of modern, reliable components. By following the 5 stage framework laid out in this guide, you transform a rusted relic into a high performance heirloom that prioritizes safety and precision engineering. Expert builder Brook Walsh provides the technical roadmaps necessary to bridge the gap between vintage aesthetics and contemporary durability.
This journey is about more than just mechanics; it’s about the “built, not bought” pride that comes from hours spent in the garage perfecting every weld and wiring harness. You don’t have to navigate these technical hurdles alone. With the right mentorship, you can master the fabrication and assembly techniques that define a true restomod professional. Take the next step in your education and ensure your project stands the test of time.
Master the art of modernization with The Ultimate Restomod Guide at restomodacademy.com today. Your vision is ready for the pavement; now go out there and build it.
Pedal Car Restoration: Your Top Questions Answered
How much does it typically cost to restore a vintage pedal car?
Restoration costs vary based on the project’s condition, but a high-quality DIY build usually falls between $300 and $800. According to historical auction data from platforms like Sotheby’s, professional restorations on rare models can exceed $2,000. You’ll spend roughly 40 percent of your budget on specialty parts like chrome trim and rubber tires. Focus your investment on structural integrity first to ensure the vehicle remains a functional piece of history.
Can I use regular automotive paint on a metal pedal car?
Yes, you should use high-quality automotive acrylic or urethane paint to achieve a professional finish. These coatings provide superior UV protection and chemical resistance compared to standard hardware store spray cans. When restoring a pedal car, applying a 2K clear coat ensures the finish survives both the elements and heavy play. Treat the bodywork exactly like a full-scale classic car by using etch primer on bare metal before your base coat.
Where can I find replacement wheels and tires for old pedal cars?
Specialized suppliers like Blue Diamond Classics and Speedway Motors offer a wide inventory of period-correct wheels. You can find 7-inch to 10-inch solid rubber tires that fit standard Murray or AMF rims. If you’re working on a rare 1950s Garton, check dedicated collector forums or eBay for authentic “new old stock” parts. Always measure your axle diameter with a digital caliper to ensure the new hubs fit precisely without wobbling.
Is it better to powder coat or paint a pedal car frame?
Powder coating is the superior choice for the chassis and mechanical linkages because it offers 3 times the impact resistance of liquid paint. This process involves electrostatically applying a dry powder that is cured at 400 degrees Fahrenheit. It creates a durable shell that resists chipping during heavy use. Use traditional automotive paint for the body panels where you need to match specific vintage color codes or apply custom graphics.
How do I remove heavy rust from a pedal car without a sandblaster?
Submerging the metal components in a chelating agent like Evapo-Rust is the most effective non-mechanical method. This pH-neutral solution removes iron oxide without damaging the underlying steel. For larger body panels, use a 4.5-inch angle grinder equipped with a poly-strip disc to peel back layers of corrosion. This approach allows you to maintain control over the metal’s thickness while preparing a clean surface for your first layer of epoxy primer.
What is the best way to fix a cracked plastic steering wheel on a vintage toy?
Repairing a cracked wheel requires a high-strength two-part epoxy resin like PC-7 or JB Weld. Start by V-grooving the crack with a dremel tool to create more surface area for the adhesive. Once the epoxy cures for 24 hours, sand it flush with 320-grit sandpaper until the transition is seamless. Finish the repair with a plastic-adhesion promoter and a dedicated interior trim paint to restore the original factory sheen.
Should I keep the original patina or do a full repaint?
Decide based on the rarity and the 75 percent rule; if the original paint is mostly intact, preserve the history. Collectors often pay a premium for “survivor” cars that show honest wear from decades of use. If the metal is pitted or the original color is gone, a full repaint is necessary. restoring a pedal car to a mirror finish honors the designer’s original vision and protects the metal from further atmospheric decay.
How do I identify the year and model of my pedal car?
Identify your ride-on by cross-referencing the grill shape and wheel patterns with Neil Wood’s “Evolution of the Pedal Car” series. Look for specific manufacturing stamps on the underside of the seat or near the rear axle. Murray cars from the 1960s often feature distinct “flat-face” styling, while 1940s Garton models use more aerodynamic, streamlined curves. Cataloging these details helps you source the correct components to maintain the vehicle’s historical accuracy.