Let’s face it, road noise is frustrating and not welcome in any vehicle, let alone a restomod (click here to learn more about what a restomod is). The noises emanating in your car are formally known as structure born vibration. These noises emanate at a frequency that is literally almost aimed at our ears. So, the key to eliminating this noise is via a process called damping.
What Is Sound Deadening Material?
Sound deadening material is most commonly known as a constrain damping material consisting of a very thin, odorless, and extremely sticky layer of butyl rubber bonded to an aluminum skin. However, there are actually three other types of sound-deadening materials though we’ve combined fiber and foam so it looks like two as follows:
- Woven foam and fiber. These products usually go under the carpet and floor mats
- Sprays. Sprays come in handy for hard to reach areas
Let’s get scientific
A damping materials effectiveness can be measured by acoustic loss factor which is the amount of vibration that’s been removed.
- A theoretical maximum loss factor is 1, in other words, at this point there is no vibration.
- Under normal conditions, an undampened 1mm thick piece of steel has a loss factor of about .001 at 200hhz
- Applying sound deadening material will improve that measure which actually means increasing the loss factor
- Some of the leading sound deadening products can vary in weight by as much as 40%
- Industry-leading sound-deadening materials only require a coverage area of 30% of a panel
- Scientific data confirms that by reducing the noise in a vehicle by 3 decibels one can effectively increase the sound of your car audio system by a factor of two.
Buyer beware
There are a lot of manufacturers making sound deadening material and their approach to this challenge varies. Primarily, I see brands that focus more on adding weight or mass loading. In other words, their materials are very thick and heavy. However, this doesn’t really work and just alters the frequency of the noise, not eliminating it. Moreover, it’s very inefficient so you need a lot of it.
My simple advice is this, the science you just briefly read about above is the best factual way to determine if sound deadening material works. And, treat sound deadening material just like any other upgrade on your restomod, put the best in it. Be wise about the cost, just like anything else, but be careful of outrageous claims from newer entrants to the market.
Why Is Sound Deadening Important?
The sound deadening material makes the interior of a car quieter, reduces rattles and road noise, and removes most vibration. For the sake of being thorough, let’s dig into a few more of the benefits of using sound deadening material. Specifically, we’ll focus on the quantitative and qualitative aspects of the product in a classic car restomod as follows:
Manage Noise and Climate Control
Generally speaking, vehicles are noisy and rattles and knocks are commonplace. Worse yet, vehicles are too warm in the summer and too cold in the winter, especially when the car is turned off. Moreover, since our focus is on classic car restomods, just think about the sound deadening options available 30-60 years ago.
One of the benefits of installing sound deadening material in your restomod is to have a quieter ride. Moreover, having better control of your climate, in addition to it being quiet, are important considerations. Who doesn’t like that?
Boost Your Restomods Stature
Have you ever road in a luxury vehicle like a BMW, Mercedes, Lexus, etc…? If so, you will quickly notice the difference in the passenger cabin ride and its because modern manufacturers use sound deadening. The better the manufacturer the better product they use.
However, even those luxury vehicles are using sound-deadening materials that are not the best in class products. Rather, they are buying in bulk whereas we are taking a more “boutique approach” to one vehicle. That said, if you want to boost your restomods status to model after even the most discriminating of cars, sound deadening material is likely for you.
Improved Restomod Car Audio Quality
Your car audios system will finally be able to “spread its wings” after removing the obstacles of vehicle noise and vibrations in the cabin. In addition, even common things like conversations, talking on your phone, and voice-based GPS navigation is greatly improved.
Sound Quality Science?
Without a doubt, sound deadening provides some obvious qualitative benefits. As we said earlier, scientific data confirms that by reducing the noise in a vehicle by 3 decibels will double the sound of your car audio system.
Who Are The Major Sound Deadening Players?
I have been using sound-deadening materials for thirty years. There are always new entrants into the market annually, and nearly just as many leaving the market. That said, the following is a list of the main players in the industry and a little bit about their products:
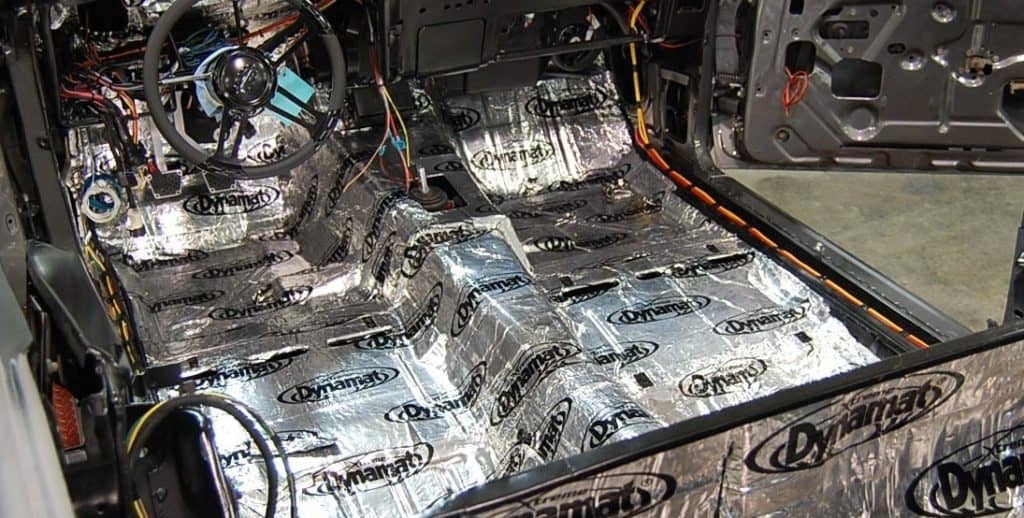
Dynamat
Dynamat is the industry leader and practically invented the product category. They are the premium product offering and known for their product quality. They have the following products specifically dedicated to automobiles:
Dynamat Xtreme
Dynamat Xtreme, click here to check the price, is a thin, super sticky butyl rubber bonded to an aluminum alloy skin. Dynamat Xtreme is very simple to cut and install. The butyl rubber and heavy aluminum will stretch and contour better than any other product on the market without tearing.
It will conform easily to all interior surfaces, and the sticky butyl rubber will adhere to a surface and stay in place without any special surface prep, and without leaving any odor or dripping material.
Dynamat Superlite
Dynamat SuperLite, click here to check the price, is a high-efficiency sound damping material used to stop noise and vibration in your automobile. It is the same sticky butyl rubber Constrain Layer Damper (CLD) as Dynamat Xtreme in a 30% thinner, and lighter form. Use Dynamat SuperLite when you need to quiet your car and get better sound, without adding too much weight.
It does not require any special equipment, so it is very simple to cut and install. It will conform easily to all interior surfaces, and the sticky butyl rubber will adhere and stay in place without any special surface prep
Dynaliner
Dynaliner, click here to check the price, is an effective automotive lightweight thermal insulator designed to use on top of Dynamat Xtreme. It is a soft, self-adhesive closed cell rubber with thousands of cells packed extremely close together, which gives the material near zero air infiltration occurrences.
DynaPad
DynaPad, click here to check the price, is a heavy, 3/8″ thick, one pound per square foot floor mat, with a four-layer composite barrier utilizing “Dissimilar Layer Insulating” technology that solves two of the most difficult automotive problems: exhaust system heat and low-frequency noise.
DynaPad has a heavy-duty vinyl barrier between two layers of acoustic “sound soaker” foam, covered by an oil and water resisting poly facing. It is used under the vehicle’s carpet as the ultimate carpet pad upgrade. DynaPad is easy to install as an under carpet pad. It has no adhesive, so it can be moved and reused.
Dynamat Hoodliner
The Dynamat Hoodliner product, click here to check the price, is made from 3/4″ acoustic sound soaker foam with a reinforced, reflective aluminized skin. The aluminized skin is cleanable, oil and water-resistant and provides 97% heat reflection. The Hoodliner has a high-tack pressure-sensitive adhesive for easy peel and stick application.
Common uses of The Hoodliner include truck and automotive hoods, engine compartments, generator housing and anywhere else that requires heat resistive acoustical foam.
DynaPlate
Dynaplate, click here to check the price, is a self-adhesive, solid aluminum sheet that can be used when space is an issue. This very thin, strong and lightweight sound deadener also does a great job bridging gaps and structurally reinforcing car body panels. Two layers of Dynaplate produce damping comparable to Dynamat Xtreme with less weight. It is an excellent product to help turn your door into a speaker enclosure.
Note: Dynaplate is a sound damping material specifically engineered for SPL competition rules and power classes of dB Drag racing, USACi, IASCA, and IdBL. Using a two-layer setup yields non-flexible panels that prevent the ballooning effect common in SPL vehicles.
Dynamat Accessories
- Dynamat Economy Roller. The Economy Roller, click here to check the price, is perfect for simple applications.
- Dynamat Professional Heavy Duty Roller. The Professional Rubber Roller, click here to check the price, is best for more complex applications.
- Switch-A-Blade. Switch-A-Blade is a pocket utility knife that combines the convenience and portability of a pocketknife with the functionality and usability of a utility knife.
Kilmat
Kilmat doesn’t have a lot of name brand recognition but what that lack in that area doesn’t mean they don’t make a formidable product because they do.
At a mere $1.65 per square foot, the Kilmat 80 mil butyl sheets are some of the best-selling sound deadening mats on the market. Using their product is easy; disassemble the interior, install the material, install the foam liner as a second layer, and then re-assemble everything.
Kilmat products have a reputation of being a little hard to install, similar to what people say about Dynamat. Regardless, the sheets are precut so they are small and easy to work with from that perspective. They have the following options for purchase:
- KILMAT 80. Mil 18 sqft car sound deadening mat, butyl automotive sound deadener, audio noise insulation and dampening. Thickness: 80 mil = 0.08 inches (2 mm), total coverage: 18 sqft (1.7 sq.m), number of sheets: 17, sheet size: 15.7 x 9.8 inches (400 x 250 mm).
- Kilmat 50. Mil 25 sqft car sound deadening mat, butyl automotive sound deadener, audio noise insulation and dampening. Thickness: 50 mil = 0.05 inches (1.3 mm), total coverage: 25 sqft (2.3 sq.m), number of sheets: 12 folded, sheet size: 20 x 15 inches (500 x 390 mm).
- Kilmat 50. Mil 25 sqft car sound deadening mat, butyl automotive sound deadener, audio noise insulation and dampening. Thickness: 50 mil = 0.05 inches (1.3 mm), total coverage: 50 sqft (4.7 sq.m), number of sheets: 47, sheet size: 15.7 x 9.8 inches (400 x 250 mm).
Noico
Yet another solid sound deadener, the Noico products are comprised of a combination of layered materials, including butyl and other improvers. They have an 80 mil nominal thickness, click here to check the price. However, a single square foot of the material weighs just 0.7 pounds. As such, these mats adequately reduce rattles, vibrations, and low-frequency noises from the engine and road.
This brand has quickly been gaining popularity but, in my opinion, not as much with classic car restomod owners. Rather, their popularity tends to be younger people or more budget-minded folks.
Noico Red Liner
This is a product built to compete with Dynamats Dynaliner products. The 150 mil sheets come in 18 square foot packs, click here to check the price. The closed-cell polyethylene form serves for heat and sound insulation, just like Dynamat.
Fatmat
The FatMat sound dampening sheets enable an exceptional reduction in roadway sound. In fact, most customers report experiencing fewer vibrations and distortions after covering key automobile elements with the mats.
Fatmat is actually an asphalt material. However, it doesn’t require additional adhesives (the roles are adhesive) and there is enough material to cover the entire surface of your restomod.
My research suggests (which is to say I have never worked with it), the product is difficult to work with. Fatmat has the following products, in addition to their sound deadening mat:
Fatmat sound deadening hood and floor liner
The hood liner product is a self-adhesive product and its been reported as a strong new entrant to the market. Maybe, their sound-deadening product hasn’t really caught up, well it hasn’t frankly.
Regardless, they also make a vinyl and foam liner as well. This product differentiates itself from a lot of the pack as it is self-adhesive. That said, I don’t hear, or read, about this product being used to heavily in restomods.
Overall Thoughts on The Major Players
Ok, I’ll admit it. This article is not a product review and I tried hard not to make it be one. Rather, I want to definitively explain what it is, why it was invented, who the players, how to get it, and how to install it.
But, I am 100% biased. Again, for thirty years I’ve been using Dynamat. I started using it when it first came out and basically it stopped our subwoofers from vibrating the mirrors of our cars. Yep, it really is that simple. In all seriousness, in my younger days, I competed in car audio sound quality competitions and that’s when I cut my teeth on this product. To me, this product is like a John Deer tractor to a farmer.
Where Can I Get Sound Deadening Material?
Sound deadening material can be purchased online and with the spread of the internet, I suspect that it is the primary place to get it for do-it-yourselfers. Car audio shops and even electronics stores like best buy sell it. Sound deadening materials have become so commonplace in the automotive industry that big-box retailers also carry it.
Sound Deadening Installation Options
Professional Installation
As one would expect, car audio shops and custom vehicle builders, restorers, and modifiers are the primary professional installation shops. That said, there are a plethora of so-called professionals installing sound-deadening materials.
The best advice I can give on the installation options is this; even the best product, installed incorrectly, will not perform very well. Said differently, the worst product installed correctly will perform admirably, relative to no sound deadening material at all. In plain English, make sure your installer knows that they are doing.
Do It Yourself Installation
Classic car restomod owners seem to have two different personality types. The first is they pay professionals to do the install for them. They may have more money than time. The other tends to do it themselves as they have more time than money. Regardless, if there are personalities, there are a lot of DIYers out there so I will focus a lot of information on this topic.
What areas will be sound-deadened?
Here are the following 6 areas I apply sound-deadening to:
- Doors. The doors need sound-deadening to reduce wind noise, vibrations, and mechanical rattles.
- Floor. The floor requires dampening to reduce road noise and heat.
- Trunk. This is an area that is debatable, however, seemingly 100% of all serious auto sound folks do it. Why? The answer most people will give is because the subwoofers are in the trunk. And, that is one reason, however, a lesser-known reason is to keep the hot sun out.
- Roof. The roof is where the heat comes in. And, there is also a lot of wind noise.
- Rear Deck. If you are a car audio audiophile and subscribe to the theory you don’t need a rear stage, this one is for you! You should definitely put sound-deadening material on the rear deck. It’s so darn small it hardly costs a thing AND there is a lot of rattling and noises taking place through that access area.
- Firewall. The firewall is an often overlooked area by many folks that don’t know too much about cars but know a lot about car audio. As a young man, working at the House of Car Stereo, most folks skipped this area. That’s a mistake.
Another area you may consider is the hood. Yep, I’ve read about and researched a lot of products for sound-deadening the hood but I have not done it. I just don’t see the reason as I am not outside the vehicle to hear it. Moreover, I ALWAYS sound-deaden the firewall which has always served me well. Leave some feedback on your experience in the review section if applicable. I’d be curious to hear about your experience with it, good or bad.
What products will you use?
Ok, now that you know what areas you’re going to address you can choose the products you’d like to install. I should be politically correct and speak generically but I am not going to. You come to this blog for practical experience from a fellow restomod enthusiast with real-world (read “in your shoes experience”) and I have honestly only installed Dynamat.
How much product do you need?
The amount of product you need is a bit tricky. Why? Well, some of the products can be used interchangeably. But, that’s not really even the main issue. And, here it is. DO IT RIGHT THE FIRST TIME.
I liken sound-deadening material to drywalling a house. You had better have the framing correct and all the wiring right (speaker wire, cat6 cable, etc…) when you put the drywall up. Because, once the drywall is on, taped, mudded, and painted you are not likely to rip it out and redo something.
Sure, it’s not impossible to take your entire interior back out of the car, and your custom sound system out of the trunk. But, if your a DIYer, at a minimum doing it wrong the first time cost you time. If you pay someone else to do it, then it cost you money.
What tools are required?
Besides all the different sound deadening material you need to have on hand, the following tools are required in almost every case:
- roller
- automotive body tape
- screwdriver set
- door panel clips
- pruning shears
- panel popper
- cleaning agent and cleaning rags
- weather-strip adhesive
- work gloves
- utility knife
Door installation
First things first:
- Remove the door panel and detach everything holding the panel in place
- Remove any unscrewed components that may be hiding some screws. You can use a flat screwdriver to pry them off. Be careful, a car door panel is designed to be removed with ease.
- Take pictures as you detach different parts to make it easier when putting everything back.
- Use appropriate screwdrivers to remove the screws. Attach the screws on a magnet to avoid misplacing some of them.

Moving on…
- Detach the door panel, remove all the screws, and detach the panels. Some panels may come off easily while others need to be pried off. Lift the panel upwards and try to remove it. However, some designs may have different ways of removing the panel, but it should come off easily after unscrewing.
- Some panels may have a seal beneath them that acts as a protective seal. If your door has a seal, take it off. In case there’s an airbag beneath, don’t interfere with it. Just remove the seal to create enough room for the sound deadener.
- Start installing the deadener on the door by cleaning the car door. Use an appropriate cleaning agent such as rubbing alcohol and a rag to clean the door. Cleaning the door surface will remove any dirt and oil and allow the deadener material to adhere firmly.
- Once the surface is clean and dry, wear work gloves and cut the material to size. Take measurements of the door surface to mount the deadener to know the amount of material you’ll cut. Use a sharp utility knife to cut the material.
- When applying the material, start with the innermost sections and around holes. While some materials come with a self-adhesive, others would require the use of glue.
- With self-adhesive materials, you’ll simply peel off a protective layer to reveal the adhesive side. Once you apply the material, roll a roller on the material while applying some pressure to make it stick firmly. This will also remove air bubbles beneath the material.
- Replace everything in place and then put back the seal and panel. Screw the panel back in place the way you removed it.
- Repeat these steps for all the doors
Floor installation
The floor is another major area where road and engine noise enters the car. Here’s how to insulate and soundproof the floor of your car:
- It’s quite easy to insulate the floor from noise and heat. This is because there’s nothing much to take apart on the floor. You’ll only need to remove the floor carpet. If the carpet is glued in place, it might take you more time to remove it. If it’s held in place with some clips, it’ll be easier to take it off.
- Upon removing the carpet, you’ll need to clean the floor thoroughly. The floor is generally dirty and it’ll need extensive cleaning and vacuuming.
- Next, you can start applying an appropriate noise deadener. Mats are best for damping the floor against noise and heat. Most mats come in regular shapes and you can cut them to fit around shapes. If the mat is self-adhesive, you’ll just remove the adhesive protector layer and apply the material. Again, remember to press the mat firmly on the floor using a roller. Cover the entire floor for the best results.
- Upon applying the mat, you can return the floor carpet back in place
Roof installation
Although you might not know it, the roof allows a lot of wind noise into your car. It’s also a major area where heat enters the car. By insulating it against heat and noise, your car interior will be more comfortable. Here’s how to insulate the roof:
- First, you need to prepare the roof for applying an insulator and sound deadener. Start with removing the cloth headliner on the roof. Be careful when removing the fabric since you’ll need to put it back in place after applying the insulator. The roof may not be dirty, but it will help cleaning it with rubbing alcohol.
- Next, apply the sound deadener or insulator. Preferably use a fiberglass mat. It will insulate the roof against heat while still soundproof it. Remember that the roof may require thicker mats than other car areas. Thus, get a thick material for your car roof to get the best results. While applying the mat or layer of deadener sheet, remember to press it in place firmly using a roller.
- Once done, put the cloth headliner back in place. You may have to glue it in place using an appropriate adhesive
Trunk installation
The trunk area also allows some noise into your car, especially when your trunk is large and flat. Simply follow these steps to soundproof the trunk:
- First, remove any items you may have in the trunk like spare parts and assorted items. Just ensure the trunk is empty.
- Remove any floor fabric or carpet in the trunk.
- Clean the trunk. The trunk is the main storage area in any car. Basically, this is where you carry all sorts of items in your car. Thus, it’s obvious that the trunk is one of the dirtiest areas of the car. You’ll need to clean it thoroughly using appropriate cleaning agents. Remove all the dirt and oil on the surface. This way, the sound-deadener will adhere firmly to the surface.
- Applying a sound deadening material. Preferably use mats or sheets for the trunk to cover large surfaces. You can also apply foam sprays for hard to reach areas where mats may not fit. Ensure to apply a thick layer of mat or foam to eliminate more noise in the trunk. Once done, apply the floor carpet or fabric back in place.
Rear deck
Most people install car speakers on the rear deck. This area is prone to vibrations and mechanical rattling especially when powerful car speakers are installed on it. Rattling and vibrations will affect your listening experience negatively. Thus, you need to soundproof this area for better sound in your car. Here’re the steps to follow:
- Remove the fabric covering the rear deck.
- Clean the surface deck with rubbing alcohol to remove any dirt.
- Cut a sheet of a deadening material into shape and apply it on the entire deck surface.
- Apply the fabric covering back and you’re done.
Firewall installation
The firewall area of a car is the section behind the dashboard. The firewall picks a lot of noise and vibrations from the engine, and this affects sound in your car. A lot of heat also finds its way into the car through the firewall. Thus, you’ll need a material that can act as a soundproofing material and a heat reflector. A fiber noise deadener material with a reflective layer on top would work best on the firewall. Here are the steps to follow:
Dismantling the dashboard
- First, you need to dismantle the dashboard to expose the firewall. This may prove to be a very challenging task. You’ll be working around electronic components, car gadgets and a lot of wiring.
- Before dismantling anything, remove the power cables from the battery. This will prevent electrical damage. Also, disable the airbags.
- Unfasten any screws on the glove compartment and pull it off the dashboard.
- Remove all the screws holding the dashboard in place. Once all the screws are removed, the dashboard will fall off easily.
- Next, remove the car stereo faceplate. Unfasten any brackets with a screwdriver.
- Unhook all wiring on the radio.
- Unhook all attachments and wires while taking pictures to help you in putting everything back.
- Once you’ve unhooked everything, the firewall will be exposed.
- Clean the firewall. Next, clean the firewall to remove any dirt and grime.
- Apply the deadener. Once the surface is clean, apply a sheet of deadener material on the firewall. Cover the entire firewall for the best results. While applying the material, cut out holes through which cables and attachments pass through.
- Assembling. Assemble all components back in place and ensure all the cables are plugged into their rightful components. Finally, attach the dashboard back in place.
DIY Key Takeaways
In conclusion, installing automotive sound deadening material in your car is something you can do on your own. With the right tools, materials and time, you’ll surely add the material successfully. By doing it yourself, you’ll save more money.
However, only use the best car sound-deadening materials to get great results. Although it’s not possible to make your car fully soundproof, you’ll reduce a lot of noise by installing automotive noise deadeners. This will create a great ambiance in your car and enjoy listening to music in your car without vibrations and external noise
Related Questions
Dynamat is hands down the best sound deadening material for cars and is most commonly known as a constrain damping material. Dynamat consists of a very thin, odorless, and extremely sticky layer of butyl rubber bonded to an aluminum skin.
Sound deadening material is absolutely worth it. The car is more enjoyable, music sounds better, and the temperature is more easily regulated.
As a guide, I would charge about $100 to fully soundproof each door when it’s done as part of a sound system install or $40 to do just the speaker area. The floor is a major job but most modern cars have minimal insulation on the floor so it’s worth the effort.
There are no shortcuts in removing sound deadening material. You simply pull it off by hand. You can then remove the residues by sticking the sound-deadening material back and forth. Once you have most of the residues off, use a solvent to dissolve rest.
