
Ok, the summer is over and winter is approaching. Your dream car needs to be winterized for a long brutal winter. How do you do it? Well, this complete guide to winterize your restomod will give you all the information you need to do it properly and protect your investment.
To avoid overwhelming you, I broke down the tips into three stages. Pre-storage preparation, during winter hibernation, and the last phase I call opening day – the first stay of restomod summer season (think baseball opening day).
Pre-Storage Preparation
I know, I know, this section of The Complete Guide to Winterize Your Restomod is the worst, as it means summer/fall is coming to an end.
- Select the location. In an ideal world, you will find a dry and dark location. also, determine if you’ll need power in the storage facility (see battery considerations in the next section)
Another consideration is if you’re using heated storage or not. I highly recommend heated storage for a whole host of reasons. The primary one is it usually doesn’t cost that much more.
If you have heated storage, then make sure your floor has drainage. With the ability to wash your car inside, you can take it out during the winter and wash off the corrosive salt elements immediately upon your return. (I don’t take my car out in the winter but that’s just a personal preference. The ability to do it is a worthwhile consideration though) - Building your own storage unit. Ok, you’ve invested a ton of money into your restomod and you may, in fact, have more than one. Or, you may eventually have more than one – you just don’t know it yet. <grin>
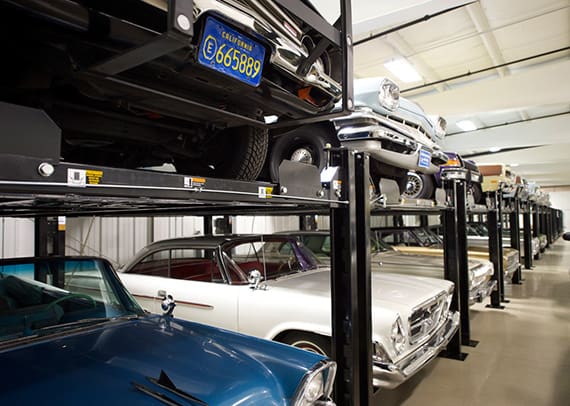
Speaking from experience, the building height is an important consideration. If you plan to stack classic cars on top of one another using a lift or platform, or would also like to store a boat, opt to build a post-frame building.
Post-frame construction is stronger and allows for taller buildings than stick-built construction because it uses laminated columns for the truss supports in comparison to a single stick of lumber. It will allow for greater height than a stick-built building. For anything beyond a traditional garage size, it would be a lower cost given the number and strength of trusses engineered into your building. - Flooring. The concrete floor is the best in terms of keeping moisture away from the vehicle. However, if you only have a dirt floor then a plastic carrier can be placed underneath it. In addition, you can use a piece of carpet or wood under the tire.
- Clean the vehicle properly. Storing your car for up to six months is a very long time. moisture and salt are both major concerns so cleaning, drying, and waxing are important. Besides, as a proud restomod owner should, you should enjoy giving your car a proper offseason sendoff.
- Putting on and removing a vehicle cover will lead to unwanted scratches if the car is dirty.
- Fill the fuel tank. Use premium gas to fill the car up for the winter. The reason we put gas in the tank is to avoid air from getting into it. Obviously, the more gas the less air contains moisture. and, moisture in the air can contaminate the fuel. Fuel contamination could lead to the ultimate restomod enemy, rust. Moreover, moisture can also lead to a plugged air filter.
- Add Fuel stabilizer. Adding a fuel stabilizer will help ensure the water doesn’t separate from the gas. Keep in mind, that you’ll need to run the vehicle to get the fuel stabilizer into the carburetor, fuel rails, injectors, and so forth. I recommend running the car for 15 minutes (which is a theme I’ll carry on throughout the article).
- Change the oil and filter. This is important as we try to keep contaminants out of the engine during storage. The added benefit is you get a jump start on spring as well.
- Check the antifreeze. This is important when using cold storage, which is not recommended. However, this becomes even more important when the heater in a “heated” storage facility goes out.
- Add air to the tires. Keeping your tires at the recommended pressure is obvious when you’re driving it daily. However, it’s also important when parking your car for an extended period. It’s all too easy to develop flat spots over the months as the rubber sits continually compressed. A few extra pounds of pressure will help a bit – and make sure you’re taking pressure readings when cold.
- Insurance considerations. Insurance companies typically need to know where you’re storing the car, especially if you’re storing it offsite. Obviously, you’ll need to check with your insurance company to figure this one out.
During Winter Hibernation
This section of The Complete Guide to Winterize Your Restomod is the absolute worst. It signifies goodbye to your best friend (the restomod) – for a short while anyway!
- Keep the critters out. Cover the air clean/intake and exhaust pipes with aluminum foil. An alternative is to put a plastic bag over them as well.
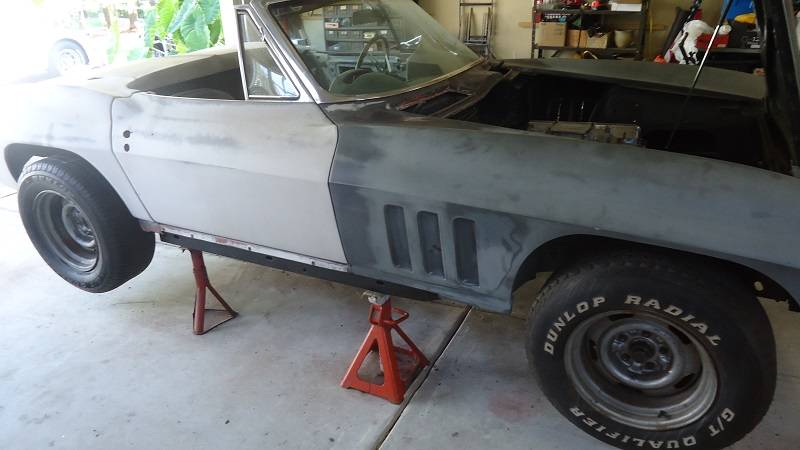
Mothballs can be placed outside the car and in the tailpipe. - Leverage jack stands. Flat tire spots are a real problem so jack stands will completely remove this challenge. In addition, the suspension is aided as well by not supporting the vehicle’s weight. Not sure if this makes a huge difference but it certainly can’t hurt. This isn’t necessary for vehicles with air-adaptive suspensions.
As we mentioned earlier, if you’re not using jack stands, park your vehicle on a thick piece of plastic. Use plastic or foam insulation as a moisture barrier. You do not want moisture from the floor to destroy your car’s underbody, exhaust, or brake components. - Battery considerations. You have a couple of options here, either unhook the battery completely. In this case, be sure to remove the negative cable first and store it separately, not on a concrete floor where it will freeze. In addition, I recommend placing dielectric grease on the terminals to prevent corrosion.
On the other hand, you can leave the battery in the car and use a battery tender. The advantage of this approach (battery tender) is that you can start the car a few times in the winter which I recommend (see next tip). Starting the vehicle with a battery tender, as opposed to having to haul the battery in and out of the vehicle, will prove to be a good decision.
Keep the window shut. Enough said. - Cover the car. Back in the day, people used to place a sheet over their vehicle. Now, given your financial and emotional investment in the restomod, just buy a proper cover. The general idea is to avoid dust and bird/rodent droppings. The main advantage of a proper cover is it breathes far better than a tarp, which can trap moisture.
- Run the car in the winter. Running the car in the winter is worthy of debate. Let me say this, I highly recommend it however, you need to run the engine for about 15 minutes.
The goal is to get the engine up to operating temperature which will burn off water vapor that can develop in cold storage scenarios. In this scenario, you need to ensure the water is removed from the exhaust system and the combustion changer, and running it for 15 minutes should do that.
CAUTION: Keep in mind the exhaust needs to be managed. You want to avoid filling your storage building with exhaust fumes and carbon monoxide. - Keep your car’s moving parts lubricated. Another advantage of running your car monthly is that doing so keeps the pumps and other moving parts lubricated.
- Check your tire pressure. Since you’re running the car anyway, you might as well check the tire pressure real quick – especially if you’re not using jack stands.
Opening Day – Let The Games Begin
This section of The Complete Guide to Winterize Your Restomod is by far and away the most enjoyable!
- Uncover the car. This is always an exciting experience on opening day. Even though you probably started it 4-6 times throughout the winter, this time you’re not putting the cover back on it!
Be sure to take your time and check for insects and vermin damage. In addition, your car cover may have become dusty over the long winter months. So, give it a good cleaning according to the manufacturer’s instructions.
Remove the baking soda units. If you forget them, they may spill during driving. In addition, remove the plastic bags (aluminum foil) from over air cleaner/air inlet and exhaust pipe(s). It’s a good idea to check for floor leaks, check all fluid levels, and check the tire pressures. - Charge the battery. If you didn’t leverage a battery tender, be sure to give your battery a full charge before placing it in the vehicle. Depending on your battery, and charger, this process should take 12-24 hours.
Be sure to attach the positive cable to the battery first. - Brakes are important. It goes without saying, but be sure to press on the brake to ensure they work and you have a good pedal. Steel brake lines can rust out and leak, and vermin can chew through the rubber brake hoses.
- Batter up! Start the vehicle and check for any fluid leaks. Give it some extra time to warm up, and check the lights, horn, etc, while the temperature begins to rise.
Drive it slowly for a mile or so. Some components such as transmissions and rear-ends require movement for full/proper lubrication.
After driving a bit, check it again for leaks, etc.

The Complete Guide to Winterize Your Restomod is a comprehensive guide to help protect your restomod. This guide has been built with the real-world (read “in your shoes”) experience to make it practical but purposeful.
Admittedly, like with all things, I understand that budget always plays a role when making a decision concerning your restomod. This guide doesn’t mean to disregard that however, I am a firm believer of a few things as follows:
- Do it right the first time. If you’re going to do something, do it right. Going halfway just isn’t the approach I recommend.
- A restomod is more than an expense. Despite what your significant other may think, a restomod is a significant investment and likely cost an awful lot to build. However, it’s not just an expense. If properly cared for this restomod may increase in value.
Bookmark this page and refer to it a few times a year.
Related Questions:
This section of The Complete Guide to Winterize Your Restomod is to answer any related questions we may not have answered!
No, I just don’t recommend it. A garage is the best place to store your car, particularly wooden or brick ones. … Cars left outside, however, are virtually impossible to protect from the elements. Temperature and humidity changes can cause condensation, while wind can cause rubbing – so make sure you wrap your car tightly in outdoor covers.
A brand new, charged car battery should keep a high level of charge for two weeks. The battery will become fully discharged during the interval from two to three months.
No. A proper cover is what should be used as it allows the car to breathe which ensures it doesn’t trap moisture. Many people use a tarp and cover interchangeably so if you’re referring to a tarp but meant cover then obviously that’s ok. But, there is a difference you should be aware of.