
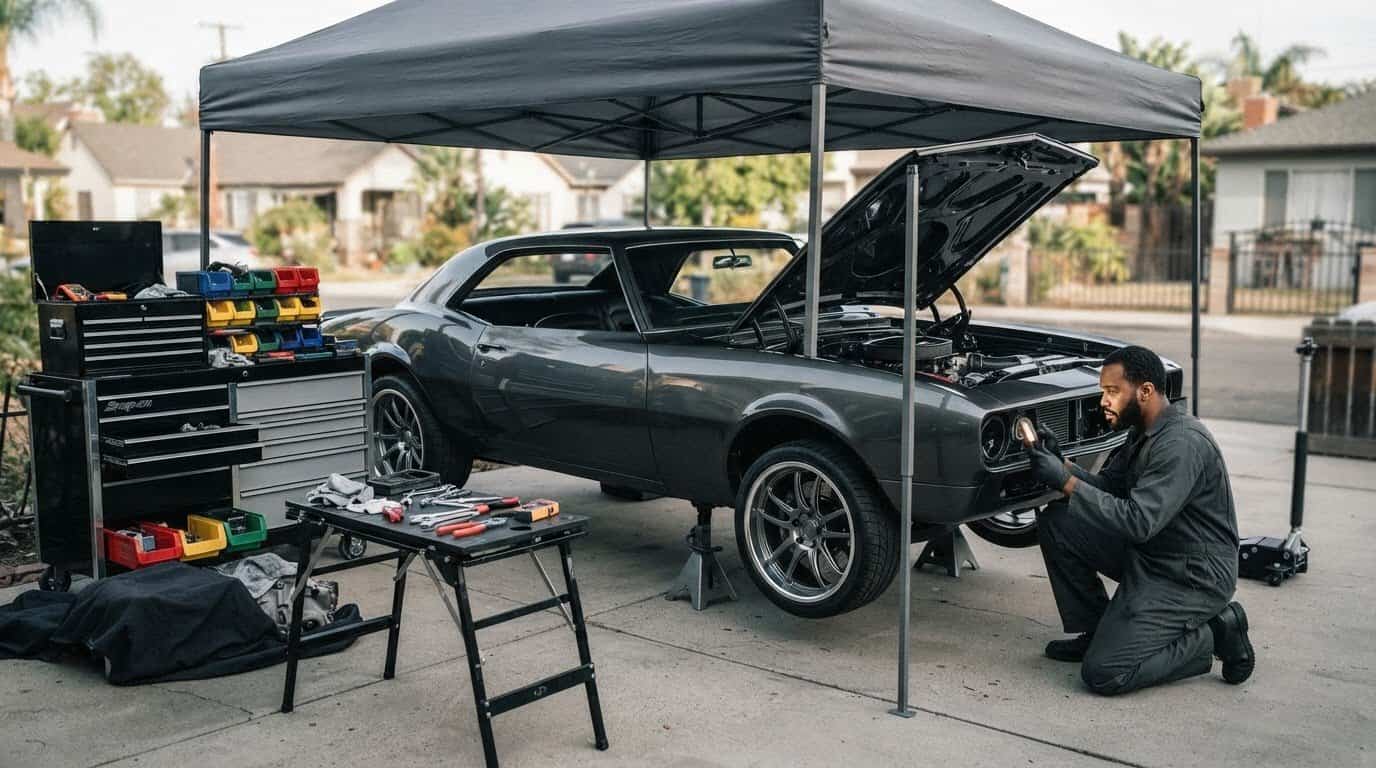
A permanent garage isn’t the price of admission to a capable restomod. Building a restomod without a garage is possible when you match each task to a suitable workspace and plan around weather, storage, and safe project logistics. You may not have room to keep the car and every component under one roof, but you can still make steady progress by planning where each stage will happen.
It’s fair to worry that a driveway won’t protect delicate parts, or that major mechanical work demands a permanent workshop. The answer isn’t to force every job into one space. Decide what you can do at home, what needs a rented or shared DIY bay, and how you’ll protect the car and parts between work sessions.
This guide will help you map a realistic workspace, protect your project from weather and clutter, and sequence tasks so limited space doesn’t stall progress. You’ll compare arrangements for different jobs, organize tools and components, and prepare for unfamiliar work before committing time or space. With a sound plan, you can bring classic character and modern reliability together, one deliberate stage at a time.
Key Takeaways
- A garage helps, but building a restomod without a garage is workable when you divide the project among suitable spaces.
- Map where the car will sit, where clean parts will stay, and where you can handle small jobs before choosing your project scope.
- Compare driveways, covered parking, shared workshops, and task-specific spaces by protection, access, storage, and fit with daily routines.
- Before each task, identify its workspace, tools, parts, and protection needs so you can stage work with fewer interruptions.
- Start with the fundamentals, review progress as you go, and plan upgrades around a sequence you can realistically complete.
Can You Build a Restomod Without a Garage? Start With the Real Constraints
Yes. A garage is helpful, but it isn’t essential if you divide the work among suitable spaces and plan each stage before it begins. Building a restomod without a garage means working without a dedicated, enclosed space for the entire build, not doing every task outdoors. Inspection, research, and some small-component work may fit at home. Other jobs need more shelter, equipment, or secure storage.
Start by defining your actual constraints. Is the car parked in a driveway exposed to rain and sun? Do you have covered space, a small workbench, or somewhere to keep removed parts clean and organized? Those details shape the project’s sequence, scope, and pace. A restomod blends classic character with modern performance and reliability. If you’re still refining that goal, this guide to what defines a restomod can help you set direction before taking anything apart.
Which parts of a restomod need dedicated workspace?
Separate tasks by what they require. Inspection, photographing components, researching fitment, and planning an electrical layout can often happen away from the vehicle. Small parts can be cleaned or measured on a stable work surface, provided you can keep them protected and identified. These jobs reward careful preparation more than a full workshop.
Disassembly changes the equation. Brackets, fasteners, trim, and larger components quickly take up space. Unlabeled or exposed parts are easier to misplace or damage. Bodywork, paint, and major mechanical work also require planning for shelter, equipment, clear working room, and protection from dust or weather. Don’t begin a task simply because the car is accessible. First decide where each removed component will go and how long it may need to stay there.
What can make a garage-free build workable?
Assess the basics before choosing a project scope: secure vehicle parking, a level work area, weather exposure, and convenient access to tools and parts. Consider whether the car can remain undisturbed between sessions and whether you can pause a task safely if conditions change. A driveway may suit inspection or limited work, while a shared workshop or task-specific space may be more practical for jobs that need equipment or steadier protection.
Think beyond the car. Can you store removed components without blocking household access or disrupting daily routines? Can you keep small parts organized and protected from moisture, dirt, and accidental knocks? If not, adjust the sequence: complete planning first, arrange suitable storage, then start work that creates loose parts. Workspace needs change as the build moves through its phases, so reassess before each major step instead of expecting one setup to serve the whole project.
Plan Garage-Free Restomod Work Around Space, Weather, and Storage
Turn your available space into a simple project map before the first part comes off. Mark where the car will be parked, where clean components can be stored, and where a small work surface can hold tools, fasteners, and paperwork. These areas don’t need to be together, but you should know how parts will move between them without getting wet, dirty, damaged, or mixed up.
For anyone building a restomod without a garage, weather is part of the schedule. Check the forecast before beginning an outdoor task, and choose work that can be paused safely if conditions change. Avoid starting a job that leaves wiring, open assemblies, or removed trim exposed when rain or wind is likely. If a task depends on steady, dry conditions, plan it for a more protected location rather than hoping the weather holds.
How should you protect the car and parts outdoors?
A well-fitted vehicle cover can help shield a parked car from ordinary outdoor exposure, but it isn’t a substitute for enclosed workspace. Keep the car’s work area clear, and don’t assume a cover makes an open repair safe from changing weather. Before covering the vehicle, remove tools and loose hardware from surfaces where they could scratch the finish.
Store removed components in a clean, dry place, away from moisture, foot traffic, and anything likely to fall or bump them. Use protective wrapping where appropriate, and keep related parts together. Set aside a sheltered spot for items that shouldn’t be exposed while you work on the car outside.
How can limited storage prevent project chaos?
Give each assembly a clear identity before it leaves the vehicle. Photograph it from several angles, including how connectors, brackets, and linkages fit together. Then label containers with the system and location, such as “front lighting” or “left door hardware,” and note unusual fastener positions. These references make reassembly easier to track, especially when the project pauses between work sessions.
Keep a written inventory that records what you removed, where it’s stored, and what still needs attention. A notebook or digital list works if you update it consistently. Group fasteners with their associated components instead of relying on memory or a shared jar. Before disassembly expands, make sure every new batch of parts has a safe storage place.
- Photograph the assembly before loosening or disconnecting anything.
- Label each container with the component group and its location on the car.
- Update the inventory as parts are removed, cleaned, or set aside for repair.
- Pause disassembly if the next components won’t fit safely in available storage.
This discipline protects more than hardware. It preserves a record of the car’s original condition and the changes you make, helping you make deliberate choices as classic character meets modern reliability. For structured guidance as you plan unfamiliar work, explore Restomod Academy’s restomod learning resources.
Compare Workspace Options for Building a Restomod Without a Garage
No single workspace has to carry the entire build. A driveway may suit inspection and planning, while a shared workshop or task-specific space can handle work that needs more room, protection, or equipment. Compare options against the job in front of you, then consider access, storage, and how each setup fits your daily routine.
Use this comparison as a starting point. Actual suitability depends on your site, the task, and the conditions you can control.
| Workspace | Advantages | Constraints | Best-fit tasks |
|---|---|---|---|
| Driveway | Convenient access to the vehicle and home tools | Exposure to weather, limited security and storage, possible disruption to household routines | Inspection, planning, photography, and selected light tasks when conditions are suitable |
| Covered parking | Some shelter from direct weather while keeping the car accessible | May offer little extra room for tools or removed parts; airflow and access can still limit work | Vehicle protection, checks, and brief tasks that fit the available space |
| Shared workshop | Can provide more room, equipment, and a protected work area | Access is temporary, so tasks and parts must be ready before the work session | Mechanical jobs that need equipment, space, or a steadier environment |
| Task-specific workspace | Matches a particular job’s environment or equipment needs | Requires coordination and moving the vehicle or components to that location | Bodywork, paint, or other work that exceeds what home space can reasonably support |
When can a driveway or covered space be enough?
A driveway or covered parking can support project planning, visual inspection, documenting existing conditions, and selected light work if the area is level, accessible, and suitable for the task. But outdoor space has limits: weather can interrupt work, security may be a concern, and tools or parts can quickly crowd the area. Keep household routes and access clear, and don’t assume every mechanical or finishing job belongs outdoors.
When does a shared or task-specific workspace make sense?
Choose a more specialized space when the work exceeds your available equipment, protection, or room. A shared workshop offers temporary access without maintaining a permanent shop, while a task-specific workspace can suit jobs with distinct environmental needs. Prepare parts, tools, and a clear task list before you go, so the session is spent on hands-on work rather than sorting or planning.
Before committing to a workspace, define the build’s scope and sequence. Identify which jobs can happen at home and which need a planned session elsewhere, then arrange parts and transport around that order. This staged approach makes building a restomod without a garage more manageable: the workspace follows the project phase instead of forcing every task into one setup.

Build a Step-by-Step Workflow for Your Garage-Free Restomod
A clear sequence keeps a limited workspace from becoming a pile of unfinished jobs. Before starting, break the build into manageable phases, such as assessment, mechanical repairs, electrical work, and upgrades. For every task, write down the space, tools, parts, and protection it needs. If one of those is missing, resolve that gap before work begins.
- 1. Define the scope. List the repairs and upgrades you’re considering, then separate essential work from changes that can wait. A tighter scope makes it easier to match the project to the space you have.
- 2. Map each task to a workspace. Note whether it can happen at home or needs more room, shelter, or equipment. Include where the car and removed components will stay while the task is underway.
- 3. Plan storage. Decide where parts, fasteners, and tools will go before disassembly. Leave room to label and document components as you remove them.
- 4. Stage the work. Gather the parts, tools, and references for one phase, and make sure the work area is ready. Don’t open the next major job until the current phase is complete or safely paused.
- 5. Review progress. Record what’s finished, what needs attention, and what must happen next. Revisit your scope and workspace plan if a repair takes a different direction than expected.
Sequencing reduces the number of parts and workspace demands you need to manage at the same time. It also makes it easier to identify what’s blocking progress before you begin the next phase.
How do you keep the project moving between work sessions?
End each session with a short log: work completed, open questions, and the next practical action. For example, note which connector still needs identification or which component is ready for inspection. Keep frequently used tools and labeled parts in consistent locations, so your next session starts with the task, not a search. Set a clear stopping point that leaves the vehicle and components protected if you need to pause.
How should you prioritize work when space is limited?
Follow dependencies first. A task that must be completed before another should lead the sequence, but only when its parts, tools, and workspace are ready. Delay disassembly if you can’t store what comes off or document how it fits back together. For unfamiliar work, study the procedure before setting aside space or ordering parts. Match tool choices to the task, and use recommended restomod gear as a reference when preparing your kit.
Build one manageable phase, document the result, then open the next. This measured rhythm helps you protect project momentum while keeping the goal in view: a classic car with the character you value and the modern reliability you’re building toward. Use Restomod Academy’s project-planning resources to strengthen your plan before committing to unfamiliar work.
Turn a Garage-Free Plan Into a Restomod You Can Finish
A workspace map becomes useful when it guides decisions, not just where the car and parts will sit. Set a realistic scope around the time, space, tools, and storage you can manage. Put essential repairs and foundational mechanical work ahead of optional upgrades, and don’t remove major components until you know where they’ll go and how you’ll track their return. That discipline gives building a restomod without a garage a clearer path from first inspection to finished car.
Keep the purpose in view as you set priorities. A restomod isn’t simply a list of new parts; it’s a considered blend of the vehicle’s classic character and the modern reliability you want from it. Each planned change should support that goal and fit into a sequence you can carry through with the workspaces available.
What should your first planning session produce?
Finish the session with a written plan you can use at the car, not a wish list of upgrades. Make priorities visible, record what you’re deliberately postponing, and note what must be decided before the next phase can begin. A useful first plan includes:
- A build scope that separates essential repairs from deferred upgrades.
- A workspace map showing where the vehicle, tools, and removed parts will be kept during each phase.
- A task sequence that identifies dependencies, storage needs, and decision points, such as whether a component needs inspection before replacement.
Use that plan to check for conflicts. If a task requires the car to stay undrivable while your parking area must remain available, adjust the timing or scope before starting. If a planned upgrade depends on a repair or fitment decision, resolve the dependency first. Small adjustments on paper can prevent a stalled build and an exposed vehicle.
How can a beginner build knowledge before turning a wrench?
Start by defining what you mean by “restomod” and what you want the finished vehicle to do. A clear understanding of the approach helps you weigh modern performance or comfort changes against the classic design you want to preserve. This foundational restomod guide can help you shape the project concept before committing to parts, space, or major disassembly.
Next, study unfamiliar procedures and dependencies before setting aside a work area. Structured learning lets you think through a task before committing time, space, or components, and helps you see where your plan needs more detail. The Ultimate Restomod Guide provides a further educational resource as you develop your scope and sequence.
Build patiently. Let the plan evolve as you learn more about the car, and revise it when a repair changes the next step. For more guidance as you shape your project, explore Restomod Academy’s learning resources.
Take the First Practical Step Toward Your Build
Make your next move small enough to complete: choose one project decision you can resolve before turning a wrench. You might clarify what you want the car to feel like on the road, identify a skill you need to learn, or decide which change best preserves its original character. Each thoughtful choice brings the build closer to a finished machine, rather than a collection of parts and open tasks.
Building a restomod without a garage asks you to be deliberate, but limited workspace doesn’t diminish the craft. Brook Walsh founded Restomod Academy to help builders learn, and its educational resources serve both beginners and experienced builders. Keep learning as your plans take shape, and let each new skill support the balance of heritage and modern reliability you want from your car.
Explore Restomod Academy’s project guidance and take the next step with a clearer plan. Restomod Academy also offers The Ultimate Restomod Guide, Restomod Consulting Services, and Premium Project Blueprints to support your project planning and learning.
Frequently Asked Questions
Can you build a restomod without a garage?
Yes, if you plan the build around the spaces you can use and the needs of each task. Building a restomod without a garage may mean doing initial inspections at home, then moving a job elsewhere when it needs more room or equipment. For example, record the condition of the engine bay before deciding whether an upgrade is necessary. Let the car’s actual condition guide the scope, rather than starting with a list of modifications.
Where can I work on a classic car if I do not have a garage?
Start with a driveway or covered parking you can access reliably, then match activities to what that space can support. A well-lit area near the car may be enough to inspect a component or take measurements, while a job requiring specialized equipment may call for a shared workspace. Consider how you’ll get tools and parts to each location, and whether moving the vehicle between work areas fits your routine.
Can I work on a restomod outside?
Yes, for selected tasks when the surface, weather, and surroundings make the work practical. Outdoor space can suit measurements, visual checks, or documenting the car’s condition, but exposed work may be interrupted by rain, wind, or poor visibility. If conditions change, stop rather than rushing to finish. Choose tasks that can be left in a stable state, and avoid opening assemblies that can’t be protected if work pauses.
How do you store classic car parts during a restomod?
Store parts by assembly, and add a brief condition note so you remember not only where each item belongs but what you observed when removing it. For instance, note a damaged connector or a missing clip beside the related component’s inventory entry. Keep delicate trim separate from heavy hardware, and make the storage location easy to find again. This record helps distinguish parts ready for reuse from those needing further inspection.
What should I do first when planning a garage-free restomod?
Define the finished car you’re aiming for, then write down the work needed to move toward it. Start with a baseline inspection rather than choosing upgrades by appearance alone. Note existing concerns, identify decisions that depend on further assessment, and separate must-do repairs from optional changes. This gives you a sensible first phase and helps prevent early purchases or disassembly from locking the project into a direction before you understand the car.
Do I need to rent a workshop to build a restomod?
No, renting a workshop isn’t automatically necessary. Decide based on the job, not on the idea that every phase must happen in one place. You might handle planning and basic checks at home, then arrange access to another workspace for a task that needs equipment or more room. Before committing to a session, prepare the procedure, parts, and tools so the time in that space is focused and productive.
How can I keep a restomod project moving without a workshop?
Keep a short list of work that can continue while a larger task is paused. If you’re waiting on a part or a decision, use the time to review reference material, organize project records, or inspect another area of the car that doesn’t depend on the open job. At each stopping point, note the exact next action and any unresolved question. That way, returning to the build feels deliberate instead of starting from memory.
A permanent garage isn’t the price of admission to a capable restomod. Building a restomod without a garage is possible when you match each task to a suitable workspace and plan around weather, storage, and safe project logistics. You may not have room to keep the car and every component under one roof, but you can still make steady progress by planning where each stage will happen.
It’s fair to worry that a driveway won’t protect delicate parts, or that major mechanical work demands a permanent workshop. The answer isn’t to force every job into one space. Decide what you can do at home, what needs a rented or shared DIY bay, and how you’ll protect the car and parts between work sessions.
This guide will help you map a realistic workspace, protect your project from weather and clutter, and sequence tasks so limited space doesn’t stall progress. You’ll compare arrangements for different jobs, organize tools and components, and prepare for unfamiliar work before committing time or space. With a sound plan, you can bring classic character and modern reliability together, one deliberate stage at a time.
Key Takeaways
- A garage helps, but building a restomod without a garage is workable when you divide the project among suitable spaces.
- Map where the car will sit, where clean parts will stay, and where you can handle small jobs before choosing your project scope.
- Compare driveways, covered parking, shared workshops, and task-specific spaces by protection, access, storage, and fit with daily routines.
- Before each task, identify its workspace, tools, parts, and protection needs so you can stage work with fewer interruptions.
- Start with the fundamentals, review progress as you go, and plan upgrades around a sequence you can realistically complete.
Can You Build a Restomod Without a Garage? Start With the Real Constraints
Yes. A garage is helpful, but it isn’t essential if you divide the work among suitable spaces and plan each stage before it begins. Building a restomod without a garage means working without a dedicated, enclosed space for the entire build, not doing every task outdoors. Inspection, research, and some small-component work may fit at home. Other jobs need more shelter, equipment, or secure storage.
Start by defining your actual constraints. Is the car parked in a driveway exposed to rain and sun? Do you have covered space, a small workbench, or somewhere to keep removed parts clean and organized? Those details shape the project’s sequence, scope, and pace. A restomod blends classic character with modern performance and reliability. If you’re still refining that goal, this guide to what defines a restomod can help you set direction before taking anything apart.
Which parts of a restomod need dedicated workspace?
Separate tasks by what they require. Inspection, photographing components, researching fitment, and planning an electrical layout can often happen away from the vehicle. Small parts can be cleaned or measured on a stable work surface, provided you can keep them protected and identified. These jobs reward careful preparation more than a full workshop.
Disassembly changes the equation. Brackets, fasteners, trim, and larger components quickly take up space. Unlabeled or exposed parts are easier to misplace or damage. Bodywork, paint, and major mechanical work also require planning for shelter, equipment, clear working room, and protection from dust or weather. Don’t begin a task simply because the car is accessible. First decide where each removed component will go and how long it may need to stay there.
What can make a garage-free build workable?
Assess the basics before choosing a project scope: secure vehicle parking, a level work area, weather exposure, and convenient access to tools and parts. Consider whether the car can remain undisturbed between sessions and whether you can pause a task safely if conditions change. A driveway may suit inspection or limited work, while a shared workshop or task-specific space may be more practical for jobs that need equipment or steadier protection.
Think beyond the car. Can you store removed components without blocking household access or disrupting daily routines? Can you keep small parts organized and protected from moisture, dirt, and accidental knocks? If not, adjust the sequence: complete planning first, arrange suitable storage, then start work that creates loose parts. Workspace needs change as the build moves through its phases, so reassess before each major step instead of expecting one setup to serve the whole project.
Plan Garage-Free Restomod Work Around Space, Weather, and Storage
Turn your available space into a simple project map before the first part comes off. Mark where the car will be parked, where clean components can be stored, and where a small work surface can hold tools, fasteners, and paperwork. These areas don’t need to be together, but you should know how parts will move between them without getting wet, dirty, damaged, or mixed up.
For anyone building a restomod without a garage, weather is part of the schedule. Check the forecast before beginning an outdoor task, and choose work that can be paused safely if conditions change. Avoid starting a job that leaves wiring, open assemblies, or removed trim exposed when rain or wind is likely. If a task depends on steady, dry conditions, plan it for a more protected location rather than hoping the weather holds.
How should you protect the car and parts outdoors?
A well-fitted vehicle cover can help shield a parked car from ordinary outdoor exposure, but it isn’t a substitute for enclosed workspace. Keep the car’s work area clear, and don’t assume a cover makes an open repair safe from changing weather. Before covering the vehicle, remove tools and loose hardware from surfaces where they could scratch the finish.
Store removed components in a clean, dry place, away from moisture, foot traffic, and anything likely to fall or bump them. Use protective wrapping where appropriate, and keep related parts together. Set aside a sheltered spot for items that shouldn’t be exposed while you work on the car outside.
How can limited storage prevent project chaos?
Give each assembly a clear identity before it leaves the vehicle. Photograph it from several angles, including how connectors, brackets, and linkages fit together. Then label containers with the system and location, such as “front lighting” or “left door hardware,” and note unusual fastener positions. These references make reassembly easier to track, especially when the project pauses between work sessions.
Keep a written inventory that records what you removed, where it’s stored, and what still needs attention. A notebook or digital list works if you update it consistently. Group fasteners with their associated components instead of relying on memory or a shared jar. Before disassembly expands, make sure every new batch of parts has a safe storage place.
- Photograph the assembly before loosening or disconnecting anything.
- Label each container with the component group and its location on the car.
- Update the inventory as parts are removed, cleaned, or set aside for repair.
- Pause disassembly if the next components won’t fit safely in available storage.
This discipline protects more than hardware. It preserves a record of the car’s original condition and the changes you make, helping you make deliberate choices as classic character meets modern reliability. For structured guidance as you plan unfamiliar work, explore Restomod Academy’s restomod learning resources.
Compare Workspace Options for Building a Restomod Without a Garage
No single workspace has to carry the entire build. A driveway may suit inspection and planning, while a shared workshop or task-specific space can handle work that needs more room, protection, or equipment. Compare options against the job in front of you, then consider access, storage, and how each setup fits your daily routine.
Use this comparison as a starting point. Actual suitability depends on your site, the task, and the conditions you can control.
| Workspace | Advantages | Constraints | Best-fit tasks |
|---|---|---|---|
| Driveway | Convenient access to the vehicle and home tools | Exposure to weather, limited security and storage, possible disruption to household routines | Inspection, planning, photography, and selected light tasks when conditions are suitable |
| Covered parking | Some shelter from direct weather while keeping the car accessible | May offer little extra room for tools or removed parts; airflow and access can still limit work | Vehicle protection, checks, and brief tasks that fit the available space |
| Shared workshop | Can provide more room, equipment, and a protected work area | Access is temporary, so tasks and parts must be ready before the work session | Mechanical jobs that need equipment, space, or a steadier environment |
| Task-specific workspace | Matches a particular job’s environment or equipment needs | Requires coordination and moving the vehicle or components to that location | Bodywork, paint, or other work that exceeds what home space can reasonably support |
When can a driveway or covered space be enough?
A driveway or covered parking can support project planning, visual inspection, documenting existing conditions, and selected light work if the area is level, accessible, and suitable for the task. But outdoor space has limits: weather can interrupt work, security may be a concern, and tools or parts can quickly crowd the area. Keep household routes and access clear, and don’t assume every mechanical or finishing job belongs outdoors.
When does a shared or task-specific workspace make sense?
Choose a more specialized space when the work exceeds your available equipment, protection, or room. A shared workshop offers temporary access without maintaining a permanent shop, while a task-specific workspace can suit jobs with distinct environmental needs. Prepare parts, tools, and a clear task list before you go, so the session is spent on hands-on work rather than sorting or planning.
Before committing to a workspace, define the build’s scope and sequence. Identify which jobs can happen at home and which need a planned session elsewhere, then arrange parts and transport around that order. This staged approach makes building a restomod without a garage more manageable: the workspace follows the project phase instead of forcing every task into one setup.
Build a Step-by-Step Workflow for Your Garage-Free Restomod
A clear sequence keeps a limited workspace from becoming a pile of unfinished jobs. Before starting, break the build into manageable phases, such as assessment, mechanical repairs, electrical work, and upgrades. For every task, write down the space, tools, parts, and protection it needs. If one of those is missing, resolve that gap before work begins.
- 1. Define the scope. List the repairs and upgrades you’re considering, then separate essential work from changes that can wait. A tighter scope makes it easier to match the project to the space you have.
- 2. Map each task to a workspace. Note whether it can happen at home or needs more room, shelter, or equipment. Include where the car and removed components will stay while the task is underway.
- 3. Plan storage. Decide where parts, fasteners, and tools will go before disassembly. Leave room to label and document components as you remove them.
- 4. Stage the work. Gather the parts, tools, and references for one phase, and make sure the work area is ready. Don’t open the next major job until the current phase is complete or safely paused.
- 5. Review progress. Record what’s finished, what needs attention, and what must happen next. Revisit your scope and workspace plan if a repair takes a different direction than expected.
Sequencing reduces the number of parts and workspace demands you need to manage at the same time. It also makes it easier to identify what’s blocking progress before you begin the next phase.
How do you keep the project moving between work sessions?
End each session with a short log: work completed, open questions, and the next practical action. For example, note which connector still needs identification or which component is ready for inspection. Keep frequently used tools and labeled parts in consistent locations, so your next session starts with the task, not a search. Set a clear stopping point that leaves the vehicle and components protected if you need to pause.
How should you prioritize work when space is limited?
Follow dependencies first. A task that must be completed before another should lead the sequence, but only when its parts, tools, and workspace are ready. Delay disassembly if you can’t store what comes off or document how it fits back together. For unfamiliar work, study the procedure before setting aside space or ordering parts. Match tool choices to the task, and use recommended restomod gear as a reference when preparing your kit.
Build one manageable phase, document the result, then open the next. This measured rhythm helps you protect project momentum while keeping the goal in view: a classic car with the character you value and the modern reliability you’re building toward. Use Restomod Academy’s project-planning resources to strengthen your plan before committing to unfamiliar work.
Turn a Garage-Free Plan Into a Restomod You Can Finish
A workspace map becomes useful when it guides decisions, not just where the car and parts will sit. Set a realistic scope around the time, space, tools, and storage you can manage. Put essential repairs and foundational mechanical work ahead of optional upgrades, and don’t remove major components until you know where they’ll go and how you’ll track their return. That discipline gives building a restomod without a garage a clearer path from first inspection to finished car.
Keep the purpose in view as you set priorities. A restomod isn’t simply a list of new parts; it’s a considered blend of the vehicle’s classic character and the modern reliability you want from it. Each planned change should support that goal and fit into a sequence you can carry through with the workspaces available.
What should your first planning session produce?
Finish the session with a written plan you can use at the car, not a wish list of upgrades. Make priorities visible, record what you’re deliberately postponing, and note what must be decided before the next phase can begin. A useful first plan includes:
- A build scope that separates essential repairs from deferred upgrades.
- A workspace map showing where the vehicle, tools, and removed parts will be kept during each phase.
- A task sequence that identifies dependencies, storage needs, and decision points, such as whether a component needs inspection before replacement.
Use that plan to check for conflicts. If a task requires the car to stay undrivable while your parking area must remain available, adjust the timing or scope before starting. If a planned upgrade depends on a repair or fitment decision, resolve the dependency first. Small adjustments on paper can prevent a stalled build and an exposed vehicle.
How can a beginner build knowledge before turning a wrench?
Start by defining what you mean by “restomod” and what you want the finished vehicle to do. A clear understanding of the approach helps you weigh modern performance or comfort changes against the classic design you want to preserve. This foundational restomod guide can help you shape the project concept before committing to parts, space, or major disassembly.
Next, study unfamiliar procedures and dependencies before setting aside a work area. Structured learning lets you think through a task before committing time, space, or components, and helps you see where your plan needs more detail. The Ultimate Restomod Guide provides a further educational resource as you develop your scope and sequence.
Build patiently. Let the plan evolve as you learn more about the car, and revise it when a repair changes the next step. For more guidance as you shape your project, explore Restomod Academy’s learning resources.
Take the First Practical Step Toward Your Build
Make your next move small enough to complete: choose one project decision you can resolve before turning a wrench. You might clarify what you want the car to feel like on the road, identify a skill you need to learn, or decide which change best preserves its original character. Each thoughtful choice brings the build closer to a finished machine, rather than a collection of parts and open tasks.
Building a restomod without a garage asks you to be deliberate, but limited workspace doesn’t diminish the craft. Brook Walsh founded Restomod Academy to help builders learn, and its educational resources serve both beginners and experienced builders. Keep learning as your plans take shape, and let each new skill support the balance of heritage and modern reliability you want from your car.
Explore Restomod Academy’s project guidance and take the next step with a clearer plan. Restomod Academy also offers The Ultimate Restomod Guide, Restomod Consulting Services, and Premium Project Blueprints to support your project planning and learning.
Frequently Asked Questions
Can you build a restomod without a garage?
Yes, if you plan the build around the spaces you can use and the needs of each task. Building a restomod without a garage may mean doing initial inspections at home, then moving a job elsewhere when it needs more room or equipment. For example, record the condition of the engine bay before deciding whether an upgrade is necessary. Let the car’s actual condition guide the scope, rather than starting with a list of modifications.
Where can I work on a classic car if I do not have a garage?
Start with a driveway or covered parking you can access reliably, then match activities to what that space can support. A well-lit area near the car may be enough to inspect a component or take measurements, while a job requiring specialized equipment may call for a shared workspace. Consider how you’ll get tools and parts to each location, and whether moving the vehicle between work areas fits your routine.
Can I work on a restomod outside?
Yes, for selected tasks when the surface, weather, and surroundings make the work practical. Outdoor space can suit measurements, visual checks, or documenting the car’s condition, but exposed work may be interrupted by rain, wind, or poor visibility. If conditions change, stop rather than rushing to finish. Choose tasks that can be left in a stable state, and avoid opening assemblies that can’t be protected if work pauses.
How do you store classic car parts during a restomod?
Store parts by assembly, and add a brief condition note so you remember not only where each item belongs but what you observed when removing it. For instance, note a damaged connector or a missing clip beside the related component’s inventory entry. Keep delicate trim separate from heavy hardware, and make the storage location easy to find again. This record helps distinguish parts ready for reuse from those needing further inspection.
What should I do first when planning a garage-free restomod?
Define the finished car you’re aiming for, then write down the work needed to move toward it. Start with a baseline inspection rather than choosing upgrades by appearance alone. Note existing concerns, identify decisions that depend on further assessment, and separate must-do repairs from optional changes. This gives you a sensible first phase and helps prevent early purchases or disassembly from locking the project into a direction before you understand the car.
Do I need to rent a workshop to build a restomod?
No, renting a workshop isn’t automatically necessary. Decide based on the job, not on the idea that every phase must happen in one place. You might handle planning and basic checks at home, then arrange access to another workspace for a task that needs equipment or more room. Before committing to a session, prepare the procedure, parts, and tools so the time in that space is focused and productive.
How can I keep a restomod project moving without a workshop?
Keep a short list of work that can continue while a larger task is paused. If you’re waiting on a part or a decision, use the time to review reference material, organize project records, or inspect another area of the car that doesn’t depend on the open job. At each stopping point, note the exact next action and any unresolved question. That way, returning to the build feels deliberate instead of starting from memory.