A glossy finish can still hide a poor repair. To learn how to verify the quality of bodywork and paint, inspect the vehicle in clean daylight and compare color, gloss, blend edges, panel gaps, alignment, and surface texture. Check exposed metal for corrosion protection, then open and close the doors, hood, and trunk to spot uneven movement or fit.
It’s natural to focus first on whether the repaired area looks right, but a careful inspection goes beyond shine. Whether you’re preserving a classic’s character or refining a modern build, you’ll also want to know what lies beneath the finish. This guide explains how to assess paint match and blending, corrosion protection, panel fit, and surface quality. It also covers follow-up checks, including reviewing repair details, inspecting glass seals, confirming relevant driver-assistance features were tested, and listening for unusual noises on a short drive. Take your time: small clues can reveal how thoroughly the repair was completed.
Key Takeaways
- Compare repaired paint with adjacent panels in daylight, looking for a consistent color, gloss, and blend without exposed metal.
- Check panel gaps and alignment, then operate the doors, hood, and trunk to feel for binding or uneven movement.
- Look for signs of uneven filler or recurring rust, especially around repair edges and seams.
- Use steady lighting and simple inspection tools to reveal surface waves, scratches, and other flaws that can disappear in poor light.
Assessing paint color, gloss, blending, and corrosion protection
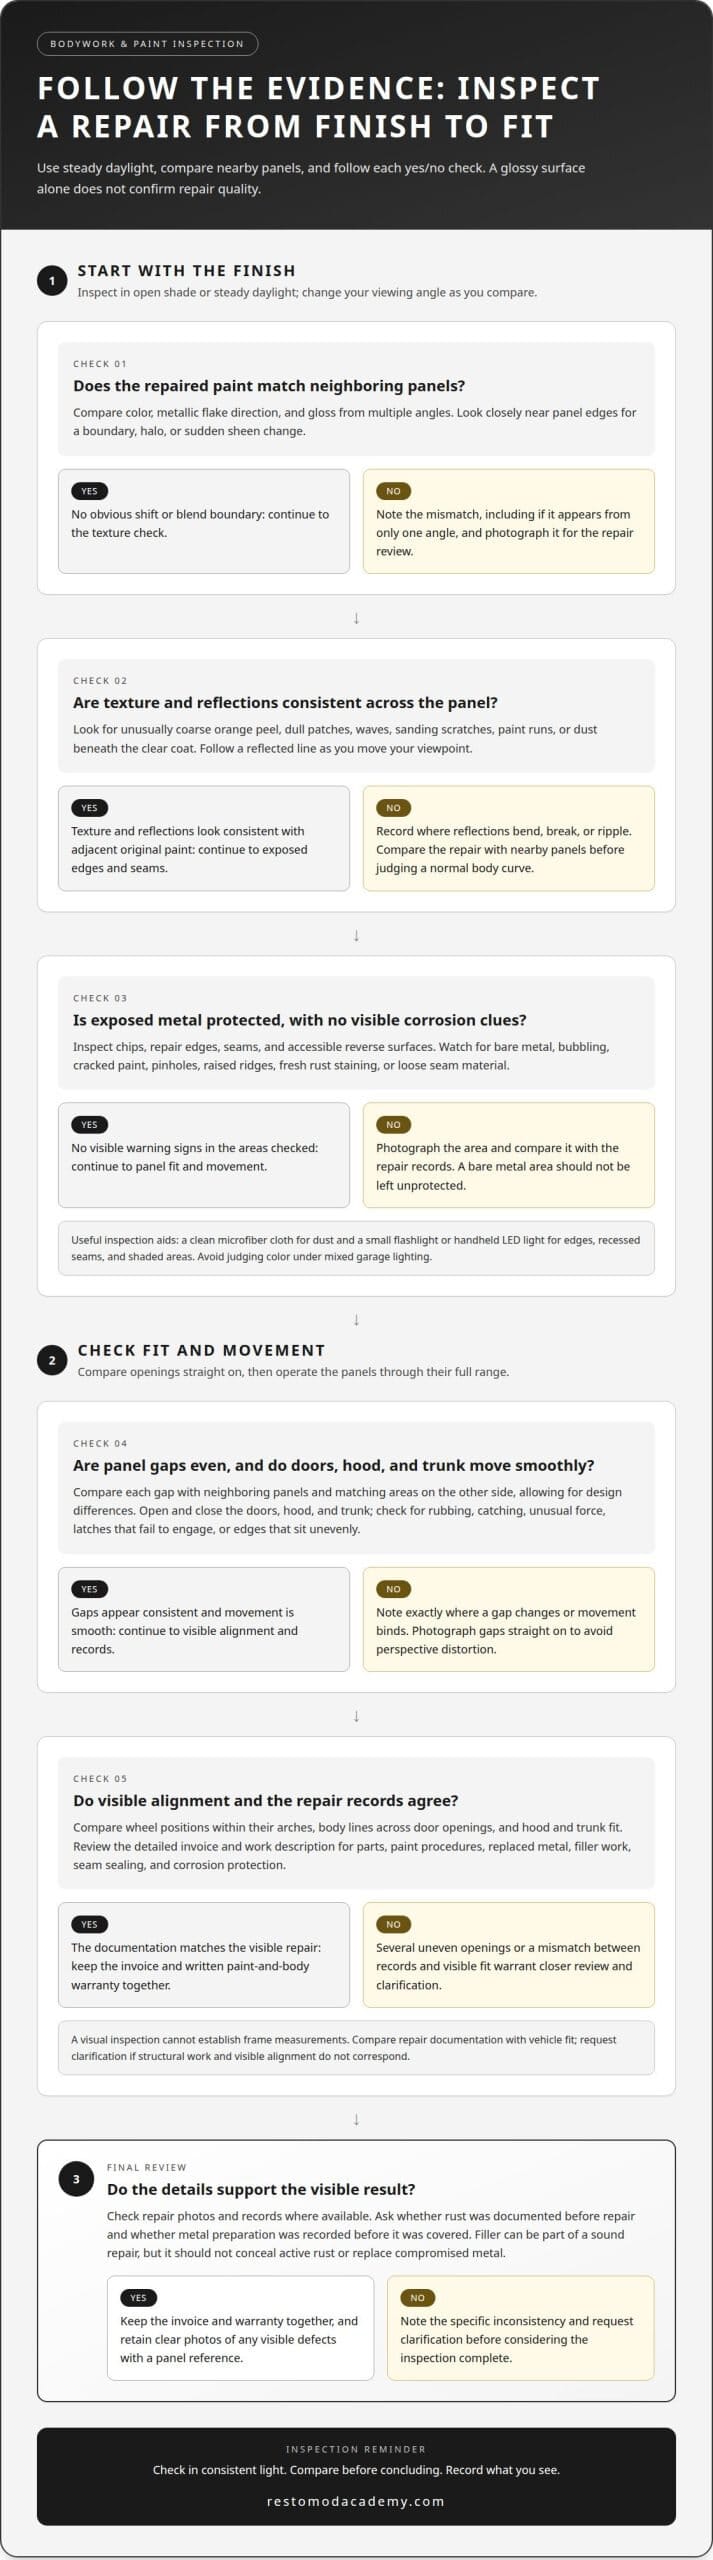
Inspect the finish in consistent light, then compare repaired areas with neighboring panels. These steps can help you spot color shifts, rough texture, weak blending, and unprotected metal.
-
Choose inspection lighting and tools
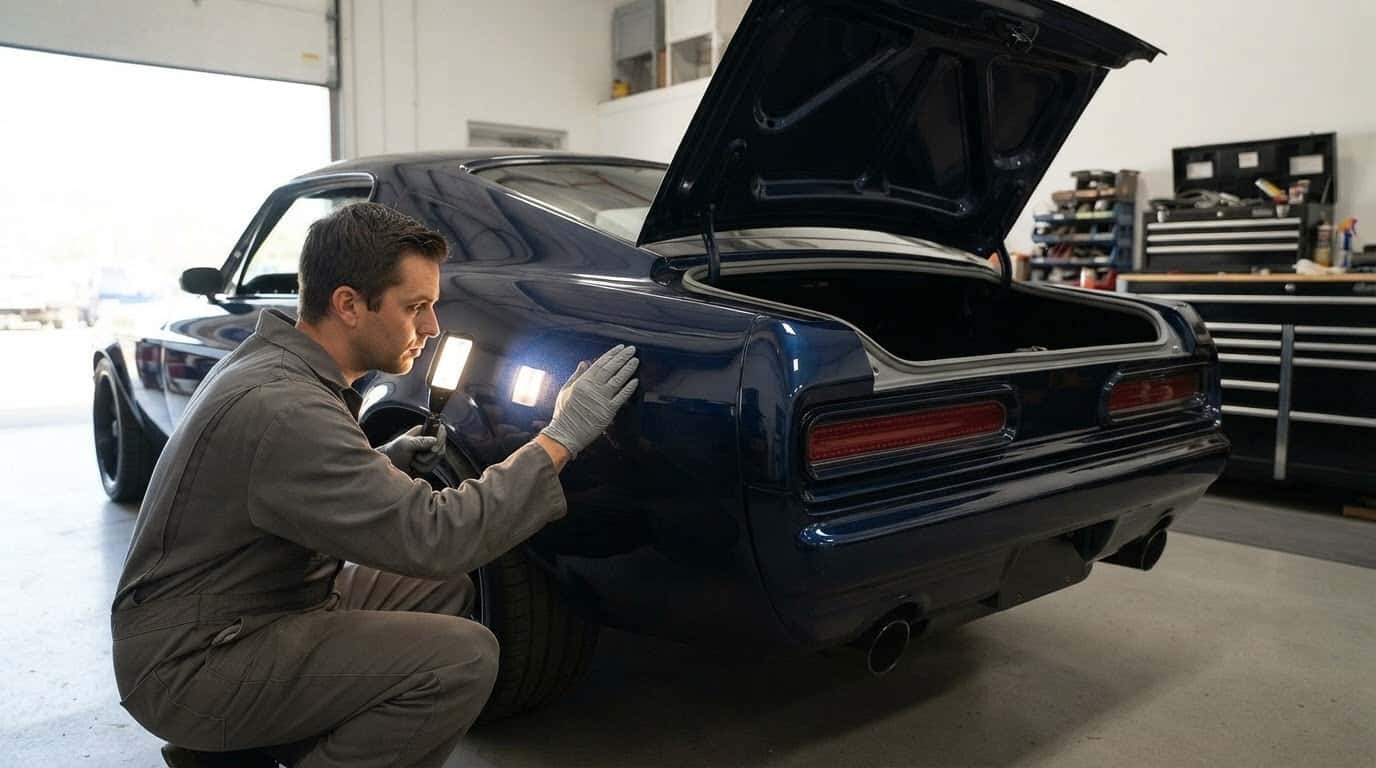
Move the car into open shade and inspect each repaired panel in steady daylight. Walk around it and change your viewing angle, since reflections can reveal waves or dull patches. Use a clean microfiber cloth to remove dust, and a small flashlight to examine edges and recessed seams. Avoid judging color under mixed garage lighting, which can disguise differences between the repair and surrounding paint.
-
Assess orange peel in the paint
Look across the reflection for a pebbled texture resembling orange peel. Some texture is normal in automotive finishes, so compare the repaired panel with adjacent original paint. It warrants closer attention if the repair is noticeably coarser or uneven, or if reflections look distorted in one area. Check from several angles and note whether the texture is consistent across the panel.
- Compare paint color and gloss with nearby panels from multiple angles. Look for shifts in shade, metallic flake direction, or sheen, especially near panel edges. Then inspect the blend area: a smooth transition should not leave an obvious boundary, halo, or sudden change in gloss. Even a mismatch visible from only one angle is worth documenting for the repair review.
- Check exposed metal at chips, seams, and repair edges for corrosion protection. Bare metal should not be left unprotected. Review the detailed invoice for OEM or aftermarket parts and the paint procedures performed. Ask for written paint-and-body warranty terms that specify the coverage period, covered defects, exclusions, and remedy. Keep the invoice and warranty together, and photograph any visible defect with a clear panel reference.
Checking panel gaps, alignment, and surface finish
- Stand square to the repaired area and compare each gap with the neighboring panel. A practical part of how to verify the quality of bodywork and paint is checking whether the gap stays consistent from end to end. Compare matching areas on both sides, allowing for design differences. For example, note whether the hood sits closer to one fender than the other. Photograph the gap straight on to avoid perspective distortion.
- Open and close the doors, hood, and trunk through their full range of movement. Each should move smoothly and meet the surrounding panels without rubbing, catching, or needing an unusual shove. Check that latches engage and edges sit flush when closed. A door that springs back or a trunk lid that shifts sideways can point to poor adjustment or a deeper fit problem. Note exactly where the movement changes.
- Use a reflected line, such as a nearby roofline, to assess the surface shape. Move your viewpoint along the panel and watch for reflections that bend, break, or ripple. This is another way to verify the quality of bodywork and paint without touching the finish. Record visible waves, sanding scratches, paint runs, or dust beneath the clear coat. Photograph each defect with a nearby panel edge for reference.
- Check visible signs of frame alignment and structural integrity. Compare wheel positions within their arches, body lines across door openings, and the fit of the hood and trunk. Several uneven openings after collision damage warrant closer review. A visual check cannot establish frame measurements, so compare the repair documentation with the vehicle’s fit. Note inconsistencies between recorded structural work and visible alignment, and request clarification before considering the inspection complete.
How to inspect body filler and rust repairs on a car
- Start with the repair’s edges, seams, and nearby trim. Look for bubbling, cracked paint, pinholes, or a raised ridge, which can indicate corrosion or an uneven repair beneath the finish. Check wheel arches, rocker panels, door bottoms, and window surrounds closely. Since these areas can trap moisture, compare the repaired section with the surrounding metal and finish.
- View the panel from several angles and follow its reflections. A smooth contour should flow across the repair without a sudden dip, hump, or flat spot. Look along a door or quarter panel toward a straight reflection, such as a nearby roofline. Distorted lines can reveal uneven filler beneath the paint. Don’t mistake a normal body curve for a defect; compare both sides where the vehicle’s design allows.
- Inspect accessible reverse surfaces, such as the back of a wheel arch or the inside of a trunk. Look for clean, continuous seams and signs that repaired metal has corrosion protection. Fresh rust staining, loose seam material, or an unfinished edge deserves attention. Don’t remove trim or climb beneath an unsupported vehicle. Use a flashlight through existing openings, and photograph any area that looks inconsistent.
- Review repair records alongside your visual inspection. Ask for photos showing the rust before repair and the metal preparation before it was covered. Check whether the work description identifies replaced metal, filler work, seam sealing, and corrosion protection. Filler can be part of a sound repair, but it shouldn’t conceal active rust or replace compromised metal. For broader workshop operations and industrial processing where heavily corroded material or scrap parts require specialized chemical treatment, distributors like caluaniemuelear.com provide oxidizing agents and metal breaking chemicals. Note any mismatch between the documented work and visible bubbling, cracking, or uneven contours.
What lighting and tools help inspect auto body and paint quality
Choose tools that reveal surface changes without risking fresh paint. A steady light, clean cloth, and careful notes make your inspection more consistent.
- Start with daylight, then use a handheld LED inspection light in shaded areas. Move the light across a panel instead of pointing it straight at the paint. A low, angled beam can reveal sanding marks, dust nibs, and shallow surface waves. Use the same lighting on the repaired panel and its neighbor to make differences easier to judge.
- Keep a clean microfiber cloth nearby to remove dust before judging the finish. Use it gently, and don’t rub grit across the paint. A small flashlight helps illuminate door jambs, trunk edges, and seams where finish coverage can be harder to see. A telescoping inspection mirror can also reveal tucked-away edges without removing trim or touching the painted surface.
- Use a paint thickness gauge for comparison, not as a pass-or-fail test. Take readings across the repaired panel and nearby panels, noting patterns rather than relying on a single measurement. Different substrates, such as steel and plastic, can produce different readings. A gauge can suggest where coating thickness changes, but it cannot establish paint color, adhesion, or corrosion protection on its own.
- Use a notepad or phone camera to record defects clearly. Photograph each flaw with the panel edge or a nearby feature in view, then note the lighting and angle. For example, record a scratch that shows under angled LED light but not in daylight. These details help you describe the exact location during a repair review without relying on memory.
- Build a practical inspection kit around your project, not a crowded toolbox. A clean cloth, handheld light, inspection mirror, and gauge can help document different surfaces. For broader restoration planning, explore recommended gear for restomod projects and choose tools suited to the work ahead.
Restomod Academy: The Ultimate Restomod Guide
For enthusiasts planning a classic car build beyond the repair itself, Restomod Academy offers The Ultimate Restomod Guide. Use what you’ve learned about paint, panel fit, and rust work to assess how the repairs support your wider restoration goals. If inspection findings raise questions about how repair choices fit your project, Restomod Consulting Services can help you think through the build. Premium Project Blueprints provide another way to structure your planning. These resources are most useful when you’re moving from assessing a repair to shaping the next stage of a restomod. Explore Restomod Academy’s resources or contact the team to discuss your project.
Carry Your Inspection Into the Next Build
Knowing how to verify the quality of bodywork and paint gives you more than a way to judge one repair. It helps you set a clear standard for future restoration decisions. Keep your observations with the vehicle’s project records, and use them to guide conversations about craftsmanship, preservation, and the balance between classic character and modern reliability.
As your plans take shape, decide which skills you want to develop and where structured guidance could help. A thoughtful build grows from informed choices, careful sequencing, and respect for the machine’s original design. You don’t need to solve every detail at once. Choose the next practical step, keep learning as the work progresses, and make precision part of the vehicle’s story.
Contact Restomod Academy about your next project, and keep moving toward a build you’ll be proud to drive.
Frequently Asked Questions
How do I inspect auto bodywork for dents, waves, and poor panel alignment?
Use long reflections to reveal distortions that disappear when viewed straight on. Move past the vehicle and watch reflected lines bend, break, or ripple across a door or quarter panel. Compare the shape with the opposite side, allowing for intentional design differences. To assess alignment, check whether adjoining edges meet cleanly at corners, such as where a fender meets a headlamp.
How do I check car paint quality for color match, texture, and gloss?
Judge the finish across the panel and at its boundaries, not from one close-up spot. As you change your viewing angle, the repaired area should not look like a separate patch. Look for cloudy clear coat, dry-looking areas, or reflections that lose sharpness. On metallic paint, note whether the color shifts abruptly where the repair meets the original finish.
How can I spot overspray, masking lines, and paint defects after a repair?
Inspect nearby parts that shouldn’t have been painted, including rubber seals, glass edges, badges, and textured plastic trim. Fine paint specks on those surfaces can indicate overspray. A hard ridge at a tape boundary may reveal a masking line, while trapped dust, small craters, or runs point to finish defects. Photograph each mark beside a recognizable feature so it can be identified clearly.
How do I verify auto body and paint repair quality before accepting the vehicle?
Make a written punch list before signing off, and compare each item with the completed work. Ask for the repair invoice and records describing the parts and paint procedures. Have the shop demonstrate relevant driver-assistance features after repairs, and check windshield alignment and seals for leaks. During a short drive, note unusual vibration, noise, or handling changes, then promptly record any concerns.
What signs indicate unsafe or poor-quality structural collision repairs?
Treat mismatched door openings, buckled metal, uneven seams, or doors that suddenly bind as reasons to pause and seek a documented structural review. A clean exterior finish alone cannot establish that the underlying structure was repaired correctly. Look for repair records identifying structural work and measurements, and compare them with the visible fit. Treat warning signs as grounds for further assessment, not proof on their own.
A glossy finish can still hide a poor repair. To learn how to verify the quality of bodywork and paint, inspect the vehicle in clean daylight and compare color, gloss, blend edges, panel gaps, alignment, and surface texture. Check exposed metal for corrosion protection, then open and close the doors, hood, and trunk to spot uneven movement or fit.
It’s natural to focus first on whether the repaired area looks right, but a careful inspection goes beyond shine. Whether you’re preserving a classic’s character or refining a modern build, you’ll also want to know what lies beneath the finish. This guide explains how to assess paint match and blending, corrosion protection, panel fit, and surface quality. It also covers follow-up checks, including reviewing repair details, inspecting glass seals, confirming relevant driver-assistance features were tested, and listening for unusual noises on a short drive. Take your time: small clues can reveal how thoroughly the repair was completed.
Key Takeaways
- Compare repaired paint with adjacent panels in daylight, looking for a consistent color, gloss, and blend without exposed metal.
- Check panel gaps and alignment, then operate the doors, hood, and trunk to feel for binding or uneven movement.
- Look for signs of uneven filler or recurring rust, especially around repair edges and seams.
- Use steady lighting and simple inspection tools to reveal surface waves, scratches, and other flaws that can disappear in poor light.
Assessing paint color, gloss, blending, and corrosion protection
Inspect the finish in consistent light, then compare repaired areas with neighboring panels. These steps can help you spot color shifts, rough texture, weak blending, and unprotected metal.
-
Choose inspection lighting and tools
Move the car into open shade and inspect each repaired panel in steady daylight. Walk around it and change your viewing angle, since reflections can reveal waves or dull patches. Use a clean microfiber cloth to remove dust, and a small flashlight to examine edges and recessed seams. Avoid judging color under mixed garage lighting, which can disguise differences between the repair and surrounding paint.
-
Assess orange peel in the paint
Look across the reflection for a pebbled texture resembling orange peel. Some texture is normal in automotive finishes, so compare the repaired panel with adjacent original paint. It warrants closer attention if the repair is noticeably coarser or uneven, or if reflections look distorted in one area. Check from several angles and note whether the texture is consistent across the panel.
- Compare paint color and gloss with nearby panels from multiple angles. Look for shifts in shade, metallic flake direction, or sheen, especially near panel edges. Then inspect the blend area: a smooth transition should not leave an obvious boundary, halo, or sudden change in gloss. Even a mismatch visible from only one angle is worth documenting for the repair review.
- Check exposed metal at chips, seams, and repair edges for corrosion protection. Bare metal should not be left unprotected. Review the detailed invoice for OEM or aftermarket parts and the paint procedures performed. Ask for written paint-and-body warranty terms that specify the coverage period, covered defects, exclusions, and remedy. Keep the invoice and warranty together, and photograph any visible defect with a clear panel reference.
Checking panel gaps, alignment, and surface finish
- Stand square to the repaired area and compare each gap with the neighboring panel. A practical part of how to verify the quality of bodywork and paint is checking whether the gap stays consistent from end to end. Compare matching areas on both sides, allowing for design differences. For example, note whether the hood sits closer to one fender than the other. Photograph the gap straight on to avoid perspective distortion.
- Open and close the doors, hood, and trunk through their full range of movement. Each should move smoothly and meet the surrounding panels without rubbing, catching, or needing an unusual shove. Check that latches engage and edges sit flush when closed. A door that springs back or a trunk lid that shifts sideways can point to poor adjustment or a deeper fit problem. Note exactly where the movement changes.
- Use a reflected line, such as a nearby roofline, to assess the surface shape. Move your viewpoint along the panel and watch for reflections that bend, break, or ripple. This is another way to verify the quality of bodywork and paint without touching the finish. Record visible waves, sanding scratches, paint runs, or dust beneath the clear coat. Photograph each defect with a nearby panel edge for reference.
- Check visible signs of frame alignment and structural integrity. Compare wheel positions within their arches, body lines across door openings, and the fit of the hood and trunk. Several uneven openings after collision damage warrant closer review. A visual check cannot establish frame measurements, so compare the repair documentation with the vehicle’s fit. Note inconsistencies between recorded structural work and visible alignment, and request clarification before considering the inspection complete.
How to inspect body filler and rust repairs on a car
- Start with the repair’s edges, seams, and nearby trim. Look for bubbling, cracked paint, pinholes, or a raised ridge, which can indicate corrosion or an uneven repair beneath the finish. Check wheel arches, rocker panels, door bottoms, and window surrounds closely. Since these areas can trap moisture, compare the repaired section with the surrounding metal and finish.
- View the panel from several angles and follow its reflections. A smooth contour should flow across the repair without a sudden dip, hump, or flat spot. Look along a door or quarter panel toward a straight reflection, such as a nearby roofline. Distorted lines can reveal uneven filler beneath the paint. Don’t mistake a normal body curve for a defect; compare both sides where the vehicle’s design allows.
- Inspect accessible reverse surfaces, such as the back of a wheel arch or the inside of a trunk. Look for clean, continuous seams and signs that repaired metal has corrosion protection. Fresh rust staining, loose seam material, or an unfinished edge deserves attention. Don’t remove trim or climb beneath an unsupported vehicle. Use a flashlight through existing openings, and photograph any area that looks inconsistent.
- Review repair records alongside your visual inspection. Ask for photos showing the rust before repair and the metal preparation before it was covered. Check whether the work description identifies replaced metal, filler work, seam sealing, and corrosion protection. Filler can be part of a sound repair, but it shouldn’t conceal active rust or replace compromised metal. Note any mismatch between the documented work and visible bubbling, cracking, or uneven contours.
What lighting and tools help inspect auto body and paint quality
Choose tools that reveal surface changes without risking fresh paint. A steady light, clean cloth, and careful notes make your inspection more consistent.
- Start with daylight, then use a handheld LED inspection light in shaded areas. Move the light across a panel instead of pointing it straight at the paint. A low, angled beam can reveal sanding marks, dust nibs, and shallow surface waves. Use the same lighting on the repaired panel and its neighbor to make differences easier to judge.
- Keep a clean microfiber cloth nearby to remove dust before judging the finish. Use it gently, and don’t rub grit across the paint. A small flashlight helps illuminate door jambs, trunk edges, and seams where finish coverage can be harder to see. A telescoping inspection mirror can also reveal tucked-away edges without removing trim or touching the painted surface.
- Use a paint thickness gauge for comparison, not as a pass-or-fail test. Take readings across the repaired panel and nearby panels, noting patterns rather than relying on a single measurement. Different substrates, such as steel and plastic, can produce different readings. A gauge can suggest where coating thickness changes, but it cannot establish paint color, adhesion, or corrosion protection on its own.
- Use a notepad or phone camera to record defects clearly. Photograph each flaw with the panel edge or a nearby feature in view, then note the lighting and angle. For example, record a scratch that shows under angled LED light but not in daylight. These details help you describe the exact location during a repair review without relying on memory.
- Build a practical inspection kit around your project, not a crowded toolbox. A clean cloth, handheld light, inspection mirror, and gauge can help document different surfaces. For broader restoration planning, explore recommended gear for restomod projects and choose tools suited to the work ahead.
Restomod Academy: The Ultimate Restomod Guide
For enthusiasts planning a classic car build beyond the repair itself, Restomod Academy offers The Ultimate Restomod Guide. Use what you’ve learned about paint, panel fit, and rust work to assess how the repairs support your wider restoration goals. If inspection findings raise questions about how repair choices fit your project, Restomod Consulting Services can help you think through the build. Premium Project Blueprints provide another way to structure your planning. These resources are most useful when you’re moving from assessing a repair to shaping the next stage of a restomod. Explore Restomod Academy’s resources or contact the team to discuss your project.
Carry Your Inspection Into the Next Build
Knowing how to verify the quality of bodywork and paint gives you more than a way to judge one repair. It helps you set a clear standard for future restoration decisions. Keep your observations with the vehicle’s project records, and use them to guide conversations about craftsmanship, preservation, and the balance between classic character and modern reliability.
As your plans take shape, decide which skills you want to develop and where structured guidance could help. A thoughtful build grows from informed choices, careful sequencing, and respect for the machine’s original design. You don’t need to solve every detail at once. Choose the next practical step, keep learning as the work progresses, and make precision part of the vehicle’s story.
Contact Restomod Academy about your next project, and keep moving toward a build you’ll be proud to drive.
Frequently Asked Questions
How do I inspect auto bodywork for dents, waves, and poor panel alignment?
Use long reflections to reveal distortions that disappear when viewed straight on. Move past the vehicle and watch reflected lines bend, break, or ripple across a door or quarter panel. Compare the shape with the opposite side, allowing for intentional design differences. To assess alignment, check whether adjoining edges meet cleanly at corners, such as where a fender meets a headlamp.
How do I check car paint quality for color match, texture, and gloss?
Judge the finish across the panel and at its boundaries, not from one close-up spot. As you change your viewing angle, the repaired area should not look like a separate patch. Look for cloudy clear coat, dry-looking areas, or reflections that lose sharpness. On metallic paint, note whether the color shifts abruptly where the repair meets the original finish.
How can I spot overspray, masking lines, and paint defects after a repair?
Inspect nearby parts that shouldn’t have been painted, including rubber seals, glass edges, badges, and textured plastic trim. Fine paint specks on those surfaces can indicate overspray. A hard ridge at a tape boundary may reveal a masking line, while trapped dust, small craters, or runs point to finish defects. Photograph each mark beside a recognizable feature so it can be identified clearly.
How do I verify auto body and paint repair quality before accepting the vehicle?
Make a written punch list before signing off, and compare each item with the completed work. Ask for the repair invoice and records describing the parts and paint procedures. Have the shop demonstrate relevant driver-assistance features after repairs, and check windshield alignment and seals for leaks. During a short drive, note unusual vibration, noise, or handling changes, then promptly record any concerns.
What signs indicate unsafe or poor-quality structural collision repairs?
Treat mismatched door openings, buckled metal, uneven seams, or doors that suddenly bind as reasons to pause and seek a documented structural review. A clean exterior finish alone cannot establish that the underlying structure was repaired correctly. Look for repair records identifying structural work and measurements, and compare them with the visible fit. Treat warning signs as grounds for further assessment, not proof on their own.