

The worst mistake you can make when evaluating a vintage vehicle is turning the ignition key first. Fresh paint and an intoxicating exhaust note can easily blind you to concealed frame rot, worn transmission synchros, or questionable title paperwork. You already know that gut instinct alone won’t protect your build budget from hidden structural damage or a seller’s clever cosmetic patches. That’s why working through a disciplined classic car pre purchase inspection checklist is your single strongest defense before any cash changes hands.
Mastering this systematic evaluation gives you the power to uncover expensive mechanical flaws and metal fatigue long before finalizing a deal. In this guide, you’ll master the exact step-by-step physical and mechanical inspection process to evaluate any vintage vehicle before buying. We’ll guide you through every critical checkpoint, covering body alignment, undercarriage rust, drivetrain health, and legal identification numbers so you have the objective data needed to negotiate the right price or walk away cleanly.
Key Takeaways
- Learn how to cross-reference hidden frame stampings against title paperwork to confirm authenticity before ever touching a wrench.
- Deploy magnetic testing tools and specialized probes using a classic car pre purchase inspection checklist to uncover concealed rust and body filler.
- Master the cold start protocol and fluid contamination checks to diagnose internal engine health without invasive teardowns.
- Audit structural torque boxes, steering linkages, and brake lines to ensure the running gear meets dependable modern safety standards.
- Translate dynamic road test behaviors and handling vibrations into clear mechanical data to negotiate the price or walk away cleanly.
Pre-Inspection Preparation: Documentation, Tools, and VIN Verification
Every legendary project begins with a baseline assessment. Before you crawl under a rocker panel or evaluate an engine block, you must verify what the car truly is on paper. A structured classic car pre purchase inspection checklist starts long before touching physical hardware. Conducting an independent pre-purchase inspection demands auditing the legal lineage first, because a flawless paint job means nothing if title defects prevent registration.
To see how an experienced builder systematically audits a vintage vehicle on site, watch this walkthrough:
The Essential Inspector Tool Kit
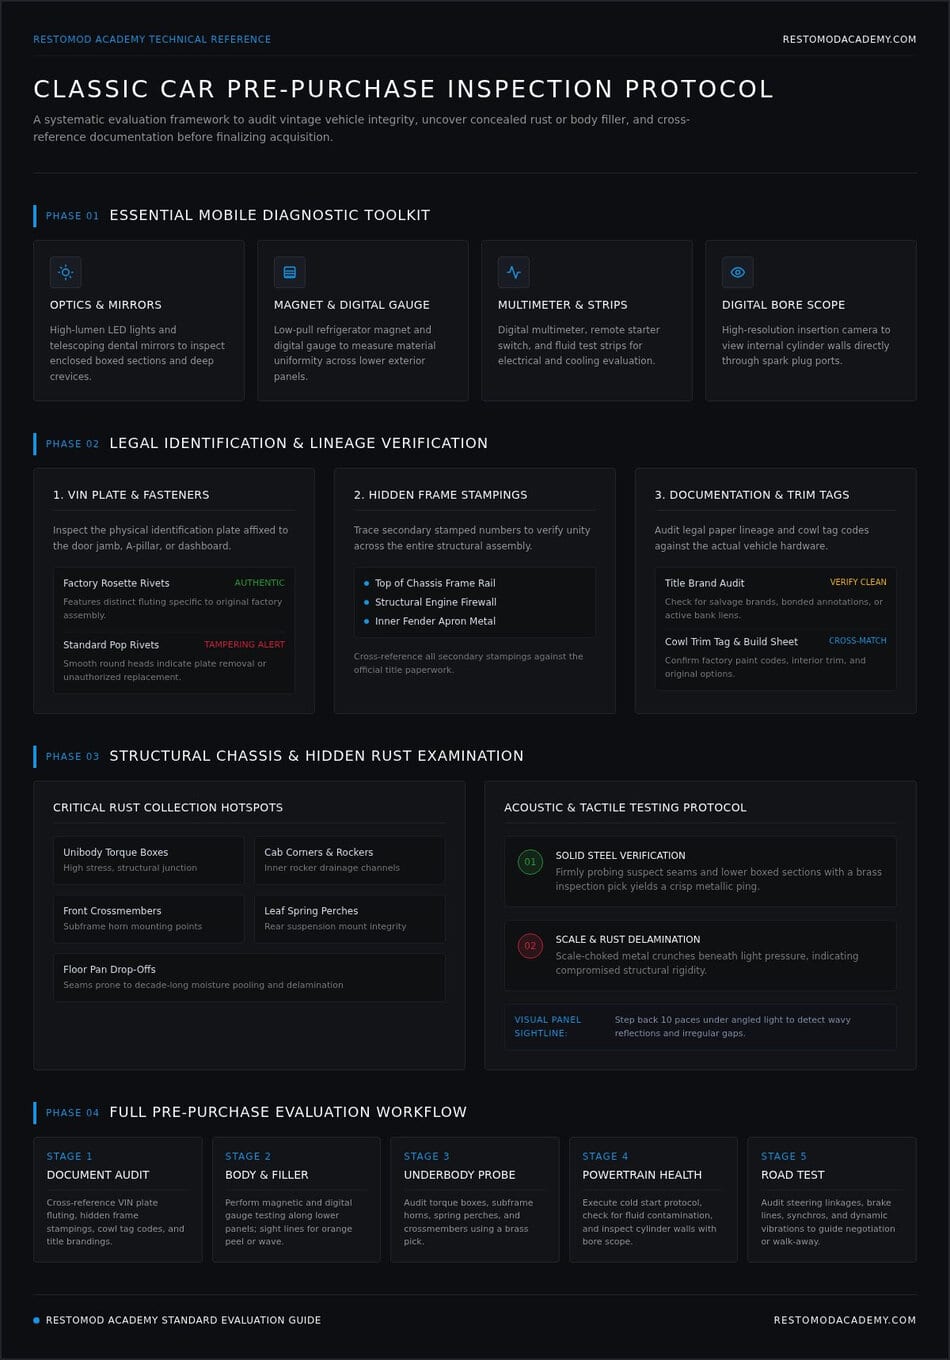
Arrive prepared with diagnostic gear suited for vintage machinery. Pack these essential items before traveling to examine the candidate vehicle:
- High-lumen LED inspection lights and telescoping dental mirrors to inspect boxed sections
- A low-pull refrigerator magnet and digital gauge to measure material uniformity across lower panels
- A digital multimeter, remote starter switch, and fluid test strips to evaluate electrical and cooling components
- A digital bore scope to view inside cylinder walls through spark plug ports
Consult our curated list of recommended gear to ensure your mobile diagnostic pack is complete.
Decoding VINs and Paperwork Authenticity
Cross-referencing identification numbers is your frontline defense against re-stamped shells, hidden liens, and state bond headaches. Inspect the physical Vehicle Identification Number (VIN) plate affixed to the door jamb, A-pillar, or dashboard. Examine the rivets closely. Factory rosette rivets feature specific fluting, while standard round pop rivets indicate tampering.
Trace secondary hidden VIN stampings stamped into the top of the frame rail, firewall, or inner fender apron. Compare these against the state title document. Scrutinize the paperwork for salvage brands, bonded annotations, or active bank liens that could cloud your legal ownership. Finally, read the cowl trim tag and build sheet to cross-reference factory paint codes, interior trim, and original options against the vehicle’s current configuration. To quickly verify original equipment and specifications, you can find out more by looking up factory vehicle data directly through the VIN. Incorporating these verification steps into your classic car pre purchase inspection checklist ensures you purchase clean metal with a clear ownership lineage.
Structural and Bodywork Audit: Detecting Rust, Filler, and Collision Damage
Fresh paint often conceals devastating structural sins. A glossy clear coat and an aggressive stance can seduce any enthusiast, but the true value of any vintage machine lies in its core foundation. Incorporating a thorough structural evaluation into your classic car pre purchase inspection checklist protects you from sinking your budget into a chassis that’s twisted or rusted beyond rescue.
Identifying Fatal Frame and Floor Rust
Grab a brass inspection pick and slide beneath the vehicle. Rust rarely rests in plain sight; it collects inside unibody torque boxes, cab corners, inner rocker channels, and subframe horns where moisture pools over decades. Firmly probe suspect seams and lower boxed sections. Solid steel yields a crisp metallic ping, while scale-choked metal crunches beneath light pressure.
Inspect front crossmembers, rear leaf spring perches, and floor pan drop-offs. If structural delamination has taken hold around suspension mounting points, the platform cannot safely handle road vibrations or dynamic braking forces. Establishing this baseline structural health is critical when planning a build around what is a restomod, where chassis rigidity must support upgraded suspension geometries and modern performance engines.
Uncovering Hidden Bondo and Body Repairs
Step back ten paces and sight down each character line under direct, angled lighting. Factory stampings should transition cleanly from front fenders through the doors and quarter panels. Wavy reflections, orange peel variations, or uneven door gaps frequently signal collision damage pulled straight on a hydraulic rack without proper realignment.
Place an electronic paint depth meter along lower quarter panels, wheel arches, and door sills. Original or cleanly refinished steel typically reads between 4 and 8 mils. Spikes past 20 or 30 mils expose thick layers of polyester filler sculpted over unresolved rot. Keep a weak magnet wrapped in microfiber handy; if it slides right off a rocker panel or dogleg, you’re looking at plastic rather than solid sheet metal. When in doubt about whether a project is structurally viable, tap into Restomod Consulting Services to evaluate chassis integrity before closing the deal.
Mechanical Powertrain Examination: Engine, Cooling, and Drivetrain Integrity
A smooth idle can mask serious internal wear if a seller warms up the engine before your arrival. Never let a warmed-up block disguise poor cold cranking behavior, piston slap, or valve guide smoke. A methodical classic car pre purchase inspection checklist demands that you audit the entire mechanical system systematically, starting with cold fluids and moving back through the drivetrain components.
Cold Start and Fluid Diagnostics
Place your bare hand directly against the intake manifold and exhaust headers before turning the key. The metal must feel stone-cold to the touch. Pull the engine oil cap and examine the underside; milky, frothy condensation signals coolant cross-contamination from a cracked casting or blown head gasket. Pull the dipstick to check oil clarity and smell for unburned gasoline.
Have an assistant turn the ignition while you watch the exhaust tailpipe and listen directly over the open engine bay. Watch for telltale smoke patterns:
- Puffy blue smoke during initial startup indicates worn valve guide seals or tired piston rings.
- Thick white smoke that lingers and smells sweet confirms coolant burning inside the combustion chambers.
- Heavy black soot points toward carburetor jetting issues or stuck choke plates.
Watch the oil pressure gauge immediately after firing. Oil pressure should build within three to five seconds. Once the engine reaches operating temperature, run a cylinder compression test across all banks to verify balanced cylinder sealing within ten percent of each other.
Drivetrain and Gearbox Assessment
Evaluating the transmission and driveline reveals whether the vehicle delivers usable power or requires immediate bench rebuilding. On manual gearboxes, depress the clutch pedal to feel for gritty throwout bearings, slipping friction plates, or leaky hydraulic slave cylinders. For automatics, pull the transmission dipstick to inspect the fluid. Bright pink or red fluid indicates healthy hydraulics, while dark brown fluid with a burnt metallic odor warns of slipping friction bands.
Inspect the underside of the drivetrain with your work light. Grasp the driveshaft near the transmission tailhousing and the rear differential pinion flange, checking for axial play or clicking within the universal joints. Leaking pinion seals and wet axle tubes point to worn bearings that cause howling at highway speeds. If your goal is swapping out an outdated, leaking powertrain for dependable modern horsepower, measure the transmission tunnel and firewall clearances against our resources in the definitive guide to an LS engine swap. Auditing these mechanical systems ensures your classic car pre purchase inspection checklist provides a clear picture of powertrain reliability before you make a commitment.
Underbody, Suspension, and Brake Systems: Running Gear Health
Getting a vintage car elevated off the pavement is where theoretical enthusiasm meets mechanical reality. A solid frame is mandatory, but the running gear dictates whether a vehicle drives with modern composure or wanders dangerously across the lane. Elevate the vehicle safely using rated jack stands on solid structural points. Running through an exhaustive classic car pre purchase inspection checklist requires getting under the chassis with a pry bar and light to evaluate every joint, bushing, and hydraulic line.
Steering Linkage and Front Suspension Checks
Grab the raised front tires at the twelve and six o’clock positions, rocking the assembly firmly to check for loose wheel bearings and worn ball joints. Next, grip at nine and three o’clock to isolate play in the outer tie rods, center link, and idler arm. Excessive slop here translates to severe steering dead zones at speed.
Inspect the steering gearbox sector shaft for fluid weeping and mechanical backlash. Examine the upper and lower control arm bushings. Decades of oil saturation and ozone exposure turn factory rubber into hard, cracked fragments, leading to unpredictable alignment shifts under braking. Check the shock absorbers for oily residue along the damper bodies, and inspect coil spring pockets or rear leaf spring packs for cracked leaves, missing center pins, or rusted shackle mounts.
Brake System Safety Evaluation
Auditing vintage braking hardware is where modern safety standards must take precedence over historical originality. Trace the hydraulic plumbing from the master cylinder down to every corner. Many pre-1967 classics still retain single-reservoir master cylinders, where a single ruptured line causes catastrophic total hydraulic failure. Modernized dual-reservoir setups offer essential hydraulic redundancy.
Search for pitted steel hardlines running along the chassis rails and over the rear axle housing. Flex hoses often swell internally with age, restricting fluid return and causing dragging calipers or drums. Pull the wheels to inspect friction surfaces:
- Check disc brake rotors for deep heat scoring, severe runout, and lip grooving.
- Measure drum brake friction surfaces for heat glazing, hairline fractures, and out-of-round wear.
- Inspect wheel cylinders and caliper piston boots for moist fluid leakage around dust seals.
Explore our detailed product reviews to evaluate aftermarket disc conversions and high-performance master cylinders. If you plan to engineer a dependable daily driver with modern stopping power, use our Premium Project Blueprints to plan your suspension and brake overhaul from the ground up. Integrating these checks into your classic car pre purchase inspection checklist guarantees you uncover critical safety liabilities before ever driving the car home.
The Dynamic Road Test: Evaluating Behavior and Closing the Purchase
Static inspections reveal hidden rot and obvious leaks, but a dynamic road evaluation uncovers how the machine behaves under actual mechanical load. Never finalize a purchase from the driveway. Accelerating through the gears, applying threshold braking, and loading the chassis through corners brings underlying powertrain stress and unaligned suspension geometry right to the surface.
On-Road Dynamics and Electrical Testing
Pull away smoothly and find an open, level stretch of pavement. Accelerate moderately while feeling for hesitation, carburetor flat spots, or clutch slipping under load. Take mental note of any howling wheel bearings, driveline vibrations at cruising speeds, or high-pitched rear differential whine when lifting off the throttle.
Test the braking system firmly from speed. The vehicle should track dead straight; violent pulls to the left or right point toward seized caliper slides, glazed drum shoes, or unequal hydraulic pressures. While driving and once parked with the engine running, systematically audit the interior switchgear:
- Cycle the headlights, high beams, turn indicators, and brake lights to spot grounding faults.
- Check that factory gauges register accurate water temperature, charging voltage, and consistent oil pressure.
- Inspect the original fuse block and under-dash wiring harnesses for brittle cloth insulation, melted plastic blocks, or messy aftermarket splices.
The Final Decision Matrix
After returning from the road test, compile your findings to make an objective, unsentimental assessment. Sort every detected issue into two distinct categories: straightforward service fixes versus structural or legal deal-breakers. Worn tie rods, weeping valve covers, and aged brake hoses are standard maintenance items that you can budget for. Conversely, buckled frame horns, rotted cowl assemblies, and mismatched title numbers represent structural liabilities that rarely justify the financial investment.
Use your itemized defects as objective leverage at the negotiating table. Presenting clear, factual findings removes emotion from the transaction, giving you the leverage to negotiate a sensible adjustment or walk away cleanly from a compromised project. If you decide the platform is solid and want a comprehensive roadmap to build modern dependability into your classic chassis, dive into The Ultimate Restomod Guide. Completing your evaluation with a thorough classic car pre purchase inspection checklist ensures you purchase the vehicle on your own terms, armed with data rather than guesswork.
Take Control of Your Next Vintage Build
A successful project isn’t born in the paint booth; it starts with an uncompromising evaluation in a seller’s garage. When you systematically audit title documentation, probe structural torque boxes for concealed scale, and vet mechanical running gear on the road, you replace wishful thinking with cold, actionable data. Relying on a disciplined classic car pre purchase inspection checklist ensures you invest only in sheet metal and running gear worthy of your time, labor, and vision.
Every vintage machine has a story, but you hold the power to dictate how its next chapter unfolds. Eliminate costly surprises and build with complete confidence using methodical instructional frameworks developed by classic builder Brook Walsh. When you’re ready to engineer modern performance, safety, and reliability into your chosen platform, master your classic car build with The Ultimate Restomod Guide. Grab your tools, trust your diagnostic process, and build something exceptional.
Frequently Asked Questions
Can I perform a thorough classic car pre-purchase inspection without lifting the vehicle?
No, you cannot execute a complete pre-purchase evaluation from ground level. Crawling beneath with a flashlight only gives partial visibility. Lifting the chassis unloads the suspension so you can test ball joints, wheel bearings, and steering play. It also exposes inner rocker channels, torque boxes, and brake line routing that remain hidden when the car sits on its tires. A proper classic car pre purchase inspection checklist requires elevating the wheels safely.
How do I detect hidden body filler if a seller will not allow magnet testing?
Use an electronic digital paint depth gauge or tactile inspection techniques instead. Calibrated paint meters use non-magnetic sensors that won’t scratch delicate clear coats. You can also run a gloved hand across body contours to feel for subtle ripples, or sight panels under low-angle direct lighting. A seller refusing non-marring magnetic checks or electronic depth gauges is an immediate red flag that warrants extreme caution.
What paperwork red flags should immediately terminate a classic car transaction?
Walk away immediately if the title shows an active lien, a bonded title stamp, or an unresolved salvage brand not disclosed upfront. Tampered VIN rivets, missing chassis data plates, or discrepancies between physical frame stampings and state paperwork present massive legal hurdles. If the seller cannot prove a clear, continuous chain of ownership or produce a title in their legal name, walk away before investing in mechanical checks.
Is structural rust on classic car subframe rails repairable for street use?
Structural frame rust is repairable, but it demands professional metal fabrication rather than simple cosmetic patching. Rotted subframe horns, unibody torque boxes, and rusted suspension mounts require sectioning in certified replacement rail sections or aftermarket front clips. If rust compromises primary load paths, the metal cannot safely handle dynamic road stresses without extensive welding and jig alignment. Factor those fabrication demands into your overall build timeline.
What happens if the engine number does not match the vehicle chassis VIN tag?
A mismatched engine number primarily impacts historical investment value rather than mechanical functionality. For pure numbers-matching collector cars, a replaced block significantly reduces market value. For enthusiasts building a performance restomod, a non-original engine matters far less, as the drivetrain is often destined for a modern crate upgrade. Ensure the non-matching block carries clean serial numbers to verify it was legally sourced before proceeding.
Can vintage drum brake systems pass a rigorous road safety inspection today?
Properly rebuilt drum brakes can pass standard mechanical safety inspections, but they remain fundamentally obsolete under modern driving conditions. Drums suffer from severe thermal fade during repeated panic stops and lack the self-cleaning capabilities of modern calipers. Upgrading to a dual-reservoir master cylinder and front disc conversions provides the hydraulic redundancy and stopping force required to safely share highways with modern traffic.
How long does a thorough pre-purchase mechanical and structural inspection take?
A thorough evaluation takes between two and four hours to complete properly. Rushing the process leads to missed defects, overlooked fluid leaks, or unspotted chassis corrosion. Allocating sufficient time allows you to verify title numbers, conduct a true cold start, thoroughly probe the underbody, and execute a dynamic road test. Although vintage builds demand specialized scrutiny, these rigorous diagnostic standards are just as valuable when vetting everyday inventory like used cars for sale Fullerton CA. Working through a methodical classic car pre purchase inspection checklist ensures you leave no mechanical component unchecked.
The worst mistake you can make when evaluating a vintage vehicle is turning the ignition key first. Fresh paint and an intoxicating exhaust note can easily blind you to concealed frame rot, worn transmission synchros, or questionable title paperwork. You already know that gut instinct alone won’t protect your build budget from hidden structural damage or a seller’s clever cosmetic patches. That’s why working through a disciplined classic car pre purchase inspection checklist is your single strongest defense before any cash changes hands.
Mastering this systematic evaluation gives you the power to uncover expensive mechanical flaws and metal fatigue long before finalizing a deal. In this guide, you’ll master the exact step-by-step physical and mechanical inspection process to evaluate any vintage vehicle before buying. We’ll guide you through every critical checkpoint, covering body alignment, undercarriage rust, drivetrain health, and legal identification numbers so you have the objective data needed to negotiate the right price or walk away cleanly.
Key Takeaways
- Learn how to cross-reference hidden frame stampings against title paperwork to confirm authenticity before ever touching a wrench.
- Deploy magnetic testing tools and specialized probes using a classic car pre purchase inspection checklist to uncover concealed rust and body filler.
- Master the cold start protocol and fluid contamination checks to diagnose internal engine health without invasive teardowns.
- Audit structural torque boxes, steering linkages, and brake lines to ensure the running gear meets dependable modern safety standards.
- Translate dynamic road test behaviors and handling vibrations into clear mechanical data to negotiate the price or walk away cleanly.
Pre-Inspection Preparation: Documentation, Tools, and VIN Verification
Every legendary project begins with a baseline assessment. Before you crawl under a rocker panel or evaluate an engine block, you must verify what the car truly is on paper. A structured classic car pre purchase inspection checklist starts long before touching physical hardware. Conducting an independent pre-purchase inspection demands auditing the legal lineage first, because a flawless paint job means nothing if title defects prevent registration.
To see how an experienced builder systematically audits a vintage vehicle on site, watch this walkthrough:
The Essential Inspector Tool Kit
Arrive prepared with diagnostic gear suited for vintage machinery. Pack these essential items before traveling to examine the candidate vehicle:
- High-lumen LED inspection lights and telescoping dental mirrors to inspect boxed sections
- A low-pull refrigerator magnet and digital gauge to measure material uniformity across lower panels
- A digital multimeter, remote starter switch, and fluid test strips to evaluate electrical and cooling components
- A digital bore scope to view inside cylinder walls through spark plug ports
Consult our curated list of recommended gear to ensure your mobile diagnostic pack is complete.
Decoding VINs and Paperwork Authenticity
Cross-referencing identification numbers is your frontline defense against re-stamped shells, hidden liens, and state bond headaches. Inspect the physical Vehicle Identification Number (VIN) plate affixed to the door jamb, A-pillar, or dashboard. Examine the rivets closely. Factory rosette rivets feature specific fluting, while standard round pop rivets indicate tampering.
Trace secondary hidden VIN stampings stamped into the top of the frame rail, firewall, or inner fender apron. Compare these against the state title document. Scrutinize the paperwork for salvage brands, bonded annotations, or active bank liens that could cloud your legal ownership. Finally, read the cowl trim tag and build sheet to cross-reference factory paint codes, interior trim, and original options against the vehicle’s current configuration. Incorporating these verification steps into your classic car pre purchase inspection checklist ensures you purchase clean metal with a clear ownership lineage.
Structural and Bodywork Audit: Detecting Rust, Filler, and Collision Damage
Fresh paint often conceals devastating structural sins. A glossy clear coat and an aggressive stance can seduce any enthusiast, but the true value of any vintage machine lies in its core foundation. Incorporating a thorough structural evaluation into your classic car pre purchase inspection checklist protects you from sinking your budget into a chassis that’s twisted or rusted beyond rescue.
Identifying Fatal Frame and Floor Rust
Grab a brass inspection pick and slide beneath the vehicle. Rust rarely rests in plain sight; it collects inside unibody torque boxes, cab corners, inner rocker channels, and subframe horns where moisture pools over decades. Firmly probe suspect seams and lower boxed sections. Solid steel yields a crisp metallic ping, while scale-choked metal crunches beneath light pressure.
Inspect front crossmembers, rear leaf spring perches, and floor pan drop-offs. If structural delamination has taken hold around suspension mounting points, the platform cannot safely handle road vibrations or dynamic braking forces. Establishing this baseline structural health is critical when planning a build around what is a restomod, where chassis rigidity must support upgraded suspension geometries and modern performance engines.
Uncovering Hidden Bondo and Body Repairs
Step back ten paces and sight down each character line under direct, angled lighting. Factory stampings should transition cleanly from front fenders through the doors and quarter panels. Wavy reflections, orange peel variations, or uneven door gaps frequently signal collision damage pulled straight on a hydraulic rack without proper realignment.
Place an electronic paint depth meter along lower quarter panels, wheel arches, and door sills. Original or cleanly refinished steel typically reads between 4 and 8 mils. Spikes past 20 or 30 mils expose thick layers of polyester filler sculpted over unresolved rot. Keep a weak magnet wrapped in microfiber handy; if it slides right off a rocker panel or dogleg, you’re looking at plastic rather than solid sheet metal. When in doubt about whether a project is structurally viable, tap into Restomod Consulting Services to evaluate chassis integrity before closing the deal.
Mechanical Powertrain Examination: Engine, Cooling, and Drivetrain Integrity
A smooth idle can mask serious internal wear if a seller warms up the engine before your arrival. Never let a warmed-up block disguise poor cold cranking behavior, piston slap, or valve guide smoke. A methodical classic car pre purchase inspection checklist demands that you audit the entire mechanical system systematically, starting with cold fluids and moving back through the drivetrain components.
Cold Start and Fluid Diagnostics
Place your bare hand directly against the intake manifold and exhaust headers before turning the key. The metal must feel stone-cold to the touch. Pull the engine oil cap and examine the underside; milky, frothy condensation signals coolant cross-contamination from a cracked casting or blown head gasket. Pull the dipstick to check oil clarity and smell for unburned gasoline.
Have an assistant turn the ignition while you watch the exhaust tailpipe and listen directly over the open engine bay. Watch for telltale smoke patterns:
- Puffy blue smoke during initial startup indicates worn valve guide seals or tired piston rings.
- Thick white smoke that lingers and smells sweet confirms coolant burning inside the combustion chambers.
- Heavy black soot points toward carburetor jetting issues or stuck choke plates.
Watch the oil pressure gauge immediately after firing. Oil pressure should build within three to five seconds. Once the engine reaches operating temperature, run a cylinder compression test across all banks to verify balanced cylinder sealing within ten percent of each other.
Drivetrain and Gearbox Assessment
Evaluating the transmission and driveline reveals whether the vehicle delivers usable power or requires immediate bench rebuilding. On manual gearboxes, depress the clutch pedal to feel for gritty throwout bearings, slipping friction plates, or leaky hydraulic slave cylinders. For automatics, pull the transmission dipstick to inspect the fluid. Bright pink or red fluid indicates healthy hydraulics, while dark brown fluid with a burnt metallic odor warns of slipping friction bands.
Inspect the underside of the drivetrain with your work light. Grasp the driveshaft near the transmission tailhousing and the rear differential pinion flange, checking for axial play or clicking within the universal joints. Leaking pinion seals and wet axle tubes point to worn bearings that cause howling at highway speeds. If your goal is swapping out an outdated, leaking powertrain for dependable modern horsepower, measure the transmission tunnel and firewall clearances against our resources in the definitive guide to an LS engine swap. Auditing these mechanical systems ensures your classic car pre purchase inspection checklist provides a clear picture of powertrain reliability before you make a commitment.
Underbody, Suspension, and Brake Systems: Running Gear Health
Getting a vintage car elevated off the pavement is where theoretical enthusiasm meets mechanical reality. A solid frame is mandatory, but the running gear dictates whether a vehicle drives with modern composure or wanders dangerously across the lane. Elevate the vehicle safely using rated jack stands on solid structural points. Running through an exhaustive classic car pre purchase inspection checklist requires getting under the chassis with a pry bar and light to evaluate every joint, bushing, and hydraulic line.
Steering Linkage and Front Suspension Checks
Grab the raised front tires at the twelve and six o’clock positions, rocking the assembly firmly to check for loose wheel bearings and worn ball joints. Next, grip at nine and three o’clock to isolate play in the outer tie rods, center link, and idler arm. Excessive slop here translates to severe steering dead zones at speed.
Inspect the steering gearbox sector shaft for fluid weeping and mechanical backlash. Examine the upper and lower control arm bushings. Decades of oil saturation and ozone exposure turn factory rubber into hard, cracked fragments, leading to unpredictable alignment shifts under braking. Check the shock absorbers for oily residue along the damper bodies, and inspect coil spring pockets or rear leaf spring packs for cracked leaves, missing center pins, or rusted shackle mounts.
Brake System Safety Evaluation
Auditing vintage braking hardware is where modern safety standards must take precedence over historical originality. Trace the hydraulic plumbing from the master cylinder down to every corner. Many pre-1967 classics still retain single-reservoir master cylinders, where a single ruptured line causes catastrophic total hydraulic failure. Modernized dual-reservoir setups offer essential hydraulic redundancy.
Search for pitted steel hardlines running along the chassis rails and over the rear axle housing. Flex hoses often swell internally with age, restricting fluid return and causing dragging calipers or drums. Pull the wheels to inspect friction surfaces:
- Check disc brake rotors for deep heat scoring, severe runout, and lip grooving.
- Measure drum brake friction surfaces for heat glazing, hairline fractures, and out-of-round wear.
- Inspect wheel cylinders and caliper piston boots for moist fluid leakage around dust seals.
Explore our detailed product reviews to evaluate aftermarket disc conversions and high-performance master cylinders. If you plan to engineer a dependable daily driver with modern stopping power, use our Premium Project Blueprints to plan your suspension and brake overhaul from the ground up. Integrating these checks into your classic car pre purchase inspection checklist guarantees you uncover critical safety liabilities before ever driving the car home.
The Dynamic Road Test: Evaluating Behavior and Closing the Purchase
Static inspections reveal hidden rot and obvious leaks, but a dynamic road evaluation uncovers how the machine behaves under actual mechanical load. Never finalize a purchase from the driveway. Accelerating through the gears, applying threshold braking, and loading the chassis through corners brings underlying powertrain stress and unaligned suspension geometry right to the surface.
On-Road Dynamics and Electrical Testing
Pull away smoothly and find an open, level stretch of pavement. Accelerate moderately while feeling for hesitation, carburetor flat spots, or clutch slipping under load. Take mental note of any howling wheel bearings, driveline vibrations at cruising speeds, or high-pitched rear differential whine when lifting off the throttle.
Test the braking system firmly from speed. The vehicle should track dead straight; violent pulls to the left or right point toward seized caliper slides, glazed drum shoes, or unequal hydraulic pressures. While driving and once parked with the engine running, systematically audit the interior switchgear:
- Cycle the headlights, high beams, turn indicators, and brake lights to spot grounding faults.
- Check that factory gauges register accurate water temperature, charging voltage, and consistent oil pressure.
- Inspect the original fuse block and under-dash wiring harnesses for brittle cloth insulation, melted plastic blocks, or messy aftermarket splices.
The Final Decision Matrix
After returning from the road test, compile your findings to make an objective, unsentimental assessment. Sort every detected issue into two distinct categories: straightforward service fixes versus structural or legal deal-breakers. Worn tie rods, weeping valve covers, and aged brake hoses are standard maintenance items that you can budget for. Conversely, buckled frame horns, rotted cowl assemblies, and mismatched title numbers represent structural liabilities that rarely justify the financial investment.
Use your itemized defects as objective leverage at the negotiating table. Presenting clear, factual findings removes emotion from the transaction, giving you the leverage to negotiate a sensible adjustment or walk away cleanly from a compromised project. If you decide the platform is solid and want a comprehensive roadmap to build modern dependability into your classic chassis, dive into The Ultimate Restomod Guide. Completing your evaluation with a thorough classic car pre purchase inspection checklist ensures you purchase the vehicle on your own terms, armed with data rather than guesswork.
Take Control of Your Next Vintage Build
A successful project isn’t born in the paint booth; it starts with an uncompromising evaluation in a seller’s garage. When you systematically audit title documentation, probe structural torque boxes for concealed scale, and vet mechanical running gear on the road, you replace wishful thinking with cold, actionable data. Relying on a disciplined classic car pre purchase inspection checklist ensures you invest only in sheet metal and running gear worthy of your time, labor, and vision.
Every vintage machine has a story, but you hold the power to dictate how its next chapter unfolds. Eliminate costly surprises and build with complete confidence using methodical instructional frameworks developed by classic builder Brook Walsh. When you’re ready to engineer modern performance, safety, and reliability into your chosen platform, master your classic car build with The Ultimate Restomod Guide. Grab your tools, trust your diagnostic process, and build something exceptional.
Frequently Asked Questions
Can I perform a thorough classic car pre-purchase inspection without lifting the vehicle?
No, you cannot execute a complete pre-purchase evaluation from ground level. Crawling beneath with a flashlight only gives partial visibility. Lifting the chassis unloads the suspension so you can test ball joints, wheel bearings, and steering play. It also exposes inner rocker channels, torque boxes, and brake line routing that remain hidden when the car sits on its tires. A proper classic car pre purchase inspection checklist requires elevating the wheels safely.
How do I detect hidden body filler if a seller will not allow magnet testing?
Use an electronic digital paint depth gauge or tactile inspection techniques instead. Calibrated paint meters use non-magnetic sensors that won’t scratch delicate clear coats. You can also run a gloved hand across body contours to feel for subtle ripples, or sight panels under low-angle direct lighting. A seller refusing non-marring magnetic checks or electronic depth gauges is an immediate red flag that warrants extreme caution.
What paperwork red flags should immediately terminate a classic car transaction?
Walk away immediately if the title shows an active lien, a bonded title stamp, or an unresolved salvage brand not disclosed upfront. Tampered VIN rivets, missing chassis data plates, or discrepancies between physical frame stampings and state paperwork present massive legal hurdles. If the seller cannot prove a clear, continuous chain of ownership or produce a title in their legal name, walk away before investing in mechanical checks.
Is structural rust on classic car subframe rails repairable for street use?
Structural frame rust is repairable, but it demands professional metal fabrication rather than simple cosmetic patching. Rotted subframe horns, unibody torque boxes, and rusted suspension mounts require sectioning in certified replacement rail sections or aftermarket front clips. If rust compromises primary load paths, the metal cannot safely handle dynamic road stresses without extensive welding and jig alignment. Factor those fabrication demands into your overall build timeline.
What happens if the engine number does not match the vehicle chassis VIN tag?
A mismatched engine number primarily impacts historical investment value rather than mechanical functionality. For pure numbers-matching collector cars, a replaced block significantly reduces market value. For enthusiasts building a performance restomod, a non-original engine matters far less, as the drivetrain is often destined for a modern crate upgrade. Ensure the non-matching block carries clean serial numbers to verify it was legally sourced before proceeding.
Can vintage drum brake systems pass a rigorous road safety inspection today?
Properly rebuilt drum brakes can pass standard mechanical safety inspections, but they remain fundamentally obsolete under modern driving conditions. Drums suffer from severe thermal fade during repeated panic stops and lack the self-cleaning capabilities of modern calipers. Upgrading to a dual-reservoir master cylinder and front disc conversions provides the hydraulic redundancy and stopping force required to safely share highways with modern traffic.
How long does a thorough pre-purchase mechanical and structural inspection take?
A thorough evaluation takes between two and four hours to complete properly. Rushing the process leads to missed defects, overlooked fluid leaks, or unspotted chassis corrosion. Allocating sufficient time allows you to verify title numbers, conduct a true cold start, thoroughly probe the underbody, and execute a dynamic road test. Working through a methodical classic car pre purchase inspection checklist ensures you leave no mechanical component unchecked.