
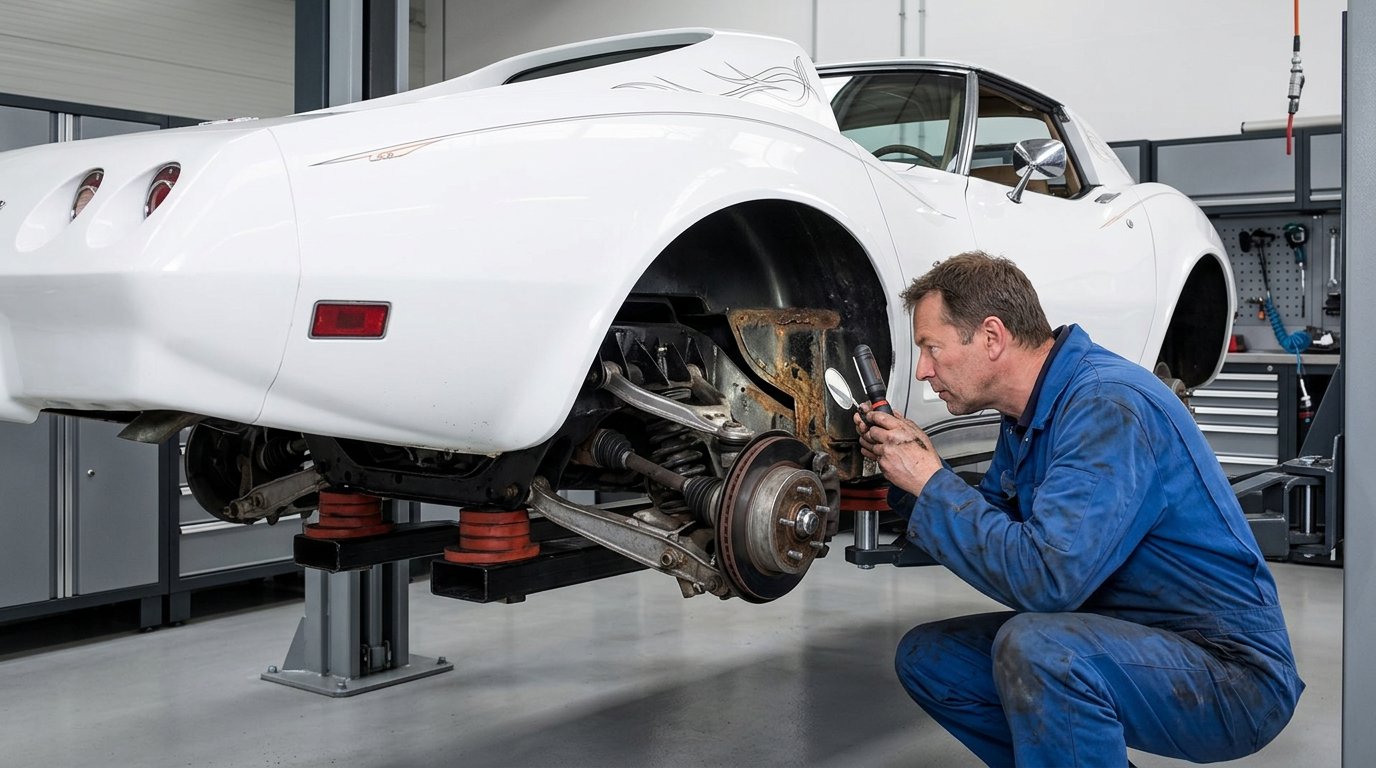
A clean-looking C3 Corvette can still hide serious corrosion where the frame and body structure trap moisture. This C3 Corvette frame rust inspection guide starts with the frame rails, trailing-arm pockets, crossmember and birdcage, where holes, flaking metal or weakened seams matter more than a thin layer of surface rust.
It’s natural to focus on the visible frame, but a careful inspection also follows the structure behind the kick panels, around the windshield and through the door openings. You’ll learn what to examine from underneath, how to tell surface oxidation from structural damage, and when removing wheels or suspension components can reveal areas you can’t see during a walk-around. Take your time: a methodical look helps you understand the car’s condition before restoration plans take shape.
Key Takeaways
- Inspect frame rails, trailing-arm pockets, and the birdcage; holes, flaking metal, or weakened seams can signal structural corrosion rather than surface rust.
- Check the front crossmember and engine cradle for bends, then look for clues that impact damage may have shifted the frame.
- Account for year-to-year differences: the frame rails changed on later C3 models, and floor construction varies across the generation.
- Removing the rear wheels can expose rust-prone trailing-arm pockets, while further disassembly may reveal corrosion hidden by suspension components.
Distinguishing surface rust from structural corrosion
Inspect the frame and nearby body structure for rust, distinguishing superficial oxidation from metal loss. A weakened frame can pose a serious safety risk, particularly if corrosion affects alignment or structural support. Don’t drive a Corvette with suspected structural corrosion until the damage has been assessed.
-
Identify Surface Rust
Examine exposed frame rails for a thin, even coating of rust. Surface rust can be normal on a C3 Corvette, but appearance alone can’t establish the metal’s condition. Check seams and edges for scale, swelling, or layers that lift away. C3 side rails are multi-piece welded assemblies, so inspect the joints carefully. Avoid scraping aggressively, which can remove sound metal or hide the boundary between corrosion and intact steel.
-
Assess Structural Corrosion
Look for deep flaking, holes, separated seams, or metal that has lost its original shape. A screwdriver-sized puncture through a frame rail indicates serious damage and is reason to reject a prospective purchase. Don’t force a tool through the steel. Instead, use existing rail openings to inspect inside. A small scope or finger may reveal rust particles trapped within the rail, even when the outside looks deceptively solid.
-
Inspect Hidden Areas
Put the Corvette on a lift and examine the rails from underneath, including the trailing-arm pockets just ahead of the rear wheels. Check the body mounts behind both kick panels, then inspect the birdcage through the lower kick-panel openings. Rust at the lower radiator mount can point to birdcage corrosion. Check the windshield base, where moisture can collect between the glass, adhesive, and metal, even in dry climates after washing.
Front crossmember and engine-cradle inspection
Inspect the front cradle for distortion as well as corrosion. A straight reference can reveal bends that rust alone won’t explain.
- Start with a clear view of the front crossmember and engine cradle. Look for creases, crushed edges, cracked welds, and sections that seem out of square. Compare the left and right sides around suspension and engine mounting points. Fresh-looking repairs beside older corrosion also warrant closer examination. Record your observations before cleaning or disturbing the surface, so the original condition is clear.
- Use a straight aluminum boxed bar cut to 26-3/8 inches to check the C3 front frame cradle for bending. Hold the bar as a straight reference against the cradle, and look for gaps or uneven contact that suggest distortion. Keep the bar steady, and compare corresponding areas on both sides rather than judging one point in isolation. This check can reveal a bend, but it doesn’t explain its cause or establish the full condition of the frame.
- Read the bar check alongside the surrounding metal. A bent cradle, damaged mounting area, or uneven frame geometry deserves closer assessment, especially if the Corvette shows signs of collision damage. Side impacts can shift front frame rails and affect alignment; a head-on impact may move one rail forward or backward relative to the other. A visual check alone cannot prove the chassis is straight. Note the location and direction of any mismatch and include it in the overall inspection.
- Record corrosion and deformation separately. Rust can weaken metal without visibly bending it, while impact damage can distort steel that otherwise looks sound. Inspect the crossmember’s edges and seams for flaking, separation, or metal loss, then compare your findings with the straight-bar check. If the cradle appears bent or its mounting points don’t align, don’t assume surface cleanup will fix the problem. A precise record helps guide the next restoration decision.
C3 frame design and year-to-year differences
- Identify the model year before comparing frame details. The C3 generation spans 1968 to 1982, and its frame design carried over from the 1963-1967 C2 Corvettes. The boxed-steel frame stayed almost identical from 1968 to 1979. That continuity makes these years useful reference points, but don’t assume every car has identical parts or condition. Confirm the year, then assess the frame according to its design period.
- Pay special attention to the rear rails on 1980-1982 Corvettes. These models had different rear frame rails to accommodate the aluminum rear axle housing. Compare the shape and layout with the correct year, rather than treating an earlier C3 as a direct match. A design change can affect what looks original and where corrosion or repairs appear. Keep the axle housing and rear rail configuration in view as you inspect.
- Describe the boxed-steel chassis and birdcage separately. The birdcage is the steel structure inside the fiberglass body, extending upward over the windshield and along both rocker panels. It supports body areas distinct from the frame rails. Corrosion in the birdcage therefore affects a different part of the structure than chassis rust. Record each location separately to keep the two systems distinct.
- Use floor construction as another year-specific clue. C3 Corvettes from 1975 and earlier had fiberglass floors, while models from 1976 to 1982 had steel pan floors. On a later car, include the floor pans in the rust inspection and note their condition separately from the frame. Earlier cars still require attention to the steel birdcage and chassis. Unlike later C5 and C6 hydroformed space-frame designs, C3 structure is relatively straightforward to examine.

Frame and suspension disassembly for inspection
Use a lift, tools to remove the rear tires, and a small inspection scope. The lift exposes the underside, while removing the tires opens access around the trailing-arm pockets. A scope can reveal debris inside the frame rails.
- Raise the C3 Corvette on a lift to inspect the chassis from below. Move along both sides and note where suspension components block your view. Check exposed surfaces and seams, then mark areas that remain hidden. A lift makes it easier to follow the frame continuously rather than judging isolated sections from beside the car.
- Remove the rear tires to reach the trailing-arm pockets just ahead of the rear wheels. Inspect the pocket edges and surrounding metal, which are difficult to assess during a walk-around with the tires on. Look for rust scale, packed debris, and signs of corrosion continuing behind suspension parts. Use a light to examine recesses, and record what you find before deciding whether further disassembly is worthwhile.
- Use existing frame-rail openings to inspect inside with a small scope. Look for loose rust particles and buildup that may indicate corrosion within the rail. You can also feel for debris through an opening with a finger, but don’t push past sharp edges. Limit the inspection to existing access points. The aim is to assess hidden conditions, not enlarge or damage an opening.
- With access improved, inspect the independent rear suspension as well as the frame. Check the trailing-arm and lower-link bushings, hub bearings, and half-shaft universal joints for wear. These components don’t establish frame condition, but they belong in the same inspection record. If you plan further teardown, note that the metal rear leaf spring is bundled at its center and attaches to the differential with four bolts.
- Compare what you can see before and after removing the rear tires. If suspension components still conceal rust, record that limitation rather than treating an obscured area as clean. The practical takeaway is simple: tire removal improves access, while further disassembly can help when critical metal remains hidden or visible damage needs closer examination.
Restomod Academy: The Ultimate Restomod Guide
Restomod Academy’s The Ultimate Restomod Guide is a practical next step after assessing a C3’s frame and structure. Use it when inspection findings start shaping a larger restoration or modernization plan, and you want to connect condition assessment with the decisions ahead. If you’re weighing how to approach a complex project, Restomod Consulting Services can help you think through the build, while Premium Project Blueprints offer structured project guidance. Keep your rust findings, model year, and areas needing further inspection in view as you plan. A sound restoration begins with understanding the car before choosing the work. Contact Restomod Academy to discuss your project.
Turn Your Inspection Into a Build Plan
A frame inspection is most useful when it informs what happens next. Use your findings to decide whether the Corvette is ready for restoration planning, needs a closer structural assessment, or should not be driven until the damage is assessed. Base that decision on the car’s actual condition, not the appeal of a quick cosmetic fix.
Let this C3 Corvette frame rust inspection guide mark the start of a more deliberate project. A clear plan can preserve the car’s character while making room for the reliability and performance you want from it. If you’re ready to consider the next stage, contact Restomod Academy and bring your project goals into the conversation.
Work through one decision at a time. Careful judgment now helps give your Corvette a sounder foundation for the road ahead.
Frequently Asked Questions
Where to Check for Rust?
Start beneath the car, then follow the structure toward the body. Use this C3 Corvette frame rust inspection guide as a zone-by-zone checklist, moving from the front cradle through the rails to the rear kickups. Inside the cabin, inspect around the windshield base and behind the kick panels. Record each finding by location and condition so you can distinguish separate concerns when planning the next step.
Which frame areas on a C3 Corvette are most prone to rust?
Prioritize the multi-piece side rails, trailing-arm pockets, and rear kickups, where seams and recesses can conceal corrosion. Also examine the body mounts behind the driver- and passenger-side kick panels, the lower radiator mount, and the birdcage. On cars with steel floor pans, inspect the front and rear pans too. Road salt exposure raises concern, particularly for cars driven in the Northeast.
How do you inspect C3 Corvette frame rust without removing the body?
Inspect the car from below on a lift and use existing frame openings to check inside the rails. Removing the rear tires improves access around the trailing-arm pockets without removing the body. A small inspection scope can reveal debris in hidden sections. This approach covers accessible areas, but a body-on inspection can’t expose every concealed surface, so note any areas that remain blocked.
How can you check the birdcage, body mounts, and windshield frame for corrosion?
Remove the lower kick panels to view the birdcage’s front upright, and inspect behind both kick panels where body mounts sit. At the windshield base, look through the glass where the dashboard meets the cowl. Check door openings too: the birdcage supports the hinge area at the front and striker attachment at the rear. On hardtop C3 models, include the structure supporting the T-tops.
How can you distinguish surface rust from structural frame damage?
Surface rust appears as oxidation without obvious holes or loss of shape; structural damage involves metal loss, perforation, or compromised seams. Compare several nearby areas rather than judging one rusty patch alone. A screwdriver-sized hole through a rail signals serious corrosion, but don’t force a tool through intact metal. Check accessible openings for rust particles, which can indicate corrosion hidden inside a rail.
What are the warning signs of hidden rust in C3 Corvette frame rails and kickups?
Watch for loose rust particles through frame openings, layered scale at seams, and corrosion near rail joints or recesses. A clean exterior doesn’t rule out internal buildup. Compare both sides and note areas obscured by suspension components. A C3 Corvette frame rust inspection guide is most useful when it records inaccessible areas separately, rather than treating unseen sections as sound.
A clean-looking C3 Corvette can still hide serious corrosion where the frame and body structure trap moisture. This C3 Corvette frame rust inspection guide starts with the frame rails, trailing-arm pockets, crossmember and birdcage, where holes, flaking metal or weakened seams matter more than a thin layer of surface rust.
It’s natural to focus on the visible frame, but a careful inspection also follows the structure behind the kick panels, around the windshield and through the door openings. You’ll learn what to examine from underneath, how to tell surface oxidation from structural damage, and when removing wheels or suspension components can reveal areas you can’t see during a walk-around. Take your time: a methodical look helps you understand the car’s condition before restoration plans take shape.
Key Takeaways
- Inspect frame rails, trailing-arm pockets, and the birdcage; holes, flaking metal, or weakened seams can signal structural corrosion rather than surface rust.
- Check the front crossmember and engine cradle for bends, then look for clues that impact damage may have shifted the frame.
- Account for year-to-year differences: the frame rails changed on later C3 models, and floor construction varies across the generation.
- Removing the rear wheels can expose rust-prone trailing-arm pockets, while further disassembly may reveal corrosion hidden by suspension components.
Distinguishing surface rust from structural corrosion
Inspect the frame and nearby body structure for rust, distinguishing superficial oxidation from metal loss. A weakened frame can pose a serious safety risk, particularly if corrosion affects alignment or structural support. Don’t drive a Corvette with suspected structural corrosion until the damage has been assessed.
-
Identify Surface Rust
Examine exposed frame rails for a thin, even coating of rust. Surface rust can be normal on a C3 Corvette, but appearance alone can’t establish the metal’s condition. Check seams and edges for scale, swelling, or layers that lift away. C3 side rails are multi-piece welded assemblies, so inspect the joints carefully. Avoid scraping aggressively, which can remove sound metal or hide the boundary between corrosion and intact steel.
-
Assess Structural Corrosion
Look for deep flaking, holes, separated seams, or metal that has lost its original shape. A screwdriver-sized puncture through a frame rail indicates serious damage and is reason to reject a prospective purchase. Don’t force a tool through the steel. Instead, use existing rail openings to inspect inside. A small scope or finger may reveal rust particles trapped within the rail, even when the outside looks deceptively solid.
-
Inspect Hidden Areas
Put the Corvette on a lift and examine the rails from underneath, including the trailing-arm pockets just ahead of the rear wheels. Check the body mounts behind both kick panels, then inspect the birdcage through the lower kick-panel openings. Rust at the lower radiator mount can point to birdcage corrosion. Check the windshield base, where moisture can collect between the glass, adhesive, and metal, even in dry climates after washing.
Front crossmember and engine-cradle inspection
Inspect the front cradle for distortion as well as corrosion. A straight reference can reveal bends that rust alone won’t explain.
- Start with a clear view of the front crossmember and engine cradle. Look for creases, crushed edges, cracked welds, and sections that seem out of square. Compare the left and right sides around suspension and engine mounting points. Fresh-looking repairs beside older corrosion also warrant closer examination. Record your observations before cleaning or disturbing the surface, so the original condition is clear.
- Use a straight aluminum boxed bar cut to 26-3/8 inches to check the C3 front frame cradle for bending. Hold the bar as a straight reference against the cradle, and look for gaps or uneven contact that suggest distortion. Keep the bar steady, and compare corresponding areas on both sides rather than judging one point in isolation. This check can reveal a bend, but it doesn’t explain its cause or establish the full condition of the frame.
- Read the bar check alongside the surrounding metal. A bent cradle, damaged mounting area, or uneven frame geometry deserves closer assessment, especially if the Corvette shows signs of collision damage. Side impacts can shift front frame rails and affect alignment; a head-on impact may move one rail forward or backward relative to the other. A visual check alone cannot prove the chassis is straight. Note the location and direction of any mismatch and include it in the overall inspection.
- Record corrosion and deformation separately. Rust can weaken metal without visibly bending it, while impact damage can distort steel that otherwise looks sound. Inspect the crossmember’s edges and seams for flaking, separation, or metal loss, then compare your findings with the straight-bar check. If the cradle appears bent or its mounting points don’t align, don’t assume surface cleanup will fix the problem. A precise record helps guide the next restoration decision.
C3 frame design and year-to-year differences
- Identify the model year before comparing frame details. The C3 generation spans 1968 to 1982, and its frame design carried over from the 1963-1967 C2 Corvettes. The boxed-steel frame stayed almost identical from 1968 to 1979. That continuity makes these years useful reference points, but don’t assume every car has identical parts or condition. Confirm the year, then assess the frame according to its design period.
- Pay special attention to the rear rails on 1980-1982 Corvettes. These models had different rear frame rails to accommodate the aluminum rear axle housing. Compare the shape and layout with the correct year, rather than treating an earlier C3 as a direct match. A design change can affect what looks original and where corrosion or repairs appear. Keep the axle housing and rear rail configuration in view as you inspect.
- Describe the boxed-steel chassis and birdcage separately. The birdcage is the steel structure inside the fiberglass body, extending upward over the windshield and along both rocker panels. It supports body areas distinct from the frame rails. Corrosion in the birdcage therefore affects a different part of the structure than chassis rust. Record each location separately to keep the two systems distinct.
- Use floor construction as another year-specific clue. C3 Corvettes from 1975 and earlier had fiberglass floors, while models from 1976 to 1982 had steel pan floors. On a later car, include the floor pans in the rust inspection and note their condition separately from the frame. Earlier cars still require attention to the steel birdcage and chassis. Unlike later C5 and C6 hydroformed space-frame designs, C3 structure is relatively straightforward to examine.
Frame and suspension disassembly for inspection
Use a lift, tools to remove the rear tires, and a small inspection scope. The lift exposes the underside, while removing the tires opens access around the trailing-arm pockets. A scope can reveal debris inside the frame rails.
- Raise the C3 Corvette on a lift to inspect the chassis from below. Move along both sides and note where suspension components block your view. Check exposed surfaces and seams, then mark areas that remain hidden. A lift makes it easier to follow the frame continuously rather than judging isolated sections from beside the car.
- Remove the rear tires to reach the trailing-arm pockets just ahead of the rear wheels. Inspect the pocket edges and surrounding metal, which are difficult to assess during a walk-around with the tires on. Look for rust scale, packed debris, and signs of corrosion continuing behind suspension parts. Use a light to examine recesses, and record what you find before deciding whether further disassembly is worthwhile.
- Use existing frame-rail openings to inspect inside with a small scope. Look for loose rust particles and buildup that may indicate corrosion within the rail. You can also feel for debris through an opening with a finger, but don’t push past sharp edges. Limit the inspection to existing access points. The aim is to assess hidden conditions, not enlarge or damage an opening.
- With access improved, inspect the independent rear suspension as well as the frame. Check the trailing-arm and lower-link bushings, hub bearings, and half-shaft universal joints for wear. These components don’t establish frame condition, but they belong in the same inspection record. If you plan further teardown, note that the metal rear leaf spring is bundled at its center and attaches to the differential with four bolts.
- Compare what you can see before and after removing the rear tires. If suspension components still conceal rust, record that limitation rather than treating an obscured area as clean. The practical takeaway is simple: tire removal improves access, while further disassembly can help when critical metal remains hidden or visible damage needs closer examination.
Restomod Academy: The Ultimate Restomod Guide
Restomod Academy’s The Ultimate Restomod Guide is a practical next step after assessing a C3’s frame and structure. Use it when inspection findings start shaping a larger restoration or modernization plan, and you want to connect condition assessment with the decisions ahead. If you’re weighing how to approach a complex project, Restomod Consulting Services can help you think through the build, while Premium Project Blueprints offer structured project guidance. Keep your rust findings, model year, and areas needing further inspection in view as you plan. A sound restoration begins with understanding the car before choosing the work. Contact Restomod Academy to discuss your project.
Turn Your Inspection Into a Build Plan
A frame inspection is most useful when it informs what happens next. Use your findings to decide whether the Corvette is ready for restoration planning, needs a closer structural assessment, or should not be driven until the damage is assessed. Base that decision on the car’s actual condition, not the appeal of a quick cosmetic fix.
Let this C3 Corvette frame rust inspection guide mark the start of a more deliberate project. A clear plan can preserve the car’s character while making room for the reliability and performance you want from it. If you’re ready to consider the next stage, contact Restomod Academy and bring your project goals into the conversation.
Work through one decision at a time. Careful judgment now helps give your Corvette a sounder foundation for the road ahead.
Frequently Asked Questions
Where to Check for Rust?
Start beneath the car, then follow the structure toward the body. Use this C3 Corvette frame rust inspection guide as a zone-by-zone checklist, moving from the front cradle through the rails to the rear kickups. Inside the cabin, inspect around the windshield base and behind the kick panels. Record each finding by location and condition so you can distinguish separate concerns when planning the next step.
Which frame areas on a C3 Corvette are most prone to rust?
Prioritize the multi-piece side rails, trailing-arm pockets, and rear kickups, where seams and recesses can conceal corrosion. Also examine the body mounts behind the driver- and passenger-side kick panels, the lower radiator mount, and the birdcage. On cars with steel floor pans, inspect the front and rear pans too. Road salt exposure raises concern, particularly for cars driven in the Northeast.
How do you inspect C3 Corvette frame rust without removing the body?
Inspect the car from below on a lift and use existing frame openings to check inside the rails. Removing the rear tires improves access around the trailing-arm pockets without removing the body. A small inspection scope can reveal debris in hidden sections. This approach covers accessible areas, but a body-on inspection can’t expose every concealed surface, so note any areas that remain blocked.
How can you check the birdcage, body mounts, and windshield frame for corrosion?
Remove the lower kick panels to view the birdcage’s front upright, and inspect behind both kick panels where body mounts sit. At the windshield base, look through the glass where the dashboard meets the cowl. Check door openings too: the birdcage supports the hinge area at the front and striker attachment at the rear. On hardtop C3 models, include the structure supporting the T-tops.
How can you distinguish surface rust from structural frame damage?
Surface rust appears as oxidation without obvious holes or loss of shape; structural damage involves metal loss, perforation, or compromised seams. Compare several nearby areas rather than judging one rusty patch alone. A screwdriver-sized hole through a rail signals serious corrosion, but don’t force a tool through intact metal. Check accessible openings for rust particles, which can indicate corrosion hidden inside a rail.
What are the warning signs of hidden rust in C3 Corvette frame rails and kickups?
Watch for loose rust particles through frame openings, layered scale at seams, and corrosion near rail joints or recesses. A clean exterior doesn’t rule out internal buildup. Compare both sides and note areas obscured by suspension components. A C3 Corvette frame rust inspection guide is most useful when it records inaccessible areas separately, rather than treating unseen sections as sound.