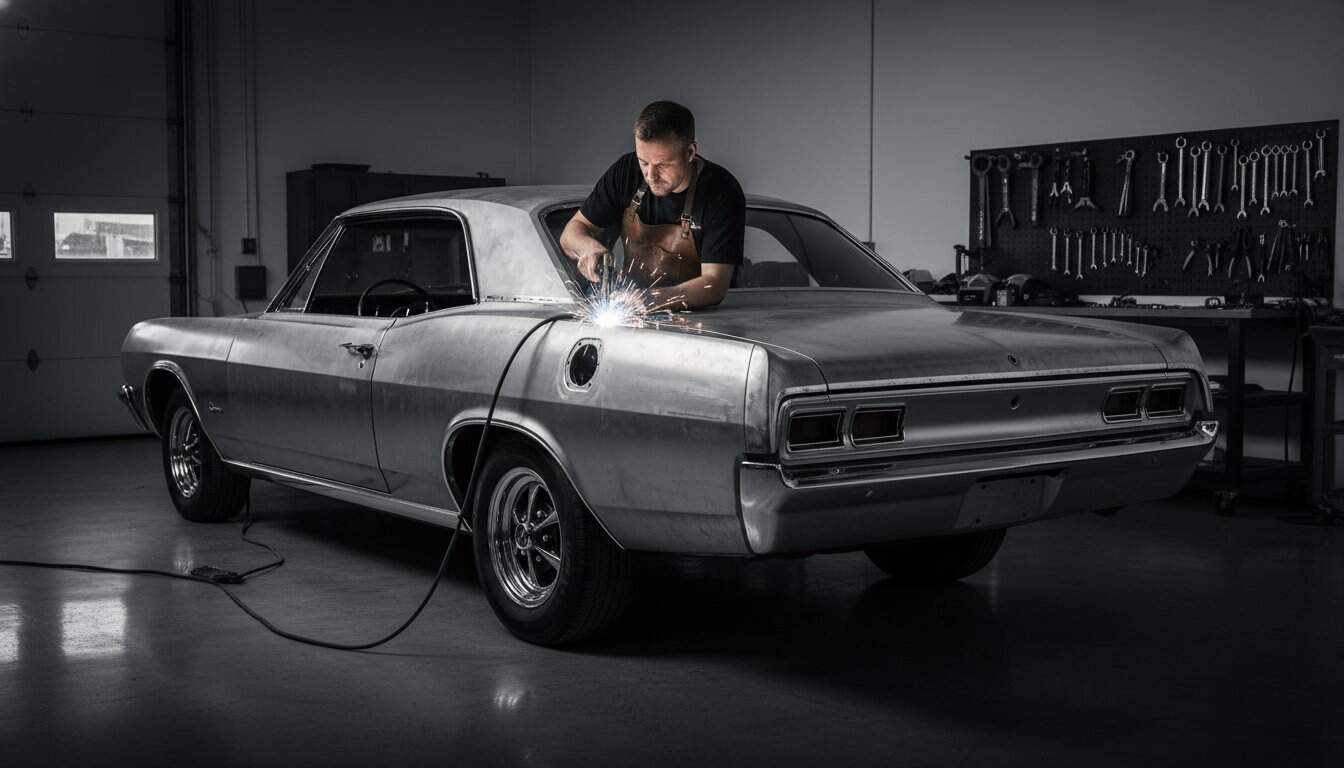
You can drop a 650-horsepower LT4 crate engine into a 1969 Chevelle, but if that power hits a frame held together by iron oxide and hope, you’ve built a high-speed liability. Most builders realize too late that classic car rust repair isn’t just about aesthetics; it’s the essential foundation of modern performance. You likely feel that familiar pit in your stomach when you stare at a bubbling quarter panel. You know the corrosion is deeper than it looks, and the fear of cutting too far or choosing the wrong chemical converter keeps your angle grinder on the shelf.
We understand that hesitation because every master fabricator started with that same uncertain first cut. This guide transforms your anxiety into the precision of a seasoned restomodder. You will master the exact sequence for identifying, cutting, and performing permanent metal restoration to ensure your chassis handles modern cornering forces. We’ll break down the 5-step fabrication process used by elite restoration shops to ensure rust stays gone for another 50 years. From selecting the right weld-through primer to perfecting your butt-welds, you’re about to gain the confidence to rebuild your car’s soul from the bare metal up.
Key Takeaways
- Uncover hidden rot and identify the electrochemical process that compromises your car’s safety before it undermines your entire build.
- Build a professional fabrication arsenal with non-negotiable tools and safety gear that bridge the gap between a hobbyist garage and a pro shop.
- Navigate the critical “repair vs. replace” dilemma to determine when to save original steel during your classic car rust repair project.
- Execute a surgical, step-by-step workflow focused on the “measure twice, cut once” mantra to ensure every patch panel fits with precision.
- Protect your legacy by applying modern sealing techniques and 2026-standard epoxy primers that guard your metalwork against future corrosion.
The Restomod Reality Check: Identifying and Assessing Classic Car Rust
Rust isn’t just a cosmetic blemish. It’s an aggressive electrochemical process where iron, oxygen, and moisture conspire to dismantle your project’s integrity from the inside out. For any serious builder, mastering classic car rust repair is the first step in ensuring a high-performance future for a vintage vehicle. You aren’t just cleaning up old metal; you’re preserving the structural foundation required to handle modern horsepower and improved suspension geometry.
Don’t let a “rust-free” sales pitch fool you. In the world of vintage steel, that phrase is almost always a myth. Oxygen finds its way into every unsealed lap joint and hidden pocket over forty years of service. To truly understand the scope of your build, you must look past the fresh paint and see the metal for what it really is. This assessment is a critical part of the automotive restoration process, determining whether you have a solid candidate or a parts car.
To better understand the depth of metal revival required for a high-end build, watch this helpful video:
The Restomod Academy philosophy is simple: fix it once, fix it right, and fix it for performance. We don’t patch for the sake of a quick flip. If you’re planning on dropping a 500-horsepower crate engine into a chassis, those small soft spots will quickly become catastrophic failures under torque. You need a solid base before you can build a masterpiece.
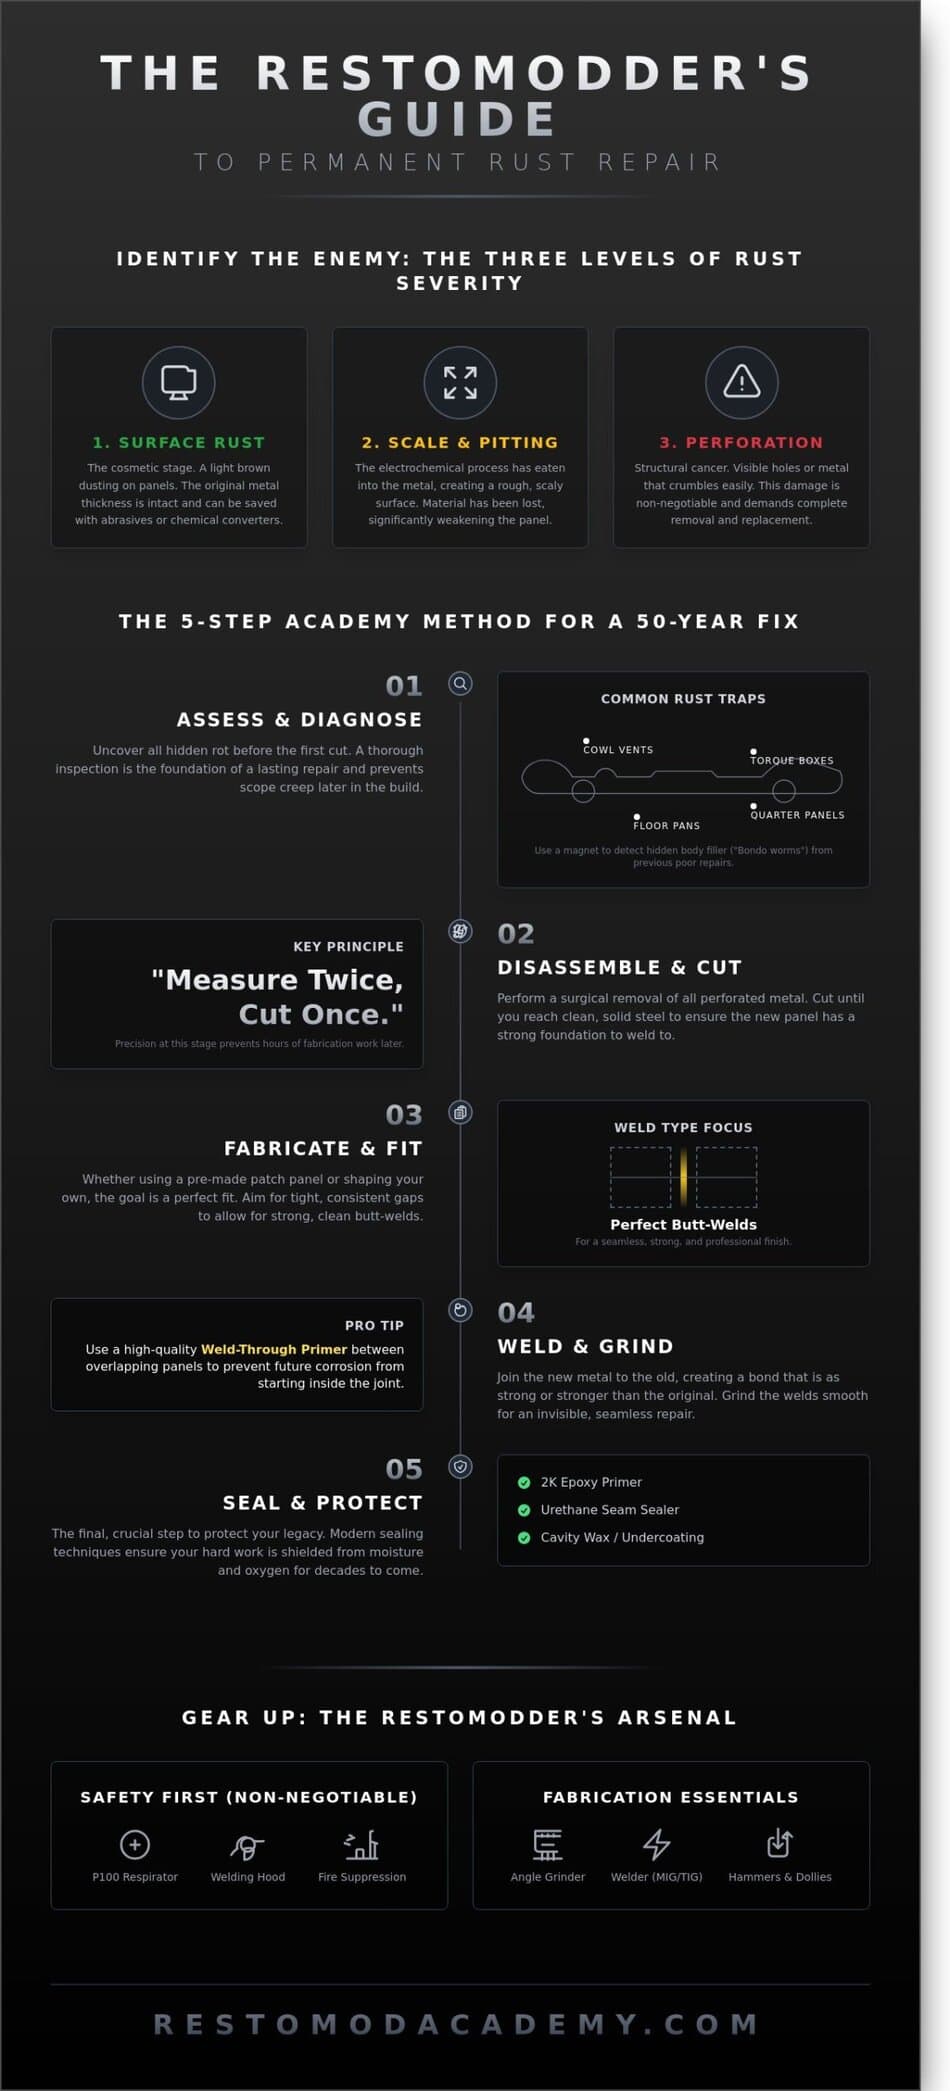
The Three Levels of Rust Severity
- Surface Rust: This is the cosmetic stage. It’s the brown dusting you see on a hood or roof. You can usually save this metal using abrasives or chemical converters without losing the original gauge thickness.
- Scale and Pitting: Here, the electrochemical reaction has eaten deep into the metal. The surface feels rough and scaly. You’ve lost material, which means the metal is significantly weaker than when it left the factory.
- Perforation: This is structural “cancer.” When you see holes or metal that crumbles like a cracker, you’ve reached full perforation. This stage demands that you cut out the rot and perform expert metal fabrication to restore safety.
Common Rust Traps in Popular Classic Models
Focus your inspection on cowl vents, floor pans, and torque boxes. These areas collect debris and moisture, rotting from the inside out. They are foundational to the car’s rigidity and are critical areas to address during the Restomod Project Planning phase. If these zones are soft, the car’s handling will never be precise, no matter how much you spend on shocks.
Use a strong magnet and a sharp pick to find hidden “Bondo worms.” These are thick layers of body filler used to hide previous bad repairs. A magnet that won’t stick to a lower quarter panel is a red flag. Identifying these issues early allows you to budget for the classic car rust repair properly before you get too deep into the mechanical assembly.
The Restomodder’s Arsenal: Essential Tools for Metal Restoration
Don’t pick up a torch until your safety gear is staged and ready. Metal restoration is a gritty, high-stakes game where sparks fly and fine dust permeates everything. Your first investments must be a P100-rated respirator, a high-definition auto-darkening welding hood, and a dedicated fire suppression system. Gaining a firm grasp on automotive technology principles will teach you how vintage steel behaves under the stress of heat and grinding. This knowledge prevents warped panels and structural failures before they happen. Safety isn’t just about protection; it’s about maintaining the focus required for precision craftsmanship.
Cutting and Grinding Essentials
A 4.5-inch angle grinder is the undisputed workhorse of the restoration shop. It’s small enough to reach into tight wheel wells but powerful enough to slice through frame rails. You’ll go through consumables quickly, so stock up on 0.045-inch cut-off wheels for precision slicing and 40-grit flap discs for smoothing out your welds. Twisted wire wheels are essential for stripping heavy scale from the undercarriage. For a curated list of tools that won’t quit halfway through your build, browse the Restomod Academy Recommended Gear.
Welding and Fabrication Tools
MIG welding remains the most accessible path for classic car rust repair. It provides the control needed for thin 18-gauge or 20-gauge sheet metal without the steep learning curve of TIG. Precision is everything in metalwork. Cleco pins are indispensable for holding patch panels in perfect alignment while you tack them. A high-quality hammer and dolly set allows you to move metal with finesse, ensuring your repair flows seamlessly into the original body lines. Don’t skimp on your helmet; a clear view of the puddle is the difference between a professional-grade repair and a messy failure.
Budget vs. Performance: The Tool Hierarchy
Modern technology is changing the restoration landscape. While traditional media blasting remains the standard for stripping large areas, portable laser rust removers are becoming a viable, clean option for surgical cleaning. Choosing the right setup for classic car rust repair depends on your project’s scope and your long-term goals.
- Good: A reliable 110v MIG welder, corded angle grinders, and manual metal shears. Perfect for the weekend warrior on a budget.
- Better: A 220v multi-process welder for deeper penetration and cordless brushless grinders for better mobility around the chassis.
- Best: A dedicated TIG setup for concours-level welds, a laser rust removal system, and a pneumatic planishing hammer for expert metal finishing.
Every tool you master adds value to your build and sharpens your craft. If you’re still planning your vision, explore what is a restomod to see how these tools bring modern performance to classic iron.
Repair vs. Replace: Deciding the Best Path for Your Sheet Metal
Every restomodder eventually faces the same crossroads when they uncover a cluster of pinholes or a jagged, rusted-out wheel arch. You must weigh the value of original craftsmanship against the efficiency of modern reproduction parts. If you spend 20 hours hammer-forming a complex curve for a quarter panel that costs $300 to replace, your labor rate effectively drops to pennies. However, if that panel is original factory steel on a rare survivor, the effort preserves the vehicle’s legacy and resale value. Your choice defines the project’s trajectory.
Safety remains your primary directive during classic car rust repair. If you are planning an LS Engine Swap, your metalwork must handle 400 plus foot-pounds of torque. Rust compromises the molecular integrity of the steel; it makes the metal brittle and thin. Patching a frame rail that needs to support a high-output modern drivetrain is a gamble you won’t win. Before you strike an arc, assess your skill level. A simple flat patch is a great starting point for a novice, but a full roof skin replacement requires advanced bracing techniques and a steady hand to avoid warping the entire greenhouse.
When to Use Patch Panels
Localized decay in non-structural areas is the perfect candidate for a patch. This approach works best when the surrounding metal is thick and healthy. If reproduction panels aren’t manufactured for your specific year, you’ll need to fabricate your own. Use the Academy Method: create a precise template using heavy card stock to mirror the contours before you ever touch a cutoff wheel. This ensures your new 18-gauge steel fits perfectly. This method saves money and keeps as much of the original car intact as possible.
When Full Panel Replacement is Mandatory
Safety dictates a full replacement when rust consumes more than 30% of a component. Extensive “swiss cheese” patterns indicate that oxidation has moved deep into the metal’s grain, making a patch panel temporary at best. You must replace the entire unit if you find structural failure in rockers, floor pans, or suspension mounting points. Cutting out the entire section is the only way to guarantee a solid foundation. This meticulous approach ensures your classic car rust repair results in a build that remains safe at highway speeds and under heavy cornering loads.
The Academy Method: A Step-by-Step Guide to Permanent Rust Repair
Successful restoration is a marathon of patience. When you approach classic car rust repair, the “measure twice, cut once” mantra isn’t just a suggestion; it’s the difference between a seamless repair and a warped quarter panel. You’re not just patching a hole. You’re restoring the structural integrity and the soul of the vehicle. The biggest mistake beginners make is trying to weld over “dirty” or oxidized metal. Rust is a contaminant. If you try to arc over it, you’ll end up with a porous, brittle weld that will fail within 12 months. You need clean, virgin steel to create a bond that lasts another fifty years.
Step 1: Excavation and Template Making
Start by stripping the area with a wire wheel or 36-grit sanding disc. You must find “white” metal, which is shiny and free of pits. Rust often travels 3 to 6 inches under seemingly healthy paint. Once you’ve reached solid ground, cut out the rot using a die grinder or plasma cutter. Don’t throw the old metal away yet. Use it as a guide to trace a template onto heavy cardstock. Press the paper against the opening and rub the edges with a dirty glove to create a perfect “shadow” of the hole. Transfer this shape to a fresh sheet of 18 or 20 gauge cold-rolled steel, leaving a tiny margin for fine-tuning.
Step 2: Cutting, Fitting, and Tacking
At the Academy, we always advocate for the butt-joint over the lap-joint. While overlapping metal is easier to weld, it creates a moisture trap between the layers that invites “cancer” back into your build. Aim for a consistent 1/16th inch gap around the entire perimeter of your patch. This gap allows for full weld penetration. Secure your patch using Cleco fasteners or high-strength magnets to keep the surfaces flush. Fire your first tacks at the four “corners” of the patch. These initial points lock the geometry in place. If the patch isn’t perfectly level with the surrounding bodywork now, it never will be.
Step 3: Final Welding and Metal Finishing
Heat is the enemy of thin sheet metal. To prevent the panel from oil-canning or warping, use the “stitch welding” technique. Place a single tack weld, then move to the opposite side of the patch. Wait until the metal is cool enough to touch with a bare hand before adding the next bead. This methodical pace keeps the 1,500-degree heat localized. Once the seam is fully closed, use a 60-grit flap disc to grind the beads flush. Avoid thinning the parent metal. Finally, shine a high-intensity LED light from the back of the panel. If you see even a tiny pinhole of light, you must fill it. A single hole is an open door for moisture and future failure.
Precision fabrication requires the right tools to ensure your classic car rust repair stands the test of time. Build your workshop the right way by checking out our recommended gear for metal restoration.
Beyond the Patch: Modern Sealing and Long-Term Prevention
You’ve spent hours cutting, fitting, and welding. Now comes the most critical phase of the project. If you leave fresh metal exposed to the atmosphere for even 24 hours, flash rust begins its invisible work. Your classic car rust repair is only as permanent as the barrier you place between the steel and the oxygen. To ensure your hard work survives until 2050 and beyond, you must adopt a 2026-standard sealing strategy. This isn’t just about hiding the work; it’s about creating a molecular bond that locks out moisture forever.
Think of this stage as the insurance policy for your craftsmanship. We don’t build cars to see them bubble in five years. We build them to be driven and admired for decades. Proper sealing transforms a simple repair into a lifetime restoration. It provides the smooth, stable surface necessary to execute your Restomod Paint Ideas with total confidence.
Chemical Conversion and Priming
Even the cleanest metal has microscopic pits where oxygen hides. Use a phosphoric acid-based converter to treat these areas before the first coat of primer. This chemical reaction transforms trace iron oxide into an inert, black phosphate coating. Once prepped, skip the old-school “self-etching” primers. While they were the industry standard for decades, they’re often porous and offer limited moisture resistance.
Instead, reach for a high-solids epoxy primer. Epoxy creates a non-porous, waterproof shell that sticks to metal like a mechanical weld. For a 100% moisture-proof seal, apply two medium coats with a 30-minute flash time between them. This creates the rock-solid foundation required for high-end body fillers and topcoats. It’s the only way to ensure your classic car rust repair doesn’t fail from the inside out.
The “Built to Last” Maintenance Routine
Rust often starts where you can’t see it. Modern restomodders use 360-degree spray wands to apply cavity waxes and internal frame coatings inside rocker panels and frame rails. These coatings remain semi-pliable, which means they won’t crack or chip when the chassis flexes under high-torque loads. Commit to an annual inspection of your drain holes and weather stripping. A single clogged leaf in a cowl drain can ruin a 500-hour restoration in just one rainy season.
- Clean drain holes in doors and rockers every 12 months.
- Apply a 9H-rated ceramic coating over your final paint for added UV and water protection.
- Inspect undercoating for rock chips that could expose bare metal.
Your metalwork is now a legacy. You’ve conquered the oxidation and replaced decay with structural integrity. It’s time to move from the fabrication table to the finish booth and give your vision the color it deserves. Your classic is officially ready for its modern transformation.
Claim Your Legacy in the Garage
Cutting through the rot is the first true test of any restomod project. You’ve now gained the insight to distinguish between minor surface scaling and the deep structural decay that threatens your car’s integrity. By applying the Academy Method, you’re moving past temporary patches toward permanent solutions that fuse vintage aesthetics with modern durability. Industry experts estimate that 70 percent of a quality paint job’s longevity depends entirely on the precision of the metalwork hidden beneath it. Mastering classic car rust repair isn’t just about fixing holes; it’s about engineering a foundation capable of handling the high-torque demands of a modern performance build.
We’ve built this platform as enthusiasts for enthusiasts, focusing on the rigorous safety standards required for today’s roads. Our step-by-step blueprints remove the guesswork from fabrication, giving you the same technical guidance used by professional shops. You’ve got the vision and the drive to bring this classic back to life. Now, it’s time to pick up the torch and make it happen. Grab your gear and let’s get to work.
Download The Ultimate Restomod Guide to master every stage of your build
Frequently Asked Questions
Is it worth repairing a car with a lot of rust?
It depends on the vehicle’s market value and your emotional connection to the project. If the repair costs exceed 70% of the finished restomod’s valuation, professional shops often advise against the investment. However, for a rare 1969 Charger, even a 50% replacement of the floor pans and frame rails preserves a legacy that outweighs the initial cost. Evaluate your vision before you cut the first piece of steel.
Can I fix classic car rust without welding?
You cannot permanently fix structural classic car rust repair without a welder. While panel adhesives like 3M 08115 provide a 3,500 psi bond for non-structural skins, they don’t replace the integrity of a fused metal joint. Use fiberglass or mesh only for cosmetic, non-load-bearing areas. For a true restomod build, you must learn to lay a clean bead or hire a professional fabricator to ensure the chassis remains rigid.
How much does it cost to have a professional fix classic car rust?
Professional metal work typically ranges from $75 to $150 per hour depending on the shop’s region and expertise. According to 2024 industry surveys from the Specialty Equipment Market Association (SEMA), a full floor pan replacement often requires 20 to 40 hours of labor. This brings the total for a single major section to between $1,500 and $6,000. Always get a written estimate before starting a full teardown.
What is the best rust converter for classic cars in 2026?
Corroseal and POR-15 remain the industry standards for converting iron oxide into a stable magnetite layer. These formulas utilize tannic acid to neutralize surface rust on areas where you can’t reach with a grinder. Apply two coats to ensure 100% coverage on the inner frame rails. This chemical transformation creates a polymer barrier that seals out oxygen and moisture for 10 or more years.
Can I use Bondo to fill rust holes?
Do not use body filler to plug holes; it absorbs moisture and causes the surrounding metal to rot within 12 months. Bondo is a finishing tool designed to level imperfections thinner than 1/8 of an inch. You must weld in a 100% steel patch panel to bridge any gaps. Once the metal is solid, use a high-quality filler to smooth the transition for a show-quality finish.
How do I stop rust from coming back after a repair?
Stop future corrosion by sealing every bare metal surface with an epoxy primer immediately after grinding. Statistics from the NACE International indicate that moisture begins oxidizing unprotected steel within 30 minutes in humid environments. Use a seam sealer on every joint to prevent water from sitting in the gaps. Finish your classic car rust repair by spraying an internal frame coating into boxed sections for 360-degree protection.
What gauge steel is best for classic car patch panels?
Most American muscle cars from the 1960s use 18-gauge or 20-gauge cold-rolled steel for body panels. Use a digital micrometer to measure your specific vehicle, as thicknesses vary by 0.010 inches between different manufacturers. For frame sections or structural supports, you will typically need 10-gauge to 14-gauge steel. Matching the original thickness ensures the heat from your welder does not warp the surrounding metal during the fabrication process.
Is structural rust repair safe for a high-performance restomod?
Structural repair is safe and necessary if you follow American Welding Society (AWS) standards for penetration and strength. A restomod with 500 horsepower puts 40% more stress on the chassis than the original factory engine. You must replace compromised torque boxes and frame rails with high-strength steel to handle the increased torque. Proper fabrication ensures your car remains rigid and predictable during high-speed cornering or hard launches.