
Your classic car wasn’t engineered to handle a modern freeway on-ramp, and no amount of nostalgia changes that fact. Those wide, sweeping body rolls and that vague, disconnected steering feel weren’t design choices; they were the limitations of a era when suspension geometry was still being figured out. If you’ve ever white-knuckled a corner in your muscle car or felt your cruiser lean like a ship in a swell, you already know the problem runs deeper than worn bushings or tired shocks.
That frustration is real, and it’s shared by builders everywhere who refuse to choose between the soul of a classic and the confidence of modern handling. This classic car sway bar upgrade guide was built for exactly that tension. Whether you’re wrestling with frame compatibility questions or trying to decode the difference between solid and hollow bar diameters, the answers are here, laid out in a way that respects both your intelligence and your build.
Inside, you’ll find everything you need to select, size, and install the right sway bar setup for your specific platform, covering front and rear configurations, bushing choices, and how to integrate your upgrade without compromising the character that made you fall in love with the car in the first place.
Key Takeaways
- Vintage suspension geometry was designed around bias-ply tires, and pairing that old-school engineering with modern radial grip creates genuine safety hazards that go far beyond a rough ride.
- This classic car sway bar upgrade guide walks you through every critical decision point, from selecting the right bar diameter to matching your upgrade to a specific build goal, whether that’s daily driving comfort or pro-touring performance.
- Sway bars deliver one of the highest handling returns for the investment of any suspension component, but their effectiveness depends heavily on the geometry corrections you make alongside them.
- Choosing between coilovers, air ride, and traditional springs isn’t just a budget decision; each technology serves a fundamentally different vision for what your build should feel like on the road.
- Before spending a dollar on suspension hardware, two foundational steps, a thorough chassis inspection and a locked-in tire and wheel package, will determine whether your upgrade succeeds or becomes an expensive lesson.
The Evolution of Handling: Why Vintage Suspension Fails Modern Roads
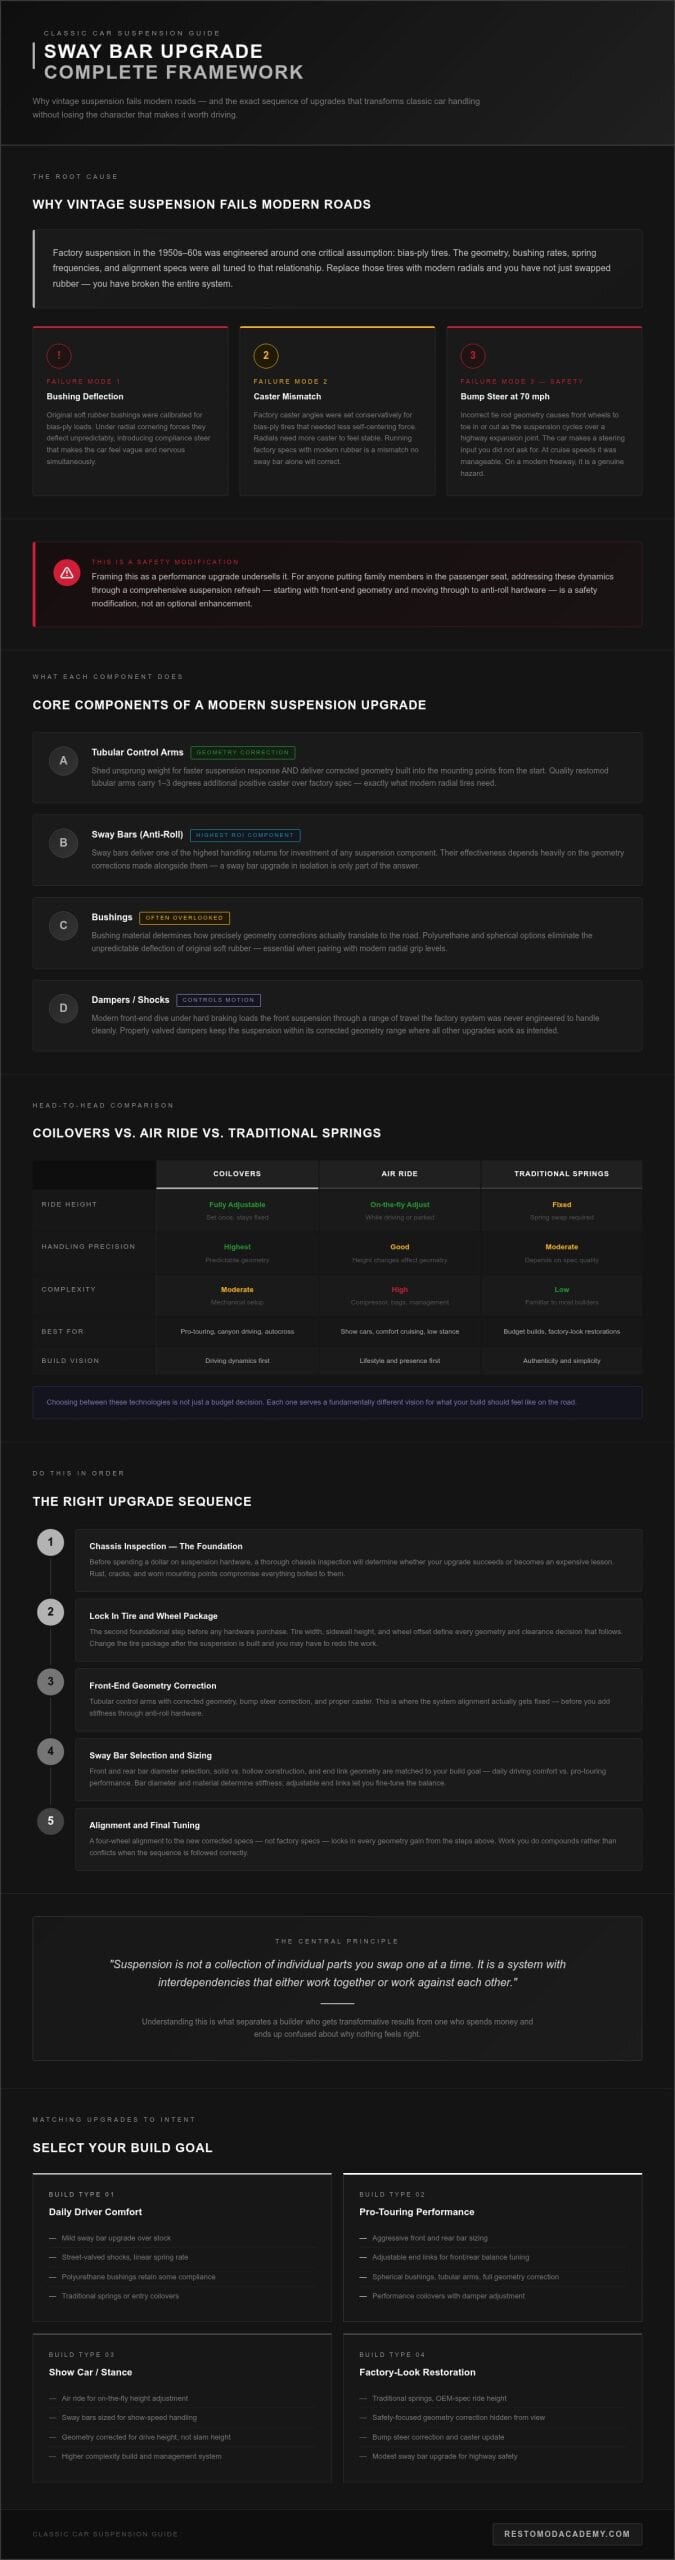
Suspension engineering in the 1950s and 1960s was built around a specific set of assumptions, and every single one of them has changed. The tire compounds, the road surfaces, the braking systems, the speeds. Factory engineers designed those systems to work in harmony with bias-ply tires that had narrow contact patches, soft sidewalls, and relatively modest grip limits. The suspension geometry, the bushing rates, the spring frequencies, all of it was tuned to that relationship. Pull that tire out of the equation and replace it with a modern radial, and you haven’t just swapped rubber; you’ve broken the entire system.
That’s the core insight this classic car sway bar upgrade guide returns to again and again: suspension isn’t a collection of individual parts you swap one at a time. It’s a system with interdependencies that either work together or work against each other. Understanding that principle is what separates a builder who gets transformative results from one who spends money and ends up confused about why nothing feels right.
The Radial Tire Revolution
Modern radial tires generate lateral grip that original factory bushings were never designed to manage. Those soft rubber bushings were calibrated to flex predictably under bias-ply loads. Under radial cornering forces, they deflect unpredictably, introducing compliance steer that makes the car feel vague and nervous at the same time. Original alignment specifications compound the problem. Caster angles from factory specs were set conservatively, because bias-ply tires needed less self-centering force to return to straight. Radials need more caster to feel stable and communicate properly through the steering column. Running factory caster specs with modern rubber is a mismatch that no amount of sway bar tuning will fully correct on its own.
Safety and Reliability on Modern Highways
Bump steer is the symptom that gets dangerous fast. When your tie rod geometry causes the front wheels to toe in or out as the suspension cycles over a highway expansion joint at 70 mph, the car makes a steering input you didn’t ask for. At vintage cruise speeds, that was manageable. On a modern freeway, it’s a genuine hazard. The problem intensifies when you factor in modern braking systems. Bigger rotors and higher-friction pads generate significantly more front-end dive under hard braking, which loads the front suspension through a range of travel it was never engineered to handle cleanly.
Framing this as a performance upgrade undersells it. For anyone putting family members in the passenger seat, addressing these dynamics through a comprehensive suspension refresh, starting with front-end geometry and moving through to anti-roll hardware, is a safety modification. The classic car sway bar upgrade guide framework exists to help you approach that process in the right sequence, with the right priorities, so the work you do compounds rather than conflicts.
Understanding what a restomod actually means as a philosophy makes this clearer. It’s not about erasing the character of your build. It’s about giving that character a foundation it can actually stand on.
Core Components of a Modern Suspension Upgrade
Every component in a suspension system has a job, and understanding what each one actually does changes how you prioritize your build budget. The mistake most builders make is treating suspension upgrades like a shopping list rather than an engineering solution. Pull the right thread, and the entire system starts to make sense.
Tubular Control Arms and Geometry Correction
Factory stamped steel control arms were designed for mass production, not precision handling. Tubular replacements solve two problems simultaneously: they shed unsprung weight, which directly improves how quickly the suspension responds to road inputs, and they’re engineered with corrected geometry built into the mounting points from the start. That second part is where the real handling gain lives.
Most quality restomod tubular arms carry additional positive caster built into their design, typically between one and three degrees more than factory spec, which is exactly what modern radial tires need to self-center properly and communicate road feel through the wheel. Control arm length also governs how much camber the wheel gains as the suspension compresses. Longer arms reduce camber gain through the stroke, which keeps the contact patch flatter during cornering and gives you more predictable grip at the limit.
The Role of Sway Bars and Bushings
Here’s where this classic car sway bar upgrade guide earns its keep: sway bars deliver more handling improvement per dollar than almost any other suspension component you can bolt on. Factory anti-roll bars on most classic platforms were sized for comfort over control. Many builders describe them as “toothpick” bars, and that’s not far off. A front bar that measures 7/8 of an inch from the factory can be replaced with a 1-3/8 inch solid or hollow unit that transforms body roll without requiring a complete suspension rebuild.
The bushing choice matters just as much as the bar diameter. Rubber bushings absorb NVH well, which is why they feel comfortable, but they also allow the bar to deflect under load before it actually starts working. That compliance robs you of response. Polyurethane bushings close that gap significantly, transmitting force more directly while still offering enough compliance to avoid transferring every road imperfection into the cabin. Delrin bushings sit at the stiff end of the spectrum and are best reserved for dedicated track or pro-touring builds where NVH is a secondary concern.
Matching bushing stiffness to your frame is a real consideration. Unibody platforms distribute load differently than full-frame cars, and a bushing that works brilliantly on a body-on-frame cruiser can introduce unwanted harshness on a unibody platform. Take the time to research your specific chassis before committing to a durometer. The depth of thinking that goes into a proper drivetrain build applies equally here; the system rewards patience and planning over impulse purchases.
Comparing Top Suspension Technologies: Coilovers vs. Air Ride vs. Springs
Choosing your spring medium is one of the most consequential decisions in any restomod build, and it’s also one of the most misunderstood. The conversation usually collapses into tribal camps: coilover devotees dismiss air ride as a show-car gimmick, while air ride enthusiasts mock spring-based builds as outdated. Both positions miss the point. Each technology represents a genuine engineering philosophy, and the right answer depends entirely on what you’re actually building.
The Coilover Advantage
Coilovers earn their reputation through simplicity and precision. A quality coilover unit gives you independent control over ride height and damping in a single, compact assembly. That’s powerful. You can dial in your stance at the corner, then tune your shock valving to match the spring rate without adding complexity to the system. For a pro-touring build or anything that sees regular canyon roads, that combination is difficult to beat.
Spring rate selection deserves serious attention here, particularly when front-end weight changes. Swapping a cast-iron big block for an LS engine typically drops 100 to 150 pounds from the nose, which means the spring rate that handled your original engine will now feel harsh and over-sprung. Coilovers make that recalibration straightforward; you swap springs rather than rebuilding the entire front end. That kind of adaptability is exactly why coilovers dominate pro-touring applications.
Air Ride for the Modern Restomod
Air ride has earned a reputation it doesn’t entirely deserve. Yes, it’s the system of choice for show builds that spend their lives on trailer floors. But modern air management has moved well beyond simple bag-and-valve setups. Digital height-sensor systems maintain consistent ride height regardless of load, adjusting in real time rather than responding to pressure changes that may not reflect actual chassis position. That’s a meaningful engineering distinction, not a marketing claim.
The honest trade-offs are worth naming. A complete air system requires a compressor, a tank, a manifold, and a network of lines, all of which need to live somewhere. On a full-size cruiser with a deep trunk, that’s manageable. On a compact platform, you’re making real compromises to cargo space and build complexity. Leaks, fittings, and solenoid maintenance add long-term ownership considerations that coilovers simply don’t carry. For a builder who wants maximum versatility and is comfortable with that complexity, air ride delivers. For everyone else, it’s worth a clear-eyed assessment before committing.
Balancing Stance and Performance
This is where this classic car sway bar upgrade guide draws a line that most resources won’t: stance and suspension travel are in direct conflict, and you cannot have both at their extremes. A slammed car looks purposeful in a parking lot and becomes dangerous on a real road. When you drop a car past its designed suspension travel range, the geometry corrections you’ve spent money on stop working. The control arms hit their bump stops early, the anti-roll bars bind, and the tire contact patch goes from optimized to compromised.
The sweet spot for a pro-touring build typically lands at one to two inches of lowering from stock ride height. That range captures the center-of-gravity benefit without sacrificing the suspension travel the system needs to function. Before you finalize any ride height, run through this clearance checklist:
- Check tire-to-fender clearance at full compression with the wheel turned to full lock in both directions
- Verify tire-to-control arm clearance through the full suspension stroke
- Confirm exhaust routing clears the ground at maximum compression
- Check driveshaft angle at ride height to ensure it stays within acceptable operating range
- Inspect sway bar end link geometry to confirm the bar isn’t pre-loaded at rest
That last point connects directly back to your anti-roll hardware. A sway bar that’s pre-loaded at static ride height isn’t tuning your handling; it’s fighting your suspension. Get the ride height right first, then let the bar do its job.
Selection Framework: Matching Upgrades to Your Build Goals
Most suspension guides hand you a parts list and leave you to figure out why you’re buying any of it. That’s exactly the analysis paralysis this classic car sway bar upgrade guide is designed to cut through. Before you spend a dollar, you need to answer one question honestly: what is this car actually for?
Three distinct build goals drive three fundamentally different upgrade paths. Conflating them is how builders end up with a track-spec front bar on a car they drive to work every day, wondering why the ride feels punishing and the tires are wearing unevenly.
The daily driver goal prioritizes confidence and comfort over lap times. You want the body roll addressed, the vague steering tightened up, and the car to feel planted without beating you up on a rough commute. A moderate front bar upgrade paired with quality shocks and fresh polyurethane bushings gets you there without turning the cabin into a vibration chamber.
The pro-touring goal is a different animal entirely. Maximum lateral grip, predictable behavior at the limit, and the ability to carry real speed through a corner. This path demands geometry corrections first, then anti-roll hardware sized to match the increased grip your tire package generates. Half-measures here don’t produce half results; they produce unpredictable ones.
The show stopper goal centers on adjustable stance and visual impact. Handling is secondary. Air ride or a quality coilover setup with wide adjustment range serves this build better than a stiff anti-roll package that fights a slammed ride height.
The Weekend Warrior Setup
For builders who want a meaningful handling improvement without a full chassis teardown, a stage one kit is the right starting point: quality adjustable shocks, matched springs, and a front sway bar upgrade sized one to two steps above factory. Adjustable shocks earn their premium here because they let you tune damping to match your spring rate as the build evolves, rather than locking you into a fixed valving that may not suit your final configuration. That adaptability pays dividends across the life of the build. Check the Recommended Gear page for a curated list of essential suspension tools before you start pulling components.
The Pro-Touring Blueprint
A high-performance suspension system is only as capable as the structure it’s bolted to. That’s not a caveat; it’s the foundational principle of pro-touring builds. A rigid chassis is required for any suspension geometry correction to function as engineered, because a flexing structure changes the relationship between mounting points dynamically, undermining every alignment spec you’ve dialed in.
On unibody platforms, subframe connectors are non-negotiable before any serious suspension work begins. They convert a structure that was designed to absorb crash energy through controlled deformation into one that can actually transmit cornering loads cleanly. Pair that with a 4-link rear conversion to replace leaf springs, and you’ve addressed the two biggest limitations holding back rear-end composure on most classic platforms. Leaf springs were a cost-effective factory solution, not a performance one, and a properly designed 4-link gives you independent control over pinion angle, roll steer, and instant center that no leaf setup can match.
If your build is heading in this direction, the educational framework inside the Ultimate Restomod Guide will help you sequence these decisions so each upgrade compounds the one before it rather than creating new problems to solve.
Planning Your Suspension Transformation: Next Steps
Knowledge without a sequence is just noise. Everything covered in this classic car sway bar upgrade guide points toward a single outcome: a car that handles with confidence and rewards every mile you put on it. Getting there requires four concrete steps, executed in order, before a single new component goes on the car.
Start with a comprehensive chassis and floor pan inspection. This isn’t optional prep work; it’s the foundation everything else depends on. Crawl under the car with a flashlight and a screwdriver. Probe the floor pan seams, the frame rails, and every suspension mounting point. Rust in a control arm pocket or a cracked subframe mount will undermine every dollar you spend on anti-roll hardware. A sway bar mounted to a compromised chassis doesn’t improve handling; it transfers load into a structure that can’t manage it cleanly. Fix the structure first. Full stop.
Step two is locking in your tire and wheel package before buying a single suspension component. Wheel diameter, tire width, and sidewall height all affect the geometry calculations that determine which bar diameter, spring rate, and shock valving you actually need. Choosing your suspension around a tire package you haven’t finalized yet is how builders end up with a setup that works on paper and fights itself on the road.
Step three is gathering the right tools before the car goes on stands. A ball joint separator, a quality spring compressor rated for your specific spring load, a torque wrench calibrated in foot-pounds, and a pickle fork for stubborn tie rod ends are the non-negotiables. Improvising with the wrong tools on suspension components isn’t a shortcut; it’s a safety hazard and a fast path to damaged hardware. The Recommended Gear page has a curated list of what’s worth owning versus renting for a job like this.
Step four completes the process: execute the install, then schedule a professional laser alignment before the car moves under its own power. No competitor will tell you this clearly enough, so this classic car sway bar upgrade guide will. Alignment isn’t a finishing touch; it’s the calibration step that makes every geometry correction you’ve made actually function as designed. Skip it, and you’re guessing.
The Importance of a Build Plan
Document your current ride height and alignment specs before you remove anything. Those baseline numbers tell you exactly how far the car has drifted from factory and give you a reference point for every adjustment that follows. Suspension work done without a documented baseline is harder to diagnose when something doesn’t feel right. The full planning framework inside Restomod Project Planning walks you through building that roadmap from the ground up, sequencing every decision so your budget compounds rather than collides. Of all the modifications a builder can tackle in the driveway, suspension is among the most technically rewarding. The feedback is immediate, the learning is tangible, and the result is a car that genuinely feels like yours.
Mastering the Art of the Restomod
Every builder reaches a point where the individual decisions start connecting into something larger than the sum of their parts. That’s the moment this work stops feeling like maintenance and starts feeling like craft. The Ultimate Restomod Guide exists to accelerate that moment, giving you the framework to make confident decisions across every system in the build, not just suspension. It’s the mentor in your corner when the research gets deep and the options multiply. Download The Ultimate Restomod Guide and start your build today alongside a community of builders who are already doing the work.
Your Build Deserves a Foundation Worth Trusting
Every decision covered in this classic car sway bar upgrade guide points toward the same destination: a classic car that earns its place on a modern road without surrendering the character that made it worth building in the first place. Getting the geometry right before bolting on hardware, matching your bar diameter to your actual build goal, and treating alignment as calibration rather than cleanup are the principles that separate a confident builder from one who keeps chasing problems.
The work is technical, but it’s not mysterious. With the right sequence and the right guidance, every step becomes a skill you own permanently.
Brook Walsh built Restomod Academy around exactly that philosophy: give builders a comprehensive roadmap so every dollar spent compounds into a better car. The Premium Project Blueprints and The Ultimate Restomod Guide are designed to be the mentor in your corner when the decisions get complex. Grab your copy of The Ultimate Restomod Guide and build with confidence. Your classic is worth doing right.
Frequently Asked Questions
Will a suspension upgrade make my classic car ride too stiff for the street?
Not if you match your components to your actual build goal. A street-oriented upgrade using quality adjustable shocks and a moderate sway bar increase delivers noticeably flatter cornering without turning the cabin into a punishment chamber. The key is bushing selection; polyurethane offers a meaningful improvement over rubber compliance without the harshness of Delrin. Builders who end up with a punishing ride almost always over-specified their anti-roll hardware for a car that never sees a track.
Do I need to weld or cut my frame to install a modern suspension kit?
Most bolt-on restomod kits are designed specifically to avoid cutting or welding, working within factory mounting locations while correcting geometry through redesigned component geometry. The exception is chassis reinforcement work on unibody platforms, where subframe connectors genuinely require welding to function properly. That’s structural work worth doing before any serious suspension upgrade, but it’s a one-time foundation step rather than a requirement of the suspension kit itself.
What is the difference between a 4-link and a leaf spring suspension?
A leaf spring is a single component doing three jobs simultaneously: locating the axle, controlling pinion angle, and providing springing. That compromise was a practical factory solution, not an optimized one. A 4-link separates those functions, giving you independent control over pinion angle, roll steer, and the instant center that determines how the rear plants under acceleration. The handling improvement is substantial, particularly on cars where rear-end composure under hard cornering or braking has always felt unpredictable.
How much does a full classic car suspension upgrade cost in 2026?
Giving you a specific number here would be misleading, because the range is genuinely wide depending on platform, build goal, and how much of the labor you handle yourself. A stage one weekend warrior setup costs considerably less than a full pro-touring build with a 4-link conversion and coilovers at all four corners. Rather than budgeting around a dollar figure, budget around your build goal first, then research component costs for your specific chassis. The Ultimate Restomod Guide helps you sequence those decisions so you’re not buying twice.
Can I install a restomod suspension kit myself in my home garage?
Most bolt-on suspension upgrades are genuinely achievable for a builder with intermediate mechanical experience, a quality floor jack, stands, and the right specialty tools. A spring compressor rated for your specific load and a ball joint separator are non-negotiables, not optional. Where professional help earns its cost is at the alignment stage; no home garage setup replaces a laser alignment rack after geometry corrections. Do the installation yourself, then invest in a proper alignment before the car moves under its own power.
How do I know if my classic car needs an alignment after an upgrade?
If you’ve replaced any component that affects wheel position, including control arms, tie rods, sway bar end links, or springs, the car needs an alignment. Full stop. Even replacing bushings can shift alignment specs enough to cause uneven tire wear or unpredictable handling. This classic car sway bar upgrade guide treats alignment as calibration, not cleanup, because that’s exactly what it is. Document your baseline specs before disassembly, then schedule the alignment before your first drive, not after you’ve noticed something feels off.
What are the best brands for restomod suspension kits?
Several manufacturers have built strong reputations in the classic car suspension space, including RideTech, QA1, Detroit Speed, and Ridetech, each with platform-specific strengths. The honest answer is that brand reputation matters less than fitment research for your specific chassis and year. A kit engineered specifically for your platform will outperform a generic solution from a bigger name every time. Cross-reference builder forums for your specific car before committing, and prioritize companies that publish geometry data alongside their marketing claims.
Should I upgrade my brakes at the same time as my suspension?
Practically speaking, yes. A suspension upgrade that improves cornering grip and reduces body roll will also allow you to carry more speed into a braking zone, and factory drum brakes weren’t designed for that scenario. Modern radial tires generate stopping forces that vintage brake systems struggle to manage cleanly, and the front-end dive that comes with harder braking loads your new suspension through a range it needs to handle predictably. Pairing a suspension refresh with a disc brake conversion on at least the front axle is the responsible sequence, not an upsell.
Your classic car wasn’t engineered to handle a modern freeway on-ramp, and no amount of nostalgia changes that fact. Those wide, sweeping body rolls and that vague, disconnected steering feel weren’t design choices; they were the limitations of a era when suspension geometry was still being figured out. If you’ve ever white-knuckled a corner in your muscle car or felt your cruiser lean like a ship in a swell, you already know the problem runs deeper than worn bushings or tired shocks.
That frustration is real, and it’s shared by builders everywhere who refuse to choose between the soul of a classic and the confidence of modern handling. This classic car sway bar upgrade guide was built for exactly that tension. Whether you’re wrestling with frame compatibility questions or trying to decode the difference between solid and hollow bar diameters, the answers are here, laid out in a way that respects both your intelligence and your build.
Inside, you’ll find everything you need to select, size, and install the right sway bar setup for your specific platform, covering front and rear configurations, bushing choices, and how to integrate your upgrade without compromising the character that made you fall in love with the car in the first place.
Key Takeaways
- Vintage suspension geometry was designed around bias-ply tires, and pairing that old-school engineering with modern radial grip creates genuine safety hazards that go far beyond a rough ride.
- This classic car sway bar upgrade guide walks you through every critical decision point, from selecting the right bar diameter to matching your upgrade to a specific build goal, whether that’s daily driving comfort or pro-touring performance.
- Sway bars deliver one of the highest handling returns for the investment of any suspension component, but their effectiveness depends heavily on the geometry corrections you make alongside them.
- Choosing between coilovers, air ride, and traditional springs isn’t just a budget decision; each technology serves a fundamentally different vision for what your build should feel like on the road.
- Before spending a dollar on suspension hardware, two foundational steps, a thorough chassis inspection and a locked-in tire and wheel package, will determine whether your upgrade succeeds or becomes an expensive lesson.
The Evolution of Handling: Why Vintage Suspension Fails Modern Roads
Suspension engineering in the 1950s and 1960s was built around a specific set of assumptions, and every single one of them has changed. The tire compounds, the road surfaces, the braking systems, the speeds. Factory engineers designed those systems to work in harmony with bias-ply tires that had narrow contact patches, soft sidewalls, and relatively modest grip limits. The suspension geometry, the bushing rates, the spring frequencies, all of it was tuned to that relationship. Pull that tire out of the equation and replace it with a modern radial, and you haven’t just swapped rubber; you’ve broken the entire system.
That’s the core insight this classic car sway bar upgrade guide returns to again and again: suspension isn’t a collection of individual parts you swap one at a time. It’s a system with interdependencies that either work together or work against each other. Understanding that principle is what separates a builder who gets transformative results from one who spends money and ends up confused about why nothing feels right.
The Radial Tire Revolution
Modern radial tires generate lateral grip that original factory bushings were never designed to manage. Those soft rubber bushings were calibrated to flex predictably under bias-ply loads. Under radial cornering forces, they deflect unpredictably, introducing compliance steer that makes the car feel vague and nervous at the same time. Original alignment specifications compound the problem. Caster angles from factory specs were set conservatively, because bias-ply tires needed less self-centering force to return to straight. Radials need more caster to feel stable and communicate properly through the steering column. Running factory caster specs with modern rubber is a mismatch that no amount of sway bar tuning will fully correct on its own.
Safety and Reliability on Modern Highways
Bump steer is the symptom that gets dangerous fast. When your tie rod geometry causes the front wheels to toe in or out as the suspension cycles over a highway expansion joint at 70 mph, the car makes a steering input you didn’t ask for. At vintage cruise speeds, that was manageable. On a modern freeway, it’s a genuine hazard. The problem intensifies when you factor in modern braking systems. Bigger rotors and higher-friction pads generate significantly more front-end dive under hard braking, which loads the front suspension through a range of travel it was never engineered to handle cleanly.
Framing this as a performance upgrade undersells it. For anyone putting family members in the passenger seat, addressing these dynamics through a comprehensive suspension refresh, starting with front-end geometry and moving through to anti-roll hardware, is a safety modification. The classic car sway bar upgrade guide framework exists to help you approach that process in the right sequence, with the right priorities, so the work you do compounds rather than conflicts.
Understanding what a restomod actually means as a philosophy makes this clearer. It’s not about erasing the character of your build. It’s about giving that character a foundation it can actually stand on.
Core Components of a Modern Suspension Upgrade
Every component in a suspension system has a job, and understanding what each one actually does changes how you prioritize your build budget. The mistake most builders make is treating suspension upgrades like a shopping list rather than an engineering solution. Pull the right thread, and the entire system starts to make sense.
Tubular Control Arms and Geometry Correction
Factory stamped steel control arms were designed for mass production, not precision handling. Tubular replacements solve two problems simultaneously: they shed unsprung weight, which directly improves how quickly the suspension responds to road inputs, and they’re engineered with corrected geometry built into the mounting points from the start. That second part is where the real handling gain lives.
Most quality restomod tubular arms carry additional positive caster built into their design, typically between one and three degrees more than factory spec, which is exactly what modern radial tires need to self-center properly and communicate road feel through the wheel. Control arm length also governs how much camber the wheel gains as the suspension compresses. Longer arms reduce camber gain through the stroke, which keeps the contact patch flatter during cornering and gives you more predictable grip at the limit.
The Role of Sway Bars and Bushings
Here’s where this classic car sway bar upgrade guide earns its keep: sway bars deliver more handling improvement per dollar than almost any other suspension component you can bolt on. Factory anti-roll bars on most classic platforms were sized for comfort over control. Many builders describe them as “toothpick” bars, and that’s not far off. A front bar that measures 7/8 of an inch from the factory can be replaced with a 1-3/8 inch solid or hollow unit that transforms body roll without requiring a complete suspension rebuild.
The bushing choice matters just as much as the bar diameter. Rubber bushings absorb NVH well, which is why they feel comfortable, but they also allow the bar to deflect under load before it actually starts working. That compliance robs you of response. Polyurethane bushings close that gap significantly, transmitting force more directly while still offering enough compliance to avoid transferring every road imperfection into the cabin. Delrin bushings sit at the stiff end of the spectrum and are best reserved for dedicated track or pro-touring builds where NVH is a secondary concern.
Matching bushing stiffness to your frame is a real consideration. Unibody platforms distribute load differently than full-frame cars, and a bushing that works brilliantly on a body-on-frame cruiser can introduce unwanted harshness on a unibody platform. Take the time to research your specific chassis before committing to a durometer. The depth of thinking that goes into a proper drivetrain build applies equally here; the system rewards patience and planning over impulse purchases.
Comparing Top Suspension Technologies: Coilovers vs. Air Ride vs. Springs
Choosing your spring medium is one of the most consequential decisions in any restomod build, and it’s also one of the most misunderstood. The conversation usually collapses into tribal camps: coilover devotees dismiss air ride as a show-car gimmick, while air ride enthusiasts mock spring-based builds as outdated. Both positions miss the point. Each technology represents a genuine engineering philosophy, and the right answer depends entirely on what you’re actually building.
The Coilover Advantage
Coilovers earn their reputation through simplicity and precision. A quality coilover unit gives you independent control over ride height and damping in a single, compact assembly. That’s powerful. You can dial in your stance at the corner, then tune your shock valving to match the spring rate without adding complexity to the system. For a pro-touring build or anything that sees regular canyon roads, that combination is difficult to beat.
Spring rate selection deserves serious attention here, particularly when front-end weight changes. Swapping a cast-iron big block for an LS engine typically drops 100 to 150 pounds from the nose, which means the spring rate that handled your original engine will now feel harsh and over-sprung. Coilovers make that recalibration straightforward; you swap springs rather than rebuilding the entire front end. That kind of adaptability is exactly why coilovers dominate pro-touring applications.
Air Ride for the Modern Restomod
Air ride has earned a reputation it doesn’t entirely deserve. Yes, it’s the system of choice for show builds that spend their lives on trailer floors. But modern air management has moved well beyond simple bag-and-valve setups. Digital height-sensor systems maintain consistent ride height regardless of load, adjusting in real time rather than responding to pressure changes that may not reflect actual chassis position. That’s a meaningful engineering distinction, not a marketing claim.
The honest trade-offs are worth naming. A complete air system requires a compressor, a tank, a manifold, and a network of lines, all of which need to live somewhere. On a full-size cruiser with a deep trunk, that’s manageable. On a compact platform, you’re making real compromises to cargo space and build complexity. Leaks, fittings, and solenoid maintenance add long-term ownership considerations that coilovers simply don’t carry. For a builder who wants maximum versatility and is comfortable with that complexity, air ride delivers. For everyone else, it’s worth a clear-eyed assessment before committing.
Balancing Stance and Performance
This is where this classic car sway bar upgrade guide draws a line that most resources won’t: stance and suspension travel are in direct conflict, and you cannot have both at their extremes. A slammed car looks purposeful in a parking lot and becomes dangerous on a real road. When you drop a car past its designed suspension travel range, the geometry corrections you’ve spent money on stop working. The control arms hit their bump stops early, the anti-roll bars bind, and the tire contact patch goes from optimized to compromised.
The sweet spot for a pro-touring build typically lands at one to two inches of lowering from stock ride height. That range captures the center-of-gravity benefit without sacrificing the suspension travel the system needs to function. Before you finalize any ride height, run through this clearance checklist:
- Check tire-to-fender clearance at full compression with the wheel turned to full lock in both directions
- Verify tire-to-control arm clearance through the full suspension stroke
- Confirm exhaust routing clears the ground at maximum compression
- Check driveshaft angle at ride height to ensure it stays within acceptable operating range
- Inspect sway bar end link geometry to confirm the bar isn’t pre-loaded at rest
That last point connects directly back to your anti-roll hardware. A sway bar that’s pre-loaded at static ride height isn’t tuning your handling; it’s fighting your suspension. Get the ride height right first, then let the bar do its job.
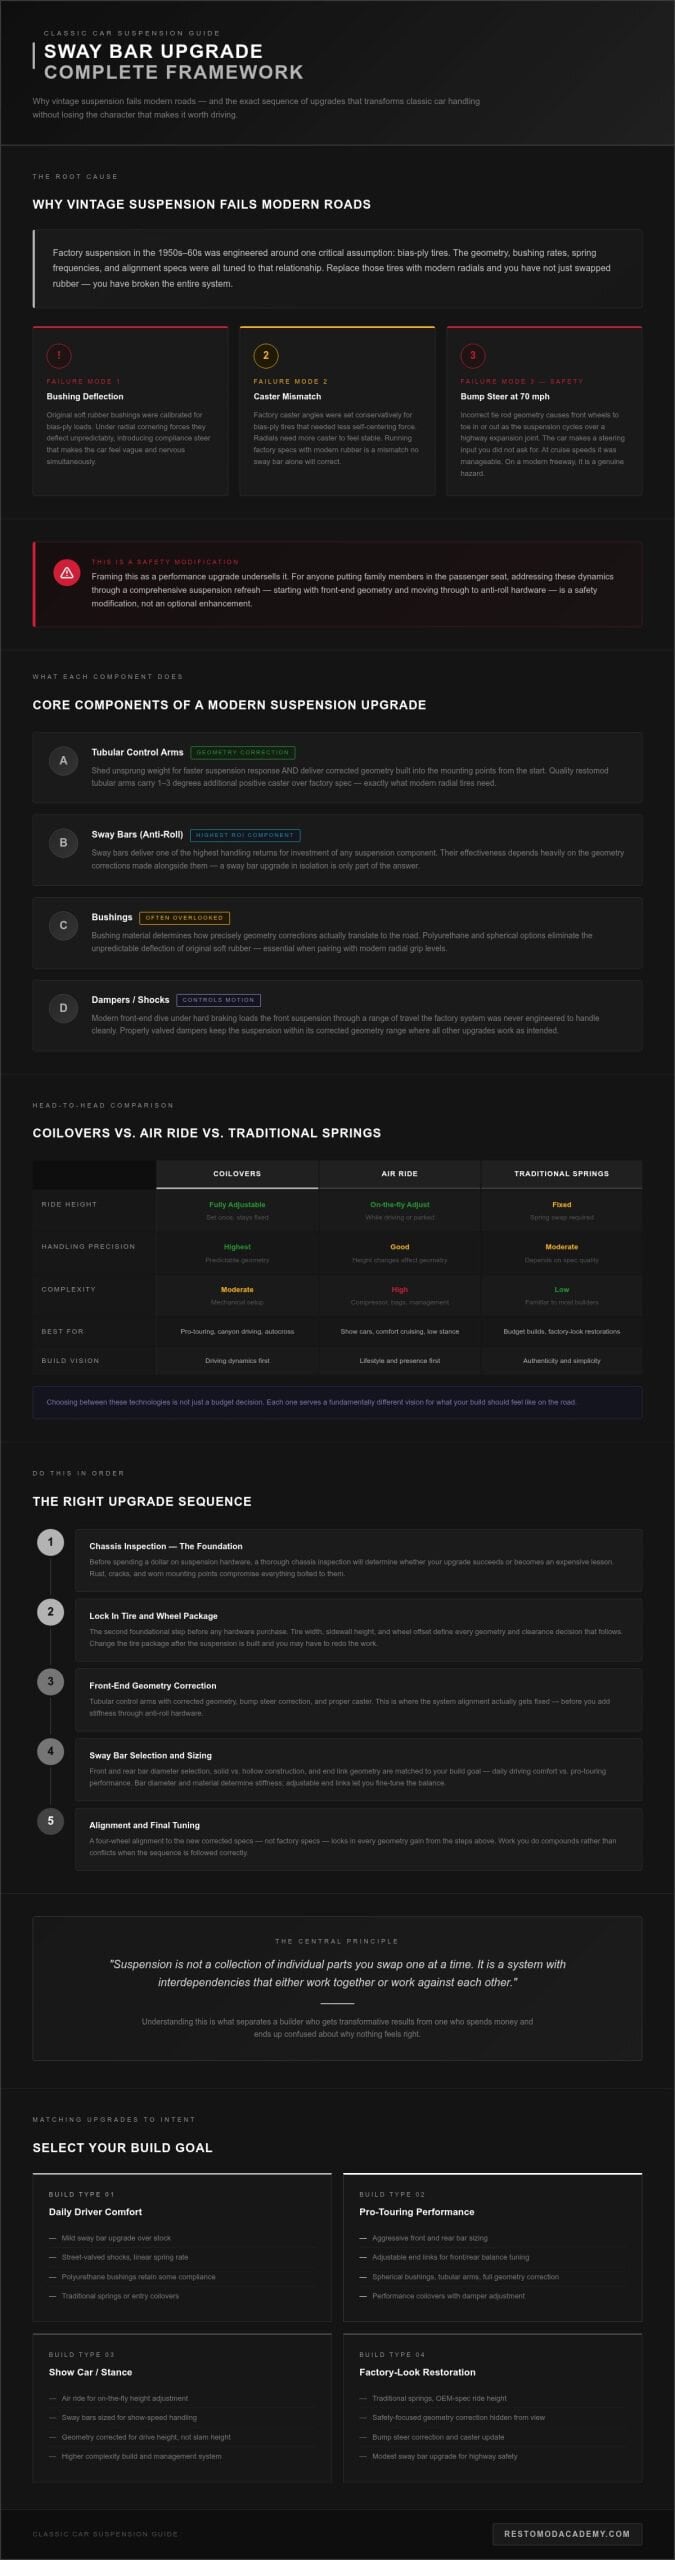
Selection Framework: Matching Upgrades to Your Build Goals
Most suspension guides hand you a parts list and leave you to figure out why you’re buying any of it. That’s exactly the analysis paralysis this classic car sway bar upgrade guide is designed to cut through. Before you spend a dollar, you need to answer one question honestly: what is this car actually for?
Three distinct build goals drive three fundamentally different upgrade paths. Conflating them is how builders end up with a track-spec front bar on a car they drive to work every day, wondering why the ride feels punishing and the tires are wearing unevenly.
The daily driver goal prioritizes confidence and comfort over lap times. You want the body roll addressed, the vague steering tightened up, and the car to feel planted without beating you up on a rough commute. A moderate front bar upgrade paired with quality shocks and fresh polyurethane bushings gets you there without turning the cabin into a vibration chamber.
The pro-touring goal is a different animal entirely. Maximum lateral grip, predictable behavior at the limit, and the ability to carry real speed through a corner. This path demands geometry corrections first, then anti-roll hardware sized to match the increased grip your tire package generates. Half-measures here don’t produce half results; they produce unpredictable ones.
The show stopper goal centers on adjustable stance and visual impact. Handling is secondary. Air ride or a quality coilover setup with wide adjustment range serves this build better than a stiff anti-roll package that fights a slammed ride height.
The Weekend Warrior Setup
For builders who want a meaningful handling improvement without a full chassis teardown, a stage one kit is the right starting point: quality adjustable shocks, matched springs, and a front sway bar upgrade sized one to two steps above factory. Adjustable shocks earn their premium here because they let you tune damping to match your spring rate as the build evolves, rather than locking you into a fixed valving that may not suit your final configuration. That adaptability pays dividends across the life of the build. Check the Recommended Gear page for a curated list of essential suspension tools before you start pulling components.
The Pro-Touring Blueprint
A high-performance suspension system is only as capable as the structure it’s bolted to. That’s not a caveat; it’s the foundational principle of pro-touring builds. A rigid chassis is required for any suspension geometry correction to function as engineered, because a flexing structure changes the relationship between mounting points dynamically, undermining every alignment spec you’ve dialed in.
On unibody platforms, subframe connectors are non-negotiable before any serious suspension work begins. They convert a structure that was designed to absorb crash energy through controlled deformation into one that can actually transmit cornering loads cleanly. Pair that with a 4-link rear conversion to replace leaf springs, and you’ve addressed the two biggest limitations holding back rear-end composure on most classic platforms. Leaf springs were a cost-effective factory solution, not a performance one, and a properly designed 4-link gives you independent control over pinion angle, roll steer, and instant center that no leaf setup can match.
If your build is heading in this direction, the educational framework inside the Ultimate Restomod Guide will help you sequence these decisions so each upgrade compounds the one before it rather than creating new problems to solve.
Planning Your Suspension Transformation: Next Steps
Knowledge without a sequence is just noise. Everything covered in this classic car sway bar upgrade guide points toward a single outcome: a car that handles with confidence and rewards every mile you put on it. Getting there requires four concrete steps, executed in order, before a single new component goes on the car.
Start with a comprehensive chassis and floor pan inspection. This isn’t optional prep work; it’s the foundation everything else depends on. Crawl under the car with a flashlight and a screwdriver. Probe the floor pan seams, the frame rails, and every suspension mounting point. Rust in a control arm pocket or a cracked subframe mount will undermine every dollar you spend on anti-roll hardware. A sway bar mounted to a compromised chassis doesn’t improve handling; it transfers load into a structure that can’t manage it cleanly. Fix the structure first. Full stop.
Step two is locking in your tire and wheel package before buying a single suspension component. Wheel diameter, tire width, and sidewall height all affect the geometry calculations that determine which bar diameter, spring rate, and shock valving you actually need. Choosing your suspension around a tire package you haven’t finalized yet is how builders end up with a setup that works on paper and fights itself on the road.
Step three is gathering the right tools before the car goes on stands. A ball joint separator, a quality spring compressor rated for your specific spring load, a torque wrench calibrated in foot-pounds, and a pickle fork for stubborn tie rod ends are the non-negotiables. Improvising with the wrong tools on suspension components isn’t a shortcut; it’s a safety hazard and a fast path to damaged hardware. The Recommended Gear page has a curated list of what’s worth owning versus renting for a job like this.
Step four completes the process: execute the install, then schedule a professional laser alignment before the car moves under its own power. No competitor will tell you this clearly enough, so this classic car sway bar upgrade guide will. Alignment isn’t a finishing touch; it’s the calibration step that makes every geometry correction you’ve made actually function as designed. Skip it, and you’re guessing.
The Importance of a Build Plan
Document your current ride height and alignment specs before you remove anything. Those baseline numbers tell you exactly how far the car has drifted from factory and give you a reference point for every adjustment that follows. Suspension work done without a documented baseline is harder to diagnose when something doesn’t feel right. The full planning framework inside Restomod Project Planning walks you through building that roadmap from the ground up, sequencing every decision so your budget compounds rather than collides. Of all the modifications a builder can tackle in the driveway, suspension is among the most technically rewarding. The feedback is immediate, the learning is tangible, and the result is a car that genuinely feels like yours.
Mastering the Art of the Restomod
Every builder reaches a point where the individual decisions start connecting into something larger than the sum of their parts. That’s the moment this work stops feeling like maintenance and starts feeling like craft. The Ultimate Restomod Guide exists to accelerate that moment, giving you the framework to make confident decisions across every system in the build, not just suspension. It’s the mentor in your corner when the research gets deep and the options multiply. Download The Ultimate Restomod Guide and start your build today alongside a community of builders who are already doing the work.
Your Build Deserves a Foundation Worth Trusting
Every decision covered in this classic car sway bar upgrade guide points toward the same destination: a classic car that earns its place on a modern road without surrendering the character that made it worth building in the first place. Getting the geometry right before bolting on hardware, matching your bar diameter to your actual build goal, and treating alignment as calibration rather than cleanup are the principles that separate a confident builder from one who keeps chasing problems.
The work is technical, but it’s not mysterious. With the right sequence and the right guidance, every step becomes a skill you own permanently.
Brook Walsh built Restomod Academy around exactly that philosophy: give builders a comprehensive roadmap so every dollar spent compounds into a better car. The Premium Project Blueprints and The Ultimate Restomod Guide are designed to be the mentor in your corner when the decisions get complex. Grab your copy of The Ultimate Restomod Guide and build with confidence. Your classic is worth doing right.
Frequently Asked Questions
Will a suspension upgrade make my classic car ride too stiff for the street?
Not if you match your components to your actual build goal. A street-oriented upgrade using quality adjustable shocks and a moderate sway bar increase delivers noticeably flatter cornering without turning the cabin into a punishment chamber. The key is bushing selection; polyurethane offers a meaningful improvement over rubber compliance without the harshness of Delrin. Builders who end up with a punishing ride almost always over-specified their anti-roll hardware for a car that never sees a track.
Do I need to weld or cut my frame to install a modern suspension kit?
Most bolt-on restomod kits are designed specifically to avoid cutting or welding, working within factory mounting locations while correcting geometry through redesigned component geometry. The exception is chassis reinforcement work on unibody platforms, where subframe connectors genuinely require welding to function properly. That’s structural work worth doing before any serious suspension upgrade, but it’s a one-time foundation step rather than a requirement of the suspension kit itself.
What is the difference between a 4-link and a leaf spring suspension?
A leaf spring is a single component doing three jobs simultaneously: locating the axle, controlling pinion angle, and providing springing. That compromise was a practical factory solution, not an optimized one. A 4-link separates those functions, giving you independent control over pinion angle, roll steer, and the instant center that determines how the rear plants under acceleration. The handling improvement is substantial, particularly on cars where rear-end composure under hard cornering or braking has always felt unpredictable.
How much does a full classic car suspension upgrade cost in 2026?
Giving you a specific number here would be misleading, because the range is genuinely wide depending on platform, build goal, and how much of the labor you handle yourself. A stage one weekend warrior setup costs considerably less than a full pro-touring build with a 4-link conversion and coilovers at all four corners. Rather than budgeting around a dollar figure, budget around your build goal first, then research component costs for your specific chassis. The Ultimate Restomod Guide helps you sequence those decisions so you’re not buying twice.
Can I install a restomod suspension kit myself in my home garage?
Most bolt-on suspension upgrades are genuinely achievable for a builder with intermediate mechanical experience, a quality floor jack, stands, and the right specialty tools. A spring compressor rated for your specific load and a ball joint separator are non-negotiables, not optional. Where professional help earns its cost is at the alignment stage; no home garage setup replaces a laser alignment rack after geometry corrections. Do the installation yourself, then invest in a proper alignment before the car moves under its own power.
How do I know if my classic car needs an alignment after an upgrade?
If you’ve replaced any component that affects wheel position, including control arms, tie rods, sway bar end links, or springs, the car needs an alignment. Full stop. Even replacing bushings can shift alignment specs enough to cause uneven tire wear or unpredictable handling. This classic car sway bar upgrade guide treats alignment as calibration, not cleanup, because that’s exactly what it is. Document your baseline specs before disassembly, then schedule the alignment before your first drive, not after you’ve noticed something feels off.
What are the best brands for restomod suspension kits?
Several manufacturers have built strong reputations in the classic car suspension space, including RideTech, QA1, Detroit Speed, and Ridetech, each with platform-specific strengths. The honest answer is that brand reputation matters less than fitment research for your specific chassis and year. A kit engineered specifically for your platform will outperform a generic solution from a bigger name every time. Cross-reference builder forums for your specific car before committing, and prioritize companies that publish geometry data alongside their marketing claims.
Should I upgrade my brakes at the same time as my suspension?
Practically speaking, yes. A suspension upgrade that improves cornering grip and reduces body roll will also allow you to carry more speed into a braking zone, and factory drum brakes weren’t designed for that scenario. Modern radial tires generate stopping forces that vintage brake systems struggle to manage cleanly, and the front-end dive that comes with harder braking loads your new suspension through a range it needs to handle predictably. Pairing a suspension refresh with a disc brake conversion on at least the front axle is the responsible sequence, not an upsell.