
A restomod rarely goes off track because of one bad part. More often, unclear goals, poor build sequencing, or weak system integration turn a promising upgrade into costly rework. The common restomod build mistakes and how to fix them often begin before the wrenching starts: with an undefined project scope, parts chosen in isolation, or problems discovered after the finish work is done.
It’s natural to focus on the engine, stance, and modern comforts that will make a classic feel like yours. But a powerful drivetrain needs to work with the transmission, brakes, fuel system, and chassis. Every upgrade also needs to suit the car’s condition and intended use. Checking those relationships early can save time and help preserve the character you’re working to maintain.
This guide explains how to spot warning signs before committing to more work and how to diagnose problems you’ve already encountered. You’ll find practical checks for project scope, component compatibility, build order, and testing, so you can bring classic style and modern reliability together in a coherent, safe build.
Key Takeaways
- Set clear priorities and constraints before choosing major systems or ordering components.
- Check how each upgrade affects related systems, and investigate warning signs before moving ahead.
- Test fitment and function before final assembly, while affected components are still accessible.
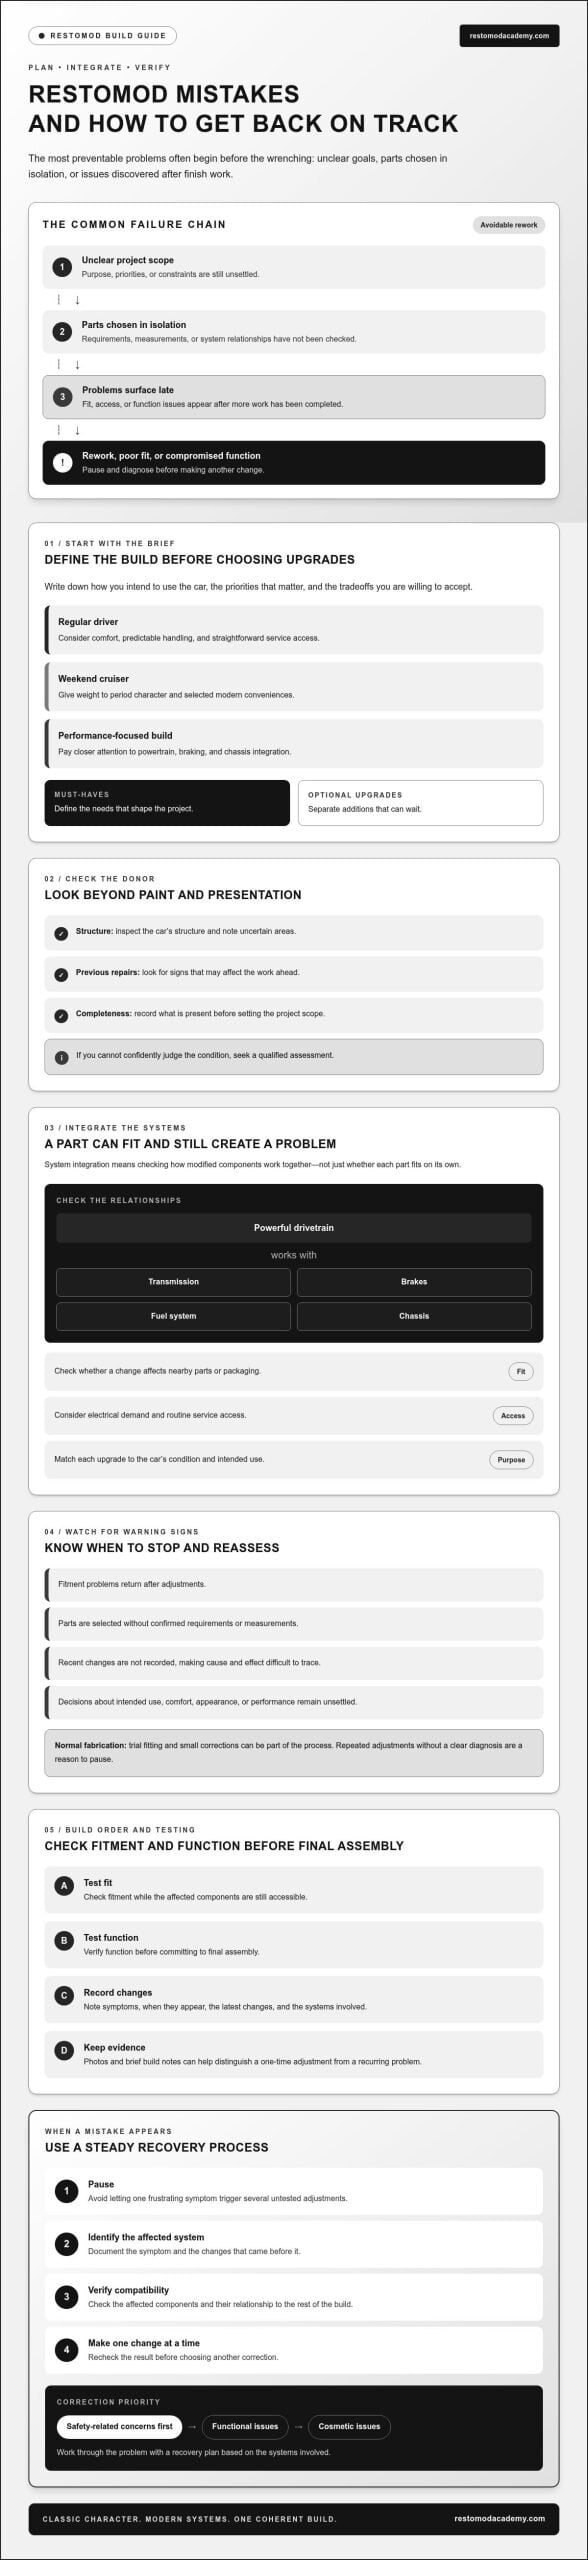
- When reviewing common restomod build mistakes and how to fix them, pause, document the problem, trace its cause, and choose a correction based on the systems involved.
- Address safety-related concerns first, then work through functional and cosmetic issues with a recovery plan.
Common Restomod Build Mistakes and How to Fix Them: Spot the Warning Signs Early
A snag during a restomod doesn’t mean the project has failed. Fabrication often requires adjustment. The key is to tell the difference between a known fitment challenge and repeated changes made without understanding the cause. A build mistake is a decision or omission that leads to avoidable rework, poor fit, or compromised function.
Restomods combine a classic car’s character with modern parts and priorities. The overview of Resto-modification describes this approach in contrast with pure restoration. Before choosing an upgrade, define what the car needs to do and check how each change may affect the rest of the build. For a concise explanation of the concept, see this guide to what a restomod is.
To see how seemingly simple modifications can create trouble, watch this video:
Use a steady recovery process: pause, identify the affected system, verify compatibility, then make one change at a time. This helps prevent one frustrating symptom from triggering several untested adjustments.
How do you know a restomod build is going off track?
Normal fabrication can involve trial fitting and small corrections. Pay attention when the same panel, mount, or component needs repeated adjustment without a clear diagnosis. An unresolved project scope, undocumented changes, or parts ordered before requirements are defined are also reasons to stop and reassess.
- Fitment problems return after adjustments.
- Parts are being selected without confirmed requirements or measurements.
- Recent changes aren’t recorded, making cause and effect difficult to trace.
- Key decisions about intended use, comfort, appearance, or performance are still unsettled.
Before taking anything apart, note the symptom, when it appears, the latest changes, and the systems involved. Photos and brief build notes can help you distinguish a one-time adjustment from a recurring problem.
Why do small decisions create bigger build problems?
A single upgrade can affect packaging, electrical demand, service access, and drivability. A component may fit its mounting point but crowd nearby parts or make routine maintenance harder. Buying before measuring and checking compatibility leaves those relationships uncertain, which increases the chance of rework.
System integration means checking how modified components work together, not just whether each part fits on its own. Keep that principle at the center of common restomod build mistakes and how to fix them: define requirements first, check related systems, and change one variable at a time.
Planning Mistakes That Derail a Restomod Before the Wrenching Starts
A clear plan keeps appealing upgrades from competing with one another. A car built for regular driving may need comfort, predictable handling, and straightforward service access. A weekend cruiser might prioritize period character and selected modern conveniences. A performance-focused project may require more attention to powertrain, braking, and chassis integration. Without a stated purpose, it’s easy to put time and effort into upgrades that don’t suit how you’ll use the car.
How can you avoid choosing the wrong donor car?
Look beyond paint and presentation. Inspect the structure, signs of previous repairs, and how complete the car is before committing. Record uncertain areas instead of assuming they’re sound, and seek a qualified assessment if you can’t confidently judge the condition. Corrosion and earlier repairs can affect what work is practical, so document those findings before setting the project scope.
Why should you define the build’s purpose before choosing upgrades?
Write down how you intend to use the car and which tradeoffs you’re willing to accept. A regular driver may call for comfort and serviceability; a weekend cruiser may put more weight on character and occasional-use convenience. A performance-focused build can shift priorities toward handling and powertrain choices. Separate must-haves from optional upgrades that can wait, so one ambitious decision doesn’t quietly reshape the whole project.
Use this sequence before ordering major components:
- 1. Define the car’s primary use and the experience you want from it.
- 2. Inspect the donor’s structure, previous repairs, completeness, and unknowns.
- 3. Set the scope by separating essential work from optional future changes.
- 4. Map dependencies so each planned upgrade is considered alongside the systems it may affect.
- 5. Document decisions, measurements, open questions, and changes as the plan develops.
That final step matters. A written record makes it easier to compare a proposed part or change with the original goals and trace why a decision was made if the project needs to change direction. Before proceeding, check that the components you’re considering suit the car’s condition and intended use. If your project includes adaptations for a driver with a disability, review the relevant NHTSA guidance on adapting motor vehicles and confirm what applies to your specific plans.
Planning won’t eliminate every surprise, but it gives you a sound basis for responding without letting one change trigger a string of unexamined decisions. If you’re still defining the project, this restomod overview can help clarify how modernization and classic character fit together. A well-scoped build is a practical first step toward preventing common restomod build mistakes and how to fix them later.
Restomod Compatibility Mistakes: Make Upgraded Systems Work Together
A component can fit in its intended location and still be wrong for the build. An engine affects more than the engine bay: its transmission, mounts, controls, cooling, fuel delivery, wiring, and service access all need consideration. The same applies to suspension, brakes, and electrical upgrades. Check how the pieces work together before committing to parts or fabrication.
Good system integration checks fitment, capacity, control, and service access together, so one upgrade doesn’t create a problem somewhere else.
| Proposed change | Related systems to check | Warning sign | Next diagnostic step |
|---|---|---|---|
| Engine and transmission upgrade | Mounting, clearance, controls, supporting systems, access | Fit depends on unverified assumptions or conflicts with nearby components | Compare measurements and requirements with component documentation; confirm uncertain details before fabrication |
| Suspension change | Wheel and tire clearance, steering, ride height, handling balance | Parts appear to fit separately but interfere through suspension travel or steering movement | Check clearances through the relevant range of movement and verify the setup as a whole |
| Brake or electrical upgrade | Available space, wiring routes, controls, maintenance access | Lines or wiring must be routed awkwardly, or access to service points is blocked | Map routing and access during mock-up before finalizing installation |
What should you check before combining engine and transmission upgrades?
Verify mounting points, physical clearance, control connections, and supporting-system requirements for your specific combination. Separate confirmed facts from assumptions: record measurements and consult the relevant component documentation. If a detail remains uncertain, get qualified advice before modifying mounts or committing to related parts. Vehicle and component combinations vary, so don’t treat one successful swap as proof that another will fit. For a structured overview, consult this LS engine swap guide.
How can suspension, brakes, and electrical upgrades create knock-on issues?
Changing one system can affect packaging, handling balance, wiring routes, and routine maintenance. A suspension setup may change available clearance; a brake or electrical change can compete for space or make a service point harder to reach. When sourcing wheel, tire, or suspension packages from outfitters like STW Autosports, review dependencies before finalizing parts, fabrication, or routing. Mock up the related components together, then check movement and access before finishing the installation.
Use the table as a starting point, not a universal fitment chart. Write down what is confirmed, what still needs checking, and which neighboring systems could be affected. That habit turns common restomod build mistakes and how to fix them into a repeatable process: verify the combination, test it in context, and change one variable at a time. For more structured project learning, explore Restomod Academy’s educational resources.
Build Sequence and Testing Mistakes: Catch Problems Before Final Assembly
Fresh paint and a finished interior make a project feel close to complete, but they can also make unresolved problems harder to reach. A hidden wiring fault, tight clearance, or mechanical issue may require removing trim or undoing finish work. Test systems while they’re accessible, and treat each completed stage as a checkpoint before moving on.
Test each completed system before concealing access or moving to final assembly.
Which checks belong before final assembly?
Use the car’s documented requirements as your checklist rather than relying on a universal set of specifications. Confirm component movement and clearances, inspect connections, and make sure routine service points remain reachable. Label wiring, fasteners, and adjustments as you go. These notes make later inspection and troubleshooting easier, especially after parts have been temporarily removed or repositioned.
- After mock-up, check that related components fit and move without interference.
- After wiring work, label connections and inspect routing before trim or panels cover it.
- After mechanical work, verify the system’s operation using the appropriate procedures for that vehicle and setup.
- Before final assembly, review access for inspection and routine service.
Keep checks specific to the car and its components. If a measurement, connection, or procedure is unclear, consult the relevant documentation instead of guessing. Safety-critical work deserves particular care: if you lack the expertise to assess it confidently, pause and have a qualified professional inspect it before the vehicle is used.
How should you diagnose a problem without creating another?
Start by pausing the build. Where it’s safe and appropriate, reproduce the symptom under controlled conditions, then record what happens and which systems are involved. Change one variable at a time. Adjusting several things at once can hide the original cause or introduce a new fault, leaving you unsure which change mattered.
Write down what you inspected, adjusted, or ruled out, then compare the result with the symptom. Stop if the problem involves safety or remains unexplained; get qualified help rather than continuing by trial and error. This disciplined approach makes common restomod build mistakes and how to fix them more manageable: inspect, test, record, and verify before closing up the work.
Build your testing plan with the same care as your parts plan. Explore Restomod Academy’s project education to support more deliberate decisions as your classic takes shape.
How to Fix a Restomod Build Mistake and Keep the Project Moving
Finding a mistake is a reason to pause, not abandon the build. Resist the urge to cover it with another change. First identify what the issue affects, then choose a correction that brings the car back in line with your project goals without creating new problems elsewhere.
Use this recovery sequence:
- Pause work and record the symptom, when it appears, and what changed before it began.
- Identify the affected components and any connected systems that could be involved.
- Compare the current result with your original requirements, measurements, and component documentation.
- Verify the likely cause before choosing a repair, revision, or return to an earlier build stage.
- Document the correction and update the plan so later decisions reflect what you’ve learned.
Sort the issue by its impact. A cosmetic flaw may be frustrating, but it usually isn’t as urgent as a functional problem that affects operation or a safety-related concern. Address safety concerns first, and don’t continue using or assembling an affected system if you can’t determine that it’s safe. If the diagnosis or repair is beyond your skills, pause and seek qualified specialist input.
Should you repair, revise, or undo the work?
Start with the original project requirements. Ask whether the current setup suits the intended use, works with dependent systems, and leaves reasonable access for future service. A local repair may be appropriate if the cause is understood and the result can be checked. If a choice conflicts with the build’s goals or has affected connected work, revising or undoing it may be the sounder path. Record the decision and any assumptions that have changed.
Before resuming, consider the reach of the correction. A change to one mounting point, for example, may affect alignment or clearance elsewhere. Map those dependencies, confirm the proposed fix against reliable documentation, and check the result before closing up the work. This deliberate approach is central to common restomod build mistakes and how to fix them: correct the cause, not just the symptom.
What resources can help you prevent the next mistake?
If several decisions or dependencies are still unclear, structured education can help you organize the questions before more work begins. Review this restomod fundamentals guide to establish shared terminology, then return to your written goals and identify what needs verification. The Ultimate Restomod Guide is another educational resource to consider as you refine your plan.
Take a breath, review the project’s purpose, and write down the next steps before picking up the tools again. To explore The Ultimate Restomod Guide, visit Restomod Academy and continue with a clear plan.
Build With a Clear Plan and Keep Moving Forward
A strong restomod is shaped by more than ambitious upgrades. It comes from defining the car’s purpose, checking how changes affect connected systems, and testing each stage before moving on. If something goes wrong, pause, trace the cause, and choose a correction that supports the build’s goals instead of rushing into another change. That’s the practical approach behind common restomod build mistakes and how to fix them.
For your next decision, write down what the car needs to do, what you know about its condition, and what still needs verification. Structured learning can help you organize complex choices. Restomod Academy offers The Ultimate Restomod Guide, consulting services, and premium project blueprints for builders developing their projects.
Explore The Ultimate Restomod Guide and take your next step with a clearer plan. Every careful check helps you work toward a classic that preserves its character while gaining the reliability and capability you want from the build.
Frequently Asked Questions
What is the most common mistake in a restomod build?
There isn’t one mistake that applies to every project, but unclear goals, rushed parts selection, and overlooked compatibility are recurring sources of trouble. To avoid common restomod build mistakes and how to fix them, begin by writing down how you intend to use the car. Then map each major change to the systems it affects, check assumptions against reliable information, and resolve open questions before buying parts or concealing access.
How do you avoid buying incompatible parts for a restomod?
Start with the exact vehicle, its intended use, and the systems already selected. Check manufacturer documentation and reliable fitment information for the specific combination you’re considering. Don’t assume a part will work just because it fits a similar car. Keep a record of unanswered questions and confirm details before ordering. If documentation is unclear or conflicting, ask a qualified specialist rather than relying on guesswork.
Can you fix a restomod mistake without starting the project over?
Often, yes. The right correction depends on what caused the problem and how much other work relies on the affected component or system. Pause, document the symptom, and identify connected systems before changing anything. Compare the current setup with the project requirements, then decide whether to repair, revise, or undo the work. Get a qualified assessment for safety-related or poorly understood faults, and update your plan after deciding.
What should you do first when a restomod system is not working properly?
Stop making adjustments and record the symptom, when it occurs, and what changed before it appeared. Consult relevant documentation, inspect the affected system methodically, and, when safe, test one possible cause at a time. Avoid replacing components based only on suspicion, since that can add uncertainty without addressing the cause. If the fault could affect safe operation or remains unexplained, stop and involve a qualified professional.
Why should you test a restomod before final assembly?
Staged testing can reveal fitment, connection, or operating problems while the relevant components are still accessible. Check each completed system before covering wiring, installing trim, or moving to final assembly. The right checks depend on the vehicle and its modifications, so follow suitable documentation and seek professional guidance when needed. Record what you inspected and the results; those notes can make later troubleshooting clearer and more methodical.
How do you keep a restomod project from going over scope?
Define how you’ll use the car and which changes matter most before expanding the upgrade list. Separate essential work from optional ideas, then compare each new proposal with the project goals, affected systems, and your skills. Keep decisions and unresolved questions in writing so the original vision stays visible as the build evolves. If you need help organizing those choices, The Ultimate Restomod Guide offers a structured educational resource to consider.
A restomod rarely goes off track because of one bad part. More often, unclear goals, poor build sequencing, or weak system integration turn a promising upgrade into costly rework. The common restomod build mistakes and how to fix them often begin before the wrenching starts: with an undefined project scope, parts chosen in isolation, or problems discovered after the finish work is done.
It’s natural to focus on the engine, stance, and modern comforts that will make a classic feel like yours. But a powerful drivetrain needs to work with the transmission, brakes, fuel system, and chassis. Every upgrade also needs to suit the car’s condition and intended use. Checking those relationships early can save time and help preserve the character you’re working to maintain.
This guide explains how to spot warning signs before committing to more work and how to diagnose problems you’ve already encountered. You’ll find practical checks for project scope, component compatibility, build order, and testing, so you can bring classic style and modern reliability together in a coherent, safe build.
Key Takeaways
- Set clear priorities and constraints before choosing major systems or ordering components.
- Check how each upgrade affects related systems, and investigate warning signs before moving ahead.
- Test fitment and function before final assembly, while affected components are still accessible.
- When reviewing common restomod build mistakes and how to fix them, pause, document the problem, trace its cause, and choose a correction based on the systems involved.
- Address safety-related concerns first, then work through functional and cosmetic issues with a recovery plan.
Common Restomod Build Mistakes and How to Fix Them: Spot the Warning Signs Early
A snag during a restomod doesn’t mean the project has failed. Fabrication often requires adjustment. The key is to tell the difference between a known fitment challenge and repeated changes made without understanding the cause. A build mistake is a decision or omission that leads to avoidable rework, poor fit, or compromised function.
Restomods combine a classic car’s character with modern parts and priorities. The overview of Resto-modification describes this approach in contrast with pure restoration. Before choosing an upgrade, define what the car needs to do and check how each change may affect the rest of the build. For a concise explanation of the concept, see this guide to what a restomod is.
To see how seemingly simple modifications can create trouble, watch this video:
Use a steady recovery process: pause, identify the affected system, verify compatibility, then make one change at a time. This helps prevent one frustrating symptom from triggering several untested adjustments.
How do you know a restomod build is going off track?
Normal fabrication can involve trial fitting and small corrections. Pay attention when the same panel, mount, or component needs repeated adjustment without a clear diagnosis. An unresolved project scope, undocumented changes, or parts ordered before requirements are defined are also reasons to stop and reassess.
- Fitment problems return after adjustments.
- Parts are being selected without confirmed requirements or measurements.
- Recent changes aren’t recorded, making cause and effect difficult to trace.
- Key decisions about intended use, comfort, appearance, or performance are still unsettled.
Before taking anything apart, note the symptom, when it appears, the latest changes, and the systems involved. Photos and brief build notes can help you distinguish a one-time adjustment from a recurring problem.
Why do small decisions create bigger build problems?
A single upgrade can affect packaging, electrical demand, service access, and drivability. A component may fit its mounting point but crowd nearby parts or make routine maintenance harder. Buying before measuring and checking compatibility leaves those relationships uncertain, which increases the chance of rework.
System integration means checking how modified components work together, not just whether each part fits on its own. Keep that principle at the center of common restomod build mistakes and how to fix them: define requirements first, check related systems, and change one variable at a time.
Planning Mistakes That Derail a Restomod Before the Wrenching Starts
A clear plan keeps appealing upgrades from competing with one another. A car built for regular driving may need comfort, predictable handling, and straightforward service access. A weekend cruiser might prioritize period character and selected modern conveniences. A performance-focused project may require more attention to powertrain, braking, and chassis integration. Without a stated purpose, it’s easy to put time and effort into upgrades that don’t suit how you’ll use the car.
How can you avoid choosing the wrong donor car?
Look beyond paint and presentation. Inspect the structure, signs of previous repairs, and how complete the car is before committing. Record uncertain areas instead of assuming they’re sound, and seek a qualified assessment if you can’t confidently judge the condition. Corrosion and earlier repairs can affect what work is practical, so document those findings before setting the project scope.
Why should you define the build’s purpose before choosing upgrades?
Write down how you intend to use the car and which tradeoffs you’re willing to accept. A regular driver may call for comfort and serviceability; a weekend cruiser may put more weight on character and occasional-use convenience. A performance-focused build can shift priorities toward handling and powertrain choices. Separate must-haves from optional upgrades that can wait, so one ambitious decision doesn’t quietly reshape the whole project.
Use this sequence before ordering major components:
- 1. Define the car’s primary use and the experience you want from it.
- 2. Inspect the donor’s structure, previous repairs, completeness, and unknowns.
- 3. Set the scope by separating essential work from optional future changes.
- 4. Map dependencies so each planned upgrade is considered alongside the systems it may affect.
- 5. Document decisions, measurements, open questions, and changes as the plan develops.
That final step matters. A written record makes it easier to compare a proposed part or change with the original goals and trace why a decision was made if the project needs to change direction. Before proceeding, check that the components you’re considering suit the car’s condition and intended use. If your project includes adaptations for a driver with a disability, review the relevant NHTSA guidance on adapting motor vehicles and confirm what applies to your specific plans.
Planning won’t eliminate every surprise, but it gives you a sound basis for responding without letting one change trigger a string of unexamined decisions. If you’re still defining the project, this restomod overview can help clarify how modernization and classic character fit together. A well-scoped build is a practical first step toward preventing common restomod build mistakes and how to fix them later.
Restomod Compatibility Mistakes: Make Upgraded Systems Work Together
A component can fit in its intended location and still be wrong for the build. An engine affects more than the engine bay: its transmission, mounts, controls, cooling, fuel delivery, wiring, and service access all need consideration. The same applies to suspension, brakes, and electrical upgrades. Check how the pieces work together before committing to parts or fabrication.
Good system integration checks fitment, capacity, control, and service access together, so one upgrade doesn’t create a problem somewhere else.
| Proposed change | Related systems to check | Warning sign | Next diagnostic step |
|---|---|---|---|
| Engine and transmission upgrade | Mounting, clearance, controls, supporting systems, access | Fit depends on unverified assumptions or conflicts with nearby components | Compare measurements and requirements with component documentation; confirm uncertain details before fabrication |
| Suspension change | Wheel and tire clearance, steering, ride height, handling balance | Parts appear to fit separately but interfere through suspension travel or steering movement | Check clearances through the relevant range of movement and verify the setup as a whole |
| Brake or electrical upgrade | Available space, wiring routes, controls, maintenance access | Lines or wiring must be routed awkwardly, or access to service points is blocked | Map routing and access during mock-up before finalizing installation |
What should you check before combining engine and transmission upgrades?
Verify mounting points, physical clearance, control connections, and supporting-system requirements for your specific combination. Separate confirmed facts from assumptions: record measurements and consult the relevant component documentation. If a detail remains uncertain, get qualified advice before modifying mounts or committing to related parts. Vehicle and component combinations vary, so don’t treat one successful swap as proof that another will fit. For a structured overview, consult this LS engine swap guide.
How can suspension, brakes, and electrical upgrades create knock-on issues?
Changing one system can affect packaging, handling balance, wiring routes, and routine maintenance. A suspension setup may change available clearance; a brake or electrical change can compete for space or make a service point harder to reach. Review dependencies before finalizing parts, fabrication, or routing. Mock up the related components together, then check movement and access before finishing the installation.
Use the table as a starting point, not a universal fitment chart. Write down what is confirmed, what still needs checking, and which neighboring systems could be affected. That habit turns common restomod build mistakes and how to fix them into a repeatable process: verify the combination, test it in context, and change one variable at a time. For more structured project learning, explore Restomod Academy’s educational resources.
Build Sequence and Testing Mistakes: Catch Problems Before Final Assembly
Fresh paint and a finished interior make a project feel close to complete, but they can also make unresolved problems harder to reach. A hidden wiring fault, tight clearance, or mechanical issue may require removing trim or undoing finish work. Test systems while they’re accessible, and treat each completed stage as a checkpoint before moving on.
Test each completed system before concealing access or moving to final assembly.
Which checks belong before final assembly?
Use the car’s documented requirements as your checklist rather than relying on a universal set of specifications. Confirm component movement and clearances, inspect connections, and make sure routine service points remain reachable. Label wiring, fasteners, and adjustments as you go. These notes make later inspection and troubleshooting easier, especially after parts have been temporarily removed or repositioned.
- After mock-up, check that related components fit and move without interference.
- After wiring work, label connections and inspect routing before trim or panels cover it.
- After mechanical work, verify the system’s operation using the appropriate procedures for that vehicle and setup.
- Before final assembly, review access for inspection and routine service.
Keep checks specific to the car and its components. If a measurement, connection, or procedure is unclear, consult the relevant documentation instead of guessing. Safety-critical work deserves particular care: if you lack the expertise to assess it confidently, pause and have a qualified professional inspect it before the vehicle is used.
How should you diagnose a problem without creating another?
Start by pausing the build. Where it’s safe and appropriate, reproduce the symptom under controlled conditions, then record what happens and which systems are involved. Change one variable at a time. Adjusting several things at once can hide the original cause or introduce a new fault, leaving you unsure which change mattered.
Write down what you inspected, adjusted, or ruled out, then compare the result with the symptom. Stop if the problem involves safety or remains unexplained; get qualified help rather than continuing by trial and error. This disciplined approach makes common restomod build mistakes and how to fix them more manageable: inspect, test, record, and verify before closing up the work.
Build your testing plan with the same care as your parts plan. Explore Restomod Academy’s project education to support more deliberate decisions as your classic takes shape.
How to Fix a Restomod Build Mistake and Keep the Project Moving
Finding a mistake is a reason to pause, not abandon the build. Resist the urge to cover it with another change. First identify what the issue affects, then choose a correction that brings the car back in line with your project goals without creating new problems elsewhere.
Use this recovery sequence:
- Pause work and record the symptom, when it appears, and what changed before it began.
- Identify the affected components and any connected systems that could be involved.
- Compare the current result with your original requirements, measurements, and component documentation.
- Verify the likely cause before choosing a repair, revision, or return to an earlier build stage.
- Document the correction and update the plan so later decisions reflect what you’ve learned.
Sort the issue by its impact. A cosmetic flaw may be frustrating, but it usually isn’t as urgent as a functional problem that affects operation or a safety-related concern. Address safety concerns first, and don’t continue using or assembling an affected system if you can’t determine that it’s safe. If the diagnosis or repair is beyond your skills, pause and seek qualified specialist input.
Should you repair, revise, or undo the work?
Start with the original project requirements. Ask whether the current setup suits the intended use, works with dependent systems, and leaves reasonable access for future service. A local repair may be appropriate if the cause is understood and the result can be checked. If a choice conflicts with the build’s goals or has affected connected work, revising or undoing it may be the sounder path. Record the decision and any assumptions that have changed.
Before resuming, consider the reach of the correction. A change to one mounting point, for example, may affect alignment or clearance elsewhere. Map those dependencies, confirm the proposed fix against reliable documentation, and check the result before closing up the work. This deliberate approach is central to common restomod build mistakes and how to fix them: correct the cause, not just the symptom.
What resources can help you prevent the next mistake?
If several decisions or dependencies are still unclear, structured education can help you organize the questions before more work begins. Review this restomod fundamentals guide to establish shared terminology, then return to your written goals and identify what needs verification. The Ultimate Restomod Guide is another educational resource to consider as you refine your plan.
Take a breath, review the project’s purpose, and write down the next steps before picking up the tools again. To explore The Ultimate Restomod Guide, visit Restomod Academy and continue with a clear plan.
Build With a Clear Plan and Keep Moving Forward
A strong restomod is shaped by more than ambitious upgrades. It comes from defining the car’s purpose, checking how changes affect connected systems, and testing each stage before moving on. If something goes wrong, pause, trace the cause, and choose a correction that supports the build’s goals instead of rushing into another change. That’s the practical approach behind common restomod build mistakes and how to fix them.
For your next decision, write down what the car needs to do, what you know about its condition, and what still needs verification. Structured learning can help you organize complex choices. Restomod Academy offers The Ultimate Restomod Guide, consulting services, and premium project blueprints for builders developing their projects.
Explore The Ultimate Restomod Guide and take your next step with a clearer plan. Every careful check helps you work toward a classic that preserves its character while gaining the reliability and capability you want from the build.
Frequently Asked Questions
What is the most common mistake in a restomod build?
There isn’t one mistake that applies to every project, but unclear goals, rushed parts selection, and overlooked compatibility are recurring sources of trouble. To avoid common restomod build mistakes and how to fix them, begin by writing down how you intend to use the car. Then map each major change to the systems it affects, check assumptions against reliable information, and resolve open questions before buying parts or concealing access.
How do you avoid buying incompatible parts for a restomod?
Start with the exact vehicle, its intended use, and the systems already selected. Check manufacturer documentation and reliable fitment information for the specific combination you’re considering. Don’t assume a part will work just because it fits a similar car. Keep a record of unanswered questions and confirm details before ordering. If documentation is unclear or conflicting, ask a qualified specialist rather than relying on guesswork.
Can you fix a restomod mistake without starting the project over?
Often, yes. The right correction depends on what caused the problem and how much other work relies on the affected component or system. Pause, document the symptom, and identify connected systems before changing anything. Compare the current setup with the project requirements, then decide whether to repair, revise, or undo the work. Get a qualified assessment for safety-related or poorly understood faults, and update your plan after deciding.
What should you do first when a restomod system is not working properly?
Stop making adjustments and record the symptom, when it occurs, and what changed before it appeared. Consult relevant documentation, inspect the affected system methodically, and, when safe, test one possible cause at a time. Avoid replacing components based only on suspicion, since that can add uncertainty without addressing the cause. If the fault could affect safe operation or remains unexplained, stop and involve a qualified professional.
Why should you test a restomod before final assembly?
Staged testing can reveal fitment, connection, or operating problems while the relevant components are still accessible. Check each completed system before covering wiring, installing trim, or moving to final assembly. The right checks depend on the vehicle and its modifications, so follow suitable documentation and seek professional guidance when needed. Record what you inspected and the results; those notes can make later troubleshooting clearer and more methodical.
How do you keep a restomod project from going over scope?
Define how you’ll use the car and which changes matter most before expanding the upgrade list. Separate essential work from optional ideas, then compare each new proposal with the project goals, affected systems, and your skills. Keep decisions and unresolved questions in writing so the original vision stays visible as the build evolves. If you need help organizing those choices, The Ultimate Restomod Guide offers a structured educational resource to consider.