
What if the vibration that appeared after your engine swap isn’t coming from the engine at all? A new powerplant can change mount position, transmission angle, and the way the driveshaft meets the rear axle. Diagnosing driveline vibration after an engine swap starts with separating symptoms tied to engine speed from those tied to road speed. It’s natural to suspect the part you just installed, but replacing components before tracing the pattern can waste time and leave a geometry problem untouched.
Pay attention to when the vibration starts, whether acceleration changes it, and where you feel it. Those repeatable clues can help narrow the source before you inspect swap-related connections. This guide shows you how to distinguish an engine-running symptom from a driveline issue, then check mounts, U-joints, driveshaft phasing, and driveline angles in a sensible order. You’ll also learn when a test is no longer safe to continue and it’s time to get qualified help. Work methodically, and you can protect the parts you’ve worked hard to bring together while building a more reliable classic.
Key Takeaways
- Use when the vibration occurs and where you feel it to guide your first checks, not to declare a part failed.
- When diagnosing driveline vibration after an engine swap, compare symptoms tied to engine rpm with those tied to road speed.
- Start with components the swap disturbed, and compare their installation with build records and manufacturer guidance.
- Follow a repeatable sequence: document symptoms, inspect while stationary, then retest cautiously while changing one variable at a time.
- Confirm any repair under the same safe conditions and recheck fasteners and clearances using the relevant documentation.
Diagnosing Driveline Vibration After an Engine Swap: Start With the Symptom
A vibration that appears just after a major engine swap can make every new mount, fastener, and shaft feel suspect. Resist the urge to name a failed part before you have a pattern. Driveline vibration is a symptom, not a diagnosis. It may point toward a rotating component or a change in how parts are positioned, but it doesn’t prove that the driveshaft, U-joint, or any other single part has failed.
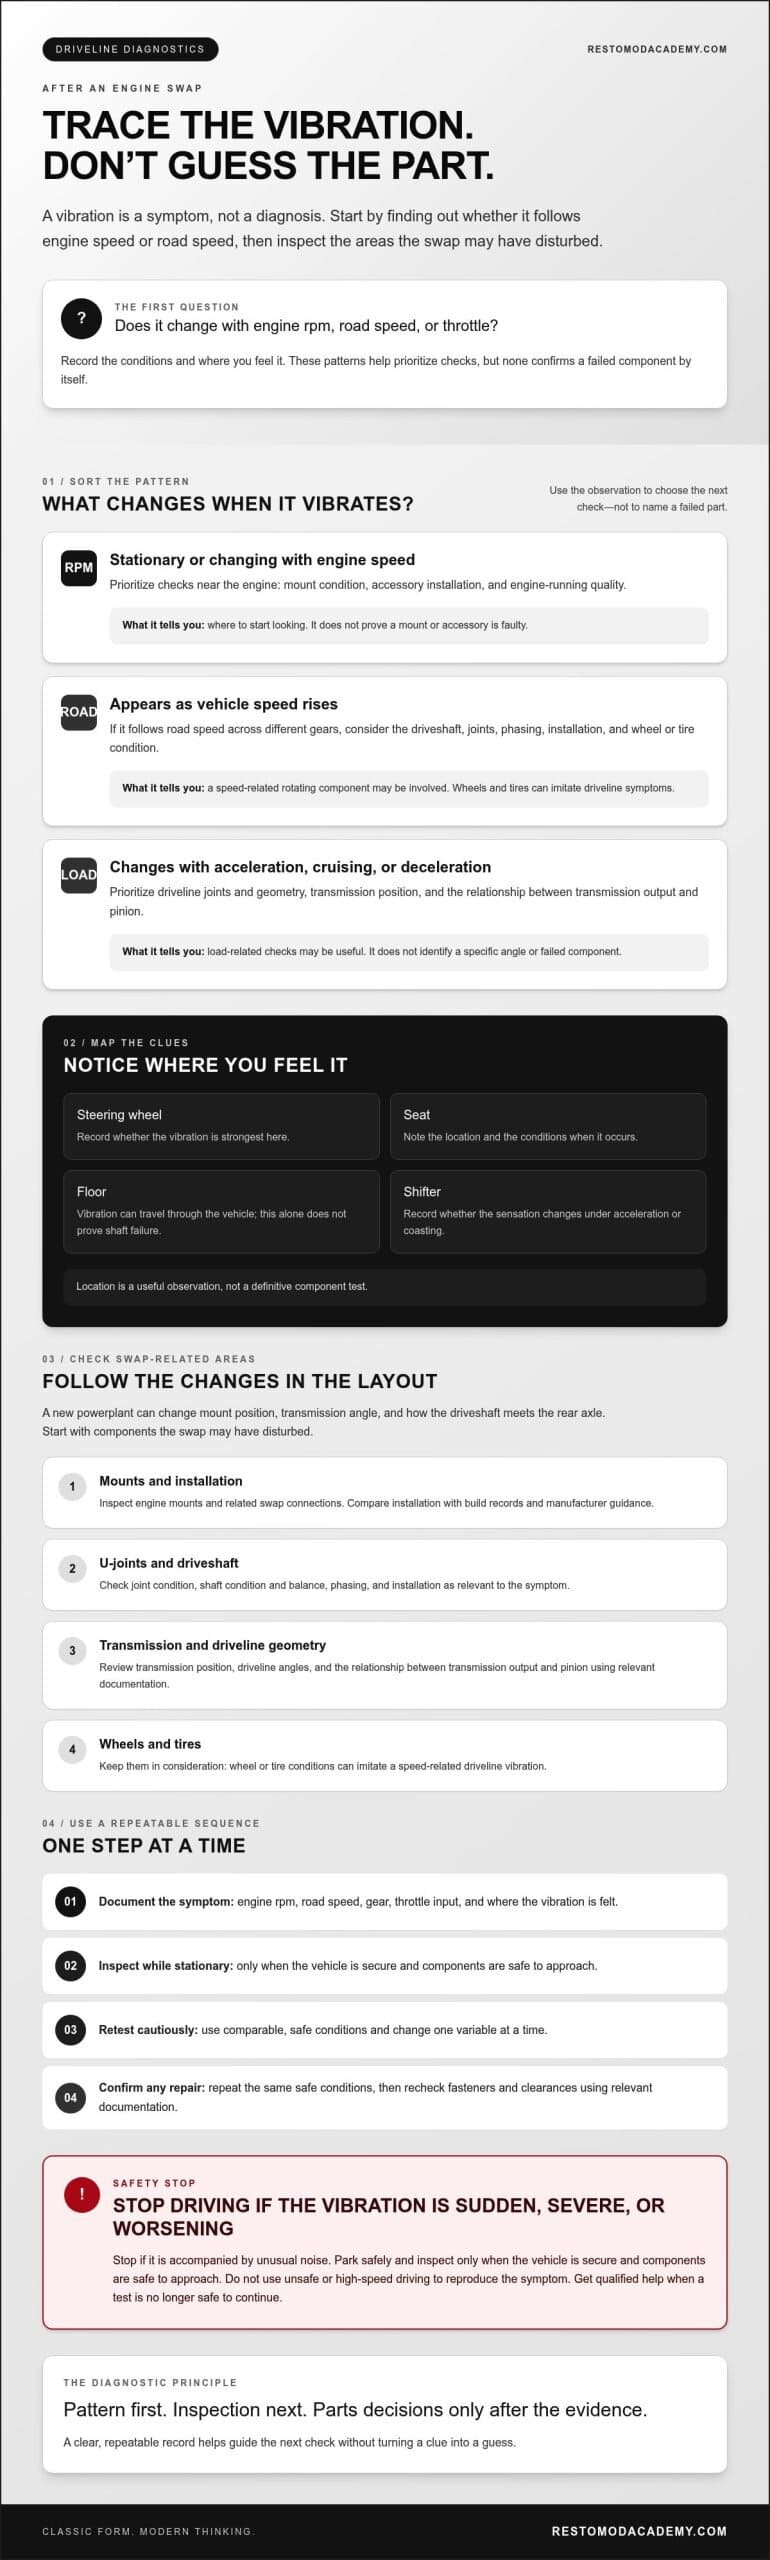
Begin diagnosing driveline vibration after an engine swap by recording what the vehicle is doing when the vibration appears. Note engine rpm, road speed, gear, throttle input, and where you feel it. A vibration that follows engine rpm differs from one that appears as road speed rises, but neither pattern identifies a cause on its own. If you’re reviewing how the swap changed the powertrain layout, the definitive guide to an LS engine swap offers relevant project context.
For a visual overview of driveline vibration, watch this video:
Does the vibration follow engine speed or road speed?
Record whether the vibration changes with engine rpm, vehicle speed, gear, or throttle. If it’s present while stationary and changes as rpm changes, prioritize engine-running components and mounts for further checks. If it appears only while moving and follows road speed across different gears, rotating driveline or wheel-related areas may deserve attention. These are clues, not confirmation. Keep notes under comparable conditions, and don’t use unsafe or high-speed driving to reproduce the symptom.
Where can you feel the vibration?
Note whether it’s strongest through the steering wheel, seat, floor, or shifter, and whether the sensation changes under acceleration or coasting. The location helps organize your observations, but vibration can travel through the vehicle, so it isn’t a definitive component test. A Drive shaft transfers power through the driveline, but feeling vibration in the floor alone doesn’t prove the shaft is at fault.
Stop driving if the vibration is sudden, severe, worsening, or accompanied by unusual noise. Park safely and inspect only when the vehicle is secure and components are safe to approach. A repeatable record of conditions and location gives the next inspection a sound starting point, without turning a useful clue into a guess.
Match Vibration Conditions to Likely Engine-Swap Causes
Use the vibration pattern to decide what to inspect first, not to declare a part guilty. A symptom that changes with engine rpm points toward a different set of checks than one that appears only as road speed rises. Changes with throttle can add another clue: acceleration, steady cruising, and deceleration place different demands on the powertrain and driveline. None of these patterns proves a single cause.
| Symptom condition | Areas to inspect | What the observation can and cannot establish |
|---|---|---|
| Vibration at idle or changing with engine rpm | Engine mounts, accessory installation, and engine-running quality | It prioritizes checks near the engine, but doesn’t prove a mount or accessory is faulty. |
| Vibration appears as vehicle speed rises, across different gears | Driveshaft condition and balance, joints, phasing, installation, and wheel or tire condition | It suggests a speed-related rotating component may be involved, but tires and wheels can imitate driveline symptoms. |
| Vibration changes between acceleration, steady throttle, and deceleration | Driveshaft joints and geometry, transmission position, and the relationship between transmission output and pinion | The change helps prioritize load-related checks, but doesn’t identify a specific angle or failed component. |
Vibration that changes with engine rpm
If the vehicle vibrates while stationary and the sensation changes as engine rpm changes, first distinguish a rough-running engine from vibration being transmitted through the chassis. Note whether the engine sounds or runs unevenly, then consider whether mounts or accessories disturbed during the swap could be transmitting or creating the sensation. Follow service information for the specific engine and installed components before measuring or adjusting anything.
Vibration that changes with vehicle speed or load
If the symptom appears only while moving, inspect the driveshaft for visible damage, missing balance weights, incorrect installation, and joint concerns. If the shaft was disconnected, confirm its orientation and phasing against the relevant component guidance. A changed engine or transmission position can alter driveline geometry and the relationship between the transmission output and pinion. Check those measurements against vehicle and component documentation rather than assuming a universal target.
Don’t overlook the tires and wheels. A road-speed vibration can come from them as well as the driveline, so include their condition in your inspection rather than jumping straight to shaft replacement. During diagnosing driveline vibration after an engine swap, compare the symptom under the same conditions and change only one test variable at a time. For broader project-planning guidance, explore Restomod Academy’s restoration and modification resources.
Inspect the Parts the Engine Swap May Have Disturbed
Start with the interfaces touched during the swap, not with a broad hunt for anything that might vibrate. List what was removed, replaced, repositioned, or newly connected: engine and transmission mounts, crossmember, exhaust, driveshaft, and related hardware. Compare what’s installed now with your build records and the instructions for the vehicle and components. A changed engine or transmission position can affect connected parts, so a small difference at a mount or crossmember may matter farther down the driveline.
This connection is why it helps to think of the driveline and powertrain as a coupled system. Inspect methodically, and don’t treat a visible mark or slight movement as proof of failure without checking the relevant manufacturer guidance.
Check mounts, transmission position, and clearances
With the vehicle safely supported, look for loose or visibly damaged mount hardware, shifted components, and signs of contact between the drivetrain and the body or chassis. Check the exhaust, crossmember, and nearby parts for fresh rub marks or inadequate clearance. Compare the engine and transmission position with your build records. Don’t guess at acceptable movement or tighten fasteners to an assumed torque value. Use the vehicle and component specific service information.
Check driveshaft fit, joints, and installation details
Confirm that the driveshaft is the documented part and that its length, orientation, and installation match the build records. If it was removed during the swap, check whether it was reinstalled in its original orientation and whether the yokes are phased as specified. Inspect the shaft and joints for visible damage, loose hardware, binding, or signs of contact. Don’t force a joint or alter the shaft based on appearance alone. Consult the component maker’s instructions if anything seems wrong.
- Compare the installed mount and crossmember locations with your swap notes.
- Look for contact marks around the exhaust, tunnel, and chassis.
- Verify driveshaft identity, orientation, and joint installation against build documentation.
- Record anything uncertain before making an adjustment.
Never work beneath a vehicle held only by a jack. Support it correctly on a stable surface, following the vehicle and lifting-equipment instructions. If you can’t verify the setup is secure, stop and get qualified help. For broader planning context on engine placement and swap interfaces, review this LS engine swap guide. Careful, documented checks make diagnosing driveline vibration after an engine swap a process of evidence, not guesswork.
Use a Safe, Repeatable Diagnostic Sequence Before Replacing Parts
Keep the diagnosis orderly. A clear sequence helps you separate useful evidence from assumptions and avoid changing several things at once. For diagnosing driveline vibration after an engine swap, work from observation to inspection, then retest only when the vehicle and conditions are safe.
Record a controlled baseline
Before adjusting or removing anything, write down the conditions that bring on the vibration. Record engine rpm, vehicle speed, selected gear, throttle state, and where you feel the sensation. Note whether it occurs at idle, during acceleration, at steady throttle, or while decelerating. These details give you a baseline to compare with later checks.
If a road test is appropriate, use a familiar, safe route and repeat only conditions you can reproduce without exceeding safe speeds or attempting risky maneuvers. Don’t try to provoke a severe vibration in traffic. If the symptom is sudden, worsening, or accompanied by unusual noise, stop driving and arrange an inspection instead.
Inspect, test, and confirm one change at a time
Start with non-invasive checks. With the vehicle parked securely, look for visible contact, loose or damaged hardware, and issues around parts disturbed during the swap. Never inspect beneath a vehicle supported only by a jack. Use appropriate vehicle support on a stable surface, follow the vehicle and equipment instructions, and don’t proceed if you can’t confirm the setup is secure.
Use this sequence to keep each step meaningful:
- Document the symptom and its operating conditions.
- Perform a stationary visual check before taking anything apart.
- Inspect swap-related mounts, connections, and driveline components against build records and manufacturer guidance.
- Make one correction at a time, then compare the result with your baseline under the same safe conditions.
If a change makes no difference, record that result rather than immediately replacing another part. If the vibration changes, note exactly what was altered. This disciplined approach helps narrow the cause while preserving a useful record of the work.
Leave specialized measurements and adjustments to the relevant manufacturer instructions or a qualified shop. A persistent or severe vibration, an unclear source, or a check beyond your tools and experience is a good reason to stop testing and seek professional inspection. Build confidence into the next stage of your project with Restomod Academy’s project-planning resources.
Confirm the Repair and Plan Your Next Engine-Swap Step
A repair isn’t confirmed just because a fastener is tight or a component has been replaced. Compare the result with the baseline you recorded before the work. If the original vibration appeared under a particular combination of speed, gear, and throttle, check whether it has changed under those same safe conditions. Don’t rely on memory: your notes help distinguish a real improvement from a symptom that has simply shifted.
How do you know the vibration is resolved?
Retest cautiously, and stop if the vehicle feels unsafe. Note whether the original vibration is reduced or gone, and pay attention to any new noise, signs of contact, or change in handling. After the repair, check affected fasteners and clearances according to the vehicle and component manufacturers’ documentation. Don’t assume a quiet first drive proves every issue is resolved.
If the symptom remains, returns, or becomes more pronounced, avoid repeated testing in an attempt to force an answer. A qualified professional can assess the vehicle and use the appropriate procedures or equipment for checks beyond your tools and experience. Stop driving and arrange help if the vibration is severe or accompanied by concerning noise or handling changes.
Carry the lesson into the rest of the build
Keep a short record of what you found, what you changed, and what happened during the confirmation test. For example, note the component inspected, the correction made, and whether the same original condition still produces vibration. This record can make future maintenance clearer and gives another technician useful context if the symptom returns.
Swap planning and diagnosis go hand in hand. If you’re mapping out future work, Restomod Academy’s guide to an LS engine swap provides broader context for a modern engine installation in a classic project. A careful record of component choices and installation details can also help keep the next stage of the build grounded in what you’ve learned.
Diagnosing driveline vibration after an engine swap is a process of observation, careful inspection, and confirmation, not guesswork or automatic parts replacement. If you’d like more structured support for your broader project, explore Restomod Academy’s educational resources or consider its Restomod Consulting Services as an option for project-level guidance.
Build a More Reliable Swap, One Clue at a Time
A new vibration doesn’t automatically mean a major component has failed. Start by noting whether it follows engine rpm, vehicle speed, or changing throttle, then inspect the parts the swap disturbed and compare them with build records and manufacturer guidance. Change one thing at a time, retest cautiously, and stop if the vibration is severe or the source is beyond your tools and experience.
That steady approach makes diagnosing driveline vibration after an engine swap less about guesswork and more about evidence. Record what you find and how the vehicle responds after a correction. Those notes can guide future maintenance and help you make better decisions as your build evolves.
Ready to plan the next stage? Explore The Ultimate Restomod Guide for educational resources on classic-car restoration and modification. If you need project-level guidance, Restomod Consulting Services are another option to consider. Keep learning, trust the process, and take pride in building a classic that blends heritage with modern reliability.
Frequently Asked Questions
Is it normal for a car to vibrate after an engine swap?
No, a new vibration shouldn’t be dismissed as a normal part of an engine swap. The work may have changed mount position, transmission placement, driveline geometry, or the installation of connected components, but the symptom alone doesn’t identify the cause. Record when it occurs and inspect the parts disturbed during the swap. If the vibration is severe, worsening, or accompanied by unusual noise, stop driving and investigate safely.
Can a driveshaft cause vibration only at certain speeds?
Yes. A driveshaft-related issue can produce vibration that becomes noticeable within a particular vehicle-speed range, then changes as speed changes. Possible inspection points include shaft damage, balance weights, joint condition, installation, and phasing. However, a speed-related vibration doesn’t prove the driveshaft is responsible. Tire or wheel problems can create similar symptoms, so compare the pattern carefully and inspect more than one possible source before replacing parts.
How can I tell whether vibration comes from the engine or the driveline?
Notice whether the vibration occurs while stationary and changes with engine rpm, or appears only as vehicle speed rises. A stationary vibration that follows rpm points toward engine-running quality, mounts, or accessories for initial checks. A symptom limited to movement may guide attention toward the driveline or wheels. These clues can prioritize inspection, but they can’t confirm a fault by themselves. During diagnosing driveline vibration after an engine swap, record conditions consistently.
What happens if I keep driving with a new driveline vibration?
Continuing to drive with an unresolved vibration may allow a problem in a rotating part, joint, mount, or connected component to worsen or affect other parts. The risk depends on the cause, which the sensation alone can’t reveal. Don’t keep testing if the vibration is sudden, severe, getting worse, or paired with unusual noise or a handling change. Stop somewhere safe and arrange an inspection before driving further.
Can incorrect engine or transmission mounts cause vibration after a swap?
Yes. A damaged, incorrectly installed, or mismatched mount can transmit engine vibration into the chassis or leave the drivetrain sitting differently than intended. A change in engine or transmission position may also affect connected driveline parts and clearances. Inspect mount hardware and visible contact points, then compare installation with build records and manufacturer guidance. Don’t guess at acceptable movement or torque values. Use vehicle and component specific documentation.
Should I replace the driveshaft if vibration starts after an engine swap?
No, don’t replace the driveshaft based only on timing. First check what was disturbed during the swap and look for visible damage, missing balance weights, joint concerns, incorrect orientation, or signs of contact. Compare the shaft and installation with build records and component guidance. Also consider wheel and tire conditions, which can imitate driveline symptoms. Replace or repair parts only after inspection provides evidence, or a qualified professional identifies the cause.
When should I stop troubleshooting and take the car to a professional?
Stop driving and seek qualified help if vibration is severe, worsening, accompanied by unusual noise, or affects handling. Arrange professional inspection if the symptom persists after basic checks, returns after a repair, or requires measurements or adjustments beyond your tools and experience. Keep your notes on speed, gear, throttle, and where the vibration is felt. Share them with the technician, along with details of what the swap changed.
What if the vibration that appeared after your engine swap isn’t coming from the engine at all? A new powerplant can change mount position, transmission angle, and the way the driveshaft meets the rear axle. Diagnosing driveline vibration after an engine swap starts with separating symptoms tied to engine speed from those tied to road speed. It’s natural to suspect the part you just installed, but replacing components before tracing the pattern can waste time and leave a geometry problem untouched.
Pay attention to when the vibration starts, whether acceleration changes it, and where you feel it. Those repeatable clues can help narrow the source before you inspect swap-related connections. This guide shows you how to distinguish an engine-running symptom from a driveline issue, then check mounts, U-joints, driveshaft phasing, and driveline angles in a sensible order. You’ll also learn when a test is no longer safe to continue and it’s time to get qualified help. Work methodically, and you can protect the parts you’ve worked hard to bring together while building a more reliable classic.
Key Takeaways
- Use when the vibration occurs and where you feel it to guide your first checks, not to declare a part failed.
- When diagnosing driveline vibration after an engine swap, compare symptoms tied to engine rpm with those tied to road speed.
- Start with components the swap disturbed, and compare their installation with build records and manufacturer guidance.
- Follow a repeatable sequence: document symptoms, inspect while stationary, then retest cautiously while changing one variable at a time.
- Confirm any repair under the same safe conditions and recheck fasteners and clearances using the relevant documentation.
Diagnosing Driveline Vibration After an Engine Swap: Start With the Symptom
A vibration that appears just after a major engine swap can make every new mount, fastener, and shaft feel suspect. Resist the urge to name a failed part before you have a pattern. Driveline vibration is a symptom, not a diagnosis. It may point toward a rotating component or a change in how parts are positioned, but it doesn’t prove that the driveshaft, U-joint, or any other single part has failed.
Begin diagnosing driveline vibration after an engine swap by recording what the vehicle is doing when the vibration appears. Note engine rpm, road speed, gear, throttle input, and where you feel it. A vibration that follows engine rpm differs from one that appears as road speed rises, but neither pattern identifies a cause on its own. If you’re reviewing how the swap changed the powertrain layout, the definitive guide to an LS engine swap offers relevant project context.
For a visual overview of driveline vibration, watch this video:
Does the vibration follow engine speed or road speed?
Record whether the vibration changes with engine rpm, vehicle speed, gear, or throttle. If it’s present while stationary and changes as rpm changes, prioritize engine-running components and mounts for further checks. If it appears only while moving and follows road speed across different gears, rotating driveline or wheel-related areas may deserve attention. These are clues, not confirmation. Keep notes under comparable conditions, and don’t use unsafe or high-speed driving to reproduce the symptom.
Where can you feel the vibration?
Note whether it’s strongest through the steering wheel, seat, floor, or shifter, and whether the sensation changes under acceleration or coasting. The location helps organize your observations, but vibration can travel through the vehicle, so it isn’t a definitive component test. A Drive shaft transfers power through the driveline, but feeling vibration in the floor alone doesn’t prove the shaft is at fault.
Stop driving if the vibration is sudden, severe, worsening, or accompanied by unusual noise. Park safely and inspect only when the vehicle is secure and components are safe to approach. A repeatable record of conditions and location gives the next inspection a sound starting point, without turning a useful clue into a guess.
Match Vibration Conditions to Likely Engine-Swap Causes
Use the vibration pattern to decide what to inspect first, not to declare a part guilty. A symptom that changes with engine rpm points toward a different set of checks than one that appears only as road speed rises. Changes with throttle can add another clue: acceleration, steady cruising, and deceleration place different demands on the powertrain and driveline. None of these patterns proves a single cause.
| Symptom condition | Areas to inspect | What the observation can and cannot establish |
|---|---|---|
| Vibration at idle or changing with engine rpm | Engine mounts, accessory installation, and engine-running quality | It prioritizes checks near the engine, but doesn’t prove a mount or accessory is faulty. |
| Vibration appears as vehicle speed rises, across different gears | Driveshaft condition and balance, joints, phasing, installation, and wheel or tire condition | It suggests a speed-related rotating component may be involved, but tires and wheels can imitate driveline symptoms. |
| Vibration changes between acceleration, steady throttle, and deceleration | Driveshaft joints and geometry, transmission position, and the relationship between transmission output and pinion | The change helps prioritize load-related checks, but doesn’t identify a specific angle or failed component. |
Vibration that changes with engine rpm
If the vehicle vibrates while stationary and the sensation changes as engine rpm changes, first distinguish a rough-running engine from vibration being transmitted through the chassis. Note whether the engine sounds or runs unevenly, then consider whether mounts or accessories disturbed during the swap could be transmitting or creating the sensation. Follow service information for the specific engine and installed components before measuring or adjusting anything.
Vibration that changes with vehicle speed or load
If the symptom appears only while moving, inspect the driveshaft for visible damage, missing balance weights, incorrect installation, and joint concerns. If the shaft was disconnected, confirm its orientation and phasing against the relevant component guidance. A changed engine or transmission position can alter driveline geometry and the relationship between the transmission output and pinion. Check those measurements against vehicle and component documentation rather than assuming a universal target.
Don’t overlook the tires and wheels. A road-speed vibration can come from them as well as the driveline, so include their condition in your inspection rather than jumping straight to shaft replacement. During diagnosing driveline vibration after an engine swap, compare the symptom under the same conditions and change only one test variable at a time. For broader project-planning guidance, explore Restomod Academy’s restoration and modification resources.
Inspect the Parts the Engine Swap May Have Disturbed
Start with the interfaces touched during the swap, not with a broad hunt for anything that might vibrate. List what was removed, replaced, repositioned, or newly connected: engine and transmission mounts, crossmember, exhaust, driveshaft, and related hardware. Compare what’s installed now with your build records and the instructions for the vehicle and components. A changed engine or transmission position can affect connected parts, so a small difference at a mount or crossmember may matter farther down the driveline.
This connection is why it helps to think of the driveline and powertrain as a coupled system. Inspect methodically, and don’t treat a visible mark or slight movement as proof of failure without checking the relevant manufacturer guidance.
Check mounts, transmission position, and clearances
With the vehicle safely supported, look for loose or visibly damaged mount hardware, shifted components, and signs of contact between the drivetrain and the body or chassis. Check the exhaust, crossmember, and nearby parts for fresh rub marks or inadequate clearance. Compare the engine and transmission position with your build records. Don’t guess at acceptable movement or tighten fasteners to an assumed torque value. Use the vehicle and component specific service information.
Check driveshaft fit, joints, and installation details
Confirm that the driveshaft is the documented part and that its length, orientation, and installation match the build records. If it was removed during the swap, check whether it was reinstalled in its original orientation and whether the yokes are phased as specified. Inspect the shaft and joints for visible damage, loose hardware, binding, or signs of contact. Don’t force a joint or alter the shaft based on appearance alone. Consult the component maker’s instructions if anything seems wrong.
- Compare the installed mount and crossmember locations with your swap notes.
- Look for contact marks around the exhaust, tunnel, and chassis.
- Verify driveshaft identity, orientation, and joint installation against build documentation.
- Record anything uncertain before making an adjustment.
Never work beneath a vehicle held only by a jack. Support it correctly on a stable surface, following the vehicle and lifting-equipment instructions. If you can’t verify the setup is secure, stop and get qualified help. For broader planning context on engine placement and swap interfaces, review this LS engine swap guide. Careful, documented checks make diagnosing driveline vibration after an engine swap a process of evidence, not guesswork.
Use a Safe, Repeatable Diagnostic Sequence Before Replacing Parts
Keep the diagnosis orderly. A clear sequence helps you separate useful evidence from assumptions and avoid changing several things at once. For diagnosing driveline vibration after an engine swap, work from observation to inspection, then retest only when the vehicle and conditions are safe.
Record a controlled baseline
Before adjusting or removing anything, write down the conditions that bring on the vibration. Record engine rpm, vehicle speed, selected gear, throttle state, and where you feel the sensation. Note whether it occurs at idle, during acceleration, at steady throttle, or while decelerating. These details give you a baseline to compare with later checks.
If a road test is appropriate, use a familiar, safe route and repeat only conditions you can reproduce without exceeding safe speeds or attempting risky maneuvers. Don’t try to provoke a severe vibration in traffic. If the symptom is sudden, worsening, or accompanied by unusual noise, stop driving and arrange an inspection instead.
Inspect, test, and confirm one change at a time
Start with non-invasive checks. With the vehicle parked securely, look for visible contact, loose or damaged hardware, and issues around parts disturbed during the swap. Never inspect beneath a vehicle supported only by a jack. Use appropriate vehicle support on a stable surface, follow the vehicle and equipment instructions, and don’t proceed if you can’t confirm the setup is secure.
Use this sequence to keep each step meaningful:
- Document the symptom and its operating conditions.
- Perform a stationary visual check before taking anything apart.
- Inspect swap-related mounts, connections, and driveline components against build records and manufacturer guidance.
- Make one correction at a time, then compare the result with your baseline under the same safe conditions.
If a change makes no difference, record that result rather than immediately replacing another part. If the vibration changes, note exactly what was altered. This disciplined approach helps narrow the cause while preserving a useful record of the work.
Leave specialized measurements and adjustments to the relevant manufacturer instructions or a qualified shop. A persistent or severe vibration, an unclear source, or a check beyond your tools and experience is a good reason to stop testing and seek professional inspection. Build confidence into the next stage of your project with Restomod Academy’s project-planning resources.
Confirm the Repair and Plan Your Next Engine-Swap Step
A repair isn’t confirmed just because a fastener is tight or a component has been replaced. Compare the result with the baseline you recorded before the work. If the original vibration appeared under a particular combination of speed, gear, and throttle, check whether it has changed under those same safe conditions. Don’t rely on memory: your notes help distinguish a real improvement from a symptom that has simply shifted.
How do you know the vibration is resolved?
Retest cautiously, and stop if the vehicle feels unsafe. Note whether the original vibration is reduced or gone, and pay attention to any new noise, signs of contact, or change in handling. After the repair, check affected fasteners and clearances according to the vehicle and component manufacturers’ documentation. Don’t assume a quiet first drive proves every issue is resolved.
If the symptom remains, returns, or becomes more pronounced, avoid repeated testing in an attempt to force an answer. A qualified professional can assess the vehicle and use the appropriate procedures or equipment for checks beyond your tools and experience. Stop driving and arrange help if the vibration is severe or accompanied by concerning noise or handling changes.
Carry the lesson into the rest of the build
Keep a short record of what you found, what you changed, and what happened during the confirmation test. For example, note the component inspected, the correction made, and whether the same original condition still produces vibration. This record can make future maintenance clearer and gives another technician useful context if the symptom returns.
Swap planning and diagnosis go hand in hand. If you’re mapping out future work, Restomod Academy’s guide to an LS engine swap provides broader context for a modern engine installation in a classic project. A careful record of component choices and installation details can also help keep the next stage of the build grounded in what you’ve learned.
Diagnosing driveline vibration after an engine swap is a process of observation, careful inspection, and confirmation, not guesswork or automatic parts replacement. If you’d like more structured support for your broader project, explore Restomod Academy’s educational resources or consider its Restomod Consulting Services as an option for project-level guidance.
Build a More Reliable Swap, One Clue at a Time
A new vibration doesn’t automatically mean a major component has failed. Start by noting whether it follows engine rpm, vehicle speed, or changing throttle, then inspect the parts the swap disturbed and compare them with build records and manufacturer guidance. Change one thing at a time, retest cautiously, and stop if the vibration is severe or the source is beyond your tools and experience.
That steady approach makes diagnosing driveline vibration after an engine swap less about guesswork and more about evidence. Record what you find and how the vehicle responds after a correction. Those notes can guide future maintenance and help you make better decisions as your build evolves.
Ready to plan the next stage? Explore The Ultimate Restomod Guide for educational resources on classic-car restoration and modification. If you need project-level guidance, Restomod Consulting Services are another option to consider. Keep learning, trust the process, and take pride in building a classic that blends heritage with modern reliability.
Frequently Asked Questions
Is it normal for a car to vibrate after an engine swap?
No, a new vibration shouldn’t be dismissed as a normal part of an engine swap. The work may have changed mount position, transmission placement, driveline geometry, or the installation of connected components, but the symptom alone doesn’t identify the cause. Record when it occurs and inspect the parts disturbed during the swap. If the vibration is severe, worsening, or accompanied by unusual noise, stop driving and investigate safely.
Can a driveshaft cause vibration only at certain speeds?
Yes. A driveshaft-related issue can produce vibration that becomes noticeable within a particular vehicle-speed range, then changes as speed changes. Possible inspection points include shaft damage, balance weights, joint condition, installation, and phasing. However, a speed-related vibration doesn’t prove the driveshaft is responsible. Tire or wheel problems can create similar symptoms, so compare the pattern carefully and inspect more than one possible source before replacing parts.
How can I tell whether vibration comes from the engine or the driveline?
Notice whether the vibration occurs while stationary and changes with engine rpm, or appears only as vehicle speed rises. A stationary vibration that follows rpm points toward engine-running quality, mounts, or accessories for initial checks. A symptom limited to movement may guide attention toward the driveline or wheels. These clues can prioritize inspection, but they can’t confirm a fault by themselves. During diagnosing driveline vibration after an engine swap, record conditions consistently.
What happens if I keep driving with a new driveline vibration?
Continuing to drive with an unresolved vibration may allow a problem in a rotating part, joint, mount, or connected component to worsen or affect other parts. The risk depends on the cause, which the sensation alone can’t reveal. Don’t keep testing if the vibration is sudden, severe, getting worse, or paired with unusual noise or a handling change. Stop somewhere safe and arrange an inspection before driving further.
Can incorrect engine or transmission mounts cause vibration after a swap?
Yes. A damaged, incorrectly installed, or mismatched mount can transmit engine vibration into the chassis or leave the drivetrain sitting differently than intended. A change in engine or transmission position may also affect connected driveline parts and clearances. Inspect mount hardware and visible contact points, then compare installation with build records and manufacturer guidance. Don’t guess at acceptable movement or torque values. Use vehicle and component specific documentation.
Should I replace the driveshaft if vibration starts after an engine swap?
No, don’t replace the driveshaft based only on timing. First check what was disturbed during the swap and look for visible damage, missing balance weights, joint concerns, incorrect orientation, or signs of contact. Compare the shaft and installation with build records and component guidance. Also consider wheel and tire conditions, which can imitate driveline symptoms. Replace or repair parts only after inspection provides evidence, or a qualified professional identifies the cause.
When should I stop troubleshooting and take the car to a professional?
Stop driving and seek qualified help if vibration is severe, worsening, accompanied by unusual noise, or affects handling. Arrange professional inspection if the symptom persists after basic checks, returns after a repair, or requires measurements or adjustments beyond your tools and experience. Keep your notes on speed, gear, throttle, and where the vibration is felt. Share them with the technician, along with details of what the swap changed.