
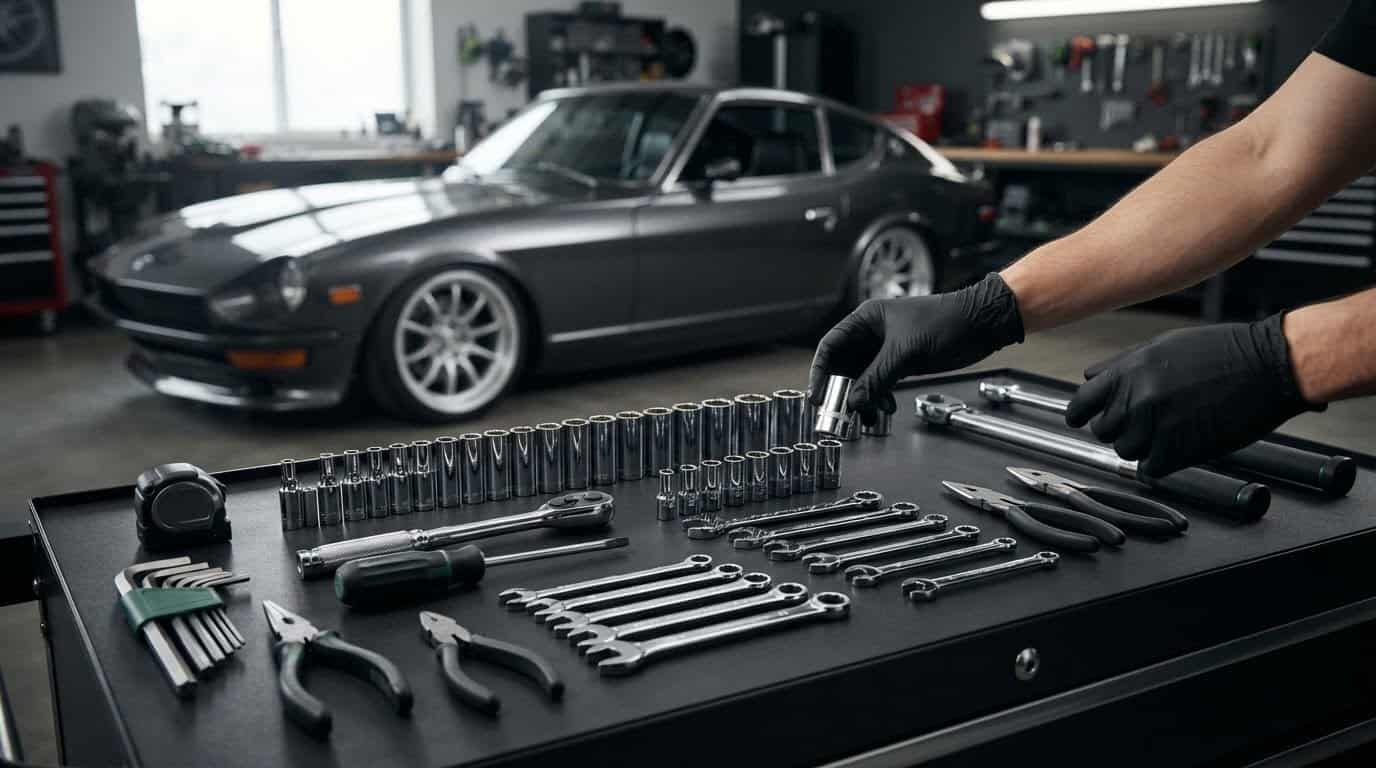
Your first car-building toolkit should be smaller than you think. The essential hand tools for a beginner car builder aren’t a towering chest of gadgets. They’re a focused set that fits fasteners properly and covers the jobs your first project is likely to involve. It’s easy to wonder whether you’re missing something when every restoration seems to call for another specialized tool. But buying too much too soon can be as frustrating as using a poorly fitting wrench and damaging a stubborn fastener.
Start with dependable basics, then let the work guide what comes next. This checklist explains when to use sockets and ratchets, combination wrenches, screwdrivers, pliers, and hex keys, including why classic-car builders should be prepared for both SAE and metric fasteners. You’ll also see when a torque wrench belongs in your kit and which specialty tools can wait until a specific task calls for them. Choose tools for the work you plan to do, and each job can build your skills as you bring vintage character and modern reliability together.
Key Takeaways
- Build a focused foundation of essential hand tools for a beginner car builder, then expand your kit to suit specific jobs.
- Match each tool to the fastener and task to help prevent damaged hardware and unnecessary frustration.
- Use pliers, a breaker bar, and a torque wrench for the jobs they’re designed for, not as substitutes for proper fit or technique.
- Choose your next tool by reviewing the upcoming task and identifying what your current kit can’t handle.
- Treat a starter kit as a way to build skill and confidence. Some jobs still require more experience or specialized tools.
Essential hand tools for a beginner car builder: start with the core kit
A first toolkit doesn’t need to fill a workshop wall. Start with tools for the jobs in front of you, then add to them as you discover what’s missing. This keeps your learning practical and helps you avoid buying specialized gear before you know whether your project needs it.
Build around hand tools for disassembly, inspection, adjustment, and reassembly: a socket set and ratchet, combination wrenches, screwdrivers, pliers, and hex keys. A torque wrench belongs on the list when a service procedure specifies a tightening torque. This starter checklist focuses on hand tools, not power tools or workshop equipment. With the right basics, you can begin learning how parts fit and fasteners behave.
For another perspective on assembling a home mechanic’s toolkit, watch this video:
Which basic tools belong in a first car-builder kit?
Choose a socket set and ratchet for common nuts and bolts, plus combination wrenches for places where a socket won’t fit or can’t move freely. A combination wrench has a box end and an open end, giving you options for different access conditions. Keep screwdrivers in several tip styles and sizes for screws around trim, brackets, and interior fittings. For a classic car, SAE and metric sizes help you match the fasteners actually on the vehicle.
Add pliers for gripping, holding, or manipulating small components, and hex keys for fasteners with an internal hex-shaped recess. Use the correct size and type instead of forcing a loose fit, which can damage the fastener and make later work harder. A torque wrench is useful when the vehicle’s service information specifies a tightening torque. It has a different purpose from a standard ratchet, so follow the procedure rather than guessing.
What should beginners leave off the first checklist?
Specialized tools earn their place when a defined task requires them. Don’t buy a tool just because it appears in a professional shop. Equipment for a particular suspension, engine, or brake procedure may sit unused until your build reaches that job. First identify the work you plan to do, then use vehicle-specific service information to determine the required tools and procedure.
Keep your first checklist focused on everyday hand tools, and add task-specific equipment when the project calls for it. A starter kit supports learning, but it doesn’t make every repair suitable for a beginner. Pair careful tool use with structured project guidance as you move from basic maintenance toward a classic-car build with modern reliability in mind.
Choose sockets, wrenches, and drivers that fit classic-car fasteners
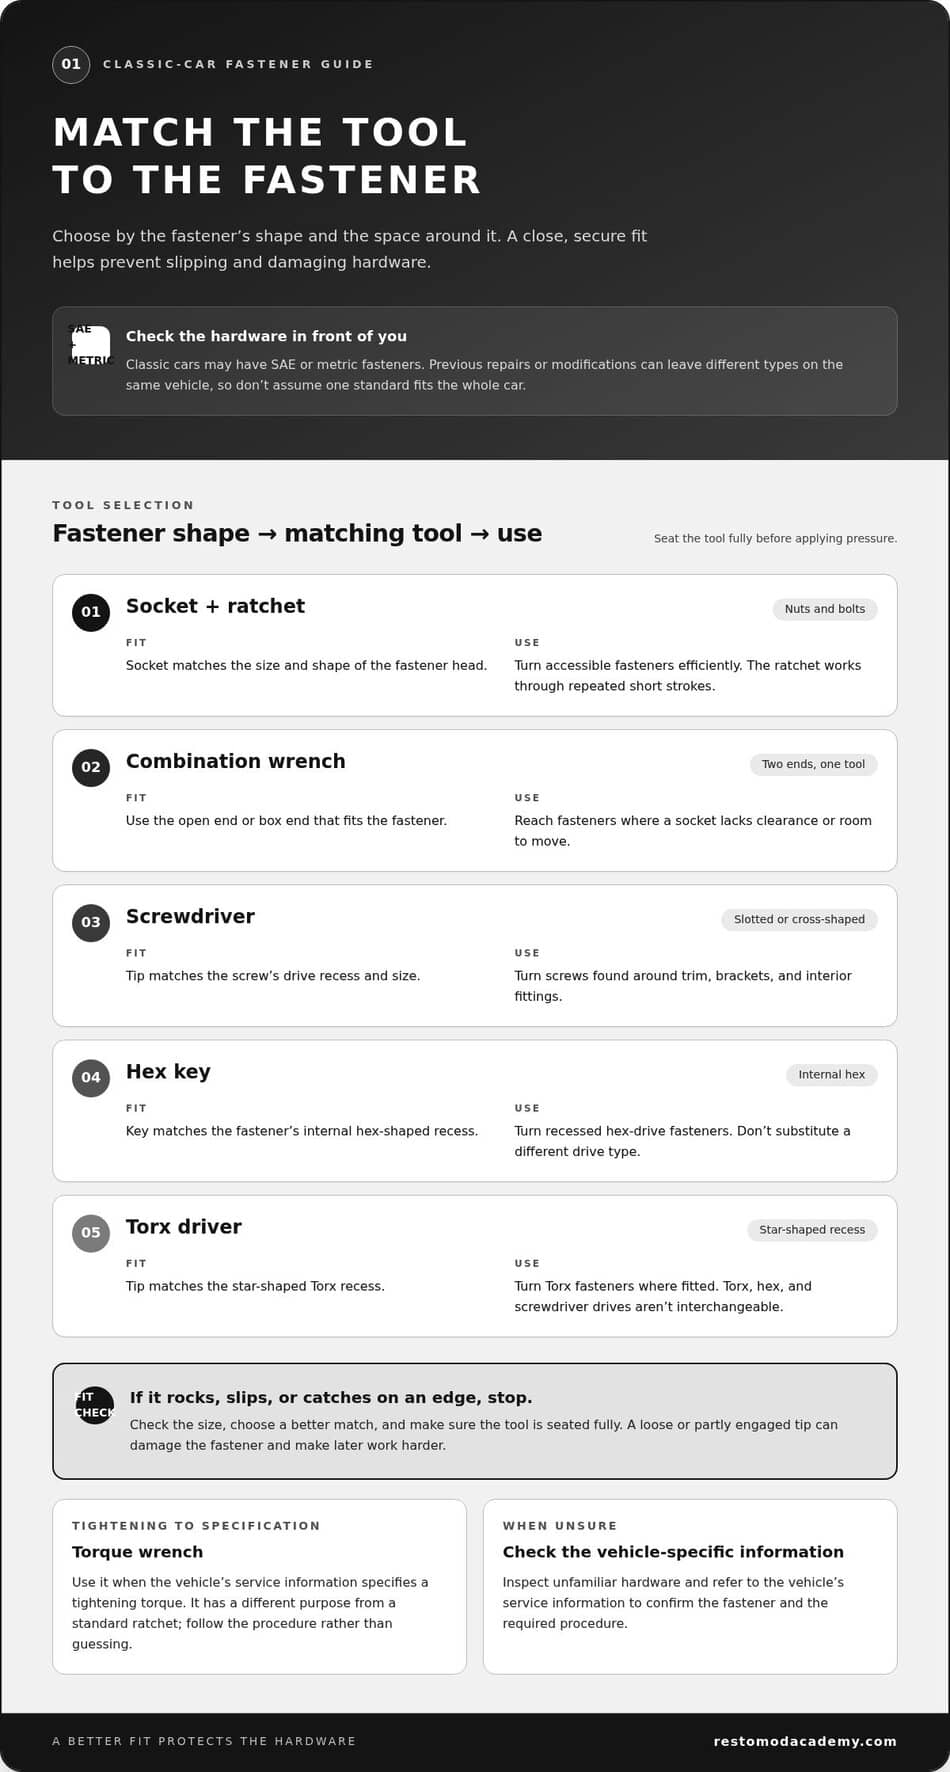
Match the tool to the fastener before applying force. Classic cars may have SAE or metric hardware, and previous repairs or modifications can leave different types of fasteners on the same vehicle. Check the fastener in front of you instead of assuming it follows one standard. The right fit helps you work deliberately, whether you’re removing a bracket or refitting an interior panel.
Use this comparison to choose a tool based on the fastener’s shape and available space:
| Tool type | Fastener fit | Typical use |
|---|---|---|
| Socket and ratchet | Socket matches the size and shape of the fastener head | Turning accessible nuts and bolts efficiently |
| Combination wrench | Open end or box end fits the fastener | Working where a socket lacks clearance or movement |
| Screwdriver | Tip matches the screw’s drive recess | Turning slotted or cross-shaped screws |
| Hex key | Key matches the fastener’s internal hex | Turning recessed hex-drive fasteners |
| Torx driver | Tip matches the star-shaped Torx recess | Turning Torx fasteners where fitted |
A close, secure fit helps protect fastener edges and drive recesses from slipping, rounding, or other damage as you turn.
When should a beginner reach for a socket or combination wrench?
Use a socket and ratchet when the fastener is accessible and the socket sits squarely over its head. The ratchet lets you turn through repeated short strokes, which is useful when there isn’t room for a full hand turn. A combination wrench gives you two options: the box end grips the fastener, while the open end can be useful when nearby parts restrict access.
Don’t force a tool that fits poorly. Check the size and seat it fully before applying pressure. If it rocks, slips, or catches only on an edge, stop and try a better match.
How do screwdrivers, hex keys, and Torx tools differ?
Slotted and cross-shaped screws need matching screwdriver tips. Internal hex fasteners take hex keys, while Torx fasteners have a star-shaped recess for a Torx driver. These drives aren’t interchangeable. A tip that only partly engages can slip and damage the recess, especially if the fastener is tight or difficult to reach.
Check unfamiliar hardware against vehicle-specific service information, and inspect the fastener itself before choosing a driver. The recommended restomod tools can help you think through equipment choices as your project takes shape.
Add gripping, leverage, and measuring tools without overbuying
Once you can turn common fasteners, a few additional hand tools help with different tasks: holding a small part steady, loosening a suitable stubborn fastener, or tightening a component to a specified torque. You won’t need them for every job. Add them as your project requires, and treat leverage as a way to apply force carefully, not as a fix for a tool that doesn’t fit.
Which pliers and leverage tools are useful for early projects?
Choose pliers for gripping and holding, not as an all-purpose substitute for a wrench. Slip-joint pliers grip objects of different sizes. Needle-nose pliers help reach or hold smaller parts in confined spaces. Locking pliers can hold a component securely when the task calls for it. Avoid gripping finished surfaces or turning fasteners with pliers if the jaws could slip or cause damage.
A breaker bar can help loosen a stubborn fastener when you have the correct socket, secure access, and a suitable direction of force. Pause if the socket shifts, the tool starts to twist, or nearby components are at risk. Uncontrolled force can damage hardware or surrounding parts, and a slipping tool can cause injury. More leverage isn’t always the answer.
An adjustable wrench can be handy for occasional jobs, but use it with care:
- Useful: Its movable jaw accommodates different fastener sizes when a correctly sized wrench isn’t at hand.
- Less suitable: A loose or poorly seated jaw can slip, so it’s not the best choice for high-force work or a fastener that needs a precise fit.
For routine turning, a correctly sized fixed wrench or socket gives a more dependable fit. Check the adjustable wrench’s jaw against the fastener and keep the tool seated as you apply force.
When does a torque wrench belong in the toolkit?
A torque wrench is used to tighten fasteners when a procedure specifies how tightly they must be secured. Unlike a standard ratchet, it helps you apply a stated torque rather than relying on the feel of “tight enough.” Use it when the procedure calls for controlled tightening, not simply because a bolt feels difficult to turn.
Follow the torque value and method in the applicable vehicle or component service procedure. The correct value depends on the specified fastener and assembly, so don’t guess, copy a number from an unrelated job, or treat one setting as suitable for every bolt. Follow the tool’s instructions, too, and stop at the procedure’s stated target.
These additions are useful when a task calls for gripping, suitable leverage, or measured tightening. As your build takes shape, project-specific restomod guidance can help connect each hands-on step to the larger goal of a classic car with modern reliability.
Buy and organize beginner car-building hand tools in a sensible order
Build your toolkit around work you’re ready to do. A planned maintenance task or small disassembly job gives you a practical reason to choose tools, check their fit, and learn how parts come apart. This keeps purchases purposeful: the essential hand tools for a beginner car builder are the tools suited to the vehicle and next job, not every item that might someday be useful.
Use this sequence before buying more:
- Define the first tasks. Choose specific jobs on your vehicle, such as removing a trim panel or inspecting an accessible component. Keep the scope realistic and consult the service procedure before starting.
- List the requirements. Note the fasteners, tool types, and sizes each procedure calls for. Check the hardware on the car rather than assuming it’s all the same standard, especially if parts have been changed or modified.
- Compare the list with your kit. Mark what you own, what you can borrow, and what’s missing. Buy only the tools needed to complete the planned work with a proper fit.
- Review after the job. Record which tools you used often, which you borrowed, and whether a missing tool held up the task. Use those notes to guide your next purchase.
How can beginners prioritize tool purchases around real tasks?
Start with the next defined job, not an imagined full restoration. Read the vehicle-specific procedure, identify the fasteners and access limits, then write down the tools required. If you borrow a tool, note when and why. If a tool repeatedly earns a place in your hand, consider adding it to your own kit. This simple record turns each job into a more accurate buying plan.
Choose well-fitting tools for the work you do most. A poorly fitting wrench or driver can slip, slow the job, and damage hardware. You don’t need the largest set. You need dependable tools that suit your fasteners and are easy to find when it’s time to use them.
What makes a starter kit easier to use in the garage?
Give each tool a consistent home, such as a marked case slot, drawer, or organizer. Return it after use, and group sockets by type or size so you can spot a missing one. Sort removed fasteners by job in labeled containers, and keep related hardware together for reassembly. These habits reduce searching and help prevent small parts from getting mixed up.
As the project grows, connect tool purchases to a written plan for the next stage of work. Explore recommended gear for related equipment guidance, and build your kit deliberately. A considered tool list keeps the focus on careful work that brings classic character and modern reliability together.
Use your first toolkit to begin building a classic car with confidence
A starter kit is a foundation for learning, not a promise that every repair is within reach. Begin with a manageable task, follow the relevant vehicle or component procedure, and notice how the parts and fasteners fit together. The essential hand tools for a beginner car builder can support steady progress, but sound judgment matters just as much as the tools in your hand.
How should a beginner approach the first hands-on job?
Choose a task with a clear scope, such as removing an accessible trim piece or inspecting a component covered by the service information for the work you plan to do. Before starting, read the procedure from beginning to end. Note warnings, required tools, the sequence of steps, and details that will matter during reassembly.
Prepare before turning the first fastener. Lay out the tools the procedure calls for, keep the work area orderly, and use a simple method to keep removed hardware associated with its location. Work deliberately, and stop if the task exceeds your knowledge, available equipment, or safe working conditions. Pausing to learn more is part of building skill, not a setback.
How can a basic toolkit grow with a restomod project?
Let documented project needs guide each addition. If the next procedure requires a tool you don’t own, identify the tool and its purpose before buying. If you can complete the task with your current kit, there’s no need to collect equipment for a hypothetical future job. A short project log can record completed work, unfamiliar steps, and tools needed next.
As plans move beyond basic maintenance, requirements can change. An engine swap, for example, brings project-specific procedures and tool needs that a general starter kit may not cover. The LS engine swap guide is an example of guidance for a later, specialized build stage. Use the plans and procedures for your own project to identify the tools the work calls for.
Tool choices are only one part of a thoughtful build. The Ultimate Restomod Guide offers structured learning about classic-car restoration and modification with modern reliability in mind. Explore what a restomod involves as you consider how your first hands-on jobs fit into a larger project. Start with work you can approach carefully, learn from each step, and let the next task shape what you add to your kit.
Let your first project set the pace
Your first build doesn’t need to happen all at once. Choose a manageable next task, learn what it requires, and let each completed step guide your confidence and your toolkit. The essential hand tools for a beginner car builder are a starting point for hands-on learning, not a shortcut around careful planning or sound judgment.
For a wider roadmap, Restomod Academy is an educational platform founded by automotive enthusiast Brook Walsh. Its restomod guides, consulting services, and project blueprints offer ways to keep learning as your plans take shape. Explore The Ultimate Restomod Guide and take the next step toward building a classic car that brings its heritage together with modern reliability.
Start with one thoughtful job, work at a steady pace, and enjoy the satisfaction of making progress with your own hands.
Frequently Asked Questions
What are the most essential hand tools for a beginner car builder?
The essential hand tools for a beginner car builder are a socket set with a ratchet, combination wrenches, screwdrivers, pliers, and hex keys. Add a torque wrench when a repair procedure calls for measured tightening. To make the list useful rather than overwhelming, choose a likely first job and check its requirements. That way, you can prioritize sizes and tool types that match the actual work.
Do I need both metric and SAE tools for a classic car?
It’s sensible to have access to both metric and SAE tools, but the car’s actual fasteners should guide which sizes you use. A classic vehicle may have been repaired or modified over time, so don’t assume every fastener matches its original specification. Before starting a job, inspect the hardware and consult the applicable service information. This helps you avoid forcing a near-fit tool onto a fastener.
Is an adjustable wrench enough for basic car work?
No, an adjustable wrench shouldn’t be your only wrench for car work. It can help with occasional fasteners when its jaws fit snugly, but a fixed-size wrench is usually a better choice for repeated turning or jobs that require firm, controlled force. Keep the adjustable wrench as a flexible backup, and avoid using it if the jaws wobble, don’t sit fully on the fastener, or begin to slip.
Can I work on a car without a torque wrench?
Yes, some tasks don’t call for a torque wrench, but use one whenever the relevant procedure specifies a torque value. That value comes from the applicable vehicle or component instructions, not guesswork or how tight a fastener feels. If you don’t have the tool for a job that requires measured tightening, pause and plan how to complete that step properly rather than treating a standard ratchet as an equivalent.
How do I avoid damaging bolts with hand tools?
Clean dirt from the fastener before choosing a tool, then confirm the tool seats fully and squarely. Keep it aligned as you turn, and use steady pressure instead of jerking or leaning on a slipping wrench. If a fastener resists unexpectedly, stop to reassess the tool fit and procedure rather than increasing force. Damaged edges or recesses can make removal and careful reassembly much harder.
Should a beginner buy a complete mechanic’s tool set?
A complete set can be convenient, but it may include tools you won’t use for your first jobs while still leaving a task-specific gap. Compare the set’s contents with the procedures and fasteners on your vehicle. Look for useful coverage in the sizes and tool types you need, plus storage that helps you return pieces to their place. Buying a focused kit and adding tools as tasks demand is also a practical approach.
Your first car-building toolkit should be smaller than you think. The essential hand tools for a beginner car builder aren’t a towering chest of gadgets. They’re a focused set that fits fasteners properly and covers the jobs your first project is likely to involve. It’s easy to wonder whether you’re missing something when every restoration seems to call for another specialized tool. But buying too much too soon can be as frustrating as using a poorly fitting wrench and damaging a stubborn fastener.
Start with dependable basics, then let the work guide what comes next. This checklist explains when to use sockets and ratchets, combination wrenches, screwdrivers, pliers, and hex keys, including why classic-car builders should be prepared for both SAE and metric fasteners. You’ll also see when a torque wrench belongs in your kit and which specialty tools can wait until a specific task calls for them. Choose tools for the work you plan to do, and each job can build your skills as you bring vintage character and modern reliability together.
Key Takeaways
- Build a focused foundation of essential hand tools for a beginner car builder, then expand your kit to suit specific jobs.
- Match each tool to the fastener and task to help prevent damaged hardware and unnecessary frustration.
- Use pliers, a breaker bar, and a torque wrench for the jobs they’re designed for, not as substitutes for proper fit or technique.
- Choose your next tool by reviewing the upcoming task and identifying what your current kit can’t handle.
- Treat a starter kit as a way to build skill and confidence. Some jobs still require more experience or specialized tools.
Essential hand tools for a beginner car builder: start with the core kit
A first toolkit doesn’t need to fill a workshop wall. Start with tools for the jobs in front of you, then add to them as you discover what’s missing. This keeps your learning practical and helps you avoid buying specialized gear before you know whether your project needs it.
Build around hand tools for disassembly, inspection, adjustment, and reassembly: a socket set and ratchet, combination wrenches, screwdrivers, pliers, and hex keys. A torque wrench belongs on the list when a service procedure specifies a tightening torque. This starter checklist focuses on hand tools, not power tools or workshop equipment. With the right basics, you can begin learning how parts fit and fasteners behave.
For another perspective on assembling a home mechanic’s toolkit, watch this video:
Which basic tools belong in a first car-builder kit?
Choose a socket set and ratchet for common nuts and bolts, plus combination wrenches for places where a socket won’t fit or can’t move freely. A combination wrench has a box end and an open end, giving you options for different access conditions. Keep screwdrivers in several tip styles and sizes for screws around trim, brackets, and interior fittings. For a classic car, SAE and metric sizes help you match the fasteners actually on the vehicle.
Add pliers for gripping, holding, or manipulating small components, and hex keys for fasteners with an internal hex-shaped recess. Use the correct size and type instead of forcing a loose fit, which can damage the fastener and make later work harder. A torque wrench is useful when the vehicle’s service information specifies a tightening torque. It has a different purpose from a standard ratchet, so follow the procedure rather than guessing.
What should beginners leave off the first checklist?
Specialized tools earn their place when a defined task requires them. Don’t buy a tool just because it appears in a professional shop. Equipment for a particular suspension, engine, or brake procedure may sit unused until your build reaches that job. First identify the work you plan to do, then use vehicle-specific service information to determine the required tools and procedure.
Keep your first checklist focused on everyday hand tools, and add task-specific equipment when the project calls for it. A starter kit supports learning, but it doesn’t make every repair suitable for a beginner. Pair careful tool use with structured project guidance as you move from basic maintenance toward a classic-car build with modern reliability in mind.
Choose sockets, wrenches, and drivers that fit classic-car fasteners
Match the tool to the fastener before applying force. Classic cars may have SAE or metric hardware, and previous repairs or modifications can leave different types of fasteners on the same vehicle. Check the fastener in front of you instead of assuming it follows one standard. The right fit helps you work deliberately, whether you’re removing a bracket or refitting an interior panel.
Use this comparison to choose a tool based on the fastener’s shape and available space:
| Tool type | Fastener fit | Typical use |
|---|---|---|
| Socket and ratchet | Socket matches the size and shape of the fastener head | Turning accessible nuts and bolts efficiently |
| Combination wrench | Open end or box end fits the fastener | Working where a socket lacks clearance or movement |
| Screwdriver | Tip matches the screw’s drive recess | Turning slotted or cross-shaped screws |
| Hex key | Key matches the fastener’s internal hex | Turning recessed hex-drive fasteners |
| Torx driver | Tip matches the star-shaped Torx recess | Turning Torx fasteners where fitted |
A close, secure fit helps protect fastener edges and drive recesses from slipping, rounding, or other damage as you turn.
When should a beginner reach for a socket or combination wrench?
Use a socket and ratchet when the fastener is accessible and the socket sits squarely over its head. The ratchet lets you turn through repeated short strokes, which is useful when there isn’t room for a full hand turn. A combination wrench gives you two options: the box end grips the fastener, while the open end can be useful when nearby parts restrict access.
Don’t force a tool that fits poorly. Check the size and seat it fully before applying pressure. If it rocks, slips, or catches only on an edge, stop and try a better match.
How do screwdrivers, hex keys, and Torx tools differ?
Slotted and cross-shaped screws need matching screwdriver tips. Internal hex fasteners take hex keys, while Torx fasteners have a star-shaped recess for a Torx driver. These drives aren’t interchangeable. A tip that only partly engages can slip and damage the recess, especially if the fastener is tight or difficult to reach.
Check unfamiliar hardware against vehicle-specific service information, and inspect the fastener itself before choosing a driver. The recommended restomod tools can help you think through equipment choices as your project takes shape.
Add gripping, leverage, and measuring tools without overbuying
Once you can turn common fasteners, a few additional hand tools help with different tasks: holding a small part steady, loosening a suitable stubborn fastener, or tightening a component to a specified torque. You won’t need them for every job. Add them as your project requires, and treat leverage as a way to apply force carefully, not as a fix for a tool that doesn’t fit.
Which pliers and leverage tools are useful for early projects?
Choose pliers for gripping and holding, not as an all-purpose substitute for a wrench. Slip-joint pliers grip objects of different sizes. Needle-nose pliers help reach or hold smaller parts in confined spaces. Locking pliers can hold a component securely when the task calls for it. Avoid gripping finished surfaces or turning fasteners with pliers if the jaws could slip or cause damage.
A breaker bar can help loosen a stubborn fastener when you have the correct socket, secure access, and a suitable direction of force. Pause if the socket shifts, the tool starts to twist, or nearby components are at risk. Uncontrolled force can damage hardware or surrounding parts, and a slipping tool can cause injury. More leverage isn’t always the answer.
An adjustable wrench can be handy for occasional jobs, but use it with care:
- Useful: Its movable jaw accommodates different fastener sizes when a correctly sized wrench isn’t at hand.
- Less suitable: A loose or poorly seated jaw can slip, so it’s not the best choice for high-force work or a fastener that needs a precise fit.
For routine turning, a correctly sized fixed wrench or socket gives a more dependable fit. Check the adjustable wrench’s jaw against the fastener and keep the tool seated as you apply force.
When does a torque wrench belong in the toolkit?
A torque wrench is used to tighten fasteners when a procedure specifies how tightly they must be secured. Unlike a standard ratchet, it helps you apply a stated torque rather than relying on the feel of “tight enough.” Use it when the procedure calls for controlled tightening, not simply because a bolt feels difficult to turn.
Follow the torque value and method in the applicable vehicle or component service procedure. The correct value depends on the specified fastener and assembly, so don’t guess, copy a number from an unrelated job, or treat one setting as suitable for every bolt. Follow the tool’s instructions, too, and stop at the procedure’s stated target.
These additions are useful when a task calls for gripping, suitable leverage, or measured tightening. As your build takes shape, project-specific restomod guidance can help connect each hands-on step to the larger goal of a classic car with modern reliability.
Buy and organize beginner car-building hand tools in a sensible order
Build your toolkit around work you’re ready to do. A planned maintenance task or small disassembly job gives you a practical reason to choose tools, check their fit, and learn how parts come apart. This keeps purchases purposeful: the essential hand tools for a beginner car builder are the tools suited to the vehicle and next job, not every item that might someday be useful.
Use this sequence before buying more:
- Define the first tasks. Choose specific jobs on your vehicle, such as removing a trim panel or inspecting an accessible component. Keep the scope realistic and consult the service procedure before starting.
- List the requirements. Note the fasteners, tool types, and sizes each procedure calls for. Check the hardware on the car rather than assuming it’s all the same standard, especially if parts have been changed or modified.
- Compare the list with your kit. Mark what you own, what you can borrow, and what’s missing. Buy only the tools needed to complete the planned work with a proper fit.
- Review after the job. Record which tools you used often, which you borrowed, and whether a missing tool held up the task. Use those notes to guide your next purchase.
How can beginners prioritize tool purchases around real tasks?
Start with the next defined job, not an imagined full restoration. Read the vehicle-specific procedure, identify the fasteners and access limits, then write down the tools required. If you borrow a tool, note when and why. If a tool repeatedly earns a place in your hand, consider adding it to your own kit. This simple record turns each job into a more accurate buying plan.
Choose well-fitting tools for the work you do most. A poorly fitting wrench or driver can slip, slow the job, and damage hardware. You don’t need the largest set. You need dependable tools that suit your fasteners and are easy to find when it’s time to use them.
What makes a starter kit easier to use in the garage?
Give each tool a consistent home, such as a marked case slot, drawer, or organizer. Return it after use, and group sockets by type or size so you can spot a missing one. Sort removed fasteners by job in labeled containers, and keep related hardware together for reassembly. These habits reduce searching and help prevent small parts from getting mixed up.
As the project grows, connect tool purchases to a written plan for the next stage of work. Explore recommended gear for related equipment guidance, and build your kit deliberately. A considered tool list keeps the focus on careful work that brings classic character and modern reliability together.
Use your first toolkit to begin building a classic car with confidence
A starter kit is a foundation for learning, not a promise that every repair is within reach. Begin with a manageable task, follow the relevant vehicle or component procedure, and notice how the parts and fasteners fit together. The essential hand tools for a beginner car builder can support steady progress, but sound judgment matters just as much as the tools in your hand.
How should a beginner approach the first hands-on job?
Choose a task with a clear scope, such as removing an accessible trim piece or inspecting a component covered by the service information for the work you plan to do. Before starting, read the procedure from beginning to end. Note warnings, required tools, the sequence of steps, and details that will matter during reassembly.
Prepare before turning the first fastener. Lay out the tools the procedure calls for, keep the work area orderly, and use a simple method to keep removed hardware associated with its location. Work deliberately, and stop if the task exceeds your knowledge, available equipment, or safe working conditions. Pausing to learn more is part of building skill, not a setback.
How can a basic toolkit grow with a restomod project?
Let documented project needs guide each addition. If the next procedure requires a tool you don’t own, identify the tool and its purpose before buying. If you can complete the task with your current kit, there’s no need to collect equipment for a hypothetical future job. A short project log can record completed work, unfamiliar steps, and tools needed next.
As plans move beyond basic maintenance, requirements can change. An engine swap, for example, brings project-specific procedures and tool needs that a general starter kit may not cover. The LS engine swap guide is an example of guidance for a later, specialized build stage. Use the plans and procedures for your own project to identify the tools the work calls for.
Tool choices are only one part of a thoughtful build. The Ultimate Restomod Guide offers structured learning about classic-car restoration and modification with modern reliability in mind. Explore what a restomod involves as you consider how your first hands-on jobs fit into a larger project. Start with work you can approach carefully, learn from each step, and let the next task shape what you add to your kit.
Let your first project set the pace
Your first build doesn’t need to happen all at once. Choose a manageable next task, learn what it requires, and let each completed step guide your confidence and your toolkit. The essential hand tools for a beginner car builder are a starting point for hands-on learning, not a shortcut around careful planning or sound judgment.
For a wider roadmap, Restomod Academy is an educational platform founded by automotive enthusiast Brook Walsh. Its restomod guides, consulting services, and project blueprints offer ways to keep learning as your plans take shape. Explore The Ultimate Restomod Guide and take the next step toward building a classic car that brings its heritage together with modern reliability.
Start with one thoughtful job, work at a steady pace, and enjoy the satisfaction of making progress with your own hands.
Frequently Asked Questions
What are the most essential hand tools for a beginner car builder?
The essential hand tools for a beginner car builder are a socket set with a ratchet, combination wrenches, screwdrivers, pliers, and hex keys. Add a torque wrench when a repair procedure calls for measured tightening. To make the list useful rather than overwhelming, choose a likely first job and check its requirements. That way, you can prioritize sizes and tool types that match the actual work.
Do I need both metric and SAE tools for a classic car?
It’s sensible to have access to both metric and SAE tools, but the car’s actual fasteners should guide which sizes you use. A classic vehicle may have been repaired or modified over time, so don’t assume every fastener matches its original specification. Before starting a job, inspect the hardware and consult the applicable service information. This helps you avoid forcing a near-fit tool onto a fastener.
Is an adjustable wrench enough for basic car work?
No, an adjustable wrench shouldn’t be your only wrench for car work. It can help with occasional fasteners when its jaws fit snugly, but a fixed-size wrench is usually a better choice for repeated turning or jobs that require firm, controlled force. Keep the adjustable wrench as a flexible backup, and avoid using it if the jaws wobble, don’t sit fully on the fastener, or begin to slip.
Can I work on a car without a torque wrench?
Yes, some tasks don’t call for a torque wrench, but use one whenever the relevant procedure specifies a torque value. That value comes from the applicable vehicle or component instructions, not guesswork or how tight a fastener feels. If you don’t have the tool for a job that requires measured tightening, pause and plan how to complete that step properly rather than treating a standard ratchet as an equivalent.
How do I avoid damaging bolts with hand tools?
Clean dirt from the fastener before choosing a tool, then confirm the tool seats fully and squarely. Keep it aligned as you turn, and use steady pressure instead of jerking or leaning on a slipping wrench. If a fastener resists unexpectedly, stop to reassess the tool fit and procedure rather than increasing force. Damaged edges or recesses can make removal and careful reassembly much harder.
Should a beginner buy a complete mechanic’s tool set?
A complete set can be convenient, but it may include tools you won’t use for your first jobs while still leaving a task-specific gap. Compare the set’s contents with the procedures and fasteners on your vehicle. Look for useful coverage in the sizes and tool types you need, plus storage that helps you return pieces to their place. Buying a focused kit and adding tools as tasks demand is also a practical approach.