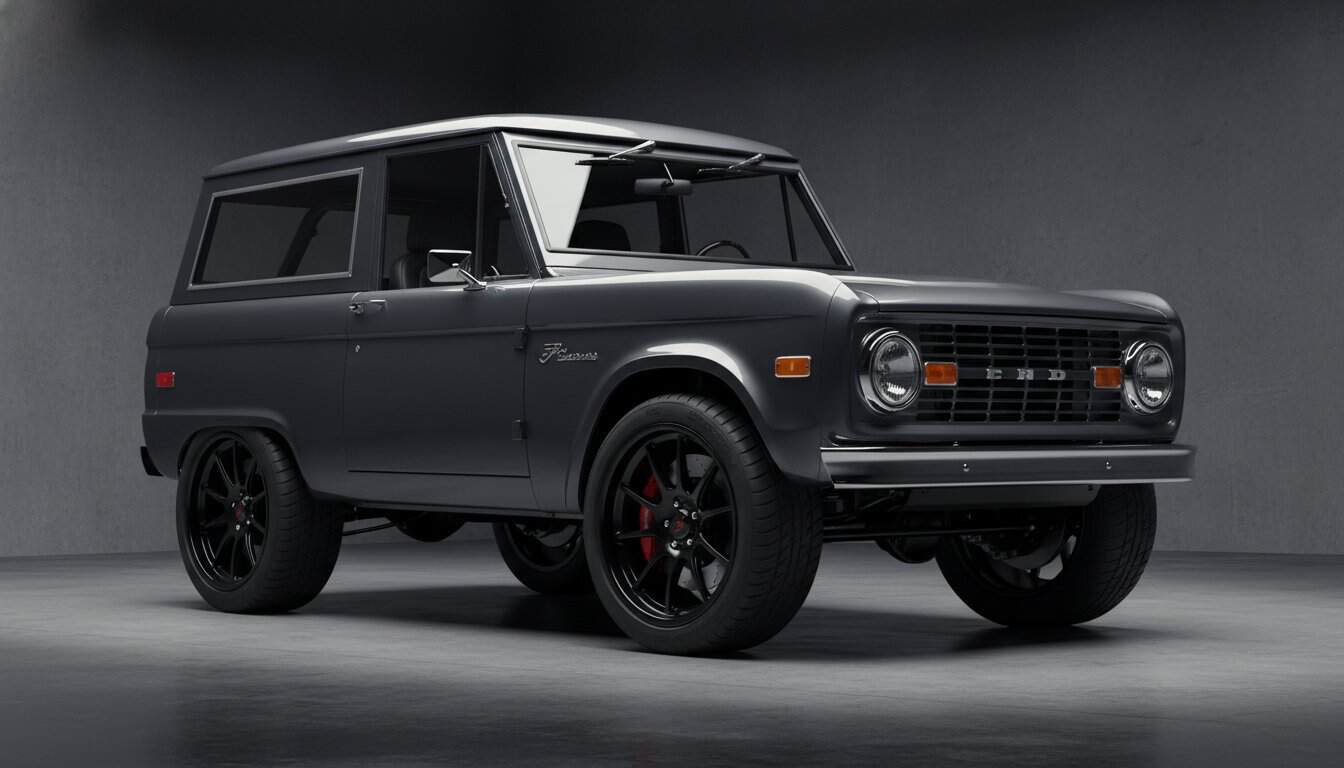
[Header Image: A beautifully restored First Gen Ford Bronco, half classic, half modern, parked in a scenic outdoor setting.]
The First Generation Ford Bronco is more than just a classic SUV; it’s a cultural icon, a symbol of rugged simplicity and go-anywhere freedom. But driving a 50-year-old vehicle in 2026 traffic can be a nerve-wracking experience. That’s where the art of the restomod comes in. This guide provides a complete blueprint of first gen bronco restomod ideas, showing you how to surgically implant modern performance, safety, and reliability into your 1966-1977 legend without sacrificing its timeless soul.
Discover the most innovative powertrain, suspension, and interior ideas to transform your 1966-1977 Ford Bronco into a reliable modern masterpiece.
Defining the First Gen Bronco Restomod Vision
Embarking on a Bronco restomod is an exercise in strategic modernization. It’s about making deliberate choices that enhance the driving experience while honoring the original design DNA. Unlike a pure restoration that demands factory-correct parts, a restomod gives you the freedom to build the Bronco that Ford would have made today, with all the benefits of modern engineering.
- Restoration vs. Restomod: A restoration returns the vehicle to its original showroom condition. A restomod, on the other hand, preserves the classic aesthetic while upgrading the powertrain, suspension, and interior for modern performance and comfort.
- The Ultimate Canvas: The Bronco’s simple, robust construction and iconic styling make it the perfect platform for modern upgrades. Its shortcomings—like vague steering and drum brakes—are easily corrected with today’s technology.
- Balancing Heritage and Modernity: The key is to make upgrades feel intentional, not out of place. Every modern component should serve the purpose of making the Bronco safer, more reliable, and more enjoyable to drive.
- Setting Your Objective: Before turning a single wrench, define your goal. Are you building a comfortable weekend cruiser, a capable off-road beast, or a reliable daily driver? Your answer will dictate every decision you make.
Identifying Your Build Style
Your vision will fall into one of three primary styles. Each has a different focus and budget, so choosing your path early is critical for a successful project.
- The Sleeper: This build hides its modern capabilities beneath a completely stock-appearing exterior. The surprise comes from the turn-key reliability of a fuel-injected V8, the stopping power of disc brakes, and the comfort of modern air conditioning.
- The Modern Classic: This is the most popular approach. It features subtle but noticeable upgrades that signal its enhanced performance, such as slightly larger wheels, modern LED headlights, and a refined interior with more supportive seats.
- The Extreme Trail Build: Here, function dictates form. The focus is entirely on off-road prowess, with significant suspension lifts, long-travel articulation, heavy-duty axles, and rugged body armor.
The Iconic 1966-1977 Platform Strengths
To modify the Bronco effectively, you must first understand its inherent design. The original engineers gave it a fantastic foundation, but it has limitations when paired with modern power.
- Short Wheelbase Dynamics: The Bronco’s short wheelbase makes it incredibly agile and maneuverable, but it can also lead to twitchy handling at highway speeds without modern suspension geometry.
- Frame Reinforcement: The original frame was designed for less than 200 horsepower. Doubling or tripling that output with a modern engine swap requires strategic reinforcement to prevent twisting and maintain structural integrity.
- Foundational Knowledge: Understanding these core principles is the first step. For a deeper dive, explore our foundational guide on what defines a true restomod.
Powertrain Upgrades: Modern Muscle for Vintage Iron
The heart of any restomod is a modern powertrain. While the original 289 and 302 V8s were adequate for their time, they can’t match the efficiency, power, and turn-key reliability of a modern crate engine. The challenge lies in fitting these sophisticated powerplants into an engine bay designed in the early 1960s.
- Engine Bay Constraints: The early Bronco’s narrow engine bay presents a packaging challenge for wide, modern overhead-cam engines like the Ford Coyote.
- Cooling System Demands: A 400+ horsepower engine generates significant heat. A high-capacity aluminum radiator with electric fans is not just an upgrade; it’s a necessity.
- Modern Transmissions: Moving from the original three-speed manual to a modern 6-speed or 10-speed automatic transmission completely transforms the driving experience, offering better acceleration and relaxed highway cruising.
[Infographic: A visual comparison of the Ford 5.0L Coyote, 7.3L Godzilla, and 2.3L EcoBoost, showing horsepower, torque, dimensions, and estimated cost for a Bronco swap.]
The Coyote Swap: The Gold Standard
The 5.0L Coyote V8 from the modern Mustang GT is the most popular and well-supported engine swap for the First Gen Bronco. It delivers an incredible power-to-weight ratio, providing thrilling acceleration and proven reliability.
- Performance Unleashed: With over 460 horsepower in a lightweight Bronco chassis, the performance is breathtaking. It transforms the vintage SUV into a legitimate sports car competitor.
- Packaging Challenges: Making it fit requires careful planning. Common modifications include relocating the brake booster, using specific engine mounts, and modifying the steering shaft for clearance.
- Control Systems: A standalone engine control pack from Ford Performance simplifies the wiring, making an otherwise complex electronic integration a plug-and-play affair.
Alternative Powerplants: Godzilla and EcoBoost
While the Coyote is king, other modern Ford engines offer unique advantages that may better suit your build goals and budget.
- The 7.3L Godzilla: This pushrod V8 is physically narrower than the Coyote, making it an easier fit. It’s a torque monster, perfect for off-road applications and towing, offering massive low-end grunt.
- The 2.3L EcoBoost: For a different approach, the turbocharged four-cylinder from the Ranger and modern Bronco offers V8-like torque with significantly less weight. This improves handling by reducing front-end mass and offers superior fuel efficiency.
- The LS Swap: Though controversial among Ford purists, the General Motors LS V8 family offers an undeniable combination of compact size, low cost, and immense aftermarket support. For a performance-per-dollar build, it’s a tough option to beat. Learn more in our definitive guide to an LS engine swap.
Chassis and Suspension: Achieving Modern Handling
A modern engine is useless if the chassis can’t handle the power. The original Bronco suspension was designed for farm trails, not freeway interchanges. A complete overhaul of the suspension, steering, and braking systems is essential for safety and driver confidence.
- Correcting Bronco Lean: Modern coilover conversions and correctly rated springs eliminate the notorious body roll and provide a stable, planted feel.
- Durable Axles: Upgrading the axles to a Dana 44 front and a Ford 9-inch rear is a time-tested formula for handling the torque of a modern V8 and the stress of larger tires.
- Frame Stiffening: Boxing the frame and adding a modern crossmember is non-negotiable. This simple step provides the rigidity needed to keep the suspension geometry stable under load.
Suspension Geometry and Lift Kits
The right stance is crucial for both looks and performance. Modern lift kits do more than just raise the vehicle; they correct geometry for improved handling.
- Choosing Your Lift: A 2.5-inch lift is ideal for a daily driver running 33-inch tires, offering a great look without excessively raising the center of gravity. A 3.5-inch lift allows for 35-inch tires and provides more capability for serious off-roading.
- Long-Travel Radius Arms: Aftermarket radius arms are longer than stock and feature better pivot points. This allows the suspension to articulate more freely off-road while dramatically improving on-road stability and ride quality.
Braking and Steering: Safety Essentials
These are the two most important safety upgrades you can make. Modern traffic demands stopping power and steering precision that the 1960s components simply cannot provide.
- Four-Wheel Disc Brakes: Converting from manual drum brakes to power-assisted four-wheel disc brakes is the single biggest improvement in safety. It provides consistent, fade-free stopping power in all conditions.
- Hydroboost vs. Vacuum Assist: For Broncos with large tires, a hydroboost brake system, which uses power steering pressure, provides superior stopping force compared to a traditional vacuum booster.
- Modern Steering Box: Replacing the vague, slow-ratio factory steering box with a modern, quick-ratio unit delivers a precise and responsive steering feel, making the Bronco feel decades newer.

Interior, Tech, and Comfort Ideas
The goal for the interior is to create a cabin that is comfortable, quiet, and functional for modern use while retaining its vintage charm. This is where you can blend classic style with hidden technology.
- Sound Deadening: Applying sound and heat insulation to the floor, firewall, and doors is the secret to transforming a tinny old truck into a quiet, solid-feeling vehicle.
- Modern HVAC: Integrated climate control systems provide powerful air conditioning and heat without cluttering the clean, simple lines of the original dashboard.
- Updated Gauges: Digital gauge clusters designed to mimic the original analog look give you 2026 accuracy with a 1966 vibe.
- Comfortable Seating: Modern seats with better bolstering and support are a must for any real driving. Look for options that complement the vintage aesthetic.
Modern Comfort in a Vintage Cabin
Small touches make a big difference in daily usability. Plan these systems early to ensure a clean and integrated installation.
- Climate Control: Aftermarket kits from companies like Vintage Air are designed to fit the Bronco specifically, providing a seamless factory-like installation with modern performance.
- Hidden Audio: Keep the original radio in the dash for a classic look, but install a modern Bluetooth-enabled amplifier and high-quality speakers hidden from view for a premium sound experience.
Safety and Electrical Systems
Upgrading the 50-year-old electrical and safety systems is just as critical as the mechanical work. This is the foundation for a reliable and safe restomod.
- Seatbelts and Roll Cages: Converting to three-point seatbelts is a minimum safety requirement. For open-top Broncos, a well-integrated roll cage provides critical rollover protection.
- New Wiring Harness: Tearing out the old, brittle wiring and installing a modern harness with a centralized fuse block is the best way to prevent electrical gremlins and ensure all your new components work reliably.
- LED Lighting: Upgrading to LED headlights, taillights, and interior lights provides vastly superior visibility and safety, all while drawing less power from your electrical system.
Executing Your Build: The Restomod Academy Way
A successful Bronco build is 90% planning and 10% execution. Having a clear roadmap before you start saves you time, money, and immense frustration. At Restomod Academy, we believe in empowering you, the builder, with the knowledge to tackle this project with confidence.
- Phase Your Build: Break the project into manageable phases—chassis, powertrain, body, interior. This allows you to keep the vehicle drivable for longer periods and makes the project feel less overwhelming.
- DIY vs. Professional Help: Know your limits. Tackle the jobs you have the tools and skills for, but don’t be afraid to sublet complex tasks like final paint or transmission rebuilding to a professional.
- Document Everything: Take photos and keep detailed records of your work. This not only helps with troubleshooting but also significantly increases the vehicle’s resale value.
Budgeting and Timeline Management
Two factors sink more projects than any other: running out of money and running out of motivation. A realistic plan prevents both.
- Account for Everything: Your budget must include a contingency for the “while I’m in there” upgrades that inevitably pop up. A good rule of thumb is to add 20% to your initial estimate. Our guide on how to budget for a restomod build provides a detailed financial roadmap.
- Set Milestones: Celebrate small victories. Setting and achieving milestones—like getting the engine started or finishing the brake system—provides the motivation needed to see a long-term project through to completion.
Essential Gear and Consulting
Having the right tools and the right advice is invaluable. Investing in quality equipment and expert guidance will pay for itself many times over.
- Must-Have Tools: A good quality engine hoist, jack stands, and a comprehensive socket set are the bare minimum. For a frame-off project, a welder and fabrication tools become essential. See our curated list of recommended gear for any restomod project.
- Expert Guidance: Sometimes, a 30-minute conversation with an expert who has built dozens of these trucks can save you 30 hours of mistakes in the garage. Professional consulting can help you navigate the most complex parts of your build.
Frequently Asked Questions (FAQ)
Is a first gen Bronco a good candidate for a restomod?
Absolutely. It’s one of the best candidates due to its simple design, strong aftermarket support, and iconic status. Its original weaknesses in braking, steering, and power are all easily corrected with modern components.
How much does a typical first gen Bronco restomod cost in 2026?
Costs vary widely based on your goals. A DIY build with a modern V8 swap can range from $40,000 to $80,000 on top of the vehicle’s cost. Professional, turn-key builds from top shops often start at $200,000 and can exceed $400,000.
What is the best engine for a Bronco restomod?
The 5.0L Ford Coyote V8 is widely considered the “best” due to its ideal balance of power, reliability, and aftermarket support. However, the 7.3L Godzilla is better for pure torque, and an LS swap often provides the most performance for the lowest cost.
Will restomodding my Bronco hurt its resale value?
When done correctly and tastefully, a restomod significantly increases a Bronco’s value. Buyers are willing to pay a premium for a classic vehicle with modern reliability and performance. Poorly executed or overly personalized builds, however, can hurt value.
Can I do a Bronco restomod in my home garage?
Yes. With proper planning, the right tools, and a methodical approach, a comprehensive Bronco restomod is an achievable project for a dedicated enthusiast in a home garage.
What are the most important safety upgrades for an early Bronco?
The top three safety priorities are: 1) Converting to four-wheel power disc brakes. 2) Upgrading to a modern, responsive steering system. 3) Installing three-point seatbelts and a proper roll cage.
Should I use a Coyote engine or an LS for my Bronco build?
Choose a Coyote if you want to keep the build Ford-powered and value the modern DOHC performance characteristics. Choose an LS if your primary drivers are budget, ease of packaging in a tight engine bay, and massive aftermarket support.
How long does a full frame-off Bronco restomod take?
For a home builder working nights and weekends, a full frame-off restomod is typically a 2-4 year project. A professional shop can often complete a similar build in 12-18 months.
Building a First Gen Bronco restomod is the ultimate automotive journey. It’s a chance to connect with a legendary machine on a mechanical level and craft it into your perfect vision. With the right plan and guidance, you can create a vehicle that honors the past while being perfectly suited for the road ahead.
Ready to turn your vision into a reality? Founded by enthusiast Brook Walsh, Restomod Academy provides the expert mentor voice and comprehensive project blueprints you need to master your build. [Master your build with The Ultimate Restomod Guide]