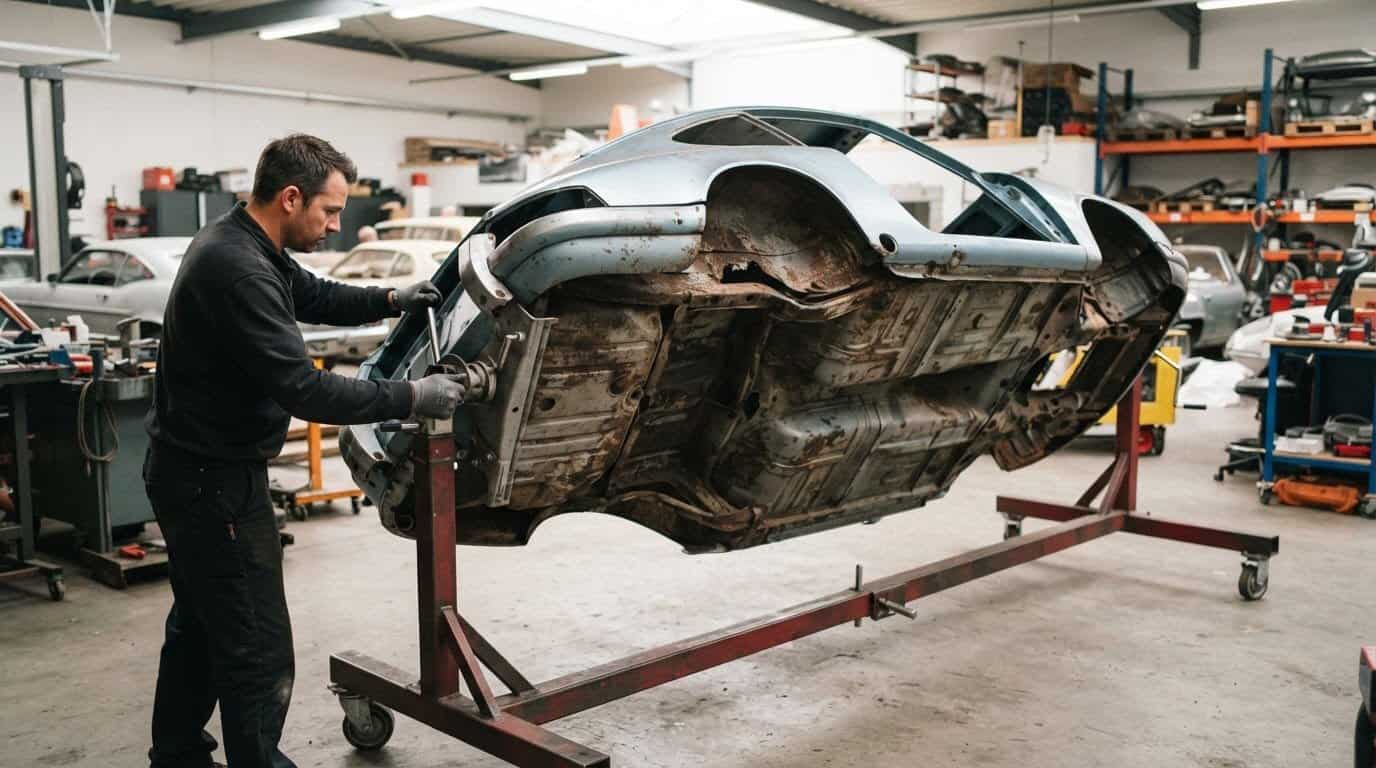
A rotisserie earns its place when the underside needs careful attention, not simply because a restoration is thorough. Use one for tasks such as rust repair, welding, cleaning, blasting, undercoating, or painting a stripped body. Once that body is properly balanced, one person can rotate it and lock it at a useful angle.
The benefit is straightforward: rotating the body brings floor pans, seams, and hard-to-reach structural areas within easier reach. But deciding when to use a rotisserie in a car restoration also means assessing the body’s condition, mounting strength, and the fixture’s capacity. A rotisserie isn’t essential for every build, and it’s designed for a stripped body, not a fully assembled car.
This guide explains which restoration tasks benefit most, how to assess body weight and safe mounting points, and what to consider before choosing a rotisserie. It also covers when stationary workshop supports may make more sense, so you can plan around the car’s structure and the finish you want.
Key Takeaways
- Match the rotisserie’s rated capacity to the body and anything still attached, and assess mounting points for structural strength before loading it.
- Plan access around the areas that need work, especially seams and structural sections that are difficult to reach from beneath a car on stands.
- Choose mounting adapters and adjustment features to suit the vehicle, then balance the body before rotating it.
- Use the project’s actual task list to decide whether a rotisserie will earn its place, from underbody repairs and blasting to priming and painting.
Rotisserie capacity and stripped-body weight
- First define what you’ll mount: a stripped body, a body with its frame, or a frame alone. A rotisserie can support a vehicle body during restoration work. List the parts that will remain attached, because doors, glass, suspension, and trim affect the load. Don’t base your capacity choice on the vehicle’s original curb weight alone.
- Compare the weight of the mounted assembly with the rotisserie’s rated capacity. Those figures describe the fixture’s capacity, not the weight of your project. Match the rating to the body and parts that will actually be mounted.
- Inspect every attachment area before lifting. On a typical full-frame car, body mounts may be suitable rotisserie mounting points, but rust or previous repairs can weaken them. Check the surrounding metal for corrosion, cracks, and distortion, and repair structural problems before mounting. A strong rotisserie cannot make a weak connection between the brackets and body safe.
- Attach the body at suitable mounting points, secure the brackets, and support its weight with jack stands before adjusting the swing arms. Keep the arms low at first to help the body remain bottom-heavy. Tighten the pivot-point base lock nut during balancing adjustments. Don’t turn the crank handle until the body is centered and balanced.
- For a home garage, permit and shop rules depend on location and workspace. Follow applicable local building and fire requirements; no single permit rule applies everywhere. As a safety step, keep the body supported during adjustments and rotate only after balancing. Afterward, turn it through 360 degrees to check center-tubing clearance.
- Plan for body-and-frame work as well as a body-only restoration. A rotisserie can hold the complete body and frame for cleaning and limited chassis-paint application before the running gear and trim are reinstalled. Whether this setup suits your project depends on the mounted load and capacity rating, so assess both before choosing it.
Access to the underside, floor pans, and panels
- Map the repair areas before choosing a support method. A car rotisserie turns a vehicle along its longitudinal axis, bringing the top, bottom, and sides within reach. Mark rust on the floor pans, rocker panels, seams, and frame-to-body joints. If most of the work is underneath, rotation can make access easier than repeatedly reaching beneath a stationary shell.
- Consider the car’s construction when judging how much access matters. On a unibody car, removing the front subframe and rear suspension can expose structural areas that are difficult to reach from below. A rotisserie lets you position those sections for inspection and repair. For example, inspect floor-pan edges and inner rocker seams from multiple angles.
- Match the fixture to the work sequence. Rust repair and welding are easier when you can position the affected panel to see the joint and control the tool. Cleaning, media blasting, undercoating, and painting are also more accessible when the shell can be turned. A blaster can work around the underside without crawling beneath the car.
- Plan each rotation around a specific task. Position a floor pan for metal removal and fitting, then turn the body to inspect nearby braces and seams. Set the shell at a useful angle for blasting or coating, and keep the work area clear while it moves. This helps you reach hidden surfaces instead of working only on visible panels.
- Decide whether better access justifies the setup. A rotisserie isn’t essential for every restoration: straightforward cleaning or localized repairs may be manageable with the body stationary. Choose rotation when extensive underside work, welding, or full-surface coating makes repeated access important. Before final assembly, inspect deep areas, especially where the frame and body meet, for consistent preparation and finish.
Choosing an auto rotisserie
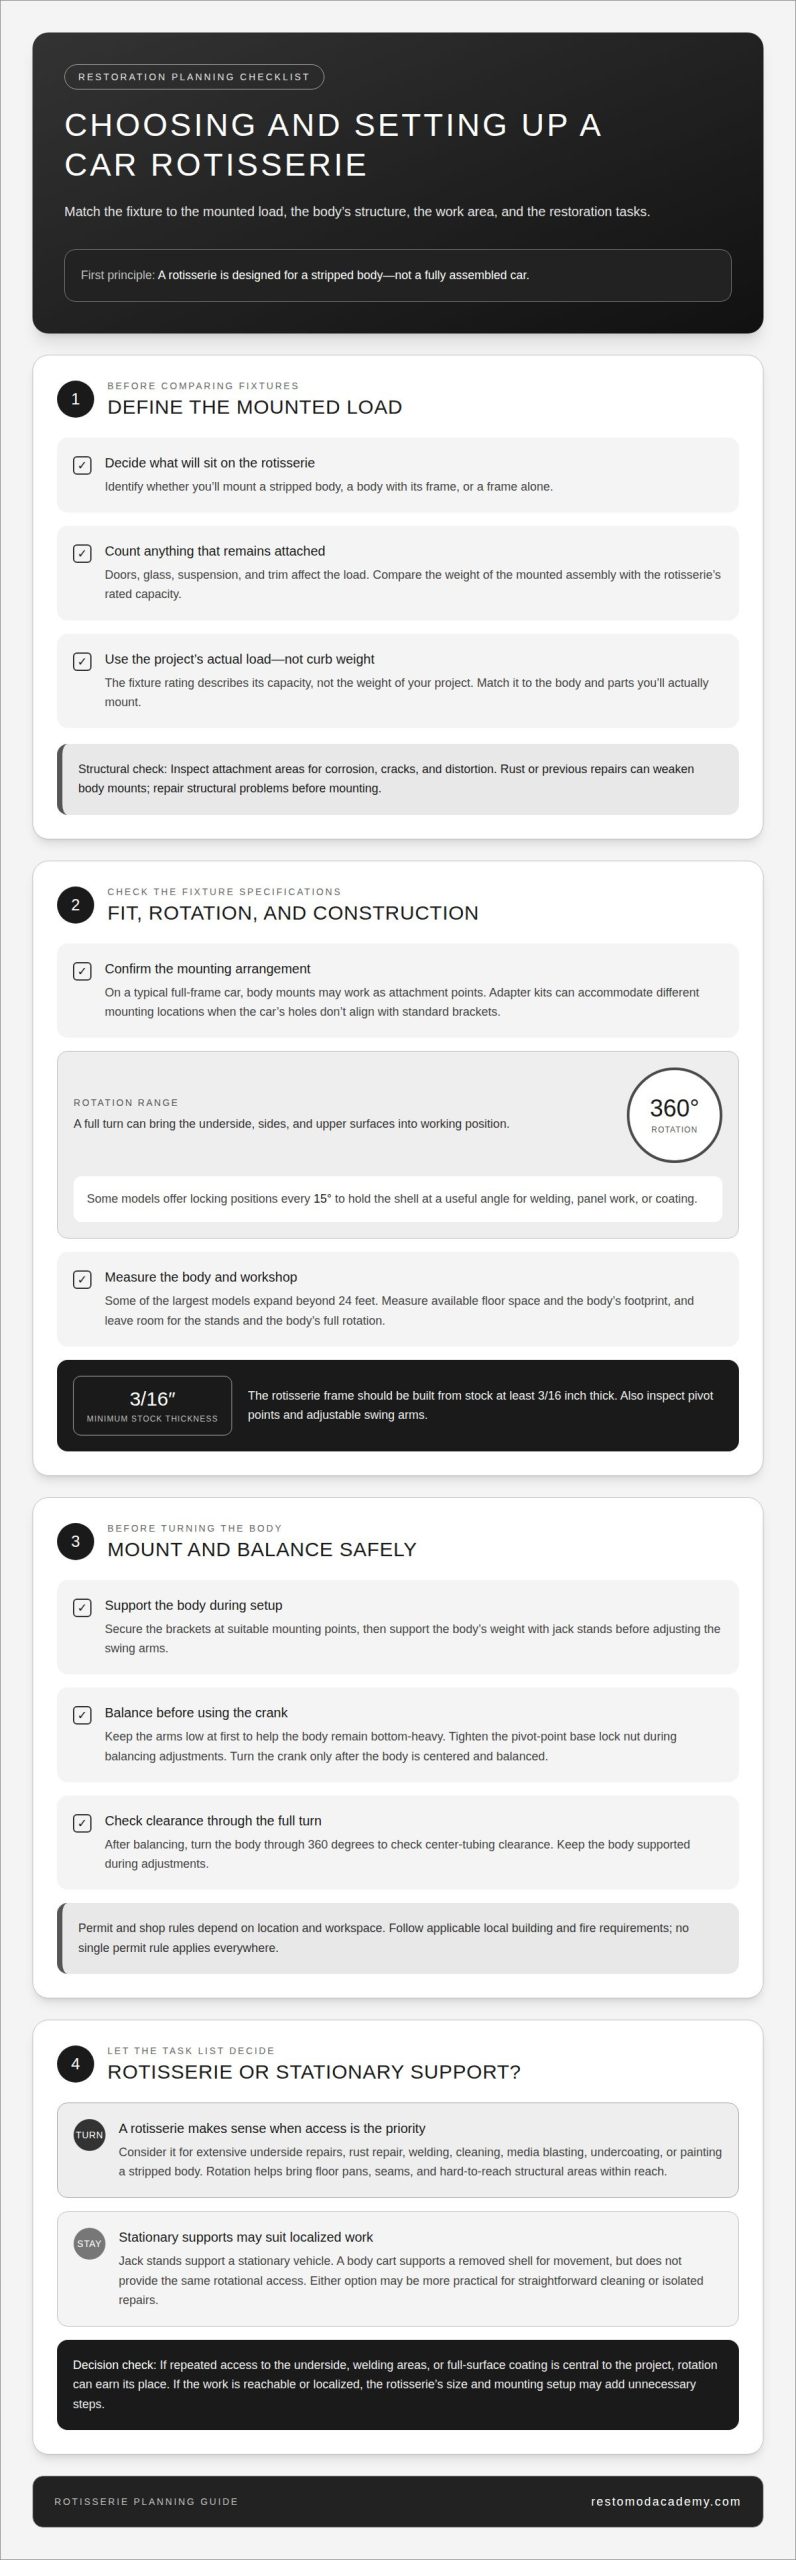
- Check that the mounting system suits the vehicle before comparing other features. On a typical full-frame car, body mounts may be suitable attachment points. Adapter kits can accommodate different mounting locations when the car’s holes don’t align with standard brackets. Make sure the mounting arrangement suits the shell and its structure.
- Choose a rotisserie that lets the body rotate through 360 degrees. That range brings the underside, sides, and upper surfaces into working position. Locking positions every 15 degrees can help hold the shell at a useful angle for a specific weld, panel, or coating task.
- Check the rotisserie’s adjustment range against the vehicle’s dimensions and your workshop layout. Some of the largest models expand beyond 24 feet, so measure the available floor space and the body’s footprint before selecting a frame. Leave room for the stands and the body’s full rotation.
- Inspect the frame construction and adjustment hardware. A rotisserie frame should be built from stock at least 3/16 inch thick. Look for sturdy pivot points and swing arms that can be adjusted to balance the mounted body. A precisely balanced shell is easier to position than one that swings unevenly.
- Choose support for the work, not the tool’s reputation. A rotisserie suits extensive underside repairs, blasting, and painting because it lets you turn the body. Jack stands support a stationary vehicle, while a body cart supports a removed shell for movement without providing the same rotational access. For localized work, either stationary option may be more practical.
- Consider the setup alongside your project timeline. A rotisserie can be worthwhile when repeated underside access is central to the restoration. If the work focuses on reachable panels or isolated repairs, its size and mounting setup may add unnecessary steps. Choose the support that gives clear access to the areas you need to restore.
Restoration tasks suited to a car rotisserie
- Move the body onto the fixture after disassembly and before extensive underside work begins. Deciding when to use a rotisserie in a car restoration is easier once the repair sequence is clear: mount the prepared shell before rust treatment, welding, or broad surface preparation.
- Use it for rust removal and welding when damage affects floor pans, seams, or other awkward underside areas. Turn the shell to bring each repair into a workable position, then inspect nearby metal for related damage. This access can help you plan a complete repair rather than patching only the visible spot.
- Choose rotation for cleaning, media blasting, undercoating, and paint preparation across the body. These jobs involve surfaces that are difficult to reach from one position. If blasting or coating is planned, schedule it after structural repairs so the finish follows the completed metalwork.
- Keep the body on the fixture during an extended stretch of bodywork if several tasks benefit from changing its angle. A restorer might use a rotisserie for a few months while completing bodywork. Deciding when to use a rotisserie in a car restoration also means considering how often the planned jobs require underside access.
- Skip the fixture for isolated repairs on reachable panels or work that doesn’t require the shell to rotate. Don’t mount a body with weak attachment areas until structural issues are repaired. When the sequence is right, use the rotisserie to build access into the plan, then move on to finishing and reassembly.
Restomod Academy
Restomod Academy helps you turn restoration decisions into a clear plan, including whether a rotisserie suits your bodywork, access needs, and project sequence. Its educational resources connect workshop choices with the larger goal of building a classic car with modern reliability.
The Ultimate Restomod Guide offers broad guidance for shaping a restomod project, while Restomod Consulting Services can help you work through project-specific decisions. Premium Project Blueprints offer another way to plan a build with greater direction. These resources can help when you’ve assessed the shell and tasks but want to align restoration choices with your overall vision.
Bring your questions about the car, its intended repairs, and your planned work. Contact Restomod Academy to discuss your restoration direction.
Plan the next stage with intention
Decide when to use a rotisserie in a car restoration while the build is still on paper, not after disassembly has narrowed your options. A clear sequence helps you preserve original reference points, plan the order of repairs, and connect each decision to the finished car you want to create.
Before work begins, write down the restoration’s priorities and the choices that depend on them. A simple project map can help turn a promising idea into steady, deliberate progress while leaving room to adapt as the car reveals its needs.
If you want to shape that plan with experienced guidance, start a project conversation with Restomod Academy. Take the next step with care, and build a classic that carries its character forward.
Frequently Asked Questions
Can one person rotate the body?
Yes, one person can rotate a properly balanced body and lock it at an angle. Balance matters more than strength: an unevenly loaded shell may swing unexpectedly. Before turning it, confirm the body is centered and stable on the pivots. Where possible, use a helper during lifting and setup, with one person at each end to help keep the body level.
Does it work on any vehicle?
No. Fit depends on the vehicle’s mounting points, structural condition, dimensions, and weight compared with the rotisserie’s capacity. A full-frame car may use body mounts, while other designs may need suitable adapters. Repair weak or heavily corroded attachment areas before mounting. Make sure the fixture can accommodate the body and its mounting arrangement before setting it up.
What is a car rotisserie used for?
A car rotisserie holds a vehicle body and lets it turn, giving a restorer access to surfaces that are otherwise awkward to reach. For example, rotating a stripped shell can make it easier to inspect seams behind a floor section or prepare the underside for coating. It improves access during restoration but doesn’t replace repairs, secure mounting, or careful project planning.
What is an automotive restoration rotisserie used for?
An automotive restoration rotisserie serves the same core purpose: supporting a body so it can be positioned for restoration work. The term emphasizes its role in a broader rebuild, where the shell may need attention in several areas rather than on one isolated panel. Plan the work order around access, so inspection, metalwork, surface preparation, and finishing are complete before the body is reunited with other components.
Which restoration tasks are best done on a rotisserie?
Choose a rotisserie when work spans hard-to-reach surfaces, such as underside rust treatment, welding, cleaning, blasting, undercoating, or paint preparation. It’s especially useful when repairs extend across the shell, since rotating the body changes the working position without repeatedly repositioning the car. For a small repair on an accessible panel, stationary support may be more practical.
What vehicle structures must be sound before mounting a car on a rotisserie?
The body’s attachment areas must be strong enough to support the mounted shell. Inspect body mounts and surrounding metal for corrosion, cracking, distortion, or previous repairs that may have weakened the connection. On a unibody vehicle, assess the specific structural sections used for attachment, not just the visible outer panels. Repair compromised metal before mounting: sound equipment cannot make a weak body connection secure.
A rotisserie earns its place when the underside needs careful attention, not simply because a restoration is thorough. Use one for tasks such as rust repair, welding, cleaning, blasting, undercoating, or painting a stripped body. Once that body is properly balanced, one person can rotate it and lock it at a useful angle.
The benefit is straightforward: rotating the body brings floor pans, seams, and hard-to-reach structural areas within easier reach. But deciding when to use a rotisserie in a car restoration also means assessing the body’s condition, mounting strength, and the fixture’s capacity. A rotisserie isn’t essential for every build, and it’s designed for a stripped body, not a fully assembled car.
This guide explains which restoration tasks benefit most, how to assess body weight and safe mounting points, and what to consider before choosing a rotisserie. It also covers when stationary workshop supports may make more sense, so you can plan around the car’s structure and the finish you want.
Key Takeaways
- Match the rotisserie’s rated capacity to the body and anything still attached, and assess mounting points for structural strength before loading it.
- Plan access around the areas that need work, especially seams and structural sections that are difficult to reach from beneath a car on stands.
- Choose mounting adapters and adjustment features to suit the vehicle, then balance the body before rotating it.
- Use the project’s actual task list to decide whether a rotisserie will earn its place, from underbody repairs and blasting to priming and painting.
Rotisserie capacity and stripped-body weight
- First define what you’ll mount: a stripped body, a body with its frame, or a frame alone. A rotisserie can support a vehicle body during restoration work. List the parts that will remain attached, because doors, glass, suspension, and trim affect the load. Don’t base your capacity choice on the vehicle’s original curb weight alone.
- Compare the weight of the mounted assembly with the rotisserie’s rated capacity. Those figures describe the fixture’s capacity, not the weight of your project. Match the rating to the body and parts that will actually be mounted.
- Inspect every attachment area before lifting. On a typical full-frame car, body mounts may be suitable rotisserie mounting points, but rust or previous repairs can weaken them. Check the surrounding metal for corrosion, cracks, and distortion, and repair structural problems before mounting. A strong rotisserie cannot make a weak connection between the brackets and body safe.
- Attach the body at suitable mounting points, secure the brackets, and support its weight with jack stands before adjusting the swing arms. Keep the arms low at first to help the body remain bottom-heavy. Tighten the pivot-point base lock nut during balancing adjustments. Don’t turn the crank handle until the body is centered and balanced.
- For a home garage, permit and shop rules depend on location and workspace. Follow applicable local building and fire requirements; no single permit rule applies everywhere. As a safety step, keep the body supported during adjustments and rotate only after balancing. Afterward, turn it through 360 degrees to check center-tubing clearance.
- Plan for body-and-frame work as well as a body-only restoration. A rotisserie can hold the complete body and frame for cleaning and limited chassis-paint application before the running gear and trim are reinstalled. Whether this setup suits your project depends on the mounted load and capacity rating, so assess both before choosing it.
Access to the underside, floor pans, and panels
- Map the repair areas before choosing a support method. A car rotisserie turns a vehicle along its longitudinal axis, bringing the top, bottom, and sides within reach. Mark rust on the floor pans, rocker panels, seams, and frame-to-body joints. If most of the work is underneath, rotation can make access easier than repeatedly reaching beneath a stationary shell.
- Consider the car’s construction when judging how much access matters. On a unibody car, removing the front subframe and rear suspension can expose structural areas that are difficult to reach from below. A rotisserie lets you position those sections for inspection and repair. For example, inspect floor-pan edges and inner rocker seams from multiple angles.
- Match the fixture to the work sequence. Rust repair and welding are easier when you can position the affected panel to see the joint and control the tool. Cleaning, media blasting, undercoating, and painting are also more accessible when the shell can be turned. A blaster can work around the underside without crawling beneath the car.
- Plan each rotation around a specific task. Position a floor pan for metal removal and fitting, then turn the body to inspect nearby braces and seams. Set the shell at a useful angle for blasting or coating, and keep the work area clear while it moves. This helps you reach hidden surfaces instead of working only on visible panels.
- Decide whether better access justifies the setup. A rotisserie isn’t essential for every restoration: straightforward cleaning or localized repairs may be manageable with the body stationary. Choose rotation when extensive underside work, welding, or full-surface coating makes repeated access important. Before final assembly, inspect deep areas, especially where the frame and body meet, for consistent preparation and finish.
Choosing an auto rotisserie
- Check that the mounting system suits the vehicle before comparing other features. On a typical full-frame car, body mounts may be suitable attachment points. Adapter kits can accommodate different mounting locations when the car’s holes don’t align with standard brackets. Make sure the mounting arrangement suits the shell and its structure.
- Choose a rotisserie that lets the body rotate through 360 degrees. That range brings the underside, sides, and upper surfaces into working position. Locking positions every 15 degrees can help hold the shell at a useful angle for a specific weld, panel, or coating task.
- Check the rotisserie’s adjustment range against the vehicle’s dimensions and your workshop layout. Some of the largest models expand beyond 24 feet, so measure the available floor space and the body’s footprint before selecting a frame. Leave room for the stands and the body’s full rotation.
- Inspect the frame construction and adjustment hardware. A rotisserie frame should be built from stock at least 3/16 inch thick. Look for sturdy pivot points and swing arms that can be adjusted to balance the mounted body. A precisely balanced shell is easier to position than one that swings unevenly.
- Choose support for the work, not the tool’s reputation. A rotisserie suits extensive underside repairs, blasting, and painting because it lets you turn the body. Jack stands support a stationary vehicle, while a body cart supports a removed shell for movement without providing the same rotational access. For localized work, either stationary option may be more practical.
- Consider the setup alongside your project timeline. A rotisserie can be worthwhile when repeated underside access is central to the restoration. If the work focuses on reachable panels or isolated repairs, its size and mounting setup may add unnecessary steps. Choose the support that gives clear access to the areas you need to restore.
Restoration tasks suited to a car rotisserie
- Move the body onto the fixture after disassembly and before extensive underside work begins. Deciding when to use a rotisserie in a car restoration is easier once the repair sequence is clear: mount the prepared shell before rust treatment, welding, or broad surface preparation.
- Use it for rust removal and welding when damage affects floor pans, seams, or other awkward underside areas. Turn the shell to bring each repair into a workable position, then inspect nearby metal for related damage. This access can help you plan a complete repair rather than patching only the visible spot.
- Choose rotation for cleaning, media blasting, undercoating, and paint preparation across the body. These jobs involve surfaces that are difficult to reach from one position. If blasting or coating is planned, schedule it after structural repairs so the finish follows the completed metalwork.
- Keep the body on the fixture during an extended stretch of bodywork if several tasks benefit from changing its angle. A restorer might use a rotisserie for a few months while completing bodywork. Deciding when to use a rotisserie in a car restoration also means considering how often the planned jobs require underside access.
- Skip the fixture for isolated repairs on reachable panels or work that doesn’t require the shell to rotate. Don’t mount a body with weak attachment areas until structural issues are repaired. When the sequence is right, use the rotisserie to build access into the plan, then move on to finishing and reassembly.
Restomod Academy
Restomod Academy helps you turn restoration decisions into a clear plan, including whether a rotisserie suits your bodywork, access needs, and project sequence. Its educational resources connect workshop choices with the larger goal of building a classic car with modern reliability.
The Ultimate Restomod Guide offers broad guidance for shaping a restomod project, while Restomod Consulting Services can help you work through project-specific decisions. Premium Project Blueprints offer another way to plan a build with greater direction. These resources can help when you’ve assessed the shell and tasks but want to align restoration choices with your overall vision.
Bring your questions about the car, its intended repairs, and your planned work. Contact Restomod Academy to discuss your restoration direction.
Plan the next stage with intention
Decide when to use a rotisserie in a car restoration while the build is still on paper, not after disassembly has narrowed your options. A clear sequence helps you preserve original reference points, plan the order of repairs, and connect each decision to the finished car you want to create.
Before work begins, write down the restoration’s priorities and the choices that depend on them. A simple project map can help turn a promising idea into steady, deliberate progress while leaving room to adapt as the car reveals its needs.
If you want to shape that plan with experienced guidance, start a project conversation with Restomod Academy. Take the next step with care, and build a classic that carries its character forward.
Frequently Asked Questions
Can one person rotate the body?
Yes, one person can rotate a properly balanced body and lock it at an angle. Balance matters more than strength: an unevenly loaded shell may swing unexpectedly. Before turning it, confirm the body is centered and stable on the pivots. Where possible, use a helper during lifting and setup, with one person at each end to help keep the body level.
Does it work on any vehicle?
No. Fit depends on the vehicle’s mounting points, structural condition, dimensions, and weight compared with the rotisserie’s capacity. A full-frame car may use body mounts, while other designs may need suitable adapters. Repair weak or heavily corroded attachment areas before mounting. Make sure the fixture can accommodate the body and its mounting arrangement before setting it up.
What is a car rotisserie used for?
A car rotisserie holds a vehicle body and lets it turn, giving a restorer access to surfaces that are otherwise awkward to reach. For example, rotating a stripped shell can make it easier to inspect seams behind a floor section or prepare the underside for coating. It improves access during restoration but doesn’t replace repairs, secure mounting, or careful project planning.
What is an automotive restoration rotisserie used for?
An automotive restoration rotisserie serves the same core purpose: supporting a body so it can be positioned for restoration work. The term emphasizes its role in a broader rebuild, where the shell may need attention in several areas rather than on one isolated panel. Plan the work order around access, so inspection, metalwork, surface preparation, and finishing are complete before the body is reunited with other components.
Which restoration tasks are best done on a rotisserie?
Choose a rotisserie when work spans hard-to-reach surfaces, such as underside rust treatment, welding, cleaning, blasting, undercoating, or paint preparation. It’s especially useful when repairs extend across the shell, since rotating the body changes the working position without repeatedly repositioning the car. For a small repair on an accessible panel, stationary support may be more practical.
What vehicle structures must be sound before mounting a car on a rotisserie?
The body’s attachment areas must be strong enough to support the mounted shell. Inspect body mounts and surrounding metal for corrosion, cracking, distortion, or previous repairs that may have weakened the connection. On a unibody vehicle, assess the specific structural sections used for attachment, not just the visible outer panels. Repair compromised metal before mounting: sound equipment cannot make a weak body connection secure.