
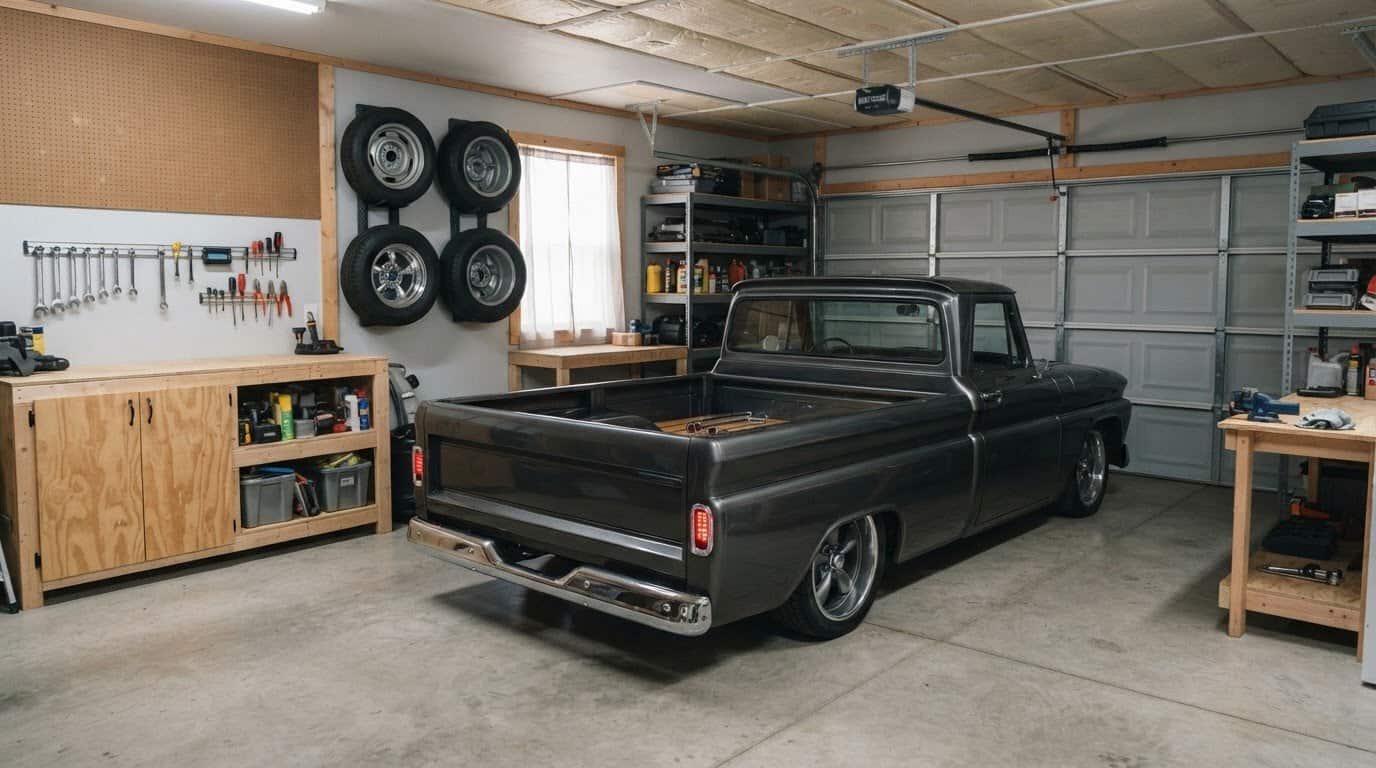
A small garage can support a long-term build without burying the workbench under parts and tools. The key to learning how to organize a garage for a long-term build is to assign every item a purpose and a place before adding storage.
It’s easy to assume you need more room, but a clear layout can make better use of the space you have. Set project goals first, then sort tools and materials into practical zones. Keep the active work area accessible, and choose storage that fits your budget. This guide covers how to maximize storage in a small garage, set a realistic timeline, and plan an organization budget without turning every corner into a shelf.
Key Takeaways
- Clear the space before choosing storage, then use wall and overhead areas to preserve room for hands-on work.
- Set practical build goals and break the garage reset into manageable tasks so the project can move forward without disrupting the workspace.
- Create distinct zones for tools, project materials, and other belongings to make essentials easier to find and return.
- Build a budget around the storage changes that solve your biggest space problems, and prioritize flexible, cost-conscious options.
How can I maximize storage for my small garage?
Plan task lighting over the workbench, and keep electrical cords clear of walking and work areas. Store fuel, chemicals, and batteries in closed, clearly labeled containers. Follow product labels, and ask your local sanitation department about chemical disposal. Control dust by cleaning from high shelves downward, and keep stored items dry and away from temperature extremes.
-
Choose Cabinets, Shelving, and Tool Storage
Measure the workbench, doors, and vehicle clearance before choosing cabinets or shelving. Keep power tools and frequently used hand tools near the bench, using drawers or a wall system to clear the work surface. Use heavy-duty brackets and anchors for shelves holding heavier items, and group seasonal items for easier access.
-
Add Sliding Shelves and Storage Walls
Install a storage wall where floor space is tight, grouping tools by task so each item has a clear home. Pegboard supports can be spaced every 16 or 24 inches to match the layout. A sliding bypass storage unit adds 50 percent more storage for long-handled tools and other items; check that doors and drawers remain accessible.
-
Build DIY Cabinets and Shelves
Build cabinets to fit the available wall, then reserve open shelving for bins and parts you need to reach often. For overhead storage, use sturdy boards spanning from rafter to rafter, and keep only lightweight items on plywood laid across cross beams. A 5-gallon bucket can corral small tools or painting supplies without spreading them across the bench.
-
Clean Shelving and Floors
Empty each shelf, then wipe down the walls and shelving before cleaning the floor, so falling dust is collected afterward. Sweep from the back of the garage toward the front, gathering debris as you go. Return items only after clearing the floor, and place a long-handled tool rack where it won’t obstruct the workbench or vehicle access.
Setting garage storage goals and a project timeline
Set a storage goal around the build, such as keeping the workbench clear and parts accessible. For ventilation and heating, plan for clear airflow and use a suitable workshop heating setup without blocking vents. To decide how to organize a garage for a long-term build, map out work areas and storage before changing the layout.
-
Measure the Garage Before Buying Storage
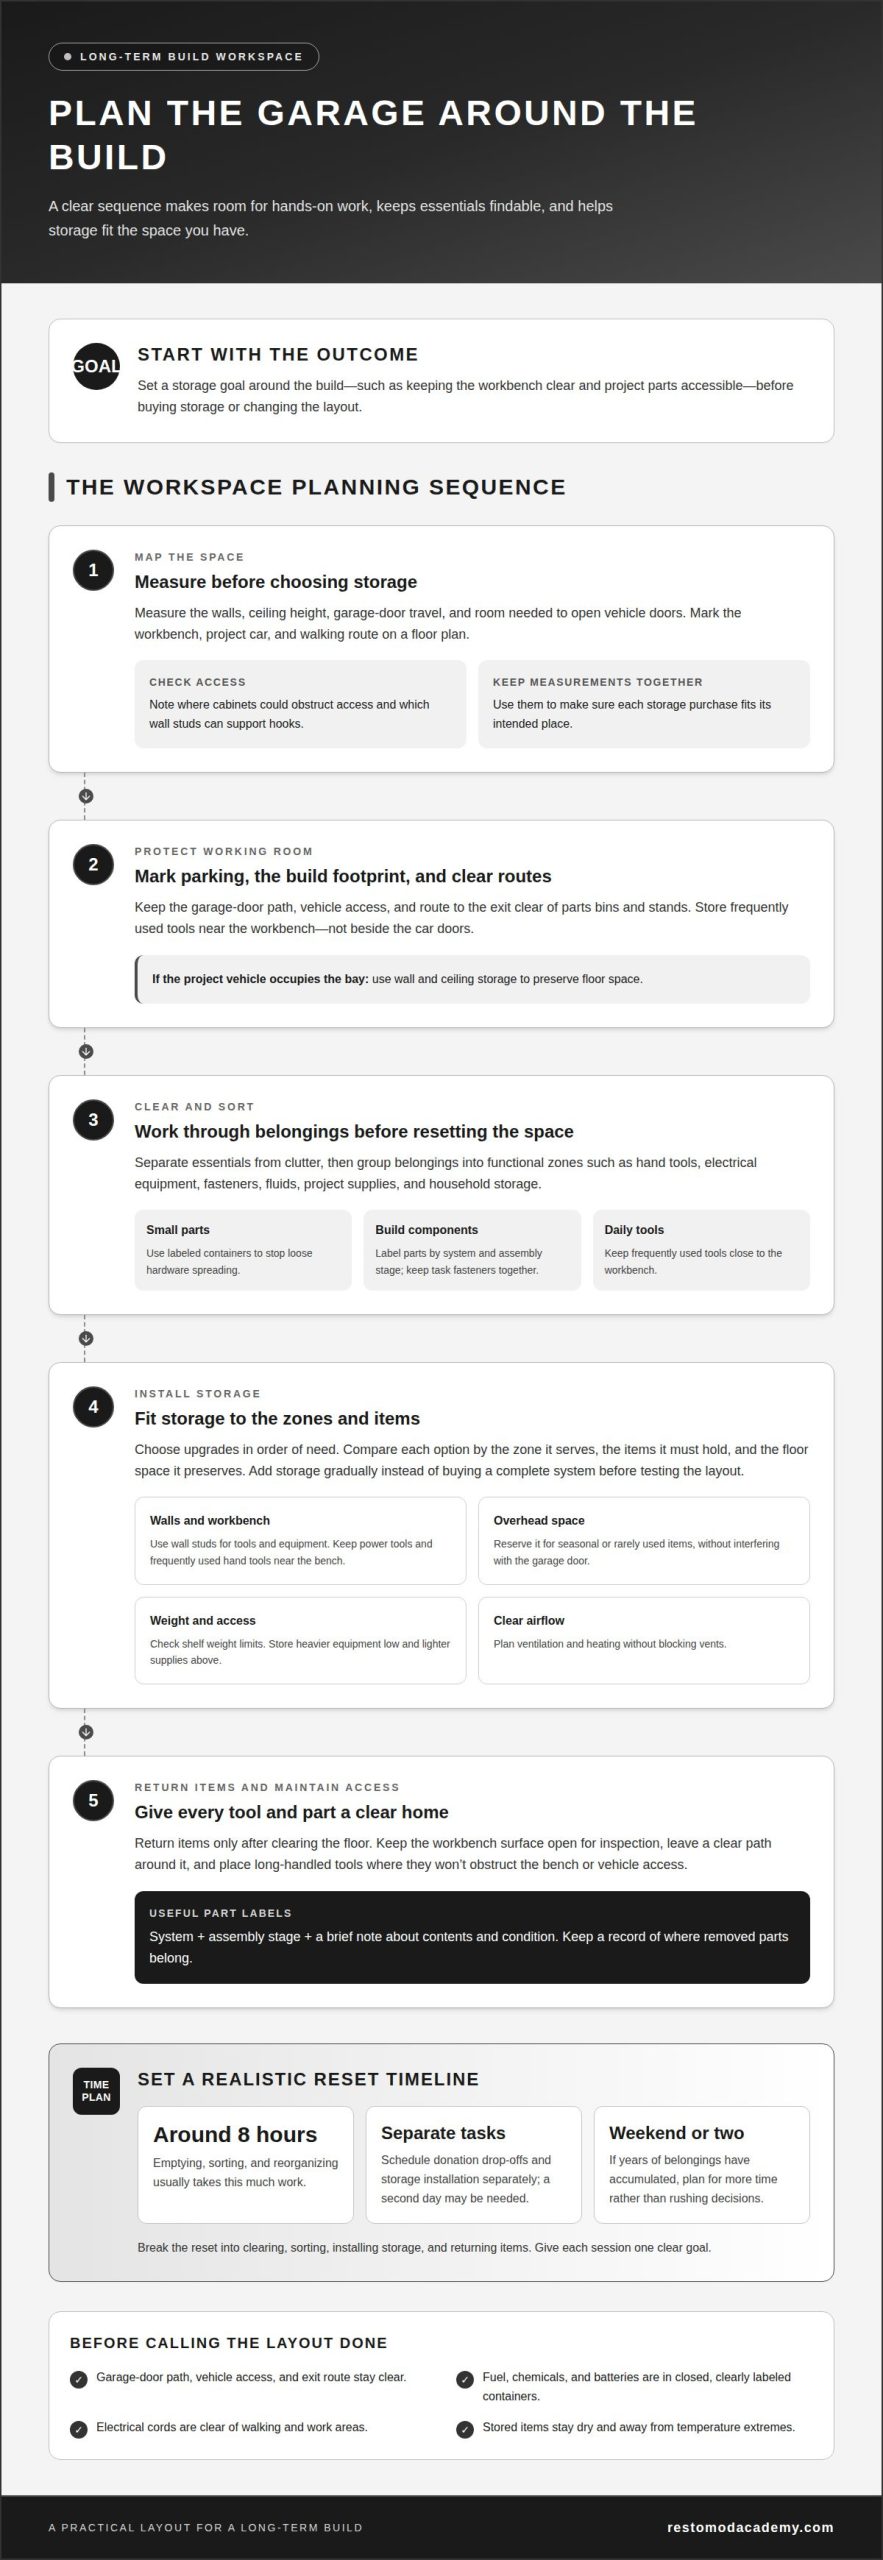
Measure the walls, ceiling height, garage-door travel, and space needed to open vehicle doors. Mark the workbench, project car, and walking route on a floor plan before choosing storage. This shows which wall studs can support hooks and where cabinets might obstruct access. Keep your measurements together so each purchase fits its intended place.
-
Keep the Garage Usable for Parking
Mark the parking area and the build’s working footprint before bringing in equipment. Keep the garage-door path, vehicle access, and route to the exit clear of parts bins and stands. Store frequently used tools near the workbench, not beside the car doors. If the project vehicle occupies the bay, use wall and ceiling storage to preserve floor space.
- Set a timeline by dividing the work into clearing, sorting, installing storage, and returning items. Emptying, sorting, and reorganizing usually takes around 8 hours of work. Schedule donation drop-offs and storage installation separately; a second day may be needed. If the garage holds years of accumulated belongings, plan for a weekend or two rather than rushing decisions. Give each session one clear goal.
- Use wall studs to hang sports equipment and tools, keeping them off the floor. Plan overhead storage for seasonal items, decorations, and gear used once a season, making sure it won’t interfere with the garage door. Secure sturdy boards from rafter to rafter, and use plywood across cross beams only for lightweight items. Place rarely used boxes higher, while keeping project parts and daily tools within reach. Label seasonal bins by contents for easier rotation.
How much does it cost to organize a garage?
- Set your budget by listing the zones the build needs: a workbench, parts storage, tools, and household supplies. Separate essentials from clutter before buying equipment. The total depends on how much storage you build yourself, which materials you choose, and whether you can reuse existing shelves. Start with the zone that creates the biggest obstruction to your work.
- Group belongings into functional zones, such as hand tools, electrical equipment, fasteners, and fluids. Use labeled containers for small parts, and keep each category near the task that uses it. This cuts down on searching and helps prevent loose hardware from spreading across the workbench or floor. Keep project supplies separate from household storage.
- Label build parts by system and assembly stage. For example, mark containers “front suspension” or “interior,” then add a brief note identifying the contents and their condition. Keep fasteners from each disassembly task together, and record where removed parts belong. A consistent labeling system makes it easier to return components to the right assembly without mixing similar pieces.
- Give the workbench its own zone, with frequently used tools close at hand and a clear surface for inspection. Store heavier equipment low and lighter supplies above it. Check shelf weight limits before loading, since excess weight can strain storage and create a hazard. Keep a clear path around the bench so parts can move safely from storage to the vehicle.
- Choose storage upgrades in order of need. Compare each option by the zone it serves, the items it must hold, and the floor space it preserves. Add storage gradually instead of buying a complete system before you’ve tested the layout.
Garage organization costs and budget tips
- Start with a written spending plan, not a shopping cart. List the garage storage problems that interrupt the build, such as loose fasteners, blocked access, or nowhere to stage parts. Rank each need by how often it affects your work. This helps you organize the garage around real tasks and make better use of available space before buying cabinets or supplies.
- Separate must-haves from upgrades. A stable work surface and accessible tool storage may matter more than matching cabinets or a full wall system. Note what you can reuse, such as sound shelves, storage bins, or a workbench. Then budget for the remaining materials and hardware. Smaller, focused changes can solve immediate problems without committing to a complete redesign.
- Stage purchases around the build sequence. If teardown comes first, prioritize labeled parts containers and a clear sorting area. Add assembly storage when components need protection and easy access. This approach spreads garage organization across a weekend or several sessions, while showing which items need permanent storage. Avoid buying organizers before you know what they need to hold.
- Compare options by function, not appearance. For each cabinet, shelf, or hook system, note its intended contents, installation needs, and effect on floor space. Reuse existing materials if they’re still suitable, and invest in new storage where strength or access matters. Keep a running total of materials and hardware, then adjust the plan if an upgrade would crowd out a higher-priority need.
- Leave room in the plan for changes as the project develops. A restoration can reveal parts that need separate storage, so avoid filling every shelf at the outset. If the build scope is still taking shape, use Premium Project Blueprints to plan your build before assigning space and funds to its supporting garage setup. The best budget serves both the machine and the work around it.
Restomod Academy
Restomod Academy’s educational resources can help you connect a well-planned workspace with the broader demands of a classic-car build. Use The Ultimate Restomod Guide to learn about the restomod process, or turn to Restomod Consulting Services for project-specific guidance. Premium Project Blueprints can help shape your build plan, aligning your garage zones, tools, and storage with the work ahead. These resources are useful when you’re moving from general garage organization to decisions about a particular vehicle and its restoration goals. A considered plan can keep the workspace functional as the project evolves. Explore Restomod Academy’s resources to find the right next step for your build.
Make Room for the Work Ahead
A well-planned garage isn’t a finished display; it’s a working part of the build. Let the layout adapt as the vehicle moves from teardown to fabrication and assembly. Review what’s slowing your next task, then make one practical adjustment to support the work ahead. This steady approach turns learning how to organize a garage for a long-term build into a useful habit, not a one-time reset.
As the project takes shape, you may want help connecting your workspace decisions with the restoration plan itself. Restomod Academy can help you think through that next stage. Contact Restomod Academy to discuss your build, and take the next step with a clear plan and renewed momentum.
Frequently Asked Questions
How do I plan garage zones for a long-term project build?
Arrange zones around the order of work: inspection, disassembly, cleaning, repair, and reassembly. Keep parts awaiting inspection separate from cleaned components ready for installation. Use a dedicated container or tray for hardware removed during each task, and note where it belongs in the assembly. This simple workflow prevents unfinished parts from getting mixed up with components ready to go back onto the vehicle.
What garage dimensions and clearances are needed for a vehicle build?
Base the layout on your vehicle’s actual footprint and the movements each task requires. Measure its length and width, then account for opening doors, moving around the car, and accessing the engine bay or trunk. Place equipment where it won’t obstruct those work areas. A plan that fits the parked vehicle may still leave too little room for repairs.
What are the best garage storage systems for tools, parts, and materials?
Choose storage by item type and frequency of use. Shallow drawers suit small hardware, while clearly labeled bins keep larger components grouped by assembly. Use closed cabinets for supplies that need protection from dust, and open shelving for items you reach often. Keep labels visible from the aisle so you can identify containers without moving other stored parts.
How do I set up a garage workbench and tool storage?
Position the workbench so you can reach tools without crossing the vehicle’s work area. Keep precision tools and frequently used hand tools close to the surface, and store bulky equipment separately. Use a removable tray for the parts involved in the current task, then clear it before starting another assembly. Good task lighting should illuminate the bench without casting shadows over detailed work.
What is the typical cost to organize and equip a garage workshop?
There’s no single typical total: the budget depends on what you can reuse and which upgrades your build needs. Reorganizing with existing shelves differs from adding cabinets, work surfaces, or new tool storage. List materials and hardware by priority, then buy for the tasks planned next. Leave room for changes as the project reveals new storage needs.
A small garage can support a long-term build without burying the workbench under parts and tools. The key to learning how to organize a garage for a long-term build is to assign every item a purpose and a place before adding storage.
It’s easy to assume you need more room, but a clear layout can make better use of the space you have. Set project goals first, then sort tools and materials into practical zones. Keep the active work area accessible, and choose storage that fits your budget. This guide covers how to maximize storage in a small garage, set a realistic timeline, and plan an organization budget without turning every corner into a shelf.
Key Takeaways
- Clear the space before choosing storage, then use wall and overhead areas to preserve room for hands-on work.
- Set practical build goals and break the garage reset into manageable tasks so the project can move forward without disrupting the workspace.
- Create distinct zones for tools, project materials, and other belongings to make essentials easier to find and return.
- Build a budget around the storage changes that solve your biggest space problems, and prioritize flexible, cost-conscious options.
How can I maximize storage for my small garage?
Plan task lighting over the workbench, and keep electrical cords clear of walking and work areas. Store fuel, chemicals, and batteries in closed, clearly labeled containers. Follow product labels, and ask your local sanitation department about chemical disposal. Control dust by cleaning from high shelves downward, and keep stored items dry and away from temperature extremes.
-
Choose Cabinets, Shelving, and Tool Storage
Measure the workbench, doors, and vehicle clearance before choosing cabinets or shelving. Keep power tools and frequently used hand tools near the bench, using drawers or a wall system to clear the work surface. Use heavy-duty brackets and anchors for shelves holding heavier items, and group seasonal items for easier access.
-
Add Sliding Shelves and Storage Walls
Install a storage wall where floor space is tight, grouping tools by task so each item has a clear home. Pegboard supports can be spaced every 16 or 24 inches to match the layout. A sliding bypass storage unit adds 50 percent more storage for long-handled tools and other items; check that doors and drawers remain accessible.
-
Build DIY Cabinets and Shelves
Build cabinets to fit the available wall, then reserve open shelving for bins and parts you need to reach often. For overhead storage, use sturdy boards spanning from rafter to rafter, and keep only lightweight items on plywood laid across cross beams. A 5-gallon bucket can corral small tools or painting supplies without spreading them across the bench.
-
Clean Shelving and Floors
Empty each shelf, then wipe down the walls and shelving before cleaning the floor, so falling dust is collected afterward. Sweep from the back of the garage toward the front, gathering debris as you go. Return items only after clearing the floor, and place a long-handled tool rack where it won’t obstruct the workbench or vehicle access.
Setting garage storage goals and a project timeline
Set a storage goal around the build, such as keeping the workbench clear and parts accessible. For ventilation and heating, plan for clear airflow and use a suitable workshop heating setup without blocking vents. To decide how to organize a garage for a long-term build, map out work areas and storage before changing the layout.
-
Measure the Garage Before Buying Storage
Measure the walls, ceiling height, garage-door travel, and space needed to open vehicle doors. Mark the workbench, project car, and walking route on a floor plan before choosing storage. This shows which wall studs can support hooks and where cabinets might obstruct access. Keep your measurements together so each purchase fits its intended place.
-
Keep the Garage Usable for Parking
Mark the parking area and the build’s working footprint before bringing in equipment. Keep the garage-door path, vehicle access, and route to the exit clear of parts bins and stands. Store frequently used tools near the workbench, not beside the car doors. If the project vehicle occupies the bay, use wall and ceiling storage to preserve floor space.
- Set a timeline by dividing the work into clearing, sorting, installing storage, and returning items. Emptying, sorting, and reorganizing usually takes around 8 hours of work. Schedule donation drop-offs and storage installation separately; a second day may be needed. If the garage holds years of accumulated belongings, plan for a weekend or two rather than rushing decisions. Give each session one clear goal.
- Use wall studs to hang sports equipment and tools, keeping them off the floor. Plan overhead storage for seasonal items, decorations, and gear used once a season, making sure it won’t interfere with the garage door. Secure sturdy boards from rafter to rafter, and use plywood across cross beams only for lightweight items. Place rarely used boxes higher, while keeping project parts and daily tools within reach. Label seasonal bins by contents for easier rotation.
How much does it cost to organize a garage?
- Set your budget by listing the zones the build needs: a workbench, parts storage, tools, and household supplies. Separate essentials from clutter before buying equipment. The total depends on how much storage you build yourself, which materials you choose, and whether you can reuse existing shelves. Start with the zone that creates the biggest obstruction to your work.
- Group belongings into functional zones, such as hand tools, electrical equipment, fasteners, and fluids. Use labeled containers for small parts, and keep each category near the task that uses it. This cuts down on searching and helps prevent loose hardware from spreading across the workbench or floor. Keep project supplies separate from household storage.
- Label build parts by system and assembly stage. For example, mark containers “front suspension” or “interior,” then add a brief note identifying the contents and their condition. Keep fasteners from each disassembly task together, and record where removed parts belong. A consistent labeling system makes it easier to return components to the right assembly without mixing similar pieces.
- Give the workbench its own zone, with frequently used tools close at hand and a clear surface for inspection. Store heavier equipment low and lighter supplies above it. Check shelf weight limits before loading, since excess weight can strain storage and create a hazard. Keep a clear path around the bench so parts can move safely from storage to the vehicle.
- Choose storage upgrades in order of need. Compare each option by the zone it serves, the items it must hold, and the floor space it preserves. Add storage gradually instead of buying a complete system before you’ve tested the layout.
Garage organization costs and budget tips
- Start with a written spending plan, not a shopping cart. List the garage storage problems that interrupt the build, such as loose fasteners, blocked access, or nowhere to stage parts. Rank each need by how often it affects your work. This helps you organize the garage around real tasks and make better use of available space before buying cabinets or supplies.
- Separate must-haves from upgrades. A stable work surface and accessible tool storage may matter more than matching cabinets or a full wall system. Note what you can reuse, such as sound shelves, storage bins, or a workbench. Then budget for the remaining materials and hardware. Smaller, focused changes can solve immediate problems without committing to a complete redesign.
- Stage purchases around the build sequence. If teardown comes first, prioritize labeled parts containers and a clear sorting area. Add assembly storage when components need protection and easy access. This approach spreads garage organization across a weekend or several sessions, while showing which items need permanent storage. Avoid buying organizers before you know what they need to hold.
- Compare options by function, not appearance. For each cabinet, shelf, or hook system, note its intended contents, installation needs, and effect on floor space. Reuse existing materials if they’re still suitable, and invest in new storage where strength or access matters. Keep a running total of materials and hardware, then adjust the plan if an upgrade would crowd out a higher-priority need.
- Leave room in the plan for changes as the project develops. A restoration can reveal parts that need separate storage, so avoid filling every shelf at the outset. If the build scope is still taking shape, use Premium Project Blueprints to plan your build before assigning space and funds to its supporting garage setup. The best budget serves both the machine and the work around it.
Restomod Academy
Restomod Academy’s educational resources can help you connect a well-planned workspace with the broader demands of a classic-car build. Use The Ultimate Restomod Guide to learn about the restomod process, or turn to Restomod Consulting Services for project-specific guidance. Premium Project Blueprints can help shape your build plan, aligning your garage zones, tools, and storage with the work ahead. These resources are useful when you’re moving from general garage organization to decisions about a particular vehicle and its restoration goals. A considered plan can keep the workspace functional as the project evolves. Explore Restomod Academy’s resources to find the right next step for your build.
Make Room for the Work Ahead
A well-planned garage isn’t a finished display; it’s a working part of the build. Let the layout adapt as the vehicle moves from teardown to fabrication and assembly. Review what’s slowing your next task, then make one practical adjustment to support the work ahead. This steady approach turns learning how to organize a garage for a long-term build into a useful habit, not a one-time reset.
As the project takes shape, you may want help connecting your workspace decisions with the restoration plan itself. Restomod Academy can help you think through that next stage. Contact Restomod Academy to discuss your build, and take the next step with a clear plan and renewed momentum.
Frequently Asked Questions
How do I plan garage zones for a long-term project build?
Arrange zones around the order of work: inspection, disassembly, cleaning, repair, and reassembly. Keep parts awaiting inspection separate from cleaned components ready for installation. Use a dedicated container or tray for hardware removed during each task, and note where it belongs in the assembly. This simple workflow prevents unfinished parts from getting mixed up with components ready to go back onto the vehicle.
What garage dimensions and clearances are needed for a vehicle build?
Base the layout on your vehicle’s actual footprint and the movements each task requires. Measure its length and width, then account for opening doors, moving around the car, and accessing the engine bay or trunk. Place equipment where it won’t obstruct those work areas. A plan that fits the parked vehicle may still leave too little room for repairs.
What are the best garage storage systems for tools, parts, and materials?
Choose storage by item type and frequency of use. Shallow drawers suit small hardware, while clearly labeled bins keep larger components grouped by assembly. Use closed cabinets for supplies that need protection from dust, and open shelving for items you reach often. Keep labels visible from the aisle so you can identify containers without moving other stored parts.
How do I set up a garage workbench and tool storage?
Position the workbench so you can reach tools without crossing the vehicle’s work area. Keep precision tools and frequently used hand tools close to the surface, and store bulky equipment separately. Use a removable tray for the parts involved in the current task, then clear it before starting another assembly. Good task lighting should illuminate the bench without casting shadows over detailed work.
What is the typical cost to organize and equip a garage workshop?
There’s no single typical total: the budget depends on what you can reuse and which upgrades your build needs. Reorganizing with existing shelves differs from adding cabinets, work surfaces, or new tool storage. List materials and hardware by priority, then buy for the tasks planned next. Leave room for changes as the project reveals new storage needs.