Why spend thousands on a high-performance crate engine and custom leather upholstery if your driving experience is still defined by the deafening roar of the road and a floorboard that feels like a furnace? You have likely spent countless hours in the garage perfecting the stance and the shine, yet that vintage tin-can resonance remains the one thing standing between your project and true luxury. It is a common struggle for every builder who wants to bridge the gap between heritage aesthetics and modern comfort. You want a cabin that feels solid, but you might worry about heavy mats affecting performance or hidden moisture causing rust beneath your new carpet.
This lizard skin vs dynamat review will help you decide which path leads to the refined, quiet ride your classic deserves. We will look at how LizardSkin Ceramic Insulation can drop cabin temperatures by up to 30 degrees and determine if Dynamat’s ability to make your audio sound twice as loud is the right fit for your specific build. We are going to break down the installation process for the home garage and show you how to strategically combine these technologies for the best result. By the end of this guide, you will have a clear blueprint for transforming your loud, hot interior into a sanctuary of precision engineering.
Key Takeaways
- Master the fundamentals of NVH to silence the bell effect of large, untreated metal body panels.
- Evaluate the strengths of butyl-based mats versus ceramic spray coatings for heat and sound suppression.
- Use this lizard skin vs dynamat review to choose the right application method for your specific garage setup and skill level.
- Learn why professional restomod builders often combine materials to eliminate noise leaks and thermal transfer.
- Discover how to achieve a luxury-feeling cabin without adding unnecessary weight that compromises your vehicle’s performance.
Understanding NVH: Why Your Restomod Needs Sound Deadening
Look at your project car’s bare metal floor pans and roof skin. To the untrained eye, it is a canvas for paint and upholstery. To a builder, it is a giant mechanical bell waiting to ring. Every time your tires hit an expansion joint or your high-lift cam pulses through the exhaust, that energy travels into the steel. This is the root of NVH, or Noise, Vibration, and Harshness. It is the rattling in the dash, the drone in your ears, and the heat radiating through the firewall that turns a Sunday cruise into an exhausting chore. Before you commit to a specific product in your lizard skin vs dynamat review, you must understand how to combat these forces at a structural level.
Vintage steel panels are thin and largely unsupported, creating what we call the bell effect. Without treatment, these panels vibrate at high frequencies, amplifying mechanical noise throughout the cabin. To fix this, you need to address two distinct problems. First, you must stop the metal from ringing through vibration damping. Second, you must block external noise and heat from entering the cabin space. Modern luxury cars feel tight and quiet because they use a layered approach to manage these energies. Your goal is to replicate that engineering using contemporary materials that won’t compromise your car’s heritage aesthetics.
The Science of Vibration Damping
Vibration damping is all about mass loading. By adding a dense material to the center of a large metal panel, you change its resonant frequency. You don’t need 100 percent coverage to stop a door skin from ringing; often, covering just 25 to 50 percent of the flat surface area is enough to kill the resonance. This is a critical distinction for builders concerned about weight. When you stop the floorboards from acting like speaker diaphragms, your actual audio system performs better. Bass becomes tighter and mid-range frequencies lose that muddy, metallic echo. You are essentially turning a tin can into a solid vault.
Thermal Insulation vs. Acoustic Barriers
Stopping the vibration is only half the battle. High-performance headers and custom exhaust systems generate immense radiant heat that can easily soak through a standard carpet kit. You need a dedicated thermal barrier to keep the cabin cool. This is where the lizard skin vs dynamat review becomes essential, as different products excel at either blocking heat or absorbing airborne sound. To truly modernize your ride, you must apply the fundamental principles of soundproofing, which include absorption and thermal decoupling.
- Radiant Heat: Blocks the literal oven effect from the engine bay and transmission tunnel.
- Acoustic Barriers: Prevents high-frequency road noise and wind whistle from penetrating the interior.
- Mechanical Harmony: Combines both to create a cabin where you can actually hold a conversation at highway speeds.
Achieving that modern, luxury feel requires more than just thick carpet. It requires a strategic plan to isolate the driver from the mechanical violence of the road while still allowing the soul of the machine to shine through.
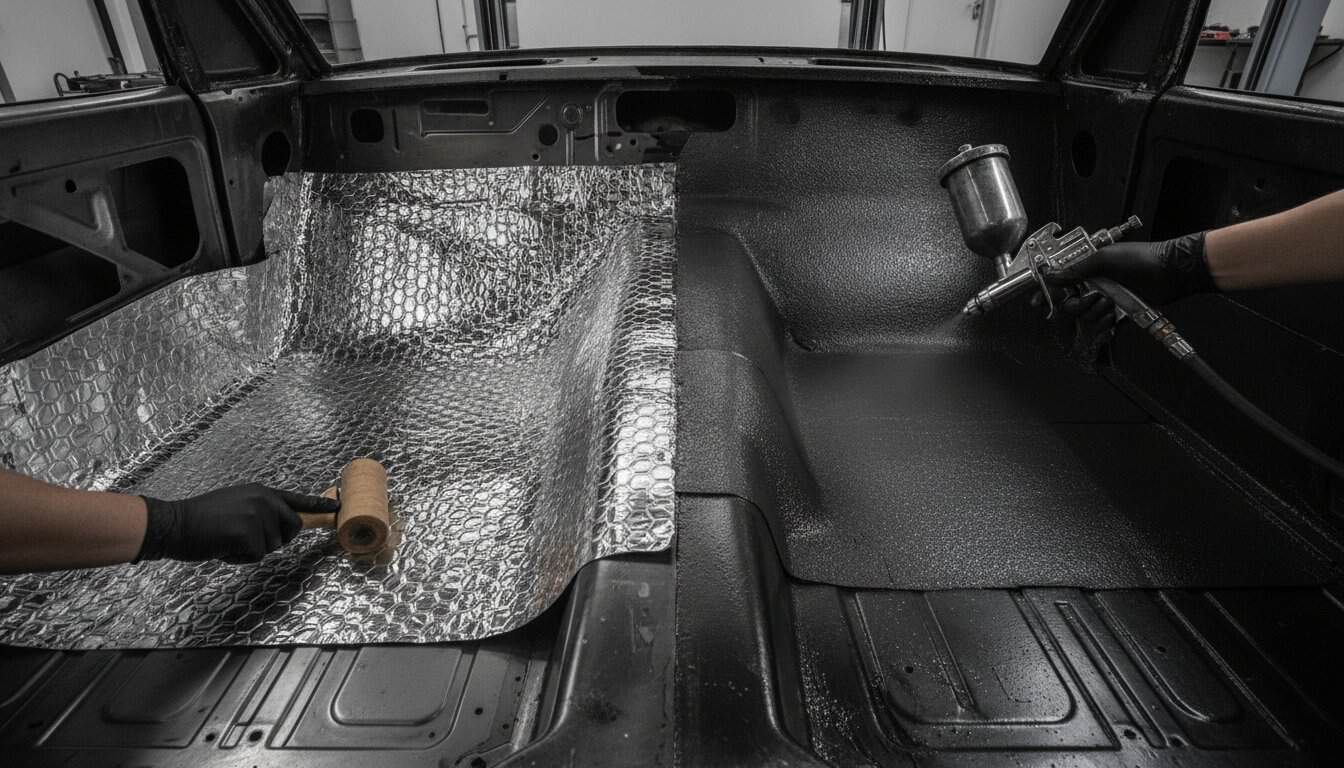
Dynamat Review: The Industry Standard for Peel-and-Stick
Pick up a sheet of Dynamat Xtreme and you will immediately notice the density. This is the heavy hitter of the restoration world, relying on a high-tack butyl rubber chemistry that has set the benchmark for decades. Unlike the cheap, asphalt-based hardware store knock-offs that off-gas a tar-like stench and melt in the summer heat, true butyl remains stable up to 300 degrees Fahrenheit. It is designed to bond permanently to the sheet metal of your doors, trunk lids, and floor panels, turning that flimsy vintage steel into a rigid, non-resonant barrier. If you are conducting a lizard skin vs dynamat review for your own build, you have to respect the simplicity of a peel-and-stick application that requires no specialized spray equipment.
The primary strength of this product lies in its ability to kill vibration on contact. By adding mass to the panel, it shifts the resonance so the metal no longer acts like a tuning fork. It is particularly effective for large, flat surfaces where the bell effect is most prominent. For those looking to dive deeper into the technical side of how these materials interact with cabin acoustics, this automotive sound absorption study provides the data behind why mass-loaded barriers are so effective at reducing low-frequency drone.
Installation Pros and Cons
Success with Dynamat depends entirely on the quality of your bond. You must use a heavy-duty steel roller to press the material into every valley and over every ridge of the floor pan. Without this mechanical pressure, air pockets form, which can trap moisture and lead to the very rust you are trying to avoid. While it is a no-mess process compared to spraying, contouring thick mats around complex curves like transmission tunnels takes patience and a sharp utility knife. If you find yourself overwhelmed by these technical choices, our recommended gear list can help you source the right tools for the job.
Performance and Weight Considerations
Dynamat claims to reduce cabin noise by up to 3 decibels, which effectively makes your interior sound twice as quiet to the human ear. However, this silence comes with a trade-off in weight. A full-car installation can add 60 to 80 pounds to your project. Mass loading is the primary mechanism of Dynamat. If you are building a track-focused machine where every ounce counts, you might want to limit application to the most resonant panels. For those seeking the ultimate balance of comfort and performance, checking out our Premium Project Blueprints can help you plan your layout with precision.
Lizard Skin Review: The Specialist Spray-On Solution
While peel-and-stick mats provide instant gratification, there are areas of a vintage chassis where a flat sheet simply cannot go. This is where the lizard skin vs dynamat review takes a turn toward the chemical and the seamless. Lizard Skin is a liquid-applied coating that creates a continuous protective envelope over every weld, rib, and compound curve of your project. Unlike mats that can leave small gaps or bridges over irregular surfaces, this spray-on solution ensures every square inch of the metal is treated. It is particularly effective for those hard-to-reach areas like the inside of roof skins or the intricate recesses of a door shell where a roller cannot reach.
The weight savings alone make this a compelling choice for performance-minded builders. While a full interior of heavy butyl mats can add significant mass, a two-gallon container of Lizard Skin covers approximately 40 to 45 square feet at a thickness of 0.040 inches. This allows you to achieve impressive results without the 60 to 80 pound penalty associated with full-coverage mats. It is a precision tool for the creator who values modern efficiency as much as heritage style. If you are planning a build that prioritizes agility, this liquid approach offers a distinct advantage.
The Spray-On Process
Applying this coating requires a shift in mindset from the typical peel-and-stick workflow. You will need the SuperPro Application Kit and an air compressor capable of maintaining steady pressure. Preparation is the most critical step; you must mask off every bolt hole, wire loom, and window track before you even open the bucket. It is a messy process that demands a dedicated afternoon in the garage. Most builders find success by applying two thin coats rather than one heavy layer, allowing the material to build up the necessary thickness for maximum effectiveness. If you need to source the right equipment for this stage, our recommended gear list covers the essentials.
Thermal vs. Acoustic Formulas
Lizard Skin offers two specific products that serve different roles in your restoration. The Ceramic Insulation formula is designed to reflect radiant heat, and it can reduce interior temperatures by up to 30 degrees Fahrenheit. This is a game-changer for cars with high-performance engines and tight engine bays. The Sound Control formula works differently than traditional rubberized undercoating; it is an acrylic-based product that dampens vibration and absorbs airborne noise. By using these together, you create a seamless thermal and acoustic envelope that mimics the tight, controlled environment of a modern luxury vehicle. This specialized approach ensures your classic remains comfortable even on the hottest summer cruises.

Head-to-Head: Lizard Skin vs. Dynamat Comparison
Choosing between these two legendary solutions is not just a matter of brand loyalty; it is a calculated decision based on your specific build goals and the weight-to-performance ratio you are willing to accept. When we look at the pure numbers in this lizard skin vs dynamat review, the differences in mass and coverage become clear. For a standard mid-sized classic, a full Dynamat Xtreme installation can add between 60 and 80 pounds to your chassis. In contrast, applying Lizard Skin at the recommended 0.040 inch thickness adds a fraction of that weight while providing a seamless barrier. One 2-gallon container of Lizard Skin covers approximately 40 to 45 square feet, making it a highly efficient way to treat large areas without turning your performance machine into a heavy cruiser.
A common fear in the restoration community is the potential for moisture trapping and rust beneath peel-and-stick mats. This is largely a myth born from poor installation rather than product failure. If you use a heavy-duty roller to ensure 100 percent adhesion, the butyl bond is airtight and actually protects the metal from oxidation. However, Lizard Skin’s spray-on nature naturally eliminates this concern by creating a monolithic coating that leaves no room for air or water to hide. Both products are engineered to outlast the vehicle’s remaining road life, provided you spend the necessary time on surface preparation and rust remediation before application.
Which is Easier for the DIY Builder?
The physical toll of these two methods is vastly different. Rolling out thick mats requires significant arm strength and can be hard on the joints, especially when working in tight footwells or over transmission tunnels. Conversely, the challenge with a spray-on coating is not the physical labor of the application, but the meticulous masking required. You must protect every thread and wire from overspray, which demands a high level of patience. If your garage lacks professional-grade ventilation, the peel-and-stick route is much more forgiving. Cleanup for Dynamat involves little more than picking up foil scraps, while Lizard Skin requires a thorough breakdown of your spray equipment before the material cures.
Performance in Extreme Conditions
If you are running a high-horsepower build with tight engine bay clearances, heat rejection becomes your primary metric. Lizard Skin Ceramic Insulation is the clear winner here, capable of reducing interior temperatures by up to 30 degrees Fahrenheit. This is a level of thermal control that standard vibration mats simply cannot match. For acoustic performance, body style matters; a fastback with large rear sail panels will benefit immensely from the vibration damping of Dynamat, whereas a convertible needs the seamless thermal protection of a spray-on coating to combat the heat rising from the road. If you want to ensure your layout is optimized for both weight and silence, our Premium Project Blueprints provide the technical roadmap you need.
The Restomod Academy Strategy: A Professional Hybrid Build
The secret to a world-class interior isn’t choosing one product over the other; it is understanding that they solve different problems. While many builders get stuck in a lizard skin vs dynamat review loop, professional shops often use a hybrid approach to maximize the strengths of both systems. You want the mass-loading power of butyl mats to kill vibration at its source, but you also need the seamless thermal barrier that only a spray-on coating can provide. By layering these materials, you create an environment that is not just quieter, but structurally more solid.
Start by identifying the most resonant areas of your chassis. These are typically the centers of the door skins, the large expanses of the floor pans, and the rear wheel tubs. Apply Dynamat Xtreme to these specific zones to stop the metal from ringing. Once your vibration damping is in place, you can integrate this foundation with other restomod interior ideas to ensure your cabin remains a sanctuary of modern comfort regardless of what’s happening under the hood.
Step-by-Step Hybrid Application
Execution is everything. Clean your surfaces with a high-quality wax and grease remover before you begin. Lay your damping mats down first, using a heavy-duty roller to ensure a perfect bond. Once the mats are secure, spray Lizard Skin over the entire surface, including the edges of the mats and into every tight crevice. This overcoating technique creates a monolithic seal that prevents air gaps and locks out moisture. It is a methodical process, but the result is a cabin that feels as tight and controlled as a modern luxury sedan.
Finalizing Your Interior
Before you rush to install your new carpet kit, consider how these layers affect fitment. A hybrid build adds thickness to your floor pans, which may require minor adjustments to seat tracks or center console mounting points. Take the time to dry-fit your components to ensure everything sits flush. To verify your work, perform the thud test; tap the exterior panels with your knuckles. If the metal sounds like a solid piece of granite rather than a hollow drum, you’ve succeeded. Having the right tools makes this technical work much more manageable, so be sure to consult our recommended gear list for the rollers and spray kits we trust in the shop. This meticulous attention to detail is what separates a standard restoration from a professional-grade restomod.
Master the Silence of Your Machine
Silencing a classic car is not about choosing a single product; it is about applying engineering principles to a vintage chassis. You have seen how mass loading with butyl mats kills resonance and how spray-on ceramic coatings create a seamless thermal shield. This lizard skin vs dynamat review proves that the most refined builds rely on a strategic combination of both technologies. By treating large panels for vibration and hard-to-reach crevices for heat, you transform a noisy cockpit into a precision driving environment that rivals modern luxury.
Every step of your restoration deserves this level of technical scrutiny. To ensure your project reaches its full potential, Download The Ultimate Restomod Guide to master every phase of your build. Authored by seasoned builder Brook Walsh, this resource provides the comprehensive blueprints and step-by-step guidance already used by thousands of DIY enthusiasts. You don’t have to navigate these complex mechanical hurdles alone. Take the lessons from the workshop and apply them to your own garage with confidence. Your dream of a modern, quiet ride is well within reach, so get out there and finish the job with precision.
Restomod Sound Deadening Frequently Asked Questions
Can I apply Lizard Skin over Dynamat?
Yes, you can apply Lizard Skin directly over Dynamat to create a superior hybrid barrier. This is a common strategy in professional shops to combine the vibration damping of butyl mats with the seamless thermal protection of a spray-on coating. Applying the liquid over the mats helps seal the edges and ensures that no air or moisture can get trapped behind the material.
Does sound deadening actually prevent rust in classic cars?
Yes, both products prevent rust by sealing the bare metal from oxygen and moisture. However, you must remediate any existing rust and clean the surface thoroughly before application. If you leave air pockets behind a peel-and-stick mat, moisture can condense in those gaps. Proper installation with a heavy roller or a continuous spray envelope is the key to long-term protection.
How much weight will Dynamat add to my restomod?
Expect to add between 60 and 80 pounds to a mid-sized classic car if you choose a full-car installation. This mass is the primary mechanism for stopping vibrations in thin steel panels. When reading a lizard skin vs dynamat review for a performance-focused build, consider that the spray-on coating adds significantly less weight while focusing more on thermal insulation and high-frequency noise reduction.
Do I need 100% coverage with Dynamat to stop vibrations?
No, you do not need 100 percent coverage to stop a panel from ringing. Covering just 25 to 50 percent of the center of a flat panel is usually enough to change its resonant frequency and kill the bell effect. You only need total coverage if you are trying to create a dedicated sound barrier to block external road noise from entering the cabin.
What is the best way to remove old factory sound deadener?
Use dry ice to freeze the old factory tar until it becomes brittle and chips off easily. This is much cleaner than using a heat gun, which often turns the old material into a sticky, smeared mess. Once you have chipped away the bulk of the old deadener, use a high-quality wax and grease remover to prep the steel for your new materials.
Is Lizard Skin better than traditional rubberized undercoating?
Yes, Lizard Skin is a technical acrylic-based coating that offers specific thermal and acoustic properties that traditional undercoating lacks. Standard rubberized sprays often trap moisture against the frame and can dry out or crack over time. This lizard skin vs dynamat review shows that technical coatings are engineered to remain flexible and provide a legitimate thermal barrier for the life of the vehicle.
Can I use Lizard Skin on the exterior of my floor pans?
Yes, Lizard Skin is designed for use on both the interior and exterior of your vehicle. Applying the Ceramic Insulation formula to the underside of your floor pans is an excellent way to block radiant heat from the exhaust before it ever reaches the cabin. It is a durable coating that also provides an extra layer of protection against road debris and moisture.
How many gallons of Lizard Skin do I need for a full interior?
Plan for approximately four gallons to cover the floor, roof, and doors of a standard classic car. One 2-gallon container typically covers 40 to 45 square feet at the required 0.040 inch thickness. Most builders apply two gallons of Sound Control followed by two gallons of Ceramic Insulation to achieve the best thermal and acoustic results for their project.