The success of a restomod project is determined by the infrastructure of your workspace, not the brand of the tools in your chest. You’ve likely felt the exhaustion that comes from working in cramped conditions or the annoyance of a tripped breaker during a critical weld. It’s a common struggle that leads to project fatigue, but it doesn’t have to be your reality. Mastering a home garage setup for car restoration starts with a commitment to the environment where your vision will take shape.
We agree that a workspace should be a source of pride, not a source of frustration. This guide will show you how to transform a standard garage into a professional-grade workshop that balances heritage aesthetics with modern performance. You’ll learn how to plan a logical, zone-based layout and understand vital infrastructure requirements, such as the 2026 standard for high-output LED lighting, before you spend a dime on equipment. We’ll walk through the essential tooling and organizational strategies needed to keep your project safe and moving forward over a multi-year timeline.
Key Takeaways
- Shift your mindset from simple maintenance to high-level engineering by treating your workshop as a dedicated production environment.
- Design a logical, zone-based home garage setup for car restoration to streamline your workflow from the initial tear-down to the final assembly.
- Plan your electrical and lighting systems to handle the high-precision demands of modern restomod engineering and heavy fabrication.
- Prioritize a precision tool battery that balances traditional mechanical gear with the technical instruments required for modern performance swaps.
- Establish professional-grade safety protocols for chemical storage and fire suppression to protect your investment over the long haul.
The Restomod Philosophy: Why Your Setup Dictates Your Success
Taking a car down to its bare frame is an act of profound courage. It’s the moment when nostalgia meets the cold, hard reality of scale, rust, and decades of mechanical fatigue. To see your project through to the first turn of the key, you must view your home garage setup for car restoration as a high-precision engineering environment rather than a simple parking space. A standard maintenance garage is designed for quick turnarounds like brake jobs or fluid flushes. In contrast, a restoration shop is built for the long game. Without a structured environment, the sheer physical and mental scale of the project often leads to fatigue and eventual abandonment.
Developing a solid automotive restoration philosophy is the first step in this transition. You aren’t just fixing what’s broken; you are re-engineering a piece of history to meet modern standards of performance and reliability. This requires a workspace that mirrors that level of intent, allowing you to focus on the artistry of the build without fighting your surroundings. It’s about creating a sanctuary where precision is the default and every tool has a purpose.
To visualize the scale and dedication required for a professional-grade build, watch this helpful video:
Transitioning from Maintenance to Restoration
You need to stop thinking about simple repairs and start thinking about complex fabrication. A successful home garage setup for car restoration requires a dedicated project space that stays undisturbed for months or even years. You cannot afford to shuffle tools or move parts every time a daily driver needs a tire rotation. This shift in mindset is essential because the technical complexity of a restomod involves integrating modern fuel-injected drivetrains and independent suspensions into vintage shells. You can explore the full scope of these ambitious projects in our guide on what is a restomod.
The Project Creep Factor
Disassembling a vehicle is a deceptive process. A car that comfortably fits in a single bay will eventually occupy the footprint of three once the body panels, interior, and drivetrain are removed. You must account for vertical and horizontal parts storage that effectively doubles your required square footage. Organization is a fundamental safety requirement, not just a lifestyle choice. Stumbling over a loose control arm or searching for a specific bolt for three hours is exactly how projects lose momentum. A DIY restoration can range from $40,000 to $80,000 in costs, and protecting that investment requires a shop layout that prioritizes surgical order over cluttered chaos.
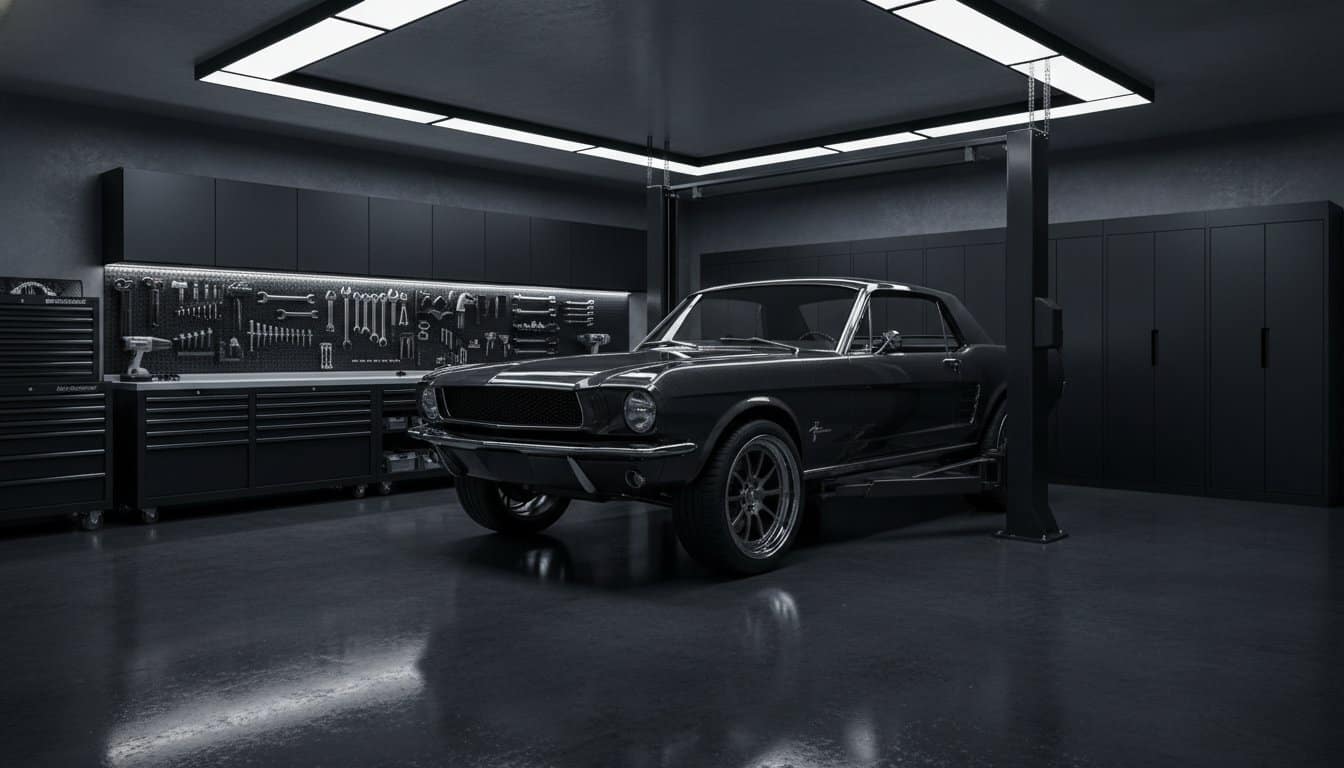
Mastering Infrastructure: Power, Lighting, and Compressed Air Systems
A professional-grade workshop is only as strong as the systems hidden behind its walls. While it’s tempting to start buying chrome-plated wrenches, your first priority must be the infrastructure that powers your ambition. A proper home garage setup for car restoration requires a calculated approach to utilities that most casual hobbyists overlook. You aren’t just powering a drill; you’re supporting high-draw MIG welders, massive air compressors, and sensitive electronic tuning equipment simultaneously. Building this foundation correctly ensures you spend your time building cars rather than resetting tripped breakers.
Electrical Load Management for Welders and Compressors
Don’t settle for the standard 110v outlets found in a typical residential garage. A dedicated 220v circuit is the gold standard for any serious builder. It provides the necessary amperage for heavy-duty welding and ensures your compressor doesn’t bog down during long sanding sessions. Position your outlets every six feet along the perimeter. This layout eliminates the tripping hazards of extension cords and keeps your workflow fluid. If you’re planning a modern performance swap, integrate high-quality surge protection. Modern EFI tuning computers are sensitive to power spikes, and a single surge can ruin months of calibration work. For those unsure where to start with their equipment list, you can find a curated selection of recommended gear that matches these power requirements.
Designing a High-Lumen Lighting Grid
Precision requires total visibility within your home garage setup for car restoration. In 2026, LED fixtures are the undisputed standard, offering 30% more energy efficiency than older fluorescent bulbs and lasting up to 94,000 hours. To spot minute paint defects or hairline cracks in a vintage frame, you need a 5000K color temperature. This daylight spectrum provides the most accurate color representation for bodywork. Don’t rely solely on overhead illumination. Install vertical wall-mounted lights to eliminate the deep shadows that naturally form under a chassis on a lift. This wrap-around lighting strategy ensures that whether you’re plumbing brake lines or wet-sanding a fender, you never have to squint to see your progress.
Compressed air is the lifeblood of the restoration shop. An 80-gallon, 2-stage air compressor is a significant investment, typically ranging between $2,100 and $2,475, but it’s essential for running sandblasters and HVLP spray guns. Design your plumbing with a slight slope toward moisture traps to protect your tools and your finish. Finally, consider your climate. Insulating your space, which usually costs between $1.70 and $4.20 per square foot, allows for year-round progress. It keeps the metal at a workable temperature and prevents the project fatigue that sets in during the height of summer or the depths of winter.
Zone-Based Layout: Optimizing Your Workflow from Tear-Down to Assembly
Stop treating your garage like a storage unit and start viewing it as a dynamic production line. A successful home garage setup for car restoration depends on how well you manage the physical flow of the project. If you are constantly shuffling heavy equipment or tripping over a welder to reach your workbench, you are bleeding momentum. In a space as tight as a standard 24′ x 24′ two-car garage, every square inch must have a dedicated purpose. By establishing specific zones, you create a workspace that supports the meticulous nature of a multi-year build without the chaos that usually accompanies a total tear-down.
The Fabrication Zone vs. The Clean Room
Precision and filth cannot coexist. You must establish a hard boundary between your fabrication zone and your clean assembly area. The fabrication zone is where the heavy lifting happens: grinding, welding, and metalwork. This area should be positioned near the garage door to allow for maximum ventilation and easy cleanup of metallic dust. Use heavy-duty welding curtains to contain sparks and prevent abrasive grit from settling on your finished components. Conversely, your clean room is a sanctuary for engine assembly and interior work. This is where you’ll handle delicate tasks like wiring or final assembly. If you are moving into the final stages of a project, such as the definitive guide to an LS engine swap, you will appreciate having an environment free of grinding debris to protect your new drivetrain.
Mapping the Path of the Chassis
The chassis is the heart of your workshop, but it shouldn’t be a permanent fixture in one spot. Invest in heavy-duty wheel dollies immediately. A mobile project allows you to shift the car as needed to gain access to different panels or to clear space for a specific task. If you are installing a lift, plan your layout around its footprint from day one. A two-post lift offers the best access for suspension and drivetrain work, but it requires a solid concrete foundation, typically four to six inches thick, and a ceiling height of at least 10 to 12 feet. Position your primary workbench and tool storage within an arm’s reach of the chassis’s most frequent resting spot to minimize unnecessary movement across the shop.
- The Tear-Down Zone: Near the entrance for easy removal of old parts and fluids.
- The Fabrication Zone: Equipped with 220v power and high-volume ventilation.
- The Assembly Zone: A well-lit, clean area with dedicated storage for new hardware.
- Vertical Storage: Use slatwalls and overhead racks to keep floors clear of seasonal items.
Your home garage setup for car restoration should also prioritize vertical space. When a car is completely disassembled, its parts will occupy nearly double the footprint of the vehicle itself. Use overhead racks for bulky items like bumpers or hoods and slatwall systems for frequently used hand tools. This keeps the floor clear for the real work: the slow, rewarding process of turning a vintage machine into a modern masterpiece. By respecting these zones, you ensure that your shop remains a place of creation rather than a graveyard of abandoned ideas.

The Precision Tool Battery: Essential Gear for Modern Performance Swaps
While a standard 255-piece socket set is a fine start for basic maintenance, it’s insufficient for the rigors of a high-performance build. Your home garage setup for car restoration must evolve into a precision battery capable of handling both heavy structural fabrication and delicate electronic integration. This isn’t just about accumulation; it’s about selecting tools that bridge the gap between mid-century aesthetics and 21st-century engineering. Categorize your arsenal by stage, Mechanical, Metalwork, and Finishing, to ensure you have the right leverage for every phase of the project.
Metalwork and Fabrication Essentials
Mastering the shape of a classic body requires more than just a hammer and dolly. You need an angle grinder for clean cuts and a shrinker-stretcher to manipulate sheet metal around custom wheel wells or firewall modifications. For intricate metal surgery, a plasma cutter is a game-changer, allowing for surgical precision that a torch simply cannot match. When selecting a welder, look for a multi-process machine like the Lincoln Electric Power MIG 211i, which handles everything from thin 24-gauge body panels to thick 3/8-inch chassis plates. You can find our curated list of recommended gear for specific brand insights that survive the test of time and heavy use.
Mechanical Precision and Diagnostic Tools
Modern performance swaps demand a level of accuracy that old-school mechanics rarely encountered. Torque wrenches are non-negotiable. Modern aluminum blocks and high-pressure fuel systems have zero tolerance for close enough. Accuracy here is the difference between a reliable cruiser and a catastrophic failure on the first test drive. Use digital calipers for custom bracket fabrication to ensure your accessory drives and brake calipers align perfectly. As you prepare for a complex project, such as the definitive guide to an LS engine swap, equip yourself with a high-end diagnostic scanner. These tools allow you to communicate with modern ECUs, troubleshoot sensor conflicts, and fine-tune your performance maps without the guesswork.
Equip your shop with the understanding that every tool is a teacher. Your home garage setup for car restoration is the classroom where you’ll learn the nuances of metal grain and electrical resistance. Don’t rush the acquisition. Focus on quality pieces that offer repeatable precision. This methodical approach to your tool battery ensures that when you finally drop that modern V8 into a vintage frame, the fitment is as flawless as the vision that started it all. To truly master these technical requirements and avoid costly mistakes, invest in The Ultimate Restomod Guide today.
Safety, Storage, and Scaling Your Workshop for Long-Term Projects
Ventilation and Chemical Safety
Restoration is a chemically intensive process. Between stripping old paint and degreasing vintage chassis parts, you will encounter fumes that a simple open door cannot handle. Install a high-volume industrial exhaust fan to manage dust and vapors effectively. Your storage strategy for these substances must be deliberate. Do not follow the common mistake of using old kitchen cabinets for chemical storage. They aren’t designed to contain leaks or withstand the weight of heavy automotive fluids. Use a dedicated metal locker for flammables and pressurized tanks. Remember that environmental responsibility is part of the craft. In 2026, regulations remain strict; you must collect used oil in leak-proof containers and take it to a collection center, where most shops accept up to 5 gallons per visit at no charge. Make personal protective equipment (PPE) a permanent, visible part of your shop layout so that grabbing a respirator or safety glasses becomes second nature.
Vertical Storage and Mobile Tool Solutions
As your project progresses, the number of loose parts will grow exponentially. Avoid the clutter that kills momentum by utilizing heavy-duty pallet racking. These systems are rated for the massive weight of engines and transmissions, unlike residential shelving units. To maintain a 360-degree workflow, invest in high-quality mobile tool carts. These allow you to bring your essential wrenches and diagnostic gear directly to the fender or the engine bay, keeping the floor clear of tripping hazards. You can find several durable options in our list of recommended gear that are built to withstand the rigors of a full restoration.
Adopt a mentor-level standard for cleanliness. Implement shadow boards or foam tool inserts in your drawers. This isn’t just for aesthetics; it’s a diagnostic tool for your shop. If a spot is empty at the end of the night, you know a tool is missing before it gets lost inside a quarter panel. Your home garage setup for car restoration should scale as your skills grow. Start with the basics of safety and organization, and as you tackle more complex fabrication, expand your infrastructure to match. A clean, safe, and scalable shop is the mark of a true builder who values the journey as much as the finished machine.
Build the Shop That Builds Your Vision
Transforming a vintage shell into a modern masterpiece requires more than just passion; it demands a workspace that respects the complexity of the task. You now understand that your home garage setup for car restoration is a living ecosystem where infrastructure, layout, and precision tools work in harmony. By prioritizing a zone-based workflow and stable electrical systems, you’ve already bypassed the hurdles that stall most DIY builds. You are no longer just an admirer of classic style; you are an active creator equipped with the knowledge to execute high-level engineering in your own driveway.
Take the next step in your journey with authoritative guidance from enthusiast Brook Walsh. Avoid the costly trial and error that drains project budgets by utilizing curated gear reviews and comprehensive blueprints for major engine swaps. Download The Ultimate Restomod Guide to start your project the right way and gain the confidence to tackle even the most daunting custom fitment challenges. The character of your vintage machine is waiting to be rediscovered. With the right foundation and a patient hand, there is no mechanical hurdle you cannot overcome. Let’s get to work.
Frequently Asked Questions
How much space do I actually need for a full car restoration?
A standard two-car garage measuring 24′ x 24′ is the ideal minimum for a professional-grade build. While you can technically work in a smaller space, a disassembled vehicle often occupies nearly double its original footprint once panels, glass, and the drivetrain are removed. Plan for at least 500 to 600 square feet to ensure you have enough clearance to move around the chassis while still housing your workbench and parts storage.
Is it worth installing a car lift in a standard home garage?
A lift is a transformative investment if your ceiling height allows for 10 to 12 feet of clearance. Budget-tier 2-post lifts typically range from $2,500 to $3,800 including installation and electrical work. This equipment drastically improves ergonomics and safety during a home garage setup for car restoration, reducing the physical strain of long-term projects and providing better access for precision chassis work.
What are the minimum electrical requirements for a restoration shop?
Install a 100-amp sub-panel to provide a stable power foundation for your workshop. You’ll need at least one dedicated 220v circuit for high-output MIG welders and large air compressors to prevent tripped breakers during heavy fabrication. Position 110v outlets every six feet along your walls to eliminate the need for extension cords and keep your workspace free of tripping hazards.
How do I keep my garage clean while doing heavy metal fabrication?
Use heavy-duty, flame-retardant welding curtains to contain sparks and metallic dust within a specific fabrication zone. Combine these physical barriers with a high-volume industrial exhaust fan to pull fine airborne particles out of the shop before they can settle on your clean assembly area or finished components. Consistent sweeping and the use of a shop vacuum with a HEPA filter will help maintain a professional standard of cleanliness.
What is the best flooring option for a restoration garage setup?
High-solids epoxy or polyaspartic coatings are the superior choices for a high-intensity workshop. These surfaces are non-porous and resist damage from welding sparks, dropped tools, and harsh automotive chemicals like brake fluid. Unlike bare concrete, which absorbs oil and generates dust, a coated floor is easy to clean and provides a bright, reflective surface that improves overall visibility under the car.
Do I need a separate air compressor for painting vs. air tools?
A single 80-gallon, 2-stage air compressor can handle both tasks if it delivers sufficient cubic feet per minute (CFM). These units, which typically cost between $2,100 and $2,475, provide the consistent volume needed for HVLP spray guns and heavy-duty sanders. The key is to install a high-quality air dryer and moisture trap in your plumbing to ensure the air is completely clean before it reaches your paint gun.
How can I organize car parts during a multi-year disassembly?
Adopt a rigorous “tag and bag” system where every fastener and small bracket is labeled and stored in clear, heavy-duty bags. Group these bags into bins categorized by vehicle sub-systems, such as suspension, braking, or interior. Store these bins on heavy-duty pallet racking to maximize your vertical space and keep the floor clear for the chassis, ensuring your home garage setup for car restoration remains organized over the long haul.
What safety equipment is absolutely mandatory for a home restomod shop?
You must have an ABC-rated fire extinguisher and a fully stocked first aid kit within immediate reach. Personal protective equipment, including a respirator rated for chemical vapors and an auto-darkening welding helmet, is non-negotiable for safe fabrication. Additionally, install a dedicated eye-wash station and ensure your shop has adequate ventilation to prevent the buildup of toxic fumes from paints and solvents.