
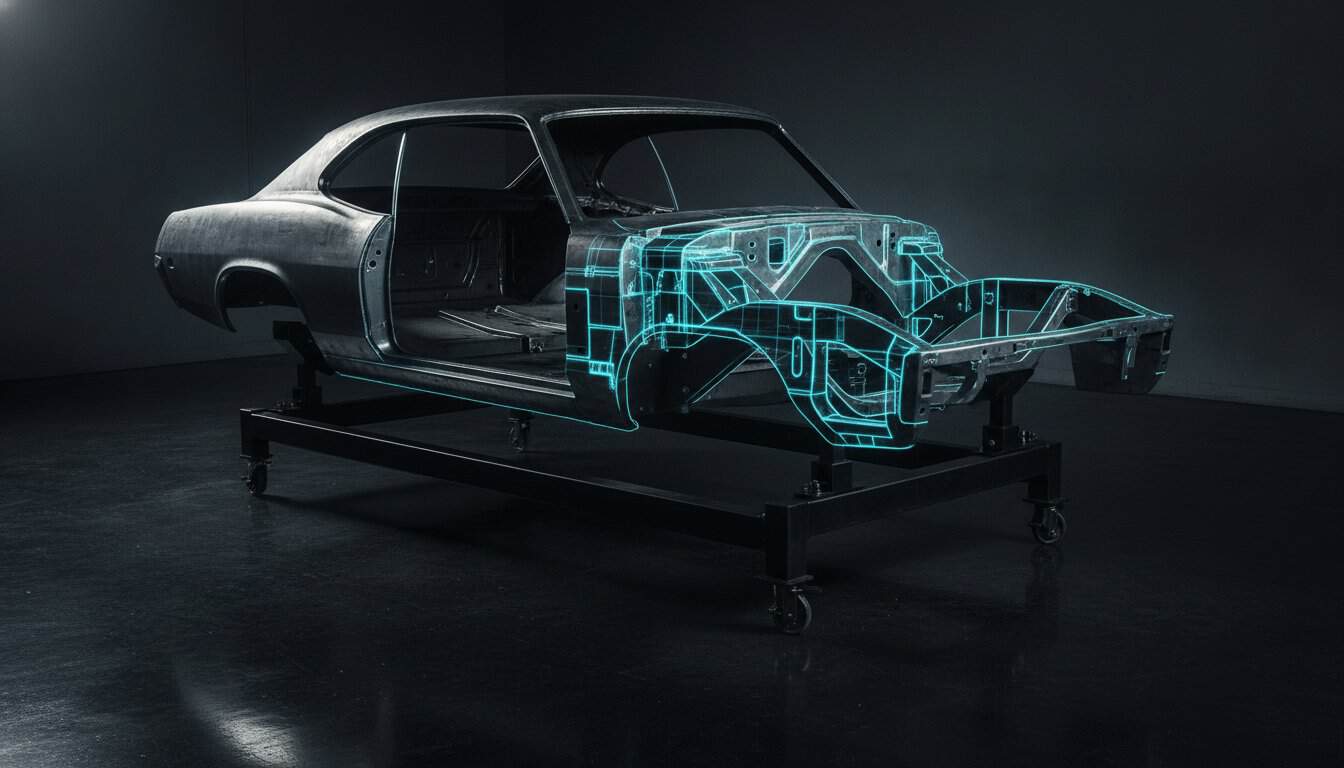
Most enthusiasts spend thousands on high-end suspension kits only to bolt them onto a frame that possesses the structural integrity of a wet noodle. It’s a hard truth to swallow in 2026, but even the most iconic vintage steel wasn’t designed to handle the lateral loads of modern performance tires. You’ve likely felt that unsettling body twist during a hard turn or heard the rhythmic groans of a chassis under stress. Without a definitive classic car chassis stiffening blueprint, you’re essentially throwing metal at a problem without understanding the underlying physics of where your car actually flexes.
I understand the frustration of adding weight to a build without seeing a measurable gain in handling. You want a car that tracks straight and responds to your fingertips with surgical precision. This guide will show you how to move beyond guesswork by using Premium Project Blueprints to document and execute your structural upgrades. We’ll break down the transition from a passive admirer of vintage style to an active creator of modern performance, ensuring every weld and brace serves a specific engineering purpose. You’re about to learn how to eliminate the rattles and transform your project into a precision handling machine.
Key Takeaways
- Master the structural geometry of your vehicle by identifying specific load paths and flex points before you ever strike an arc.
- Implement critical reinforcements like subframe connectors and X-bracing to distribute torque evenly across the floor pan.
- Choose between traditional physical mockups or advanced 3D scanning to develop a comprehensive classic car chassis stiffening blueprint tailored to your specific build.
- Ensure professional-grade results by leveling and squaring your chassis on a dedicated frame jig before transferring technical coordinates to the metal.
- Leverage Premium Project Blueprints to eliminate engineering guesswork and align your vintage machine with modern performance standards.
Defining the Classic Car Chassis Stiffening Blueprint
A classic car chassis stiffening blueprint is far more than a simple workshop drawing. It’s a calculated technical schematic that identifies exact load paths and potential flex points within your vehicle’s architecture. Think of it as the structural DNA of your build. Many builders make the mistake of simply adding steel where they think a frame looks weak; however, this often leads to adding dead weight without gaining any measurable structural rigidity. In 2026, we have the tools to be incredibly precise. A visual plan is essential for maintaining geometric alignment when you’re dropping 600 horsepower into a vehicle chassis originally designed for 150. Professional documentation serves as a comprehensive roadmap for your entire suspension and drivetrain integration, ensuring every component works in harmony rather than fighting a twisting frame.
The Anatomy of a Structural Plan
You can’t fix what you can’t measure. A proper plan starts by identifying datum points on the frame. These are fixed reference marks used to measure torsional twist and ensure the car remains square throughout the fabrication process. Your blueprint must account for both longitudinal stress, like the violent force of acceleration, and lateral stress from aggressive cornering. This technical approach aligns perfectly with our core philosophy of what is a restomod: blending vintage aesthetics with modern, predictable performance. By mapping these stresses beforehand, you ensure that every ounce of steel you weld onto the car contributes to a more rigid and responsive platform.
Blueprints as a Safety and Value Asset
Building on a weak foundation is a recipe for disaster. When you upgrade to modern big brake kits and high-grip radial tires, you’re introducing mechanical forces the original factory engineers never imagined. Without a documented classic car chassis stiffening blueprint, you risk structural failure or persistent body cracks under extreme loads. Beyond safety, professional documentation serves as a pedigree for your project. A car with a detailed, engineered chassis plan, such as our Premium Project Blueprints, carries significantly more resale value than one with mystery reinforcements hidden under the carpet. As your mentor, I tell you this: the structural foundation you lay today determines the performance ceiling of your entire build. If the frame flexes, even the most expensive suspension can’t do its job. Precision starts on paper before it ever reaches the welder.
Critical Engineering Components of a Chassis Reinforcement Plan
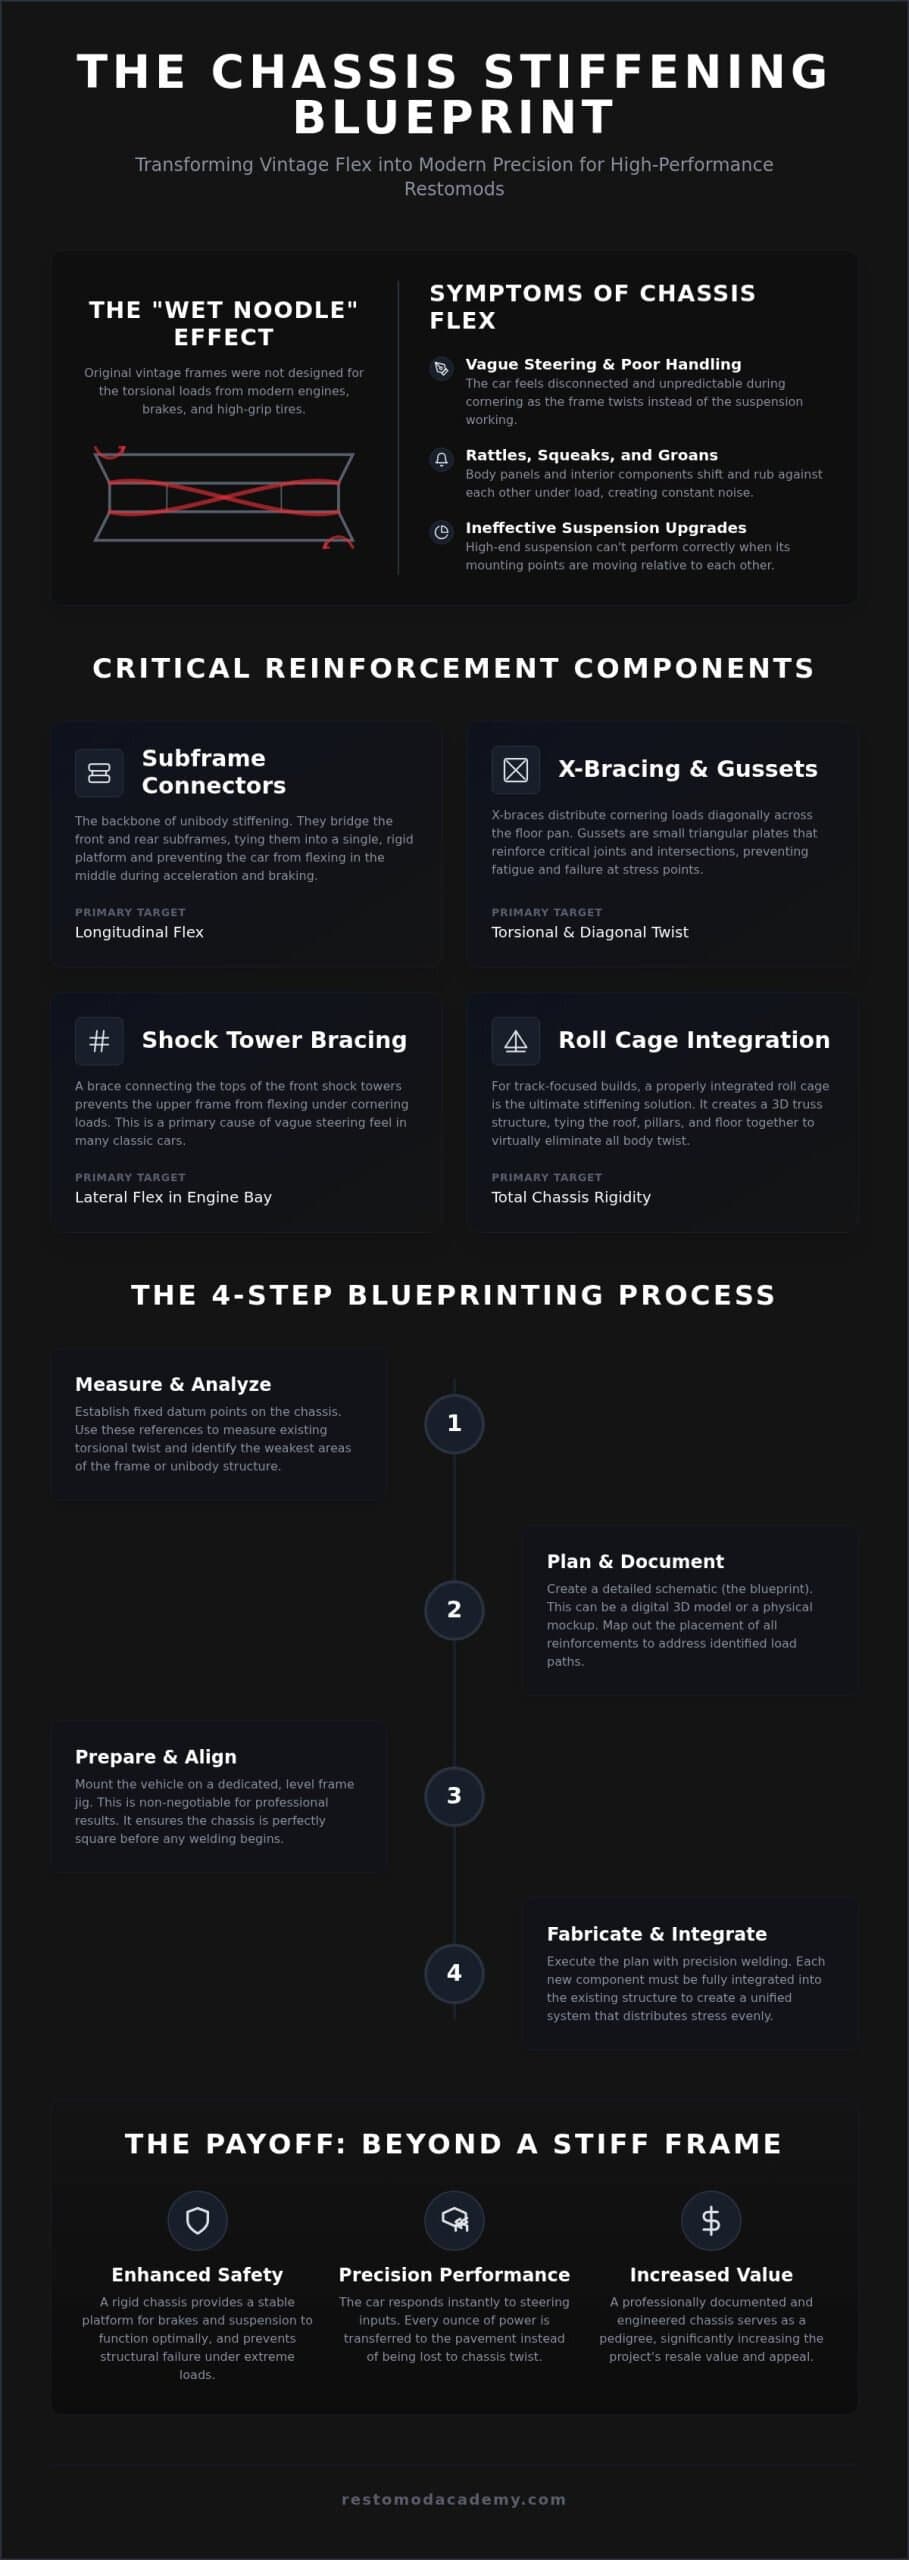
Moving from a high-level concept to physical fabrication requires a deep understanding of how individual components interact. Your classic car chassis stiffening blueprint must treat the vehicle as a unified system rather than a collection of separate parts. For unibody cars, subframe connectors are the absolute backbone of this strategy. They bridge the gap between the front and rear suspension mounting points, effectively turning two separate structures into a single, rigid platform. Without these connectors, the middle of the car acts like a hinge, absorbing energy that should be directed through the suspension.
X-bracing and gusseting take this rigidity a step further by distributing loads across the floor pan. While subframe connectors handle longitudinal flex, an X-brace manages the diagonal forces that occur during aggressive cornering. Gussets should be used at every major intersection of the frame or roll cage to prevent joint fatigue. Integrating these elements into a cohesive classic car chassis stiffening blueprint prevents the common pitfall of over-stiffening one area while leaving another to fail under pressure.
Shock tower bracing and roll cage integration represent the final stages of a professional build. Bracing the front shock towers eliminates deflection in the engine bay, which is the primary cause of vague steering feel in vintage machines. If your project is transitioning from a spirited street car to a track-capable weapon, a roll cage becomes a structural necessity rather than just a safety feature. It ties the roof structure to the floor, creating a three-dimensional truss that virtually eliminates body twist. If you are preparing for this level of fabrication, checking our recommended fabrication tools will ensure you have the right equipment for precision welding.
Torsional Rigidity and Load Paths
Mapping the path of energy is vital for a successful build. When you enter a corner, energy travels from the contact patch of the tires, through the springs and dampers, and directly into the chassis mounting points. If the chassis is weak, it becomes an undamped spring that ruins your handling geometry. Torsional rigidity is the resistance of a chassis to twisting forces. You can identify where a factory chassis is likely to fail by looking for areas of high stress concentration, such as the steering box mount or the rear leaf spring hangers, where metal fatigue often manifests as fine cracks over decades of use.
Material Selection and Welding Standards
Specifying the right materials in your technical blueprints is a safety-critical decision. I generally recommend Drawn Over Mandrel (DOM) steel tubing for most street and pro-touring builds because of its predictable strength and ease of welding. Chromoly is an excellent alternative for weight savings, but it requires specialized TIG welding and stress-relieving techniques that may be beyond the average home shop. Don’t overlook the power of stitch welding factory seams. By adding three-inch welds spaced every few inches along the entire length of the factory pinch welds, you can significantly improve the unit strength of a vintage body without adding any measurable weight.
Digital Modeling vs. Hands-On Mockups: Selecting Your Blueprint Method
In 2026, the gap between professional engineering and the home garage has narrowed significantly. You’re no longer limited to eyeballing a piece of angle iron and hoping for the best. When developing your classic car chassis stiffening blueprint, you face a choice between the tactile reliability of hands-on mockups and the surgical accuracy of digital modeling. Traditional mockups, using cardboard templates or plastic models, allow you to visualize spatial constraints in real-time. It’s a low-cost way to ensure your exhaust routing won’t interfere with your new X-brace. However, digital blueprints have revolutionized the restomod world. By using 3D scanning and Finite Element Analysis (FEA), you can see exactly how a frame reacts to stress before you ever strike an arc.
The cost-benefit analysis here is clear. While digital planning requires a steeper learning curve and an investment in software, the time saved during fabrication is immense. Digital precision eliminates the trial and error that plagues many builds. I always recommend a hybrid approach for the serious DIY builder. Use digital tools for the heavy engineering and manual mockups for the final fitment. This combination ensures your structural reinforcements are both technically sound and practically achievable in your own workshop. Don’t waste your energy on parts that don’t fit; let the data guide your hands.
The Case for Digital Precision
Digital modeling allows you to move beyond basic sketches. By generating CAD files, you can order laser-cut reinforcement plates that fit perfectly the first time. Achieving this level of precision is impossible with a handheld grinder and a prayer. Virtual stress testing is perhaps the most powerful tool in your arsenal. It lets you simulate high-torque launches or aggressive cornering to see where your chassis will flex. If the software shows a weak point in your classic car chassis stiffening blueprint, you can fix it on the screen for free rather than cutting out steel later. These electronic files also make it easy to collaborate with specialist fabrication shops, allowing them to review your plan without ever seeing the car in person.
When Manual Measurement is Mandatory
Despite the power of CAD, you can’t ignore the physical reality of a fifty-year-old car. Decades of rust repair or previous accidents can alter the factory dimensions of your frame. Your digital model might be perfect, but if the car’s body has shifted a quarter-inch over the years, the parts won’t fit. This is why the measure twice, cut once philosophy becomes your greatest asset. You must verify every digital coordinate with physical measurements on a level surface. To get this right, you’ll need a specific set of tools. Check our recommended gear for the essential measuring and fabrication tools required to bridge the gap between your digital blueprint and the physical metal of your project.
Implementing the Plan: A Systematic Approach to Chassis Rigidity
Execution is where your engineering work meets the reality of the workshop. You can’t simply start welding and hope for the best; you need a disciplined sequence of events to ensure your classic car chassis stiffening blueprint translates into a straight, high-performance machine. The first and most critical step is to level and square the chassis on a dedicated frame jig or a perfectly flat surface. If your foundation is off by even a fraction of an inch, every reinforcement you add will permanently lock that twist into the car. Once the car is secured, transfer your blueprint coordinates to the physical metal using precision marking tools like a carbide scribe and a digital protractor. Accuracy at this stage prevents the “stacking” of small errors that lead to major alignment headaches later.
When you begin the actual fabrication, execute your tack welds in a deliberate cross-pattern. This strategy is vital for managing heat and preventing structural warping. If you weld one entire side of a subframe connector before moving to the other, the cooling metal will pull the frame out of alignment. After the structure is tacked together, verify your suspension geometry and driveline angles. It’s much easier to break a small tack weld to adjust a pinion angle now than it is to cut out a finished seam later. Finally, finish with stress-relieving heat cycles and high-quality corrosion protection, such as epoxy primer, to ensure your work lasts for another fifty years.
Fabrication Mastery for Chassis Work
Welding heavy-gauge subframe connectors to thin factory floor pans requires finesse. You must manage heat soak carefully to avoid blowing holes in the original sheet metal or causing excessive distortion. I recommend using a series of short, staggered welds rather than one continuous bead. Ensure every surface is ground to bright metal; structural integrity depends on a clean weld pool. To get the best results, consult our recommended gear list for the specific welders and clamps that make these high-stakes tasks manageable.
Validation and Testing
Don’t just assume the car is stiffer; prove it. Use a dial indicator to measure actual flex reduction by supporting the car at three corners and measuring the deflection at the fourth. Documenting these measurements allows you to update your master project blueprint with real-world data. The final alignment check is the most critical step of the entire process. A rigid chassis allows for much more aggressive alignment settings, which is where you’ll truly feel the transformation in steering response and cornering grip. If you want to skip the trial and error and start with a proven foundation, invest in our Premium Project Blueprints to ensure your build meets professional engineering standards from day one.
Elevating Your Build with Restomod Academy Premium Project Blueprints
Chassis stiffening is more than a workshop chore; it’s the physical manifestation of your commitment to engineering excellence. You’ve already learned how to map load paths and manage heat soak, but applying that knowledge requires the confidence of a professional. By utilizing a classic car chassis stiffening blueprint from our Premium Project Blueprints collection, you replace hope with hard data. To find the right technical resources for your project, you can explore Digital Product Sales at the Peradus Store. These plans are specifically designed for the performance demands of 2026, ensuring your vintage steel can handle the grip and torque of modern components. Precision is the difference between a car that feels like a collection of parts and one that feels like a factory-engineered masterpiece.
Joining our community means prioritizing safety and reliability over quick fixes. You aren’t just building a car; you’re crafting a legacy. Structured, mentor-led guidance helps you transition from a passive admirer to an active creator, giving you the skills to tackle even the most daunting fabrication tasks. When you work from a professional classic car chassis stiffening blueprint, you’re building a high-value asset that stands up to the closest technical scrutiny.
Our chassis reinforcement packages provide everything you need to execute a pro-level build. You’ll find detailed schematics for subframe connectors, X-braces, and gusseting that integrate perfectly with your specific vehicle architecture. These blueprints are designed to work in harmony with our other roadmaps, ensuring your drivetrain and chassis are never at odds. Instead of solving one problem only to create another, you can follow a unified path toward excellence. For a complete look at the restoration philosophy that drives our engineering, explore our resource on what is a restomod and see how the Ultimate Restomod Guide can frame your entire project.
Consulting and Mentorship
If you’re facing a one-off chassis challenge or a complex fabrication hurdle, our Restomod Consulting Services offer the personalized guidance you need. Sometimes a project presents a unique obstacle that requires a second set of expert eyes to ensure safety and structural integrity. I’ve spent years in the shop solving the exact problems you’re encountering now, and I’m here to help you navigate them. For builders focusing on modern power, our definitive guide to an ls engine swap provides the technical framework for integrating high-output engines with a reinforced chassis. Let’s ensure your build is safe, fast, and built to last.
Start Your Structural Transformation Today
Building a world-class restomod requires more than just high-end parts; it demands a structural foundation that can handle the rigors of modern performance. You’ve learned how to identify load paths, select the right materials, and implement a systematic approach to fabrication. By following a technical classic car chassis stiffening blueprint, you move beyond the guesswork that plagues so many builds and step into the role of a precision engineer. It’s about ensuring that every ounce of torque is translated into forward motion rather than wasted in body twist.
Our Premium Project Blueprints provide the professional engineering schematics and actionable plans you need for modern reliability in 2026. With expert mentorship from Brook Walsh, you’ll have a steady hand guiding you through every complex weld and measurement. Don’t let structural flex compromise your hard work or your safety. It’s time to take control of your project and build a machine that responds with surgical accuracy on the road. Download Your Premium Project Blueprints and Build a Rock-Solid Foundation and begin the next chapter of your build with confidence. Your journey from passive admirer to master builder is well underway; keep your standards high and your welds clean.
Frequently Asked Questions
What exactly is included in a chassis stiffening blueprint?
A professional blueprint includes detailed technical schematics that identify specific load paths and flex points unique to your car’s architecture. You’ll find precise measurements for subframe connectors, X-bracing, and gusseting locations. It also specifies material types, such as DOM tubing, and provides a clear sequence for welding. Using a classic car chassis stiffening blueprint ensures you aren’t just adding weight, but strategically placing steel where it actually improves structural integrity.
Can I stiffen my classic car chassis without a full roll cage?
You can absolutely transform your car’s handling without the intrusiveness of a full roll cage. Most street-driven restomods see massive gains from subframe connectors, shock tower braces, and floor pan X-bracing. These components target the primary flex points of vintage unibody and body-on-frame designs. While a cage offers the ultimate in rigidity, these targeted reinforcements allow you to maintain a clean interior while still creating a precision handling machine that tracks straight.
How do I know if my unibody car needs subframe connectors?
If you’ve upgraded to a high-torque engine or modern performance tires, your unibody car is likely crying out for subframe connectors. Common signs include persistent interior squeaks, doors that don’t close quite right when the car is on a jack, or a vague feeling in the steering during hard cornering. These symptoms indicate the chassis is twisting under load. Installing connectors bridges the gap between front and rear structures, effectively eliminating that hinge-like behavior.
What is the best material to use for chassis reinforcement in 2026?
In 2026, Drawn Over Mandrel (DOM) mild steel remains the gold standard for most high-performance builds. It offers an excellent balance of strength, predictability, and ease of welding for the serious DIY builder. While chromoly is lighter, it requires specialized TIG welding and stress-relieving processes that can complicate a home project. Stick with high-quality DOM for your reinforcements to ensure your build stays safe, reliable, and structurally sound for decades to come.
Will stiffening the chassis make the ride quality too harsh for the street?
Stiffening the chassis actually improves ride quality by allowing the suspension to do its job. When a frame flexes, it acts like an unmanaged spring, leading to unpredictable vibrations and harshness. A rigid foundation ensures that your shocks and springs manage the road’s imperfections instead of the car’s body. You’ll notice fewer rattles and a more composed, modern feel that makes long drives in your vintage machine far more enjoyable and precise.
How do blueprints help prevent chassis warping during the welding process?
Blueprints provide a strategic welding sequence that manages heat distribution across the frame. By following a documented classic car chassis stiffening blueprint, you’ll use specific tack-weld patterns and staggered beads to prevent the metal from pulling the car out of alignment. Heat soak is the enemy of a straight chassis. A professional plan tells you exactly where to start and stop, ensuring your car remains square and true once the metal cools.
Do I need engineering software to create my own chassis blueprint?
You don’t need expensive CAD software to build a world-class car, but you do need a proven plan. While some builders use 3D scanning, others rely on precise manual measurements and physical mockups. If you want to skip the steep learning curve of engineering software, our Premium Project Blueprints offer pre-engineered solutions for specific architectures. These plans provide the technical precision of modern software without requiring you to spend months mastering complex digital tools.
How does chassis stiffening affect the overall value of a restomod project?
Proper chassis reinforcement significantly boosts the market value of a restomod by proving the build is engineered for safety and performance. Buyers in 2026 look for professional-grade documentation that shows the car can handle its power. A reinforced frame suggests a holistic approach to the build, rather than a parts-catalog assembly. When you can show a buyer a documented structural plan, you’re offering them peace of mind and a superior driving experience.
Most enthusiasts spend thousands on high-end suspension kits only to bolt them onto a frame that possesses the structural integrity of a wet noodle. It’s a hard truth to swallow in 2026, but even the most iconic vintage steel wasn’t designed to handle the lateral loads of modern performance tires. You’ve likely felt that unsettling body twist during a hard turn or heard the rhythmic groans of a chassis under stress. Without a definitive classic car chassis stiffening blueprint, you’re essentially throwing metal at a problem without understanding the underlying physics of where your car actually flexes.
I understand the frustration of adding weight to a build without seeing a measurable gain in handling. You want a car that tracks straight and responds to your fingertips with surgical precision. This guide will show you how to move beyond guesswork by using Premium Project Blueprints to document and execute your structural upgrades. We’ll break down the transition from a passive admirer of vintage style to an active creator of modern performance, ensuring every weld and brace serves a specific engineering purpose. You’re about to learn how to eliminate the rattles and transform your project into a precision handling machine.
Key Takeaways
- Master the structural geometry of your vehicle by identifying specific load paths and flex points before you ever strike an arc.
- Implement critical reinforcements like subframe connectors and X-bracing to distribute torque evenly across the floor pan.
- Choose between traditional physical mockups or advanced 3D scanning to develop a comprehensive classic car chassis stiffening blueprint tailored to your specific build.
- Ensure professional-grade results by leveling and squaring your chassis on a dedicated frame jig before transferring technical coordinates to the metal.
- Leverage Premium Project Blueprints to eliminate engineering guesswork and align your vintage machine with modern performance standards.
Defining the Classic Car Chassis Stiffening Blueprint
A classic car chassis stiffening blueprint is far more than a simple workshop drawing. It’s a calculated technical schematic that identifies exact load paths and potential flex points within your vehicle’s architecture. Think of it as the structural DNA of your build. Many builders make the mistake of simply adding steel where they think a frame looks weak; however, this often leads to adding dead weight without gaining any measurable structural rigidity. In 2026, we have the tools to be incredibly precise. A visual plan is essential for maintaining geometric alignment when you’re dropping 600 horsepower into a vehicle chassis originally designed for 150. Professional documentation serves as a comprehensive roadmap for your entire suspension and drivetrain integration, ensuring every component works in harmony rather than fighting a twisting frame.
The Anatomy of a Structural Plan
You can’t fix what you can’t measure. A proper plan starts by identifying datum points on the frame. These are fixed reference marks used to measure torsional twist and ensure the car remains square throughout the fabrication process. Your blueprint must account for both longitudinal stress, like the violent force of acceleration, and lateral stress from aggressive cornering. This technical approach aligns perfectly with our core philosophy of what is a restomod: blending vintage aesthetics with modern, predictable performance. By mapping these stresses beforehand, you ensure that every ounce of steel you weld onto the car contributes to a more rigid and responsive platform.
Blueprints as a Safety and Value Asset
Building on a weak foundation is a recipe for disaster. When you upgrade to modern big brake kits and high-grip radial tires, you’re introducing mechanical forces the original factory engineers never imagined. Without a documented classic car chassis stiffening blueprint, you risk structural failure or persistent body cracks under extreme loads. Beyond safety, professional documentation serves as a pedigree for your project. A car with a detailed, engineered chassis plan, such as our Premium Project Blueprints, carries significantly more resale value than one with mystery reinforcements hidden under the carpet. As your mentor, I tell you this: the structural foundation you lay today determines the performance ceiling of your entire build. If the frame flexes, even the most expensive suspension can’t do its job. Precision starts on paper before it ever reaches the welder.
Critical Engineering Components of a Chassis Reinforcement Plan
Moving from a high-level concept to physical fabrication requires a deep understanding of how individual components interact. Your classic car chassis stiffening blueprint must treat the vehicle as a unified system rather than a collection of separate parts. For unibody cars, subframe connectors are the absolute backbone of this strategy. They bridge the gap between the front and rear suspension mounting points, effectively turning two separate structures into a single, rigid platform. Without these connectors, the middle of the car acts like a hinge, absorbing energy that should be directed through the suspension.
X-bracing and gusseting take this rigidity a step further by distributing loads across the floor pan. While subframe connectors handle longitudinal flex, an X-brace manages the diagonal forces that occur during aggressive cornering. Gussets should be used at every major intersection of the frame or roll cage to prevent joint fatigue. Integrating these elements into a cohesive classic car chassis stiffening blueprint prevents the common pitfall of over-stiffening one area while leaving another to fail under pressure.
Shock tower bracing and roll cage integration represent the final stages of a professional build. Bracing the front shock towers eliminates deflection in the engine bay, which is the primary cause of vague steering feel in vintage machines. If your project is transitioning from a spirited street car to a track-capable weapon, a roll cage becomes a structural necessity rather than just a safety feature. It ties the roof structure to the floor, creating a three-dimensional truss that virtually eliminates body twist. If you are preparing for this level of fabrication, checking our recommended fabrication tools will ensure you have the right equipment for precision welding.
Torsional Rigidity and Load Paths
Mapping the path of energy is vital for a successful build. When you enter a corner, energy travels from the contact patch of the tires, through the springs and dampers, and directly into the chassis mounting points. If the chassis is weak, it becomes an undamped spring that ruins your handling geometry. Torsional rigidity is the resistance of a chassis to twisting forces. You can identify where a factory chassis is likely to fail by looking for areas of high stress concentration, such as the steering box mount or the rear leaf spring hangers, where metal fatigue often manifests as fine cracks over decades of use.
Material Selection and Welding Standards
Specifying the right materials in your technical blueprints is a safety-critical decision. I generally recommend Drawn Over Mandrel (DOM) steel tubing for most street and pro-touring builds because of its predictable strength and ease of welding. Chromoly is an excellent alternative for weight savings, but it requires specialized TIG welding and stress-relieving techniques that may be beyond the average home shop. Don’t overlook the power of stitch welding factory seams. By adding three-inch welds spaced every few inches along the entire length of the factory pinch welds, you can significantly improve the unit strength of a vintage body without adding any measurable weight.
Digital Modeling vs. Hands-On Mockups: Selecting Your Blueprint Method
In 2026, the gap between professional engineering and the home garage has narrowed significantly. You’re no longer limited to eyeballing a piece of angle iron and hoping for the best. When developing your classic car chassis stiffening blueprint, you face a choice between the tactile reliability of hands-on mockups and the surgical accuracy of digital modeling. Traditional mockups, using cardboard templates or plastic models, allow you to visualize spatial constraints in real-time. It’s a low-cost way to ensure your exhaust routing won’t interfere with your new X-brace. However, digital blueprints have revolutionized the restomod world. By using 3D scanning and Finite Element Analysis (FEA), you can see exactly how a frame reacts to stress before you ever strike an arc.
The cost-benefit analysis here is clear. While digital planning requires a steeper learning curve and an investment in software, the time saved during fabrication is immense. Digital precision eliminates the trial and error that plagues many builds. I always recommend a hybrid approach for the serious DIY builder. Use digital tools for the heavy engineering and manual mockups for the final fitment. This combination ensures your structural reinforcements are both technically sound and practically achievable in your own workshop. Don’t waste your energy on parts that don’t fit; let the data guide your hands.
The Case for Digital Precision
Digital modeling allows you to move beyond basic sketches. By generating CAD files, you can order laser-cut reinforcement plates that fit perfectly the first time. Achieving this level of precision is impossible with a handheld grinder and a prayer. Virtual stress testing is perhaps the most powerful tool in your arsenal. It lets you simulate high-torque launches or aggressive cornering to see where your chassis will flex. If the software shows a weak point in your classic car chassis stiffening blueprint, you can fix it on the screen for free rather than cutting out steel later. These electronic files also make it easy to collaborate with specialist fabrication shops, allowing them to review your plan without ever seeing the car in person.
When Manual Measurement is Mandatory
Despite the power of CAD, you can’t ignore the physical reality of a fifty-year-old car. Decades of rust repair or previous accidents can alter the factory dimensions of your frame. Your digital model might be perfect, but if the car’s body has shifted a quarter-inch over the years, the parts won’t fit. This is why the measure twice, cut once philosophy becomes your greatest asset. You must verify every digital coordinate with physical measurements on a level surface. To get this right, you’ll need a specific set of tools. Check our recommended gear for the essential measuring and fabrication tools required to bridge the gap between your digital blueprint and the physical metal of your project.
Implementing the Plan: A Systematic Approach to Chassis Rigidity
Execution is where your engineering work meets the reality of the workshop. You can’t simply start welding and hope for the best; you need a disciplined sequence of events to ensure your classic car chassis stiffening blueprint translates into a straight, high-performance machine. The first and most critical step is to level and square the chassis on a dedicated frame jig or a perfectly flat surface. If your foundation is off by even a fraction of an inch, every reinforcement you add will permanently lock that twist into the car. Once the car is secured, transfer your blueprint coordinates to the physical metal using precision marking tools like a carbide scribe and a digital protractor. Accuracy at this stage prevents the “stacking” of small errors that lead to major alignment headaches later.
When you begin the actual fabrication, execute your tack welds in a deliberate cross-pattern. This strategy is vital for managing heat and preventing structural warping. If you weld one entire side of a subframe connector before moving to the other, the cooling metal will pull the frame out of alignment. After the structure is tacked together, verify your suspension geometry and driveline angles. It’s much easier to break a small tack weld to adjust a pinion angle now than it is to cut out a finished seam later. Finally, finish with stress-relieving heat cycles and high-quality corrosion protection, such as epoxy primer, to ensure your work lasts for another fifty years.
Fabrication Mastery for Chassis Work
Welding heavy-gauge subframe connectors to thin factory floor pans requires finesse. You must manage heat soak carefully to avoid blowing holes in the original sheet metal or causing excessive distortion. I recommend using a series of short, staggered welds rather than one continuous bead. Ensure every surface is ground to bright metal; structural integrity depends on a clean weld pool. To get the best results, consult our recommended gear list for the specific welders and clamps that make these high-stakes tasks manageable.
Validation and Testing
Don’t just assume the car is stiffer; prove it. Use a dial indicator to measure actual flex reduction by supporting the car at three corners and measuring the deflection at the fourth. Documenting these measurements allows you to update your master project blueprint with real-world data. The final alignment check is the most critical step of the entire process. A rigid chassis allows for much more aggressive alignment settings, which is where you’ll truly feel the transformation in steering response and cornering grip. If you want to skip the trial and error and start with a proven foundation, invest in our Premium Project Blueprints to ensure your build meets professional engineering standards from day one.
Elevating Your Build with Restomod Academy Premium Project Blueprints
Chassis stiffening is more than a workshop chore; it’s the physical manifestation of your commitment to engineering excellence. You’ve already learned how to map load paths and manage heat soak, but applying that knowledge requires the confidence of a professional. By utilizing a classic car chassis stiffening blueprint from our Premium Project Blueprints collection, you replace hope with hard data. These plans are specifically designed for the performance demands of 2026, ensuring your vintage steel can handle the grip and torque of modern components. Precision is the difference between a car that feels like a collection of parts and one that feels like a factory-engineered masterpiece.
Joining our community means prioritizing safety and reliability over quick fixes. You aren’t just building a car; you’re crafting a legacy. Structured, mentor-led guidance helps you transition from a passive admirer to an active creator, giving you the skills to tackle even the most daunting fabrication tasks. When you work from a professional classic car chassis stiffening blueprint, you’re building a high-value asset that stands up to the closest technical scrutiny.
Premium Project Blueprints for the Serious Builder
Our chassis reinforcement packages provide everything you need to execute a pro-level build. You’ll find detailed schematics for subframe connectors, X-braces, and gusseting that integrate perfectly with your specific vehicle architecture. These blueprints are designed to work in harmony with our other roadmaps, ensuring your drivetrain and chassis are never at odds. Instead of solving one problem only to create another, you can follow a unified path toward excellence. For a complete look at the restoration philosophy that drives our engineering, explore our resource on what is a restomod and see how the Ultimate Restomod Guide can frame your entire project.
Consulting and Mentorship
If you’re facing a one-off chassis challenge or a complex fabrication hurdle, our Restomod Consulting Services offer the personalized guidance you need. Sometimes a project presents a unique obstacle that requires a second set of expert eyes to ensure safety and structural integrity. I’ve spent years in the shop solving the exact problems you’re encountering now, and I’m here to help you navigate them. For builders focusing on modern power, our definitive guide to an ls engine swap provides the technical framework for integrating high-output engines with a reinforced chassis. Let’s ensure your build is safe, fast, and built to last.
Start Your Structural Transformation Today
Building a world-class restomod requires more than just high-end parts; it demands a structural foundation that can handle the rigors of modern performance. You’ve learned how to identify load paths, select the right materials, and implement a systematic approach to fabrication. By following a technical classic car chassis stiffening blueprint, you move beyond the guesswork that plagues so many builds and step into the role of a precision engineer. It’s about ensuring that every ounce of torque is translated into forward motion rather than wasted in body twist.
Our Premium Project Blueprints provide the professional engineering schematics and actionable plans you need for modern reliability in 2026. With expert mentorship from Brook Walsh, you’ll have a steady hand guiding you through every complex weld and measurement. Don’t let structural flex compromise your hard work or your safety. It’s time to take control of your project and build a machine that responds with surgical accuracy on the road. Download Your Premium Project Blueprints and Build a Rock-Solid Foundation and begin the next chapter of your build with confidence. Your journey from passive admirer to master builder is well underway; keep your standards high and your welds clean.
Frequently Asked Questions
What exactly is included in a chassis stiffening blueprint?
A professional blueprint includes detailed technical schematics that identify specific load paths and flex points unique to your car’s architecture. You’ll find precise measurements for subframe connectors, X-bracing, and gusseting locations. It also specifies material types, such as DOM tubing, and provides a clear sequence for welding. Using a classic car chassis stiffening blueprint ensures you aren’t just adding weight, but strategically placing steel where it actually improves structural integrity.
Can I stiffen my classic car chassis without a full roll cage?
You can absolutely transform your car’s handling without the intrusiveness of a full roll cage. Most street-driven restomods see massive gains from subframe connectors, shock tower braces, and floor pan X-bracing. These components target the primary flex points of vintage unibody and body-on-frame designs. While a cage offers the ultimate in rigidity, these targeted reinforcements allow you to maintain a clean interior while still creating a precision handling machine that tracks straight.
How do I know if my unibody car needs subframe connectors?
If you’ve upgraded to a high-torque engine or modern performance tires, your unibody car is likely crying out for subframe connectors. Common signs include persistent interior squeaks, doors that don’t close quite right when the car is on a jack, or a vague feeling in the steering during hard cornering. These symptoms indicate the chassis is twisting under load. Installing connectors bridges the gap between front and rear structures, effectively eliminating that hinge-like behavior.
What is the best material to use for chassis reinforcement in 2026?
In 2026, Drawn Over Mandrel (DOM) mild steel remains the gold standard for most high-performance builds. It offers an excellent balance of strength, predictability, and ease of welding for the serious DIY builder. While chromoly is lighter, it requires specialized TIG welding and stress-relieving processes that can complicate a home project. Stick with high-quality DOM for your reinforcements to ensure your build stays safe, reliable, and structurally sound for decades to come.
Will stiffening the chassis make the ride quality too harsh for the street?
Stiffening the chassis actually improves ride quality by allowing the suspension to do its job. When a frame flexes, it acts like an unmanaged spring, leading to unpredictable vibrations and harshness. A rigid foundation ensures that your shocks and springs manage the road’s imperfections instead of the car’s body. You’ll notice fewer rattles and a more composed, modern feel that makes long drives in your vintage machine far more enjoyable and precise.
How do blueprints help prevent chassis warping during the welding process?
Blueprints provide a strategic welding sequence that manages heat distribution across the frame. By following a documented classic car chassis stiffening blueprint, you’ll use specific tack-weld patterns and staggered beads to prevent the metal from pulling the car out of alignment. Heat soak is the enemy of a straight chassis. A professional plan tells you exactly where to start and stop, ensuring your car remains square and true once the metal cools.
Do I need engineering software to create my own chassis blueprint?
You don’t need expensive CAD software to build a world-class car, but you do need a proven plan. While some builders use 3D scanning, others rely on precise manual measurements and physical mockups. If you want to skip the steep learning curve of engineering software, our Premium Project Blueprints offer pre-engineered solutions for specific architectures. These plans provide the technical precision of modern software without requiring you to spend months mastering complex digital tools.
How does chassis stiffening affect the overall value of a restomod project?
Proper chassis reinforcement significantly boosts the market value of a restomod by proving the build is engineered for safety and performance. Buyers in 2026 look for professional-grade documentation that shows the car can handle its power. A reinforced frame suggests a holistic approach to the build, rather than a parts-catalog assembly. When you can show a buyer a documented structural plan, you’re offering them peace of mind and a superior driving experience.