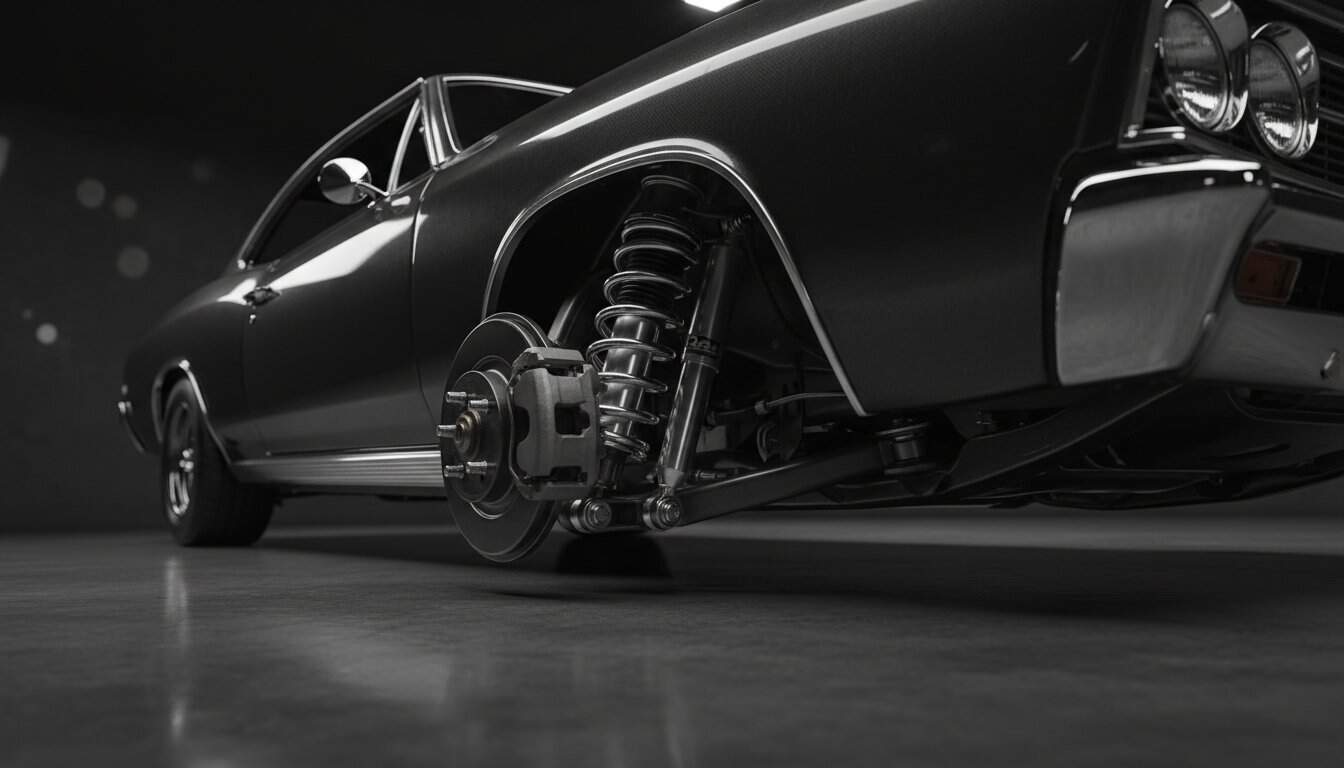
Your classic car factory suspension was engineered for 1960s bias-ply tires and a leisurely cruise, not the high-grip demands of a 2026 performance build. You know the exhausting feeling of taking a corner and waiting three seconds for the chassis to catch up with the steering wheel. It’s a common frustration for builders who love vintage aesthetics but hate the “floating boat” handling that makes spirited driving feel more like a gamble than a thrill. You want modern performance, but the fear of buying parts that won’t fit your specific donor frame often keeps the project stuck on jack stands.
You shouldn’t have to guess if a control arm will clear your subframe or struggle to decode complex suspension geometry. This guide masters the technical nuances of qa1 performance parts to help you build a precision machine with total confidence. We’ll bridge the gap between street comfort and track-ready stiffness, ensuring your project handles exactly how you envisioned it from the first turn of the wrench. We are breaking down the entire product lineup, comparing coilover configurations, and providing a clear roadmap for a successful suspension overhaul that honors your car’s legacy while embracing modern technology.
Key Takeaways
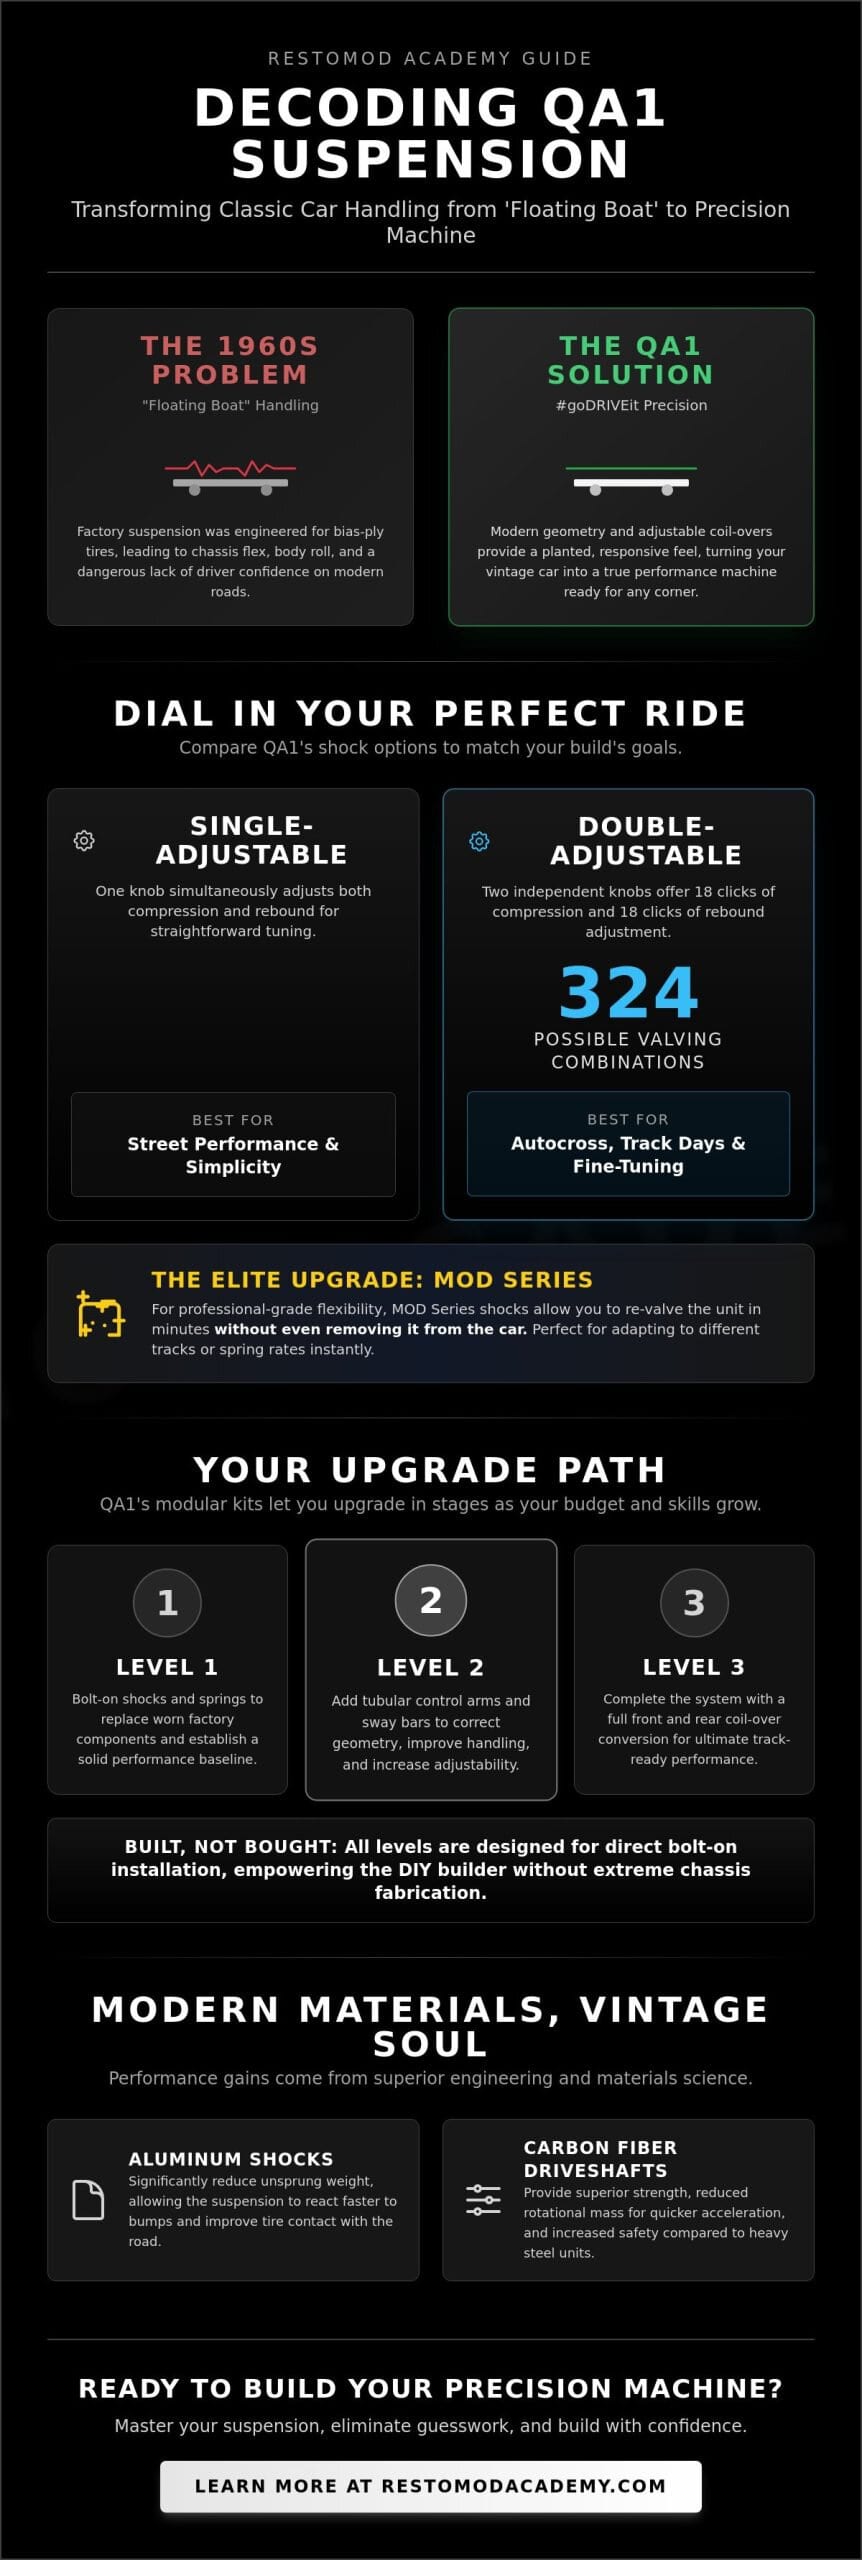
- Transform your classic’s “floating boat” handling into modern precision by adopting the #goDRIVEit philosophy for superior street drivability.
- Decode the technical nuances of single and double-adjustable shocks to dial in the perfect damping for your specific restomod build.
- Compare qa1 kits against industry rivals to find the ideal balance of bolt-on simplicity, performance, and budget-friendly installation.
- Master the “Measure Twice, Order Once” rule with our professional checklist for calculating critical ride height and extended length dimensions.
- Embrace the “Built, Not Bought” mentality by learning how to upgrade your suspension geometry without the need for extreme chassis fabrication.
What is QA1? The Restomod Builder’s Secret to Modern Handling
If you’re serious about turning a vintage muscle car into a canyon carver, you’ve likely seen the black and silver stickers at every major autocross event. QA1 stands as the premier authority in high-performance suspension and driveline components for American classics. Based in Lakeville, Minnesota, this American-made powerhouse has spent decades refining the hardware that keeps old steel planted on modern asphalt. They don’t just sell parts; they engineer solutions that turn 50-year-old chassis into precision instruments.
The brand operates under the #goDRIVEit philosophy. This isn’t about building trailer queens that sit under neon lights at indoor shows. It’s a call to action for every builder to get their car out of the garage and onto the road. Whether you’re working on a GM A-Body, a classic F-Body, a vintage Ford Mustang, or a C10 truck, the goal is consistent: total confidence behind the wheel. You want a car that starts, stops, and turns like a vehicle from the 2020s while retaining its 1960s soul.
To better understand how these components transform a classic Mopar, watch this helpful video:
The Evolution of Suspension in the Restomod Era
The 1960s were a golden age for horsepower, but suspension technology lagged far behind. Most muscle cars left the factory with leaf springs or twin-I-beam setups designed for bias-ply tires and straight-line stability. When you introduce modern radial tires, those old systems flex and bind. Understanding the fundamentals of an automotive suspension system is the first step toward mastering your build. QA1 bridges this gap by replacing outdated geometry with modern multi-link systems and coil-overs. This modernization is the core of the movement. For a deeper dive into these concepts, explore our What is a Restomod? guide.
Why QA1 is a Staple in the Restomod Academy Toolbelt
We recommend qa1 because they understand the DIY builder’s journey. Their kits are modular, offering Level 1, 2, and 3 packages that allow you to upgrade in stages as your budget and skills grow. You don’t need a fabrication shop to get results. Most of their components are direct bolt-on replacements for factory hardware. This accessibility empowers you to take control of your project without cutting into the original frame. Beyond ease of use, the performance gains are measurable. Aluminum shocks reduce unsprung weight, while their carbon fiber driveshafts provide superior strength and safety compared to heavy steel units. It’s about using modern materials to honor vintage craftsmanship.
Deep Dive: Decoding QA1 Coilovers, Shocks, and Control Arms
Choosing the right damping profile transforms a floaty 1960s cruiser into a precise instrument. The qa1 catalog offers two primary paths: single-adjustable and double-adjustable shocks. Single-adjustable units use one knob to change both compression and rebound simultaneously. It’s a fantastic solution for street builds where simplicity is king. Double-adjustable shocks feature two independent knobs, offering 18 clicks for each. This creates 324 possible valving combinations, allowing you to tune exactly how the car hits a bump versus how it recovers.
For elite builds that demand professional-grade flexibility, the Mod Series shocks are the gold standard. These high-end units allow for re-valving without even removing the shock from the car. You can swap internal valve packs in minutes to adapt to different track conditions or spring rates. While most vintage vehicles utilize common suspension configurations like double-wishbone or leaf spring setups, these modern shocks bring 2026-level precision to 1960s designs.
Don’t overlook the connection points. Factory rubber bushings act like a sponge, soaking up road feel and causing alignment shifts under load. QA1 solves this by using rod ends and spherical bearings. These components eliminate bushing deflection entirely, ensuring your suspension geometry remains consistent during hard cornering. It’s the difference between a car that wanders and one that tracks straight as an arrow.
The Magic of QA1 Coilovers: Stance and Performance
Stance is about more than just looking good at a Saturday morning meet. qa1 coilovers allow you to adjust ride height by moving the spring seat up or down the shock body. This method ensures you don’t sacrifice spring travel when lowering the car. You must select your spring rates based on your specific powertrain. A lightweight aluminum LS engine typically requires a 450lb spring, while a heavy iron Big Block might need 550lb or more. Check our definitive guide to an LS engine swap to help calculate your front-end weight requirements.
Tubular Components: Control Arms and Sway Bars
Factory stamped-steel control arms were never designed for modern radial tires. QA1 tubular control arms correct this by adding 3 to 4 degrees of positive caster, which significantly improves high-speed stability and steering return. Pair these with a hollow-core sway bar to reduce body roll without making the ride feel brittle. Unsprung weight is the mass of components like wheels and brakes that isn’t supported by the springs; reducing it allows your shocks to react faster to road imperfections. This reduction in mass ensures your tires stay in contact with the pavement through mid-corner bumps.
Carbon Fiber Driveshafts: The Overlooked Performance Boost
Safety is the primary reason to ditch your old steel driveshaft. In high-RPM scenarios, a steel shaft can whip and “pole-vault” the car if it fails, whereas a carbon fiber shaft is designed to shatter into harmless fibers. Beyond safety, the reduction in rotational mass is a game changer for throttle response. Less weight to spin up means more power reaches the ground instantly. If you’re building a high-horsepower machine, browse our recommended gear for driveline upgrades that can handle the torque. Consider these upgrades as the final step in securing your car’s mechanical legacy.
QA1 vs. The Competition: Choosing the Right Suspension Kit
Selecting a suspension brand determines the soul of your build. While qa1 dominates the market for enthusiasts who want a weekend transformation, you need to know how they stack up against heavy hitters like RideTech and Detroit Speed. RideTech specializes in air-ride technology and ultra-plush street manners. If you want your car to drop to the weeds at a show but still cruise like a modern luxury sedan, they are a strong contender. However, QA1 provides a more direct, mechanical connection to the road through their coilover systems. They offer a simpler bolt-on experience that doesn’t require the complex plumbing or tank storage of an air system.
Detroit Speed sits at the opposite end of the spectrum. Their kits represent the pinnacle of Pro-Touring performance, but they demand significant fabrication skills. You’ll often find yourself cutting out floor pans or welding in entire subframes to make their components fit. QA1 bridges the gap between stock components and race-ready hardware. It offers 90 percent of that elite performance at a fraction of the cost and labor. Before you start turning wrenches, take a moment to study how car suspensions work to visualize how geometry changes affect your specific chassis.
The Decision Matrix: Street Cruiser or Autocross Warrior?
Identify your build tier before you open your wallet. QA1 organizes their kits into levels. A Level 1 kit uses street-friendly polyurethane bushings that prioritize quiet operation and longevity. If you plan to hit the local autocross circuit, step up to a Level 3 kit. These include race-spec rod ends that eliminate deflection but require frequent cleaning to prevent noise. This trade-off is the reality of precision engineering. For a wider look at the market, read our suspension upgrades for cars guide to see how these choices impact your long-term project goals.
Cost vs. Performance: Where to Spend and Where to Save
Don’t blow your entire budget on carbon fiber trim if your shocks are bottoming out. Invest in double-adjustable shocks early. The ability to tune compression and rebound independently with 18 distinct settings allows you to dial in the car for a 500-mile road trip or a 60-second track sprint. You can save money by keeping your stock control arms initially and upgrading to tubular versions later. Since qa1 offers a lifetime warranty on their USA-made shocks, this protection adds immense value to a build you intend to keep for decades. Focus on the foundation first; the aesthetic details can wait until the stance and handling are perfected.
Planning Your QA1 Install: Measurements and Compatibility
Precision defines a master builder. Before you click “buy” on your qa1 kit, embrace the “Measure Twice, Order Once” rule. Suspension geometry is a game of millimeters. One wrong calculation turns a high-performance upgrade into a mechanical headache that stalls your project for weeks. You aren’t just swapping parts; you’re re-engineering the way your classic interacts with the road. This stage requires a steady hand and a sharp eye for detail.
The DIY Builder’s Measurement Checklist
Follow these steps to ensure your components fit the first time. Suspension travel is the most critical factor here. If your shocks bottom out or overextend, you risk internal valve damage or catastrophic failure of the mounting points.
- Step 1: Measuring Shock Travel. Determine your target ride height first. Measure the distance between the upper and lower shock mounts. Next, jack the car to full extension and then compress it to the bump stops. You generally need 2 to 3 inches of compression travel from your settled ride height to handle road undulations safely.
- Step 2: Checking Engine Interference. Modern engine swaps often introduce clearance issues. Large oil pans or thick-tube headers can occupy the same space as your new tubular control arms. Verify that your steering linkage and control arms won’t strike the engine block or exhaust during a full steering lock.
- Step 3: Verifying Wheel Backspacing. Many qa1 upgrades, especially those involving drop spindles or brake conversions, can push the wheel mounting surface outward by 0.25 to 0.5 inches. Measure your current wheel-to-fender gap. If you’re tight on space, you may need wheels with more backspacing to prevent the tires from shredding against the fender lips.
Essential Tools for a QA1 Suspension Overhaul
Don’t fight the car with basic hand tools. You need a dedicated ball joint separator to avoid damaging the tapers on your new spindles. A high-quality coil spring compressor is a safety requirement, not an option. Use a digital angle finder to set your initial caster and camber settings while the car is still on the stands. For a complete breakdown of shop essentials, review our recommended gear for professional-grade results.
“A calibrated torque wrench is the only thing standing between a precision-engineered ride and a catastrophic mechanical failure on the highway.”
Once the last bolt is tight, your work isn’t finished. A professional alignment is mandatory before your first real test drive. New bushings and revised geometry change the car’s footprint entirely. Driving even 50 miles on a “garage alignment” can cause 20% more tire wear than a properly indexed setup. Set your baseline, get it on a laser rack, and then enjoy the transformation.
Ready to choose your components? Explore our detailed product reviews to find the right fit for your chassis.
The Restomod Academy Verdict: Is QA1 Right for Your Project?
Deciding on a suspension path defines the character of your entire build. After decades of seeing chassis swaps and custom fabrication projects, our team views qa1 as the definitive sweet spot for the modern enthusiast. It bridges the gap between budget-friendly replacements and six-figure custom chassis work. You aren’t just buying parts; you’re investing in a system designed to handle the 500-plus horsepower levels common in 2026 builds while maintaining a bolt-on simplicity that respects your garage time.
The “Built, Not Bought” philosophy is the heartbeat of this Academy. We value the grease under your fingernails and the pride of a stance you dialed in yourself. Choosing a qa1 system supports this mission because their kits are engineered specifically for the DIY builder. You don’t need a master’s degree in suspension geometry to achieve professional-grade results. These components empower you to transform a floaty, 50-year-old chassis into a precision machine that carves corners with confidence. If you want to understand how this upgrade fits into the larger picture of your vehicle’s evolution, check out our Ultimate Restomod Guide for a total vehicle transformation blueprint.
Final Pro-Tips for QA1 Success
Execution is where the vision meets the pavement. To ensure your installation goes smoothly and delivers the performance you expect, keep these three rules in mind during the process:
- The Quarter-Inch Rule: Always call tech support if your measurements feel off by more than 1/4 inch. Precision matters when you’re correcting decades of factory tolerances and frame sag.
- Baseline First: Don’t over-stiffen your ride immediately. Start with the recommended baseline settings for your specific vehicle weight and adjust only after you’ve logged at least 50 miles.
- Research the Hardware: See the gear in action before you turn a wrench. Check out our Product Reviews for specific kit unboxings and detailed component breakdowns.
Your journey doesn’t end with a single upgrade. It’s about the legacy you create with every bolt tightened and every system optimized. Join the Academy today to access in-depth blueprints and connect with a community of builders who share your vision for perfection. Let’s get your project off the jack stands and onto the open road where it belongs. The garage is calling, and your masterpiece is waiting for its next move.
Claim Your Spot on the Grid with Modern Handling
Building a restomod that handles like a 2026 performance vehicle requires more than just swapping parts; it demands a shift in your build philosophy. You’ve learned how qa1 suspension systems utilize precision-engineered valving and high-strength components to eliminate the unpredictable sway of factory setups. We’ve broken down the critical steps for measuring your chassis clearance and selecting the right spring rates for your specific engine weight. These technical details are what separate a trailer queen from a true driver’s machine. At The Restomod Academy, we believe in the “built, not bought” ethos that defines our community. We provide the expert-led tutorials for DIY builders, curated lists of high-performance gear, and step-by-step blueprints for classic muscle that turn complex engineering into achievable goals. Your vision for a perfected classic is within reach when you follow a proven roadmap. Download The Ultimate Restomod Guide and Start Your Build Today. Grab your tools and prepare to transform your vintage steel into a modern masterpiece; the road is waiting for you.
Frequently Asked Questions
Is QA1 suspension good for daily driving?
Yes, this suspension is an excellent choice for daily driving because it bridges the gap between track performance and street comfort. The Proma Star series offers 18 clicks of adjustment, allowing you to soften the dampening for city streets or stiffen it for highway stability. You’ll gain a composed ride that feels modern without losing the vintage soul of your vehicle. It’s a reliable upgrade that handles the rigors of a 50 mile daily commute with ease.
What is the difference between QA1 single and double adjustable shocks?
The primary difference lies in how you control the fluid movement within the shock. Single adjustable shocks use one knob to change both compression and rebound at a fixed ratio, which is perfect for 90 percent of street builds. Double adjustable shocks feature two separate knobs, giving you independent control over how the shock compresses and how it extends. This precision allows builders to fine tune weight transfer during a 60 foot launch or high speed corner entry.
Do I need to weld anything to install a QA1 coilover kit?
You don’t need a welder for the majority of QA1 coilover installations because they’re designed as direct bolt on replacements. For example, the front coilover conversion for 1967 to 1969 Camaros utilizes factory mounting points to secure the hardware. While some rear 4 link systems require minor bracket welding, over 80 percent of their catalog focuses on a garage friendly installation process. Always check the specific 20 page installation manual for your vehicle year to confirm the required tool set.
Can I use QA1 shocks with my factory control arms?
Yes, you can pair these shocks with your factory stamped steel control arms to improve dampening without a full teardown. The Stocker Star line is specifically engineered to fit into the original mounting locations of most domestic muscle cars. However, upgrading to tubular arms later will unlock better suspension geometry and more travel. Start with the shocks to feel an immediate 20 percent improvement in body roll and stability during spirited Sunday drives.
How do I choose the right spring rate for my QA1 coilovers?
Choose your spring rate based on the total front end weight of your car and how you plan to drive it. A small block Chevy in a cruiser typically requires a 350 to 450 pound spring, while a heavy big block or iron head engine might need 550 pounds or more. Consult the official weight chart to match your specific engine and transmission combination. Getting this right ensures your restomod sits at the perfect ride height while maintaining proper valve travel.
What is the warranty on QA1 performance parts?
QA1 offers a limited lifetime warranty on their aluminum shocks, provided you register the product within 30 days of purchase. This coverage protects you against defects in materials and workmanship for the duration of your ownership. It’s a testament to their American manufacturing standards in Lakeville, Minnesota. Knowing your investment is backed by a company with 30 years of history provides peace of mind as you push your project to its limits.
Does QA1 offer suspension kits for classic trucks like the C10?
Yes, they provide comprehensive suspension solutions for 1963 to 1987 Chevy C10 trucks that completely transform their handling characteristics. Their front and rear coilover conversion systems replace the dated factory crossmembers and trailing arms with modern geometry. These kits can drop your ride height by 5 inches while maintaining full suspension travel. It’s the ultimate way to make a 50 year old workhorse corner like a performance sedan from the 2026 model year.
How does QA1 compare to RideTech for restomod builds?
This brand stands out for its user friendly, bolt on philosophy that appeals to the “built, not bought” community. While RideTech is often associated with high end air suspension and track focused Fox shocks, these kits focus on accessible coilover technology that fits a wider range of budgets. Both companies manufacture high quality components in the USA. Your choice depends on whether you want the simplicity of a mechanical coilover or the complexity of an air management system.