
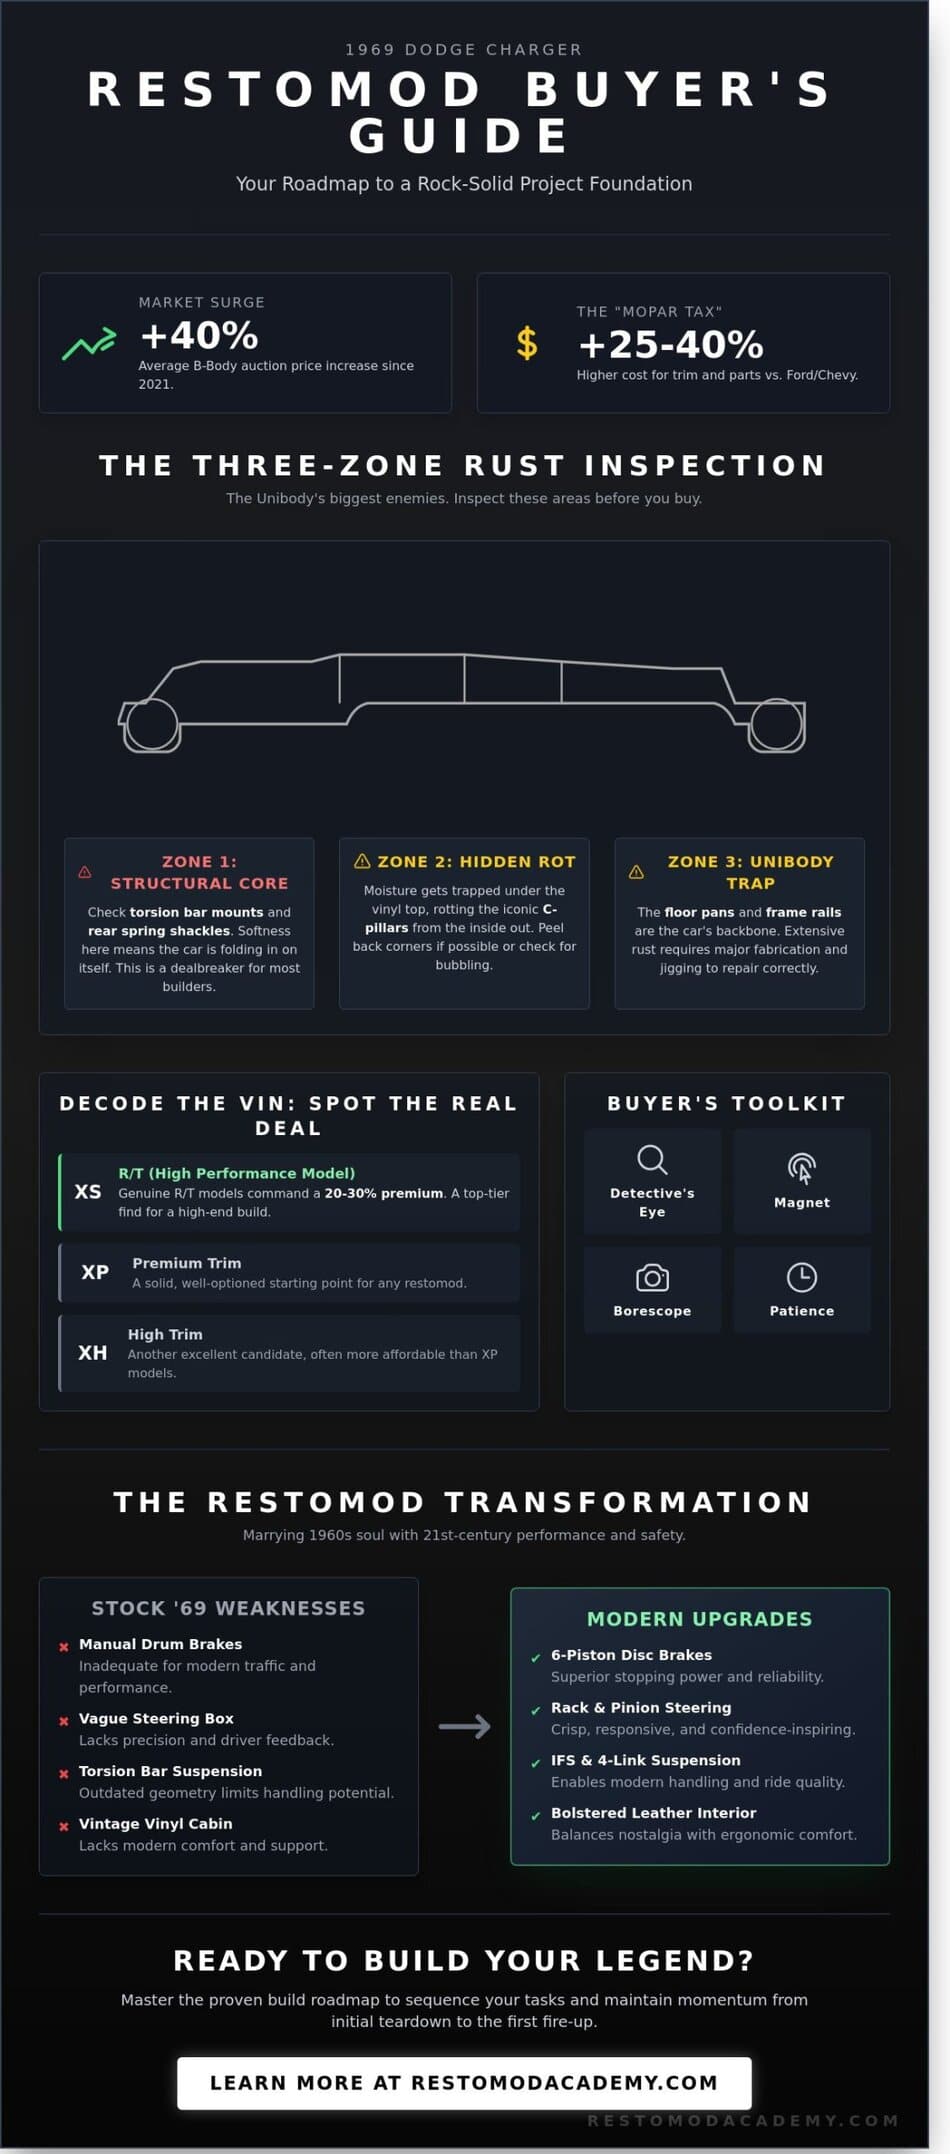
The most expensive mistake you’ll ever make isn’t buying a 1969 Dodge Charger; it’s buying the wrong one and realizing it only after the first $10,000 of metalwork. You likely already feel that owning this Mopar legend is the ultimate automotive goal, yet the fear of hidden structural rust in the C-pillars or a “basket case” frame keeps your project stuck in the planning phase. It’s frustrating to see auction prices for B-bodies surge by 40% since 2021 while the actual driving experience of a stock 1969 dodge charger remains stuck in the era of manual drum brakes and vague steering.
You deserve a muscle car that captures the 1960s aesthetic without the 1960s danger. I’ll help you master the art of sourcing and modernizing this icon so it delivers the reliability of a 2026 sports car. We’ll start by decoding VIN tags to ensure you aren’t overpaying for a clone, then move into the technical fabrication and suspension geometry required to ground that high-performance vision in reality. This guide ensures your build is as solid as it is fast.
Key Takeaways
- Identify high-value project cars by mastering a professional “Three-Zone” rust inspection to ensure your foundation is rock solid.
- Learn how to preserve the iconic “Coke Bottle” styling of the 1969 dodge charger while integrating modern “Pro-Touring” stances and high-performance wheel fitment.
- Master the technical requirements for a modern Hellcrate Hemi swap and the transition to independent front suspension for superior handling.
- Elevate your cabin’s craftsmanship by swapping vintage vinyl for bolstered modern leather that balances nostalgia with contemporary comfort.
- Utilize a proven build roadmap to sequence your fabrication tasks and maintain momentum from the initial teardown to the first fire-up.
The 1969 Dodge Charger: Why It Remains the Ultimate Restomod Icon
The 1969 Dodge Charger stands as the undisputed king of the muscle car era. Its “Coke Bottle” profile, characterized by a narrow waist and flared fenders, remains one of the most aggressive silhouettes ever stamped in Detroit steel. While the 1968 model introduced this second-generation body, the 1969 version refined it with a center-split grille and long, recessed taillights. These design cues, combined with its dominance in pop culture, have made it a primary target for high-end builds. From the orange “General Lee” that jumped through 145 episodes of television to the 2,000-horsepower Maximus Charger seen in the Fast & Furious franchise, this car represents a legacy of power.
For many builders, the appeal lies in the B-Body platform. This chassis is exceptionally friendly to modern suspension swaps because of its modular nature. You can replace the original torsion bar setup with a contemporary front subframe and a four-link rear suspension to handle the torque of a modern Hemi. Choosing a restomod approach over a factory-correct restoration allows you to keep that iconic 1969 dodge charger aesthetic while benefiting from 21st-century braking and handling. It is the perfect marriage of 1960s soul and 2020s performance.
The 1969 Model Year Differences
Identifying a true 1969 model starts at the front. Unlike the open 1968 grille, the 69 features a vertical center divider. Out back, the 1968 round “saucer” lights were replaced by wide horizontal units. If you are hunting for a donor car, check the VIN. An “XS” code indicates an R/T model, which often commands a 20% to 30% premium over “XP” (Premium) or “XH” (High) trims. While the ultra-rare Charger 500 and Daytona trims are often too valuable to cut up, the standard 1969 dodge charger provides the perfect canvas for modernization. You can find deep-dive details on these variations in the 1969 Dodge Charger history archives.
The “Built, Not Bought” Philosophy
Building a 69 Charger is about more than just owning a fast car; it is about the emotional reward of tailoring a machine to your specific driving style. Restomodding preserves the legacy of cars that would otherwise be scrapped due to missing original engines or rotted drivetrains. A restomod is the intersection of heritage and high-tech safety. By integrating modern rack-and-pinion steering and Wilwood six-piston brakes, you transform a 55-year-old heavy-hitter into a reliable daily driver. This process turns a garage project into a lasting piece of personal craftsmanship and a shared adventure for the DIY community.
Buyer’s Guide: How to Source and Evaluate a 69 Charger for Restoration
Scouring the market for a 1969 dodge charger in 2026 requires a detective’s eye and a lot of patience. Forget the high-traffic sites where prices are inflated by bidding wars. Instead, dive into niche Mopar forums or local estate auctions in dry climates like Nevada or West Texas. Finding a “barn find” today often means looking for cars that have been off the grid for 30 years. When you locate a candidate, bring a high-strength magnet and a borescope. You aren’t just buying a car; you’re buying a metal fabrication project.
Prepare for the “Mopar Tax” early in your planning. Because Dodge produced significantly fewer units than Chevrolet or Ford, replacement trim and interior components often cost 25% to 40% more than Mustang or Camaro parts. A simple chrome window molding for a Charger can fetch triple the price of a similar part for a Chevelle. Don’t let the initial purchase price blind you to these long-term costs. Understanding the specific 1969 Dodge Charger models and performance variations will help you determine if the asking price matches the car’s original equipment or if it’s a base model with R/T badges slapped on later.
Critical Inspection Areas for B-Bodies
The “Unibody” trap is real. Unlike full-frame cars, the 1969 dodge charger relies on its floor pans and frame rails for structural rigidity. Check the torsion bar mounts and the rear spring shackles first. If these points are soft, the car is literally folding in on itself. Use restomod project planning to map out these structural repairs before you commit to the purchase. Inspect the C-pillars under the vinyl top. Moisture traps there, rotting the metal from the inside out. If you see bubbles in the vinyl, expect to replace the entire roof skin.
Documentation and Title Verification
Check the VIN plate on the dash and ensure it matches the Fender Tag located on the driver’s side inner fender. These tags tell the story of the car’s birth, from paint codes to engine specs. While a numbers-matching drivetrain is less critical for a restomod build, it significantly impacts your entry price. Avoid cars with “Title Washing” history, especially those sourced from states with loose vintage car regulations. Always verify the hidden VIN stamps on the radiator yoke and the trunk lip to ensure the body hasn’t been “re-vinned” with a donor plate. If the metal doesn’t match the paper, walk away.
Ready to start your journey? Learn more about the fundamentals of the restomod movement to see how modern tech can save these classic icons.
Modernizing the Beast: 1969 Dodge Charger Restomod Ideas
Building a restomod is about honoring the 1969 dodge charger while fixing the mechanical flaws of the 1960s. Your goal is to create a machine that looks like a vintage dream but drives like a modern supercar. Start with the “Pro-Touring” stance. This look requires dropping the ride height by 2 to 3 inches using a modern coilover suspension. Match this with aggressive wheel fitment, typically 18×9-inch wheels up front and 19×11-inch wheels in the rear. This setup improves your contact patch by over 35 percent compared to original bias-ply tires, giving you the grip needed for modern traffic.
Understanding the 1969 Dodge Charger history helps you appreciate why these styling cues matter before you start making permanent changes. Ditch the flat vinyl bench seats. They offer zero lateral support and get uncomfortably hot. Install bolstered modern leather seats that keep you planted during hard cornering. High-quality hides provide a premium feel that the original factory interiors simply couldn’t match in 1969.
The iconic hideaway headlights are a signature feature, but the original vacuum-operated systems are notoriously unreliable. They often leak or move at different speeds, leaving your car looking “sleepy.” Replace those old canisters with electric actuators. It’s a straightforward upgrade that ensures your headlights snap open instantly every single time you hit the switch.
Color choice defines the personality of your build. You can stick with classic Mopar “High Impact” colors like Plum Crazy or Hemi Orange to keep that nostalgic punch. However, many modern builders are opting for metallic finishes with deep clear coats. These modern paints offer a level of reflection and depth that wasn’t possible with the single-stage paints used five decades ago.
Blending Vintage Style with Modern Comfort
Keep your dashboard looking authentic while upgrading the technology. You can integrate digital gauges directly into the classic “tic-toc-tach” housings. This gives you precise data on engine vitals without cluttering the interior with plastic pods. For music, use a hidden audio system with Bluetooth internals tucked behind the factory radio faceplate. You can explore restomod interior ideas to help you integrate modern climate control systems that actually keep the cabin cold during summer cruises.
Exterior Refinements and Metal Work
True craftsmanship shows in the details of the metal. Shave the drip rails to create a smoother, more aerodynamic profile. You should also tuck the bumpers closer to the body, narrowing the factory gaps from 0.75 inches down to a tight 0.25 inches for a tailored look. Swap the dim incandescent bulbs for LED conversions in those recessed 1969 taillights. Consult a classic car bodywork guide to learn how to correct the panel misalignments that were common on the 1969 dodge charger assembly lines.
Performance Overhaul: Drivetrains, Suspension, and Safety
Transforming a 1969 dodge charger from a wallowing cruiser into a precision instrument requires a holistic approach to the drivetrain. You can’t simply drop a 707-horsepower 6.2L Supercharged Hellcrate into the engine bay and expect the factory 1960s hardware to survive. This swap demands a complete rethink of how power reaches the pavement. Swapping the legendary but limited 3-speed 727 Torqueflite for a Tremec T-56 6-speed manual or a modern 8-speed automatic provides the gear ratios necessary to keep that Hemi in its power band while offering highway-friendly cruising. Modern transmissions also handle the massive torque loads that would shred original internals during a hard launch.
Safety must keep pace with speed. If you’re pushing 700 horsepower, 14-inch rotors and 6-piston calipers are non-negotiable requirements for your build. Factory drum brakes or early discs will fade into uselessness after a single high-speed stop. You need the thermal capacity that only large-diameter rotors provide to safely arrest the momentum of a 3,600-pound B-body. Pair these with a modern master cylinder and proportioning valve to ensure the car stops straight and true every time you hit the pedal.
The Great Engine Debate
Choosing your heartbeat is the most critical decision of the restoration. A modern Gen III Hemi offers 100,000-mile reliability and incredible power density, whereas a traditional Big Block Wedge delivers that unmistakable vintage lope and massive low-end torque. For those prioritizing ultimate parts availability and cost-efficiency, review our definitive guide to an LS engine swap. If you choose to keep the original 383 or 440 engines, an EFI conversion is the single best upgrade for cold-start reliability. These systems replace the carburetor and self-tune based on real-time oxygen sensor data, eliminating the need for constant jetting adjustments.
Handling and Chassis Stiffening
The 1969 dodge charger features a unibody construction that is prone to the “B-Body Twist” when subjected to modern torque levels. Weld-in subframe connectors are essential to tie the front and rear of the car together, preventing structural fatigue and paint cracking. To fix the “vague” factory steering, install a modern rack-and-pinion system. This replaces the old steering box and eliminates the dead spot at center. When it’s time to choose your stance, consult our guide on suspension upgrades for cars to decide between the track-ready precision of coilovers or the versatility of air ride. Moving from factory torsion bars to an independent front suspension (IFS) completely alters the car’s geometry, allowing it to corner like a modern sports coupe.
Executing Your Build: How Restomod Academy Guides Your Journey
Restoring a 1969 dodge charger isn’t just a hobby; it’s a multi-year commitment that requires a clear, logical roadmap. Most builders hit a wall around the 18-month mark, a phenomenon we call project paralysis. We prevent this by breaking your build into phases that prioritize structural integrity before you ever touch the drivetrain. This sequencing ensures you don’t paint yourself into a corner or install a high-performance engine into a chassis that can’t handle the torque. Our B-Body blueprints provide exact measurements for suspension geometry and engine mounts, cutting your fabrication time by an estimated 15% compared to trial-and-error methods.
Effective budget management separates the dreamers from the drivers. Our proprietary tracking tools help you categorize every cent across 12 distinct build sectors, from metalwork to final upholstery. We recommend a 20% contingency fund for every 1969 dodge charger project to account for the hidden rust often found in the rear sail panels or trunk floors after media blasting. The final 10% of the build, which includes panel gaps and interior trim alignment, defines the quality of your legacy. This stage often takes as long as the initial teardown because it requires 100% of your focus to transition from a functional machine to a show-winning masterpiece.
Your Resource Toolkit
Success in the garage depends on having the right equipment for Mopar-specific fabrication challenges. You can find the exact welders, rotisseries, and specialty pullers we trust in our recommended gear list. To save thousands on parts that don’t fit or perform as advertised, consult our product reviews. These guides help you avoid shiny part syndrome by focusing on verified performance data rather than marketing hype. For those handling high-stakes builds, our Restomod Consulting service offers direct access to master builders who’ve solved every B-Body quirk imaginable.
Joining the Community
You don’t have to weld in isolation. The Restomod Academy forum is a specialized hub where members troubleshoot specific 69 Charger wiring diagrams and EFI conversions in real-time. Sharing your build progress provides the accountability needed to cross the finish line while inspiring the next generation of enthusiasts to pick up a wrench. Your journey contributes to the collective knowledge of the Mopar community, turning your individual project into a shared adventure. If you’re ready to stop dreaming and start turning bolts, Enroll in the Ultimate Restomod Guide today and master the precision of modern performance.
Drive Your B-Body Vision Into Reality
You’ve learned how to evaluate a potential B-body donor and why the 1969 dodge charger stands alone as the peak of muscle car design. From sourcing a solid foundation to integrating modern drivetrain technology, the path to a high-performance restomod is now clear. Founder Brook Walsh, a lifelong Mopar enthusiast, established Restomod Academy to provide the step-by-step blueprints required for B-body modernization. You get access to comprehensive reviews of the latest EFI and suspension kits, ensuring every component you install meets professional standards. These resources eliminate the guesswork that often stalls a project in the fabrication stage.
Don’t let your project sit under a tarp for another decade. Take the technical knowledge we’ve discussed and apply it to your own garage. It’s time to stop dreaming and start fabricating. With the right mentor and a methodical approach, you’ll master the complexities of wiring and suspension geometry. Start Your Journey: Get The Ultimate Restomod Guide. Grab your tools and prepare to bring a legend back to life; your masterpiece is waiting for its first turn of the key.
Frequently Asked Questions
How much does a 1969 Dodge Charger project car cost in 2026?
Expect to pay between $40,000 and $55,000 for a viable 1969 dodge charger project car based on current 5 percent annual appreciation trends reported by classic car analysts. This price range typically covers a “Condition 4” vehicle that requires a total overhaul but remains structurally sound. Always prioritize a complete car; sourcing missing trim and interior components can easily add 20 percent to your initial acquisition costs.
Can I put a modern Hellcat engine in a 1969 Charger?
You can definitely install a 707-horsepower Hellcat crate engine into this chassis by using a specialized Mopar “Hellcrate” wiring kit and reinforced motor mounts. This swap requires you to modify the transmission tunnel to accommodate the large 8HP90 eight-speed automatic gearbox. You must also upgrade the K-frame to handle the massive 650 lb-ft of torque produced by the supercharged 6.2-liter powerplant.
What are the common rust spots on a 1969 Dodge Charger?
Focus your inspection on the rear window channel, lower quarter panels, and trunk floor because these areas trap moisture in 85 percent of original survivors. Check the frame rails near the steering box and the torsion bar crossmember for structural rot that compromises safety. These B-Body cars often hide severe corrosion beneath their vinyl tops, so peel back the trim to examine the roof skin thoroughly.
Is a 1969 Charger a unibody or body-on-frame car?
The 1969 Charger uses a unibody construction where the floor pans, roof, and body panels are welded together to create a single structural unit. This design is lighter than a body-on-frame setup but can flex under high stress. If you plan on building a high-horsepower machine, install subframe connectors to tie the front and rear sections together; this prevents the body from twisting during hard launches.
How do I tell a real 1969 Charger R/T from a clone?
Verify the fifth digit of the VIN located on the dash pad; a genuine R/T must feature the letter “L” in that position. Look at the fender tag for the “XS29” code, which identifies the vehicle as a Charger R/T rather than a base model or a 500. Clones frequently lack the heavy-duty suspension components or the 150-mph speedometer that came standard on the 37,000 R/T units produced that year.
What is the best modern suspension for a 69 Charger?
A 4-link rear suspension system from manufacturers like Reilly Control-Alt-Design (RMS) provides the best balance of cornering grip and ride quality for a modern build. These kits replace the archaic leaf springs with adjustable coilover shocks, allowing you to fine-tune your stance and damping. Upgrading to an independent front suspension (IFS) kit removes the bulky torsion bars and adds precise rack-and-pinion steering for a contemporary driving feel.
Are 1969 Dodge Chargers reliable for daily driving after a restomod?
A professionally executed 1969 dodge charger restomod is exceptionally reliable for daily use if you integrate electronic fuel injection and a modern aluminum radiator. Swapping the original points ignition for a digital system eliminates 90 percent of cold-start issues. With a modern overdrive transmission, you can cruise at 75 mph while keeping engine speeds low, ensuring your vintage muscle car handles the daily commute with modern efficiency.
How long does a full 1969 Dodge Charger restomod typically take?
A comprehensive restomod project usually requires 1,500 to 2,500 man-hours, which translates to a timeline of 18 to 24 months for most dedicated builders. Metalwork and body preparation often consume 40 percent of the total schedule due to the large surface area of these cars. Create a detailed build plan for the 120 individual sub-assemblies to keep your project moving forward and avoid common restoration bottlenecks.