
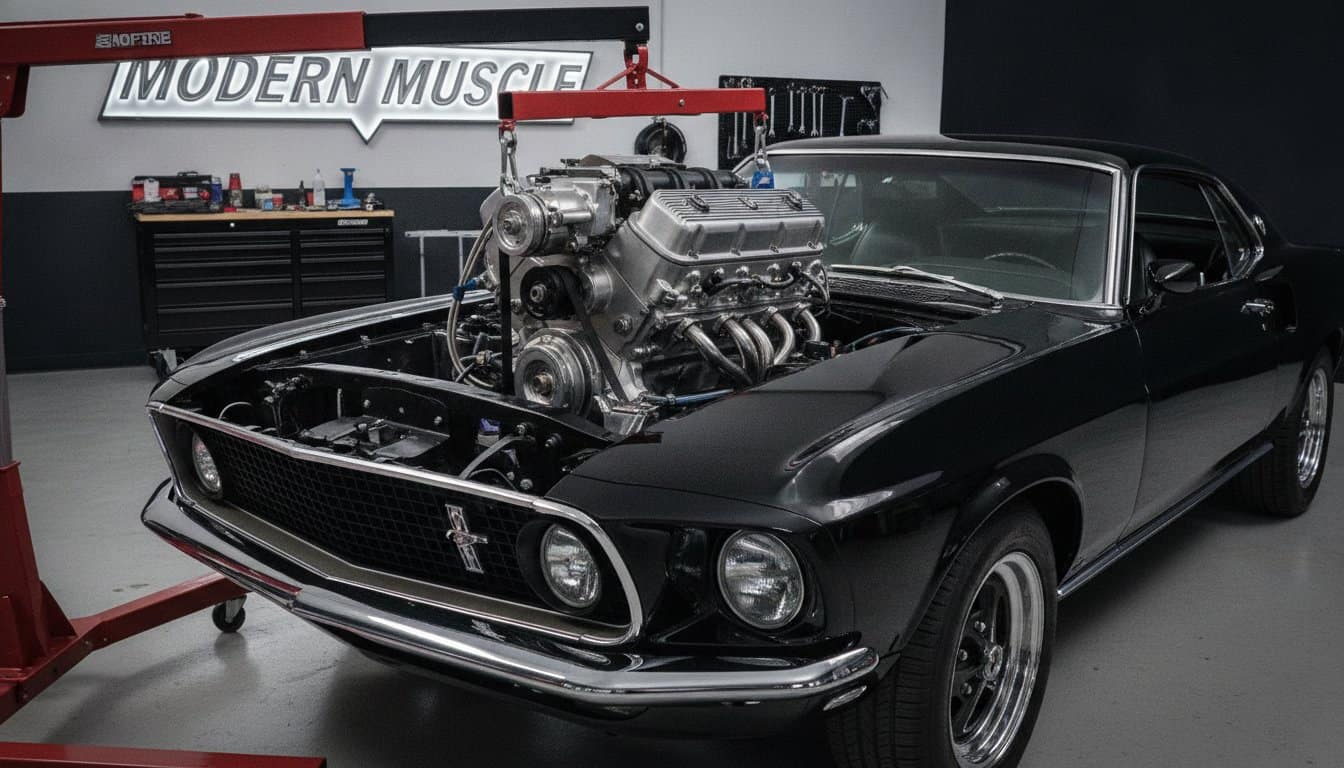
What if the most expensive part of your engine swap isn’t actually the engine itself? Many builders dive into a project thinking a cheap junkyard pull is the finish line, only to watch their bank account bleed out through fuel system upgrades and cooling modifications. Understanding the true cost of ls swap in classic car builds requires looking past the long block and into the intricate details that make a restomod truly drivable. It’s about more than just raw horsepower; it’s about the precision of modern engineering meeting the soul of vintage steel.
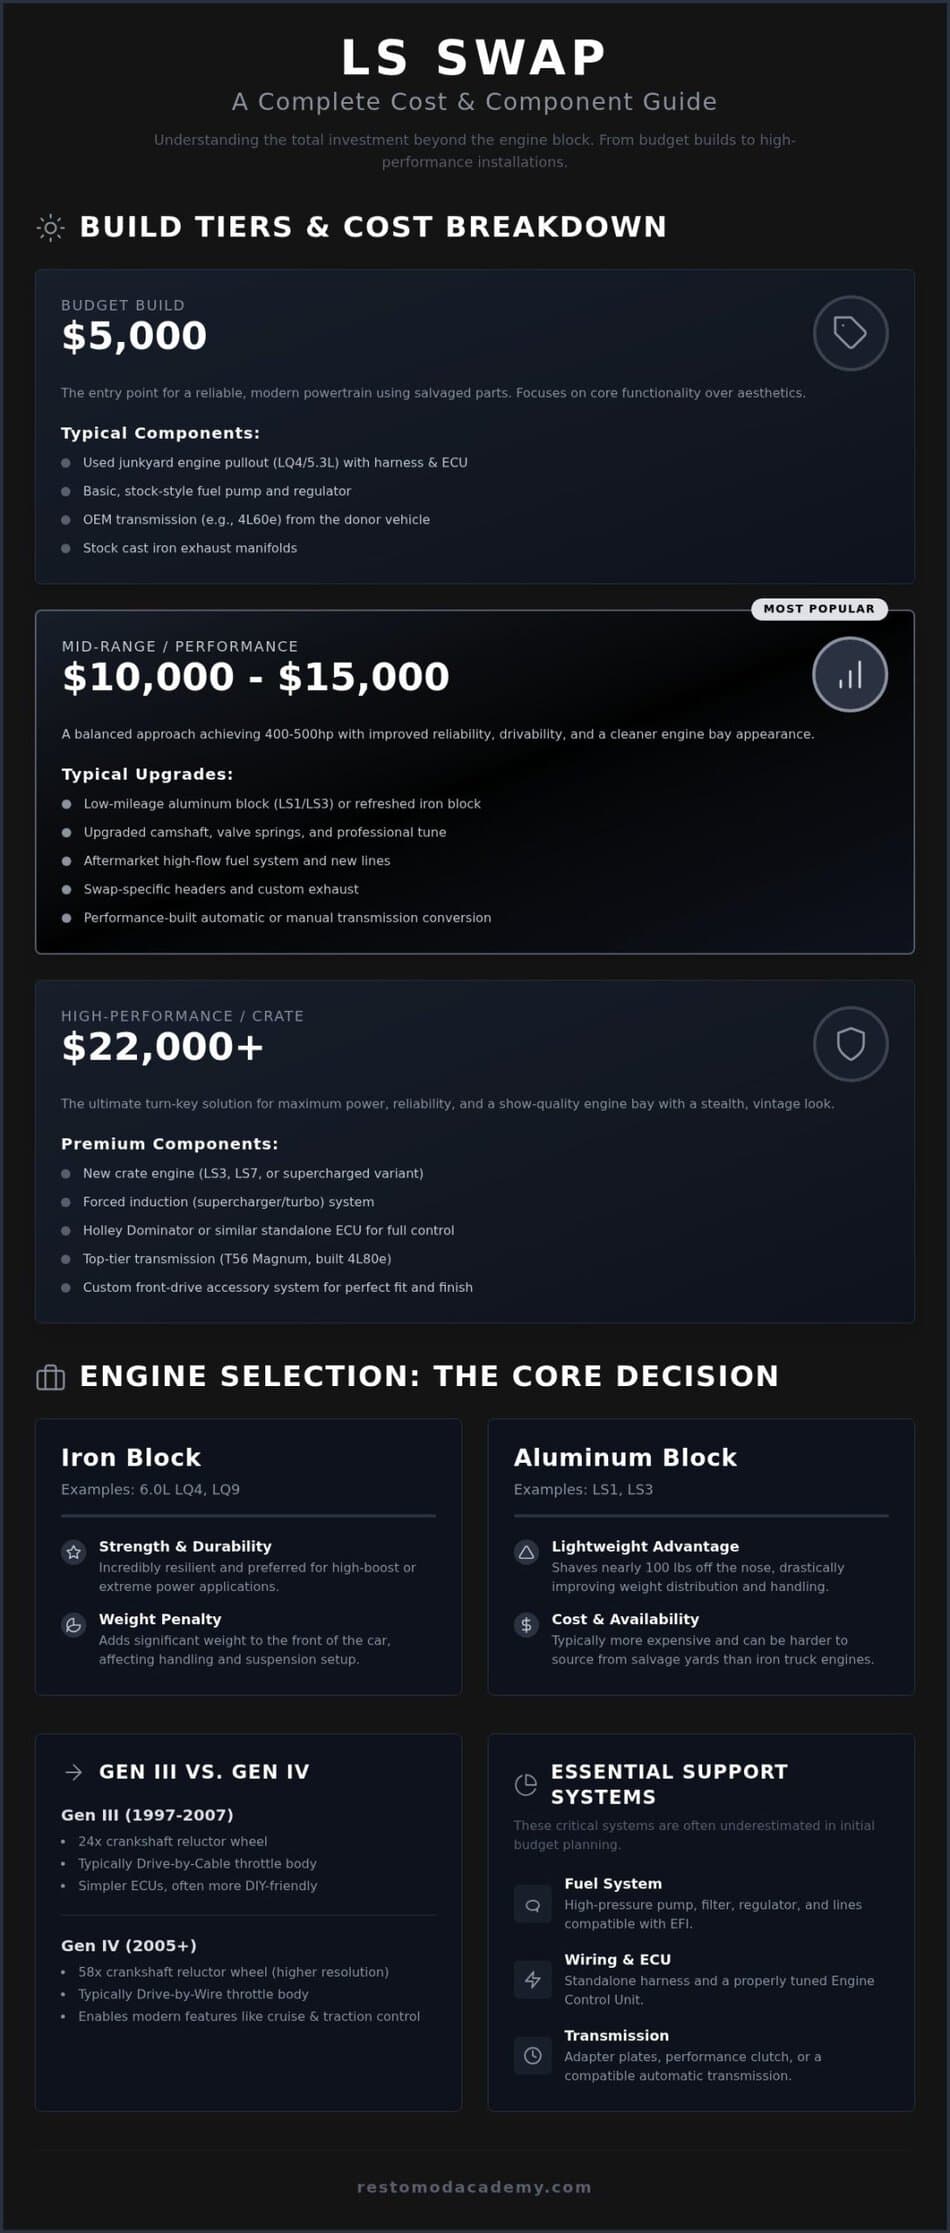
You likely want the turn-key reliability of a modern 400hp daily driver without losing that period-correct charm under the hood. I agree that the prospect of complex wiring harnesses and rising costs can feel like a roadblock to your vision. This guide provides a mentor-led roadmap to help you chart the financial and technical landscape of the 2026 restomod market. We’ll break down everything from basic $5,000 budget builds to premium $22,000 high-performance installations, ensuring your engine bay looks professional and your budget remains intact.
Key Takeaways
- Identify the specific power-to-weight advantages of the LS family to transform your vintage car’s handling and reliability.
- Navigate the total cost of ls swap in classic car builds by accounting for critical support systems often missed in initial estimates.
- Master the art of the stealth swap to integrate modern performance while preserving the timeless character of your engine bay.
- Follow a methodical technical checklist for wiring and fuel systems to transition your project into a high-functioning daily driver.
- Implement a staged build strategy to manage your resources effectively and maintain momentum throughout the restoration process.
Why the LS Engine is the Gold Standard for Modernizing Classics
Look under the hood of any top-tier restomod and you will likely find the distinctive intake manifold of a GM Gen III or IV V8. Defining an LS swap is simple: it is the surgical replacement of a tired, outdated powertrain with a modern masterpiece of engineering. These engines represent the gold standard because they offer a perfect balance of physical size and explosive potential. The aluminum block variants provide a massive power-to-weight advantage, removing heavy iron from the nose of your car and drastically improving weight distribution. When you evaluate the cost of ls swap in classic car projects, you must consider the value of this improved handling and the peace of mind that comes with modern components.
Reliability Meets High Performance
Stop struggling with the temperamental nature of vintage carburetors and embrace the precision of modern electronic fuel injection (EFI). This technology offers a set-and-forget experience that ensures your engine fires up instantly in any climate. You can reach 400 to 500 horsepower with nothing more than simple bolt-on modifications and a proper tune. Beyond the raw power, you gain modern fuel economy that transforms your classic into a viable daily driver. This reliability allows you to focus on the joy of the drive rather than the anxiety of a potential breakdown on a long-distance cruise.
The Cost-Effectiveness of the LS Platform
Analyze your budget carefully before you commit to a traditional engine rebuild. In many cases, the cost of ls swap in classic car builds is actually more affordable than a high-end restoration of a numbers-matching small block. The market is flooded with affordable donor engines from trucks and SUVs produced in the early 2000s, making raw materials easy to find. Massive aftermarket competition has also lowered the price of specialized parts like headers and mounts, which simplifies the assembly process for the home builder. To see how these components fit into a larger build strategy, explore the definitive guide to an ls engine swap for more technical insights.
Selecting Your Engine: A Guide to the LS Family
Choosing your power plant is the most critical decision in your build. It dictates the complexity of your wiring, the requirements for your fuel system, and the ultimate weight balance of your vehicle. You must start by identifying your performance goals. Are you looking for a reliable cruiser or a high-boost track monster? The LS family is vast, and picking the right donor engine will prevent you from wasting money on incompatible parts later. Every choice you make here directly influences the total cost of ls swap in classic car projects, so don’t rush this phase of the journey.
Understanding the generational shift between Gen III and Gen IV architectures is vital for your electronics strategy. Gen III engines, produced between 1997 and 2007, typically use a 24x reluctor wheel on the crankshaft. These are often easier for the DIY builder because they utilize simpler ECUs and often feature drive-by-cable throttle bodies. Gen IV engines move to a 58x reluctor wheel, which offers higher resolution for the computer but requires more modern, specific controllers. Most Gen IV units also employ drive-by-wire systems, which replace your traditional throttle cable with an electronic pedal assembly. While this adds a layer of modern complexity, it simplifies the integration of cruise control and traction systems.
Iron Block vs Aluminum Block
Decide whether you prioritize brute strength or surgical handling. Iron blocks, such as the 6.0L LQ4 or LQ9 found in heavy-duty trucks, are incredibly resilient and preferred for high-boost applications. However, they carry a significant weight penalty. If you want your classic to carve corners, choose an aluminum block like the LS1 or LS3. Swapping to an aluminum engine can shave nearly 100 pounds off the nose of your car. This weight reduction drastically changes your front suspension requirements and may allow you to use softer spring rates for a more compliant ride. For a detailed breakdown of the components needed for either path, consult the definitive guide to an ls engine swap.
Sourcing a Reliable Junk Yard Gem
Mastering the salvage yard is a badge of honor for the budget builder. When inspecting a potential donor, check the oil color for signs of coolant contamination and verify the VIN code to ensure you are getting the exact displacement you’re paying for. Buying a complete pullout that includes the harness, ECU, and all front-drive accessories is the most efficient way to manage the cost of ls swap in classic car builds. These used packages typically range from $2,800 to $7,500. If you prefer the security of a warranty, a new LS3 Connect and Cruise system is approximately $19,000 and provides a streamlined, though more expensive, path to completion. To help you plan these expenses with precision, our Premium Project Blueprints offer a structured approach to sourcing and assembly.
Aesthetic Integration: Achieving the Vintage LS Look
Integrating a modern power plant into vintage steel requires more than just mechanical compatibility; it demands a commitment to design. While previous sections detailed the technical selection of your engine, this phase focuses on the stealth swap philosophy. You want to open your hood and see an engine that honors the car’s heritage rather than a mess of plastic and sensors. When you budget for the cost of ls swap in classic car builds, remember that aesthetic components like valve cover adapters and paint are just as vital as the motor mounts. These choices define the soul of your machine.
Relocate your coil packs immediately. The standard LS configuration places these components directly on top of the valve covers, creating a cluttered, industrial look that screams modern donor vehicle. Move them to the firewall or hide them behind the cylinder heads using relocation brackets. Once the coils are gone, install valve covers that mimic the perimeter-bolt style of a classic small block Chevy. Finish the look by painting the block in a heritage color, such as Chevy Orange or a period-correct satin black. This simple act of painting grounds the modern hardware in tradition and makes the engine feel like a natural extension of the car.
Hiding the Rats Nest of Wiring
Wiring is the enemy of a clean engine bay. Tuck your harness behind the firewall or run it through the inner fenders to maintain a minimalist aesthetic that highlights the engine itself. Replace cheap plastic split-conduit with high-quality braided loom or heat-shrink tubing. This small change provides a professional finish that suggests surgical precision rather than a rushed assembly. If you’re still defining your vision for the car, it’s helpful to understand what is a restomod and how these design choices affect the car’s ultimate value and character.
Intake Manifolds and Throttle Body Conversions
Swap out the tall, plastic truck intake for a low-profile car manifold or a polished aluminum unit. The factory truck manifolds are efficient but lack the visual grace required for a show-quality engine bay. If you truly want to maintain a vintage appearance, consider a carb-style throttle body. This allows you to retain a traditional round air cleaner, effectively masking the modern EFI system from the casual observer. Adapting vintage-style sensors for your oil pressure and temperature gauges further bridges the gap between the 1960s dashboard and 21st-century performance. These details ensure that the cost of ls swap in classic car projects results in a vehicle that looks as good as it performs.
The Technical Checklist: Wiring, Fuel, and Transmission
Transitioning from the visual design to the mechanical heart of your project requires a methodical approach to the support systems. You cannot simply drop a modern V8 into an old chassis and expect it to function without upgrading the infrastructure. Selecting your standalone wiring harness is the first hurdle. While thinning a factory truck harness saves money, it often leads to troubleshooting nightmares for the novice builder. A new custom harness, which typically costs between $600 and $900, provides a clean, labeled interface that connects your modern ECU to your vintage chassis with minimal friction. This investment is a significant part of the cost of ls swap in classic car projects, but it ensures your engine starts on the first turn of the key.
Upgrade your fuel system with an EFI-ready tank to handle the demands of modern fuel injection. You can’t rely on a mechanical pump designed for a carburetor; you need a high-pressure electric pump capable of maintaining the 58 psi required by LS injectors. Simultaneously, choose your transmission based on your intended driving experience. An automatic 4L60E offers effortless cruising, while a T56 manual provides the mechanical engagement many enthusiasts crave. Don’t overlook the cooling system during this phase. Modern engines have higher thermal loads than vintage small blocks, so install a high-flow aluminum radiator and dual electric fans to keep temperatures stable in heavy traffic.
Solving the LS Swap Wiring Puzzle
Demystify the electronics by focusing on the four-wire hookup required to make the engine run. At its core, the system needs constant power, switched power, a ground, and a fuel pump trigger. Grounding is the most critical element of this process. Ensure you have dedicated grounds from the engine to the frame, the engine to the body, and the battery to the frame. This simple step prevents 90 percent of the electrical issues that plague DIY builds. For a deeper dive into the specific pinouts and sensor locations, consult the definitive guide to an ls engine swap.
Gauge Integration and Signal Conversion
Bridge the gap between generations by using mechanical-to-electronic signal converters for your original speedometers. These devices allow you to keep your vintage needle-style gauges while receiving a digital pulse from the modern transmission. If you prefer a more comprehensive view of your machine’s health, a digital dash provides real-time monitoring of every data point directly from the OBDII port. This eliminates the need for multiple individual analog sensors and cleans up the interior aesthetic. You can effectively manage the cost of ls swap in classic car builds by deciding early if you will retain the factory cluster or move to a modern display. Our Premium Project Blueprints provide the schematics you need to integrate these systems with professional precision.
Planning Your Build with the Restomod Academy Framework
Success in the garage begins long before you pick up a wrench. Define your horsepower goals and your hard budget limit before you purchase a single sensor or bracket. It’s easy to let the cost of ls swap in classic car projects spiral out of control when you chase “just a little more” power without a solid roadmap. Our framework prioritizes a staged build approach. This method prevents project fatigue by breaking the restoration into achievable, logical milestones. You might focus on the engine mounting and transmission fitment first, then move to the fuel system, rather than trying to wire the entire car in one marathon session.
Creating Your Project Blueprint
Measure your engine bay with surgical precision. Check the clearance between the exhaust headers and the steering box; these are common interference points that can derail a build. Using Premium Project Blueprints eliminates the fitment guesswork that often leads to expensive returns and wasted labor. Document every wire and bolt as you go. Create a dedicated folder for your project that includes wiring diagrams and part numbers. This foresight makes future maintenance and troubleshooting a simple task rather than a detective mystery. To ensure your planning aligns with the broader goals of a high-quality build, explore the definitive guide to an ls engine swap for a deeper technical dive.
Consulting with the Experts
Know when to transition from solitary labor to professional guidance. While the DIY spirit is the heart of the community, booking Restomod Consulting Services can save you thousands in avoided errors. Sometimes a thirty-minute conversation with a mentor can solve a wiring puzzle that has stalled your progress for weeks. Join the community to share your progress and troubleshoot with fellow builders who have faced the same hurdles. If you’re ready to gather the necessary tools for the job, check our recommended gear for a curated list of workshop essentials. This journey is a shared adventure. Embrace the expertise of those who have paved the way before you to master the cost of ls swap in classic car builds and turn your vision into a reliable, high-performance reality.
Bring Your Vision to Life with Precision
Building a restomod is a labor of love that requires a surgical eye for detail and a steady hand. You now understand that managing the cost of ls swap in classic car builds is about more than just the initial engine purchase; it’s about the synergy of modern performance and vintage soul. By following a structured roadmap, you can avoid the common pitfalls of project fatigue and hidden expenses. You’ve learned how to select the right block, integrate modern electronics, and preserve the heritage of your machine through thoughtful design.
To ensure your project moves from the jack stands to the open road, it’s time to take the next step. Download the Ultimate Restomod Guide to start planning your engine swap today. With expert mentoring from Brook Walsh and our comprehensive project blueprints, you’ll find instructional clarity designed for all skill levels. This framework empowers you to stop being a spectator and start being the creator of your own high-performance legacy. Your garage is waiting. Pick up the wrench and let’s get to work.
Frequently Asked Questions
How much does a basic LS swap for a classic car typically cost?
A basic entry into this world typically ranges from $5,000 to $9,000 when using a used short block and a modified factory harness. This path requires more personal labor but keeps the cost of ls swap in classic car projects manageable for the budget-conscious builder. You’ll likely source a high-mileage truck engine and handle the cleaning and assembly yourself. It’s a rewarding way to learn the platform’s fundamentals while modernizing your machine.
Do I need to change my transmission when doing an LS swap?
You don’t strictly have to change your transmission, but you will need specific adapter plates and a compatible torque converter or flywheel to mate a vintage gearbox to the modern block. While keeping an old TH350 or Muncie saves money upfront, it often sacrifices the overdrive benefits of a modern 4L60E or T56. Integrating a contemporary transmission ensures your drivetrain can handle the increased torque and provides a more refined highway cruising experience.
Will an LS engine fit in my classic car without cutting the hood?
Most LS engines will fit under a standard hood if you select the correct intake manifold. Factory truck intakes are notoriously tall and often interfere with the hood lines of classic muscle cars. By swapping to a low-profile car manifold from an LS1 or LS6, or choosing a specialized aftermarket aluminum unit, you can maintain the original exterior silhouette. Always measure your clearance at the throttle body and air cleaner before final mounting.
What is the best LS engine to look for in a junkyard?
The 6.0L iron block engines like the LQ4 and LQ9 are widely considered the best balance of value and performance in the salvage yard. These workhorses are found in millions of early 2000s trucks and SUVs, making them easy to locate and relatively affordable. They offer incredible strength for those planning to add boost later. If you prioritize weight savings, look for an all-aluminum L33 or LC9 from a later model Silverado or Sierra.
Can I keep my original gauges with an LS swap?
Yes, you can retain your original gauges by using mechanical-to-electronic signal converters or specialized sending unit adapters. These components allow your vintage needle-style speedometer and tachometer to communicate with the modern ECU. This approach is essential for builders who want to maintain a period-correct interior aesthetic. While it requires extra wiring and calibration, the result is a seamless blend of 1960s style and 21st-century mechanical reliability under the hood.
Is an LS swap legal for street use in states with strict emissions?
An LS swap is legal in most states, but those with strict emissions like California require specific hardware to pass inspection. You must typically use an engine from the same year or newer than your vehicle and retain all factory emissions equipment. Systems like the E-ROD packages are specifically designed to be 50-state legal. Always check your local regulations and consult with an inspection station before you begin the assembly process to ensure compliance.
How long does it take the average DIY builder to complete an LS swap?
The timeline for a first-time swap typically ranges from 40 to 100 hours of actual labor, depending on your mechanical experience and the complexity of the build. For a weekend warrior, this often translates to three to six months of real-world time. Factors like custom fabrication for mounts and the intricacies of the fuel system can extend the project. Patience is key; rushing the technical details often leads to rework and increased costs later.
What are the most common mistakes people make during their first LS swap?
The most frequent errors involve inadequate fuel systems and poor electrical grounding. Many builders try to use a low-pressure fuel pump or skip the necessary dedicated grounds, leading to phantom stalling and sensor failures. Another common mistake is underestimating the total cost of ls swap in classic car projects by ignoring small parts like sensors, fittings, and fluids. Using a structured blueprint helps you account for these details and ensures a professional, reliable finished product.
What if the most expensive part of your engine swap isn’t actually the engine itself? Many builders dive into a project thinking a cheap junkyard pull is the finish line, only to watch their bank account bleed out through fuel system upgrades and cooling modifications. Understanding the true cost of ls swap in classic car builds requires looking past the long block and into the intricate details that make a restomod truly drivable. It’s about more than just raw horsepower; it’s about the precision of modern engineering meeting the soul of vintage steel.
You likely want the turn-key reliability of a modern 400hp daily driver without losing that period-correct charm under the hood. I agree that the prospect of complex wiring harnesses and rising costs can feel like a roadblock to your vision. This guide provides a mentor-led roadmap to help you chart the financial and technical landscape of the 2026 restomod market. We’ll break down everything from basic $5,000 budget builds to premium $22,000 high-performance installations, ensuring your engine bay looks professional and your budget remains intact.
Key Takeaways
- Identify the specific power-to-weight advantages of the LS family to transform your vintage car’s handling and reliability.
- Navigate the total cost of ls swap in classic car builds by accounting for critical support systems often missed in initial estimates.
- Master the art of the stealth swap to integrate modern performance while preserving the timeless character of your engine bay.
- Follow a methodical technical checklist for wiring and fuel systems to transition your project into a high-functioning daily driver.
- Implement a staged build strategy to manage your resources effectively and maintain momentum throughout the restoration process.
Why the LS Engine is the Gold Standard for Modernizing Classics
Look under the hood of any top-tier restomod and you will likely find the distinctive intake manifold of a GM Gen III or IV V8. Defining an LS swap is simple: it is the surgical replacement of a tired, outdated powertrain with a modern masterpiece of engineering. These engines represent the gold standard because they offer a perfect balance of physical size and explosive potential. The aluminum block variants provide a massive power-to-weight advantage, removing heavy iron from the nose of your car and drastically improving weight distribution. When you evaluate the cost of ls swap in classic car projects, you must consider the value of this improved handling and the peace of mind that comes with modern components.
Reliability Meets High Performance
Stop struggling with the temperamental nature of vintage carburetors and embrace the precision of modern electronic fuel injection (EFI). This technology offers a set-and-forget experience that ensures your engine fires up instantly in any climate. You can reach 400 to 500 horsepower with nothing more than simple bolt-on modifications and a proper tune. Beyond the raw power, you gain modern fuel economy that transforms your classic into a viable daily driver. This reliability allows you to focus on the joy of the drive rather than the anxiety of a potential breakdown on a long-distance cruise.
The Cost-Effectiveness of the LS Platform
Analyze your budget carefully before you commit to a traditional engine rebuild. In many cases, the cost of ls swap in classic car builds is actually more affordable than a high-end restoration of a numbers-matching small block. The market is flooded with affordable donor engines from trucks and SUVs produced in the early 2000s, making raw materials easy to find. Massive aftermarket competition has also lowered the price of specialized parts like headers and mounts, which simplifies the assembly process for the home builder. To see how these components fit into a larger build strategy, explore the definitive guide to an ls engine swap for more technical insights.
Selecting Your Engine: A Guide to the LS Family
Choosing your power plant is the most critical decision in your build. It dictates the complexity of your wiring, the requirements for your fuel system, and the ultimate weight balance of your vehicle. You must start by identifying your performance goals. Are you looking for a reliable cruiser or a high-boost track monster? The LS family is vast, and picking the right donor engine will prevent you from wasting money on incompatible parts later. Every choice you make here directly influences the total cost of ls swap in classic car projects, so don’t rush this phase of the journey.
Understanding the generational shift between Gen III and Gen IV architectures is vital for your electronics strategy. Gen III engines, produced between 1997 and 2007, typically use a 24x reluctor wheel on the crankshaft. These are often easier for the DIY builder because they utilize simpler ECUs and often feature drive-by-cable throttle bodies. Gen IV engines move to a 58x reluctor wheel, which offers higher resolution for the computer but requires more modern, specific controllers. Most Gen IV units also employ drive-by-wire systems, which replace your traditional throttle cable with an electronic pedal assembly. While this adds a layer of modern complexity, it simplifies the integration of cruise control and traction systems.
Iron Block vs Aluminum Block
Decide whether you prioritize brute strength or surgical handling. Iron blocks, such as the 6.0L LQ4 or LQ9 found in heavy-duty trucks, are incredibly resilient and preferred for high-boost applications. However, they carry a significant weight penalty. If you want your classic to carve corners, choose an aluminum block like the LS1 or LS3. Swapping to an aluminum engine can shave nearly 100 pounds off the nose of your car. This weight reduction drastically changes your front suspension requirements and may allow you to use softer spring rates for a more compliant ride. For a detailed breakdown of the components needed for either path, consult the definitive guide to an ls engine swap.
Sourcing a Reliable Junk Yard Gem
Mastering the salvage yard is a badge of honor for the budget builder. When inspecting a potential donor, check the oil color for signs of coolant contamination and verify the VIN code to ensure you are getting the exact displacement you’re paying for. Buying a complete pullout that includes the harness, ECU, and all front-drive accessories is the most efficient way to manage the cost of ls swap in classic car builds. These used packages typically range from $2,800 to $7,500. If you prefer the security of a warranty, a new LS3 Connect and Cruise system is approximately $19,000 and provides a streamlined, though more expensive, path to completion. To help you plan these expenses with precision, our Premium Project Blueprints offer a structured approach to sourcing and assembly.
Aesthetic Integration: Achieving the Vintage LS Look
Integrating a modern power plant into vintage steel requires more than just mechanical compatibility; it demands a commitment to design. While previous sections detailed the technical selection of your engine, this phase focuses on the stealth swap philosophy. You want to open your hood and see an engine that honors the car’s heritage rather than a mess of plastic and sensors. When you budget for the cost of ls swap in classic car builds, remember that aesthetic components like valve cover adapters and paint are just as vital as the motor mounts. These choices define the soul of your machine.
Relocate your coil packs immediately. The standard LS configuration places these components directly on top of the valve covers, creating a cluttered, industrial look that screams modern donor vehicle. Move them to the firewall or hide them behind the cylinder heads using relocation brackets. Once the coils are gone, install valve covers that mimic the perimeter-bolt style of a classic small block Chevy. Finish the look by painting the block in a heritage color, such as Chevy Orange or a period-correct satin black. This simple act of painting grounds the modern hardware in tradition and makes the engine feel like a natural extension of the car.
Hiding the Rats Nest of Wiring
Wiring is the enemy of a clean engine bay. Tuck your harness behind the firewall or run it through the inner fenders to maintain a minimalist aesthetic that highlights the engine itself. Replace cheap plastic split-conduit with high-quality braided loom or heat-shrink tubing. This small change provides a professional finish that suggests surgical precision rather than a rushed assembly. If you’re still defining your vision for the car, it’s helpful to understand what is a restomod and how these design choices affect the car’s ultimate value and character.
Intake Manifolds and Throttle Body Conversions
Swap out the tall, plastic truck intake for a low-profile car manifold or a polished aluminum unit. The factory truck manifolds are efficient but lack the visual grace required for a show-quality engine bay. If you truly want to maintain a vintage appearance, consider a carb-style throttle body. This allows you to retain a traditional round air cleaner, effectively masking the modern EFI system from the casual observer. Adapting vintage-style sensors for your oil pressure and temperature gauges further bridges the gap between the 1960s dashboard and 21st-century performance. These details ensure that the cost of ls swap in classic car projects results in a vehicle that looks as good as it performs.
The Technical Checklist: Wiring, Fuel, and Transmission
Transitioning from the visual design to the mechanical heart of your project requires a methodical approach to the support systems. You cannot simply drop a modern V8 into an old chassis and expect it to function without upgrading the infrastructure. Selecting your standalone wiring harness is the first hurdle. While thinning a factory truck harness saves money, it often leads to troubleshooting nightmares for the novice builder. A new custom harness, which typically costs between $600 and $900, provides a clean, labeled interface that connects your modern ECU to your vintage chassis with minimal friction. This investment is a significant part of the cost of ls swap in classic car projects, but it ensures your engine starts on the first turn of the key.
Upgrade your fuel system with an EFI-ready tank to handle the demands of modern fuel injection. You can’t rely on a mechanical pump designed for a carburetor; you need a high-pressure electric pump capable of maintaining the 58 psi required by LS injectors. Simultaneously, choose your transmission based on your intended driving experience. An automatic 4L60E offers effortless cruising, while a T56 manual provides the mechanical engagement many enthusiasts crave. Don’t overlook the cooling system during this phase. Modern engines have higher thermal loads than vintage small blocks, so install a high-flow aluminum radiator and dual electric fans to keep temperatures stable in heavy traffic.
Solving the LS Swap Wiring Puzzle
Demystify the electronics by focusing on the four-wire hookup required to make the engine run. At its core, the system needs constant power, switched power, a ground, and a fuel pump trigger. Grounding is the most critical element of this process. Ensure you have dedicated grounds from the engine to the frame, the engine to the body, and the battery to the frame. This simple step prevents 90 percent of the electrical issues that plague DIY builds. For a deeper dive into the specific pinouts and sensor locations, consult the definitive guide to an ls engine swap.
Gauge Integration and Signal Conversion
Bridge the gap between generations by using mechanical-to-electronic signal converters for your original speedometers. These devices allow you to keep your vintage needle-style gauges while receiving a digital pulse from the modern transmission. If you prefer a more comprehensive view of your machine’s health, a digital dash provides real-time monitoring of every data point directly from the OBDII port. This eliminates the need for multiple individual analog sensors and cleans up the interior aesthetic. You can effectively manage the cost of ls swap in classic car builds by deciding early if you will retain the factory cluster or move to a modern display. Our Premium Project Blueprints provide the schematics you need to integrate these systems with professional precision.
Planning Your Build with the Restomod Academy Framework
Success in the garage begins long before you pick up a wrench. Define your horsepower goals and your hard budget limit before you purchase a single sensor or bracket. It’s easy to let the cost of ls swap in classic car projects spiral out of control when you chase “just a little more” power without a solid roadmap. Our framework prioritizes a staged build approach. This method prevents project fatigue by breaking the restoration into achievable, logical milestones. You might focus on the engine mounting and transmission fitment first, then move to the fuel system, rather than trying to wire the entire car in one marathon session.
Creating Your Project Blueprint
Measure your engine bay with surgical precision. Check the clearance between the exhaust headers and the steering box; these are common interference points that can derail a build. Using Premium Project Blueprints eliminates the fitment guesswork that often leads to expensive returns and wasted labor. Document every wire and bolt as you go. Create a dedicated folder for your project that includes wiring diagrams and part numbers. This foresight makes future maintenance and troubleshooting a simple task rather than a detective mystery. To ensure your planning aligns with the broader goals of a high-quality build, explore the definitive guide to an ls engine swap for a deeper technical dive.
Consulting with the Experts
Know when to transition from solitary labor to professional guidance. While the DIY spirit is the heart of the community, booking Restomod Consulting Services can save you thousands in avoided errors. Sometimes a thirty-minute conversation with a mentor can solve a wiring puzzle that has stalled your progress for weeks. Join the community to share your progress and troubleshoot with fellow builders who have faced the same hurdles. If you’re ready to gather the necessary tools for the job, check our recommended gear for a curated list of workshop essentials. This journey is a shared adventure. Embrace the expertise of those who have paved the way before you to master the cost of ls swap in classic car builds and turn your vision into a reliable, high-performance reality.
Bring Your Vision to Life with Precision
Building a restomod is a labor of love that requires a surgical eye for detail and a steady hand. You now understand that managing the cost of ls swap in classic car builds is about more than just the initial engine purchase; it’s about the synergy of modern performance and vintage soul. By following a structured roadmap, you can avoid the common pitfalls of project fatigue and hidden expenses. You’ve learned how to select the right block, integrate modern electronics, and preserve the heritage of your machine through thoughtful design.
To ensure your project moves from the jack stands to the open road, it’s time to take the next step. Download the Ultimate Restomod Guide to start planning your engine swap today. With expert mentoring from Brook Walsh and our comprehensive project blueprints, you’ll find instructional clarity designed for all skill levels. This framework empowers you to stop being a spectator and start being the creator of your own high-performance legacy. Your garage is waiting. Pick up the wrench and let’s get to work.
Frequently Asked Questions
How much does a basic LS swap for a classic car typically cost?
A basic entry into this world typically ranges from $5,000 to $9,000 when using a used short block and a modified factory harness. This path requires more personal labor but keeps the cost of ls swap in classic car projects manageable for the budget-conscious builder. You’ll likely source a high-mileage truck engine and handle the cleaning and assembly yourself. It’s a rewarding way to learn the platform’s fundamentals while modernizing your machine.
Do I need to change my transmission when doing an LS swap?
You don’t strictly have to change your transmission, but you will need specific adapter plates and a compatible torque converter or flywheel to mate a vintage gearbox to the modern block. While keeping an old TH350 or Muncie saves money upfront, it often sacrifices the overdrive benefits of a modern 4L60E or T56. Integrating a contemporary transmission ensures your drivetrain can handle the increased torque and provides a more refined highway cruising experience.
Will an LS engine fit in my classic car without cutting the hood?
Most LS engines will fit under a standard hood if you select the correct intake manifold. Factory truck intakes are notoriously tall and often interfere with the hood lines of classic muscle cars. By swapping to a low-profile car manifold from an LS1 or LS6, or choosing a specialized aftermarket aluminum unit, you can maintain the original exterior silhouette. Always measure your clearance at the throttle body and air cleaner before final mounting.
What is the best LS engine to look for in a junkyard?
The 6.0L iron block engines like the LQ4 and LQ9 are widely considered the best balance of value and performance in the salvage yard. These workhorses are found in millions of early 2000s trucks and SUVs, making them easy to locate and relatively affordable. They offer incredible strength for those planning to add boost later. If you prioritize weight savings, look for an all-aluminum L33 or LC9 from a later model Silverado or Sierra.
Can I keep my original gauges with an LS swap?
Yes, you can retain your original gauges by using mechanical-to-electronic signal converters or specialized sending unit adapters. These components allow your vintage needle-style speedometer and tachometer to communicate with the modern ECU. This approach is essential for builders who want to maintain a period-correct interior aesthetic. While it requires extra wiring and calibration, the result is a seamless blend of 1960s style and 21st-century mechanical reliability under the hood.
Is an LS swap legal for street use in states with strict emissions?
An LS swap is legal in most states, but those with strict emissions like California require specific hardware to pass inspection. You must typically use an engine from the same year or newer than your vehicle and retain all factory emissions equipment. Systems like the E-ROD packages are specifically designed to be 50-state legal. Always check your local regulations and consult with an inspection station before you begin the assembly process to ensure compliance.
How long does it take the average DIY builder to complete an LS swap?
The timeline for a first-time swap typically ranges from 40 to 100 hours of actual labor, depending on your mechanical experience and the complexity of the build. For a weekend warrior, this often translates to three to six months of real-world time. Factors like custom fabrication for mounts and the intricacies of the fuel system can extend the project. Patience is key; rushing the technical details often leads to rework and increased costs later.
What are the most common mistakes people make during their first LS swap?
The most frequent errors involve inadequate fuel systems and poor electrical grounding. Many builders try to use a low-pressure fuel pump or skip the necessary dedicated grounds, leading to phantom stalling and sensor failures. Another common mistake is underestimating the total cost of ls swap in classic car projects by ignoring small parts like sensors, fittings, and fluids. Using a structured blueprint helps you account for these details and ensures a professional, reliable finished product.