

A high-quality classic car audio system isn’t actually about the head unit; it’s about engineering a modern acoustic environment within a vintage shell. You love the mechanical roar of your engine, but you shouldn’t have to choose between a V8 soundtrack and your favorite album. We’ve all felt the frustration of thin metal doors rattling or wind noise drowning out the music at highway speeds. It’s a common struggle for those of us who demand modern performance without cutting into a pristine, original dashboard.
I am going to show you how to engineer a crystal-clear audio experience that remains completely invisible to the casual observer. You’ll learn how to overcome underpowered factory electrical systems and integrate high-fidelity components that look period-correct. We will explore the vital role of sound deadening, which can cost between $200 and $600 for DIY materials, and how to select compact Class D amplifiers that hide under a seat. This guide covers the meticulous steps needed to transform your cabin into a private concert hall while keeping the heritage of your machine intact. Let’s get to work on making your vintage ride sound as good as it looks.
Key Takeaways
- Master the art of acoustic engineering by neutralizing the rattles and wind noise inherent in vintage cabins before installing a single component.
- Implement a “no-cut” philosophy to integrate a high-fidelity classic car audio system that preserves your dashboard’s original aesthetic while delivering modern Bluetooth connectivity.
- Discover why external amplification and electrical upgrades are the non-negotiable foundations for driving clear sound through heavy road and engine noise.
- Apply the science of mass loading and thermal insulation to create a quiet, controlled environment that allows high-end components to perform at their peak.
- Use Digital Signal Processing to correct the irregular acoustics of a small cabin, ensuring every note reaches your ears with perfect time alignment.
The Challenge of Achieving High-Fidelity Sound in Vintage Cabins
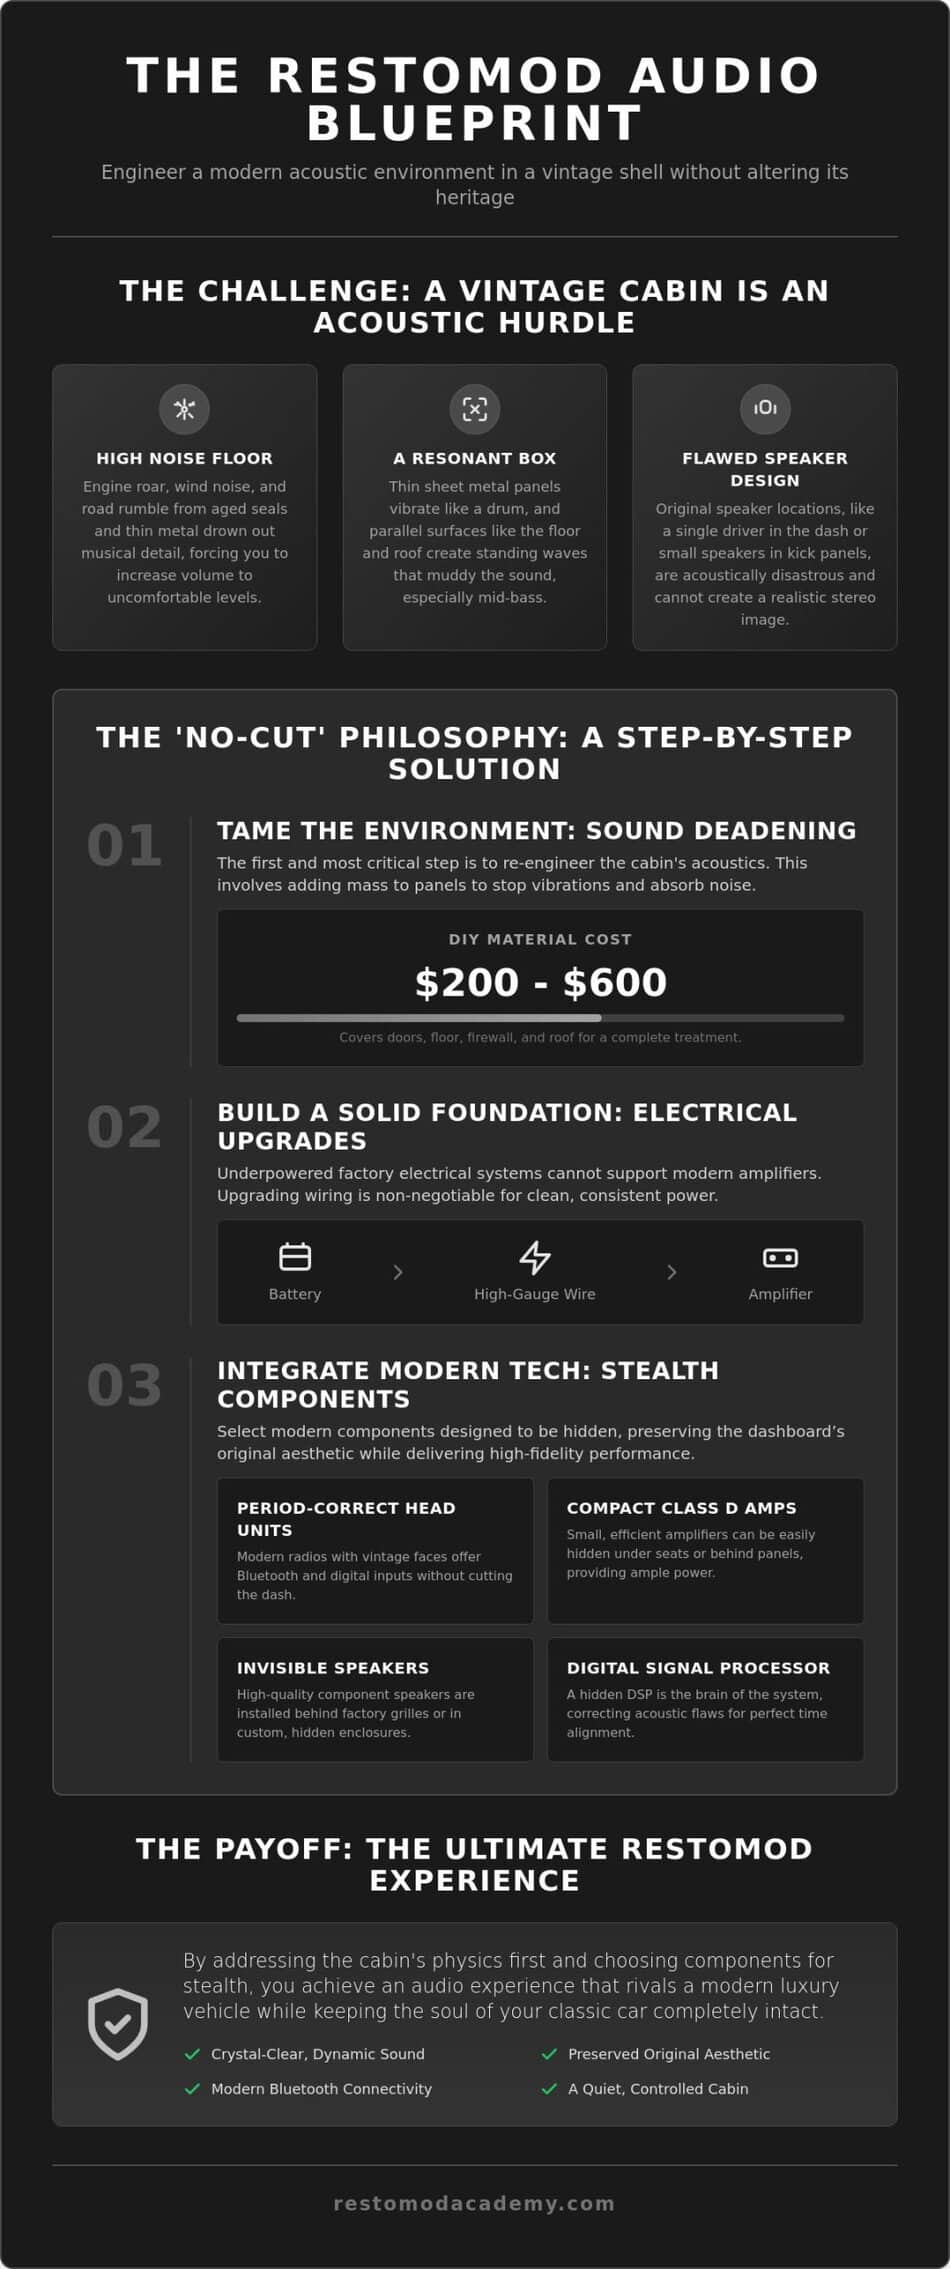
Think of your car’s interior as a musical instrument. In a modern luxury sedan, every surface is engineered to absorb or diffuse sound. In a vintage ride, you are essentially sitting inside a resonant metal box. Parallel surfaces like the floor and roof create standing waves that muddy your mid-bass, while thin sheet metal acts like a drum head, vibrating in sympathy with your engine. To build a truly great classic car audio system, you must first understand that you are fighting an uphill battle against the very physics of the vehicle. The history of vehicle audio shows us that early systems were never designed for fidelity; they were designed simply to be heard over the mechanical clatter of the road.
The noise floor in a classic car is exceptionally high. Between the roar of a high-compression V8 and the wind whistling through aged window seals, your music has to work incredibly hard just to be audible. This environment destroys the dynamic range of your recordings. Subtle details in the music are swallowed by low-frequency road noise, forcing you to turn up the volume to uncomfortable levels just to hear the lyrics. This is why we embrace the restomod audio philosophy. We aren’t just swapping parts. We are re-engineering the cabin to have a modern acoustic soul while maintaining its vintage aesthetic.
To better understand the practical side of these installations, watch this helpful video:
Acoustic Hurdles of the 1960s and 70s
During the 1960s and 70s, manufacturers prioritized cost and assembly speed over cabin quietness. You’ll find almost zero factory insulation behind the door panels or under the dash. This lack of mass allows external noise to flood the cabin. Furthermore, original speaker locations are a disaster for sound staging. A single speaker in the center of the dash or a pair of tiny drivers in the kick panels cannot create a realistic stereo image. You also have to contend with unshielded ignition systems. Vintage spark plug wires and distributors emit electromagnetic interference that often manifests as a high-pitched whine through your speakers, a problem modern cars solved decades ago.
Setting Your Audio Goals
Define your finish line before you buy your first amplifier. Are you looking for a system that stays hidden behind factory grilles, or are you willing to build custom kick panels for better imaging? I always tell builders to plan their classic car audio system during the initial teardown phase. It’s much easier to run high-quality shielded cables and apply sound deadening when the interior is gutted. If you are still defining the scope of your build, understanding what is a restomod will help you decide how much modern technology you want to blend with your heritage steel. Precision planning now prevents the heartbreak of tearing out a fresh carpet later to fix a ground loop or a rattling door skin.
Stealth Integration: Modern Tech with a Period-Correct Look
Preserving the architectural integrity of your dashboard is the first commandment of a high-fidelity classic car audio system. Once you cut that original steel or plastic to fit a modern double-DIN unit, you’ve permanently altered the vehicle’s history and likely its resale value. The goal is a stealthy installation where the cabin remains a time capsule, yet the performance rivals a professional environment like Origo Studio. Achieving this requires a shift in perspective. You aren’t just installing a radio; you are engineering a hidden network of components that respect the heritage of your machine.
I always advocate for the “no-cut” rule. This philosophy mandates that every upgrade must be reversible or completely invisible. We can now use original knobs and switches to control modern digital signals, bridging the gap between 1960s tactile feel and 21st-century processing. If your project requires a modern display for navigation or tuning, consider creative mounting locations like the glove box or a custom-fabricated center console extension. These solutions keep the technology out of your sightline until you actually need it, maintaining that clean, factory-correct aesthetic during your Sunday cruise.
Choosing the Right Head Unit
You have three primary paths for your source unit. First, modular radio motors allow you to mount the “brain” of the stereo behind the dash while the faceplate fits perfectly into the original twin-knob openings. Second, you can opt for a completely hidden black-box system. These units hide under a seat or behind the dash and are controlled entirely via your smartphone. Finally, professional conversion of a factory AM radio to include Bluetooth and FM capabilities typically costs between $395 and $550. This service allows you to keep your original hardware while gaining modern reliability. It’s the ultimate way to blend classic style with modern performance.
Hiding Speakers in Plain Sight
The challenge with speakers is finding air space without hacking into door cards. Kick panel pods are a fantastic solution. They house modern component speakers in a location that provides excellent imaging while appearing factory-correct. For the rear, custom-built packages can be wrapped in period-matched vinyl to hide powerful drivers from prying eyes. If you’re ready to start selecting the components that will make this vision a reality, check out our recommended gear for top-tier stealth components. Don’t forget about under-dash brackets for a front sound stage; they allow you to mount smaller speakers without drilling a single new hole in your pristine interior. Even subwoofers can be integrated stealthily using shallow-mount enclosures hidden beneath the seats or behind the trunk’s trim panels.
Designing the System Architecture: Amps, Speakers, and Subwoofers
Think of your system architecture as the electrical nervous system of your build. Every component from the source unit to the speaker cone must work in harmony to deliver precision. While many enthusiasts focus on the head unit, the real work happens in the signal path. You must ensure that the low-level signal from your source reaches the amplifier without picking up electromagnetic interference from your alternator or ignition system. This requires high-quality shielded RCA cables and a dedicated grounding point to prevent the dreaded engine whine from invading your music.
External amplification is non-negotiable when building a high-fidelity classic car audio system. Even the best retro-styled head units only produce about 15 to 22 watts of continuous power per channel. That is simply not enough to overcome the wind noise and mechanical roar of a vintage machine at highway speeds. You need headroom. Aim for an amplifier that provides at least 50 to 75 watts RMS per channel. This ensures your speakers play clearly without distortion, even when you’re competing with a high-flow exhaust. Always match your speaker impedance, typically 4 ohms, to your amplifier’s output to maintain maximum efficiency and prevent overheating.
Component Speakers vs. Coaxial Units
Component speakers are the gold standard for creating a realistic sound stage. By separating the tweeter from the woofer, you can place high frequencies at ear level while keeping the larger drivers in factory locations. In a classic interior, this often means mounting tweeters subtly on the A-pillars or dash corners. Coaxial units, which combine the drivers into one piece, are easier to install in factory 4×10 or 6×9 cutouts, but they often fire sound at your ankles. If you use coaxials, ensure they have a high-quality built-in crossover to protect the delicate tweeter from low-frequency damage. For a deeper look at the parts that make the cut, browse our recommended gear for proven audio solutions.
Subwoofers in the Classic Trunk
Adding a subwoofer to a muscle car requires some creative engineering, especially with large fuel tanks often sitting right behind the rear seat. You have to decide between a sealed enclosure for tight, accurate bass or a ported box for more volume. If your trunk space is a priority, consider a free-air subwoofer mounted directly to the package tray, though this requires a perfectly sealed trunk to act as the box. For trucks or small coupes where space is at a premium, compact under-seat powered subwoofers provide the necessary low-end punch without requiring you to sacrifice your storage area. Remember that the goal isn’t to rattle the windows of the car next to you; it’s to fill in the bottom end of the frequency spectrum that road noise usually destroys.
The Foundation of Sound: Insulation and Electrical Upgrades
High-fidelity audio is only as good as the environment it lives in. Putting a premium speaker into a vibrating metal door is like fitting racing slicks to a car with a bent frame; you aren’t going to get the performance you paid for. To engineer a truly high-end classic car audio system, you must address the structural and electrical foundations of your vehicle. Vintage steel is thin and resonant. Without proper intervention, your music will always be competing with the sympathetic vibrations of the floor pans and door skins. We solve this through the science of mass loading and decoupling.
You need to distinguish between mass loading and thermal insulation. Mass loading involves applying heavy, butyl-based sheets to the metal to stop it from ringing like a bell. This lowers the resonant frequency of the panel. Thermal insulation and closed-cell foams, on the other hand, are designed to block heat and decouple interior trim from the metal, preventing plastic-on-metal squeaks. For a typical DIY project, expect to spend between $200 and $600 on quality deadening materials. This is the most labor-intensive part of the build, but it is the single most important factor in achieving that modern luxury car feel.
Step-by-Step Sound Deadening
- Apply butyl sheets to at least 25 to 50 percent of the flat metal surfaces in your doors and floor. You don’t need 100 percent coverage to stop the ringing; focus on the center of the panels.
- Layer closed-cell foam over the butyl to act as a gasket for your door panels. This stops rattles before they start.
- Seal the firewall with a dedicated heat and sound barrier. This blocks the high-frequency whine of the transmission and the mechanical clatter of the engine bay.
Powering the Performance
Your factory electrical system was designed to run a set of headlights and a heater fan, not a 500-watt amplifier. You must calculate the total current draw of your new components. A high-output alternator, often 100 amps or more, is a mandatory upgrade for any serious build. Prices for these units range from $100 to over $500, depending on the output and finish. Proper grounding is also critical. I recommend the “Big Three” upgrade: replace your battery-to-chassis, engine-to-chassis, and alternator-to-battery cables with 0 or 2-gauge wire. This ensures a stable voltage supply and eliminates the alternator whine that plagues so many amateur installations. To see the specific components I trust for these heavy-duty electrical tasks, browse our recommended gear for electrical upgrades.
Use dedicated fuse blocks for your audio system rather than tapping into the original glass-fuse panel. This protects your vintage wiring harness from modern current demands. By separating the audio power circuit entirely, you ensure that a blown stereo fuse won’t leave you stranded on the side of the road with no headlights. This methodical approach to the foundation is what separates a professional restomod from a weekend hack job. It is a shared adventure in precision that rewards you every time you turn the key.
Tuning and Final Execution for the Ultimate Restomod Experience
The physical installation of your classic car audio system is the mechanical foundation, but the tuning process is where the artistry begins. Most builders stop once the wires are hidden and the speakers are mounted. However, the irregular dimensions and hard surfaces of a vintage cabin create an acoustic nightmare that no amount of high-end hardware can solve on its own. This is where a Digital Signal Processor (DSP) becomes your most valuable tool. It acts as the hidden conductor of your system, allowing you to digitally correct the frequency response and neutralize the standing waves that naturally occur between parallel metal panels.
One of the most transformative features of modern tuning is time alignment. Because you sit closer to the left speaker than the right, the sound hits your ears at different times, which collapses the stereo image. A DSP allows you to delay the signal to the nearer speakers by milliseconds, ensuring every note reaches your ears simultaneously. This creates a soundstage that feels like it is coming from the center of the dashboard rather than your feet. As you refine these technical details, consider how they complement your broader restomod interior ideas to ensure the technology never clashes with your cabin’s comfort or style.
Professional Tuning at Home
You don’t need a professional studio to achieve high-fidelity results. Download a Real Time Analyzer (RTA) app on your smartphone to visualize frequency spikes and dips within the cabin. Use this data to adjust your EQ, specifically looking for harsh peaks caused by glass reflections or muffled tones from thick leather seats. Setting your gain levels correctly is equally vital. Avoid the temptation to use the gain as a volume knob; its purpose is to match the output of your head unit to the input sensitivity of your amplifier. Proper gain structure prevents clipping, which is the leading cause of speaker failure and distorted sound at highway speeds.
Mastering Your Build
Master the Soundtrack of Your Build
Engineering a high-fidelity classic car audio system is a meticulous journey that fundamentally transforms your driving experience. You now understand that success starts with a silent foundation of butyl deadening and a robust electrical system capable of handling modern current demands. By prioritizing stealth integration and digital signal processing, you ensure that your cabin remains a tribute to heritage design while delivering the sonic precision of a modern luxury machine. These steps move you from simply owning a vintage car to creating a refined, high-performance environment.
This project is a shared adventure in precision and pride. If you are ready to move beyond basic installations and master every aspect of your interior modernization, Brook Walsh and our community of dedicated DIY builders are here to provide the expert mentorship you need. We offer comprehensive project blueprints that turn intimidating technical hurdles into achievable, logical steps. Use the tools and knowledge you’ve gained to build a machine that sounds as powerful as it looks.
Take Control of Your Project with The Ultimate Restomod Guide and start your next chapter in the workshop today. Your vision is within reach; it’s time to make it a reality.
Frequently Asked Questions
Can I use my original factory radio with modern speakers?
Integrate your original radio by using a signal converter or a professional internal conversion to drive modern 4-ohm speakers safely. Most vintage units lack the wattage to move modern cones effectively, which can lead to overheating the radio’s output stage. A conversion service typically adds modern internals like Bluetooth and higher power while keeping your factory knobs functional and your dashboard untouched.
Do I need to upgrade my alternator for a modern classic car audio system?
Upgrading your alternator is mandatory if you plan on adding external amplifiers to your classic car audio system. Most factory alternators from the 1960s only produce 35 to 60 amps, which is barely enough for the headlights and ignition. A high-output 100-amp or 140-amp alternator provides the stable current needed to prevent your lights from dimming during heavy bass hits.
What is the best way to hide a subwoofer in a classic car?
Hide your subwoofer by using shallow-mount enclosures under the front seats or building a false floor in the trunk. Another effective method is mounting a free-air subwoofer to the rear package tray, provided you seal the trunk cavity completely. These methods provide the low-end punch you need without sacrificing the period-correct look of your interior or cutting into original sheet metal.
How do I stop my vintage car doors from rattling with new speakers?
Apply butyl-based vibration dampeners directly to the inner door skin to stop the metal from ringing like a bell. Follow this by adding a layer of closed-cell foam between the door panel and the metal frame to act as a gasket. This decoupling technique prevents the plastic or vinyl trim from buzzing against the steel when your speakers are playing at high volume.
Should I use 1-way, 2-way, or 3-way speakers in my restomod?
Choose 2-way component speakers for the best balance of sound quality and installation ease. These allow you to place the tweeter at ear level for better imaging while the woofer stays in a factory location. While 3-way systems offer superior midrange detail, they often require custom fabrication that can compromise a stealthy, original appearance in a classic car audio system.
What is a ‘no-cut’ radio and why is it important for classic cars?
A no-cut radio is a head unit specifically engineered to fit into your original twin-shaft dashboard opening without any trimming or drilling. Preserving the factory dash is vital for maintaining the vehicle’s historical integrity and market value. These units look like 1960s hardware on the outside but contain modern digital processors and Bluetooth connectivity on the inside to satisfy modern expectations.
Is Bluetooth audio quality good enough for a high-end system?
Modern Bluetooth technology is more than capable of delivering high-fidelity sound for a classic car audio system. While a hardwired USB connection offers the highest possible bit rate, current Bluetooth protocols provide a clean signal that is indistinguishable from a CD for most listeners. The convenience of wireless streaming usually outweighs the marginal gains of a physical cable in a noisy vintage cabin.
How much sound deadening material do I actually need?
You generally need to cover 25 to 50 percent of the flat metal surfaces with butyl sheets to stop structural resonance. Adding more material beyond this point provides diminishing returns for vibration control, though it can help with heat rejection. Focus your efforts on the center of large, unreinforced panels like the floor pans and the inner door skins to achieve the best results.
A high-quality classic car audio system isn’t actually about the head unit; it’s about engineering a modern acoustic environment within a vintage shell. You love the mechanical roar of your engine, but you shouldn’t have to choose between a V8 soundtrack and your favorite album. We’ve all felt the frustration of thin metal doors rattling or wind noise drowning out the music at highway speeds. It’s a common struggle for those of us who demand modern performance without cutting into a pristine, original dashboard.
I am going to show you how to engineer a crystal-clear audio experience that remains completely invisible to the casual observer. You’ll learn how to overcome underpowered factory electrical systems and integrate high-fidelity components that look period-correct. We will explore the vital role of sound deadening, which can cost between $200 and $600 for DIY materials, and how to select compact Class D amplifiers that hide under a seat. This guide covers the meticulous steps needed to transform your cabin into a private concert hall while keeping the heritage of your machine intact. Let’s get to work on making your vintage ride sound as good as it looks.
Key Takeaways
- Master the art of acoustic engineering by neutralizing the rattles and wind noise inherent in vintage cabins before installing a single component.
- Implement a “no-cut” philosophy to integrate a high-fidelity classic car audio system that preserves your dashboard’s original aesthetic while delivering modern Bluetooth connectivity.
- Discover why external amplification and electrical upgrades are the non-negotiable foundations for driving clear sound through heavy road and engine noise.
- Apply the science of mass loading and thermal insulation to create a quiet, controlled environment that allows high-end components to perform at their peak.
- Use Digital Signal Processing to correct the irregular acoustics of a small cabin, ensuring every note reaches your ears with perfect time alignment.
The Challenge of Achieving High-Fidelity Sound in Vintage Cabins
Think of your car’s interior as a musical instrument. In a modern luxury sedan, every surface is engineered to absorb or diffuse sound. In a vintage ride, you are essentially sitting inside a resonant metal box. Parallel surfaces like the floor and roof create standing waves that muddy your mid-bass, while thin sheet metal acts like a drum head, vibrating in sympathy with your engine. To build a truly great classic car audio system, you must first understand that you are fighting an uphill battle against the very physics of the vehicle. The history of vehicle audio shows us that early systems were never designed for fidelity; they were designed simply to be heard over the mechanical clatter of the road.
The noise floor in a classic car is exceptionally high. Between the roar of a high-compression V8 and the wind whistling through aged window seals, your music has to work incredibly hard just to be audible. This environment destroys the dynamic range of your recordings. Subtle details in the music are swallowed by low-frequency road noise, forcing you to turn up the volume to uncomfortable levels just to hear the lyrics. This is why we embrace the restomod audio philosophy. We aren’t just swapping parts. We are re-engineering the cabin to have a modern acoustic soul while maintaining its vintage aesthetic.
To better understand the practical side of these installations, watch this helpful video:
Acoustic Hurdles of the 1960s and 70s
During the 1960s and 70s, manufacturers prioritized cost and assembly speed over cabin quietness. You’ll find almost zero factory insulation behind the door panels or under the dash. This lack of mass allows external noise to flood the cabin. Furthermore, original speaker locations are a disaster for sound staging. A single speaker in the center of the dash or a pair of tiny drivers in the kick panels cannot create a realistic stereo image. You also have to contend with unshielded ignition systems. Vintage spark plug wires and distributors emit electromagnetic interference that often manifests as a high-pitched whine through your speakers, a problem modern cars solved decades ago.
Setting Your Audio Goals
Define your finish line before you buy your first amplifier. Are you looking for a system that stays hidden behind factory grilles, or are you willing to build custom kick panels for better imaging? I always tell builders to plan their classic car audio system during the initial teardown phase. It’s much easier to run high-quality shielded cables and apply sound deadening when the interior is gutted. If you are still defining the scope of your build, understanding what is a restomod will help you decide how much modern technology you want to blend with your heritage steel. Precision planning now prevents the heartbreak of tearing out a fresh carpet later to fix a ground loop or a rattling door skin.
Stealth Integration: Modern Tech with a Period-Correct Look
Preserving the architectural integrity of your dashboard is the first commandment of a high-fidelity classic car audio system. Once you cut that original steel or plastic to fit a modern double-DIN unit, you’ve permanently altered the vehicle’s history and likely its resale value. The goal is a stealthy installation where the cabin remains a time capsule, yet the performance rivals a professional environment like Origo Studio. Achieving this requires a shift in perspective. You aren’t just installing a radio; you are engineering a hidden network of components that respect the heritage of your machine.
I always advocate for the “no-cut” rule. This philosophy mandates that every upgrade must be reversible or completely invisible. We can now use original knobs and switches to control modern digital signals, bridging the gap between 1960s tactile feel and 21st-century processing. If your project requires a modern display for navigation or tuning, consider creative mounting locations like the glove box or a custom-fabricated center console extension. These solutions keep the technology out of your sightline until you actually need it, maintaining that clean, factory-correct aesthetic during your Sunday cruise.
Choosing the Right Head Unit
You have three primary paths for your source unit. First, modular radio motors allow you to mount the “brain” of the stereo behind the dash while the faceplate fits perfectly into the original twin-knob openings. Second, you can opt for a completely hidden black-box system. These units hide under a seat or behind the dash and are controlled entirely via your smartphone. Finally, professional conversion of a factory AM radio to include Bluetooth and FM capabilities typically costs between $395 and $550. This service allows you to keep your original hardware while gaining modern reliability. It’s the ultimate way to blend classic style with modern performance.
Hiding Speakers in Plain Sight
The challenge with speakers is finding air space without hacking into door cards. Kick panel pods are a fantastic solution. They house modern component speakers in a location that provides excellent imaging while appearing factory-correct. For the rear, custom-built packages can be wrapped in period-matched vinyl to hide powerful drivers from prying eyes. If you’re ready to start selecting the components that will make this vision a reality, check out our recommended gear for top-tier stealth components. Don’t forget about under-dash brackets for a front sound stage; they allow you to mount smaller speakers without drilling a single new hole in your pristine interior. Even subwoofers can be integrated stealthily using shallow-mount enclosures hidden beneath the seats or behind the trunk’s trim panels.
Designing the System Architecture: Amps, Speakers, and Subwoofers
Think of your system architecture as the electrical nervous system of your build. Every component from the source unit to the speaker cone must work in harmony to deliver precision. While many enthusiasts focus on the head unit, the real work happens in the signal path. You must ensure that the low-level signal from your source reaches the amplifier without picking up electromagnetic interference from your alternator or ignition system. This requires high-quality shielded RCA cables and a dedicated grounding point to prevent the dreaded engine whine from invading your music.
External amplification is non-negotiable when building a high-fidelity classic car audio system. Even the best retro-styled head units only produce about 15 to 22 watts of continuous power per channel. That is simply not enough to overcome the wind noise and mechanical roar of a vintage machine at highway speeds. You need headroom. Aim for an amplifier that provides at least 50 to 75 watts RMS per channel. This ensures your speakers play clearly without distortion, even when you’re competing with a high-flow exhaust. Always match your speaker impedance, typically 4 ohms, to your amplifier’s output to maintain maximum efficiency and prevent overheating.
Component Speakers vs. Coaxial Units
Component speakers are the gold standard for creating a realistic sound stage. By separating the tweeter from the woofer, you can place high frequencies at ear level while keeping the larger drivers in factory locations. In a classic interior, this often means mounting tweeters subtly on the A-pillars or dash corners. Coaxial units, which combine the drivers into one piece, are easier to install in factory 4×10 or 6×9 cutouts, but they often fire sound at your ankles. If you use coaxials, ensure they have a high-quality built-in crossover to protect the delicate tweeter from low-frequency damage. For a deeper look at the parts that make the cut, browse our recommended gear for proven audio solutions.
Subwoofers in the Classic Trunk
Adding a subwoofer to a muscle car requires some creative engineering, especially with large fuel tanks often sitting right behind the rear seat. You have to decide between a sealed enclosure for tight, accurate bass or a ported box for more volume. If your trunk space is a priority, consider a free-air subwoofer mounted directly to the package tray, though this requires a perfectly sealed trunk to act as the box. For trucks or small coupes where space is at a premium, compact under-seat powered subwoofers provide the necessary low-end punch without requiring you to sacrifice your storage area. Remember that the goal isn’t to rattle the windows of the car next to you; it’s to fill in the bottom end of the frequency spectrum that road noise usually destroys.
The Foundation of Sound: Insulation and Electrical Upgrades
High-fidelity audio is only as good as the environment it lives in. Putting a premium speaker into a vibrating metal door is like fitting racing slicks to a car with a bent frame; you aren’t going to get the performance you paid for. To engineer a truly high-end classic car audio system, you must address the structural and electrical foundations of your vehicle. Vintage steel is thin and resonant. Without proper intervention, your music will always be competing with the sympathetic vibrations of the floor pans and door skins. We solve this through the science of mass loading and decoupling.
You need to distinguish between mass loading and thermal insulation. Mass loading involves applying heavy, butyl-based sheets to the metal to stop it from ringing like a bell. This lowers the resonant frequency of the panel. Thermal insulation and closed-cell foams, on the other hand, are designed to block heat and decouple interior trim from the metal, preventing plastic-on-metal squeaks. For a typical DIY project, expect to spend between $200 and $600 on quality deadening materials. This is the most labor-intensive part of the build, but it is the single most important factor in achieving that modern luxury car feel.
Step-by-Step Sound Deadening
- Apply butyl sheets to at least 25 to 50 percent of the flat metal surfaces in your doors and floor. You don’t need 100 percent coverage to stop the ringing; focus on the center of the panels.
- Layer closed-cell foam over the butyl to act as a gasket for your door panels. This stops rattles before they start.
- Seal the firewall with a dedicated heat and sound barrier. This blocks the high-frequency whine of the transmission and the mechanical clatter of the engine bay.
Powering the Performance
Your factory electrical system was designed to run a set of headlights and a heater fan, not a 500-watt amplifier. You must calculate the total current draw of your new components. A high-output alternator, often 100 amps or more, is a mandatory upgrade for any serious build. Prices for these units range from $100 to over $500, depending on the output and finish. Proper grounding is also critical. I recommend the “Big Three” upgrade: replace your battery-to-chassis, engine-to-chassis, and alternator-to-battery cables with 0 or 2-gauge wire. This ensures a stable voltage supply and eliminates the alternator whine that plagues so many amateur installations. To see the specific components I trust for these heavy-duty electrical tasks, browse our recommended gear for electrical upgrades.
Use dedicated fuse blocks for your audio system rather than tapping into the original glass-fuse panel. This protects your vintage wiring harness from modern current demands. By separating the audio power circuit entirely, you ensure that a blown stereo fuse won’t leave you stranded on the side of the road with no headlights. This methodical approach to the foundation is what separates a professional restomod from a weekend hack job. It is a shared adventure in precision that rewards you every time you turn the key.
Tuning and Final Execution for the Ultimate Restomod Experience
The physical installation of your classic car audio system is the mechanical foundation, but the tuning process is where the artistry begins. Most builders stop once the wires are hidden and the speakers are mounted. However, the irregular dimensions and hard surfaces of a vintage cabin create an acoustic nightmare that no amount of high-end hardware can solve on its own. This is where a Digital Signal Processor (DSP) becomes your most valuable tool. It acts as the hidden conductor of your system, allowing you to digitally correct the frequency response and neutralize the standing waves that naturally occur between parallel metal panels.
One of the most transformative features of modern tuning is time alignment. Because you sit closer to the left speaker than the right, the sound hits your ears at different times, which collapses the stereo image. A DSP allows you to delay the signal to the nearer speakers by milliseconds, ensuring every note reaches your ears simultaneously. This creates a soundstage that feels like it is coming from the center of the dashboard rather than your feet. As you refine these technical details, consider how they complement your broader restomod interior ideas to ensure the technology never clashes with your cabin’s comfort or style.
Professional Tuning at Home
You don’t need a professional studio to achieve high-fidelity results. Download a Real Time Analyzer (RTA) app on your smartphone to visualize frequency spikes and dips within the cabin. Use this data to adjust your EQ, specifically looking for harsh peaks caused by glass reflections or muffled tones from thick leather seats. Setting your gain levels correctly is equally vital. Avoid the temptation to use the gain as a volume knob; its purpose is to match the output of your head unit to the input sensitivity of your amplifier. Proper gain structure prevents clipping, which is the leading cause of speaker failure and distorted sound at highway speeds.
Mastering Your Build
Master the Soundtrack of Your Build
Engineering a high-fidelity classic car audio system is a meticulous journey that fundamentally transforms your driving experience. You now understand that success starts with a silent foundation of butyl deadening and a robust electrical system capable of handling modern current demands. By prioritizing stealth integration and digital signal processing, you ensure that your cabin remains a tribute to heritage design while delivering the sonic precision of a modern luxury machine. These steps move you from simply owning a vintage car to creating a refined, high-performance environment.
This project is a shared adventure in precision and pride. If you are ready to move beyond basic installations and master every aspect of your interior modernization, Brook Walsh and our community of dedicated DIY builders are here to provide the expert mentorship you need. We offer comprehensive project blueprints that turn intimidating technical hurdles into achievable, logical steps. Use the tools and knowledge you’ve gained to build a machine that sounds as powerful as it looks.
Take Control of Your Project with The Ultimate Restomod Guide and start your next chapter in the workshop today. Your vision is within reach; it’s time to make it a reality.
Frequently Asked Questions
Can I use my original factory radio with modern speakers?
Integrate your original radio by using a signal converter or a professional internal conversion to drive modern 4-ohm speakers safely. Most vintage units lack the wattage to move modern cones effectively, which can lead to overheating the radio’s output stage. A conversion service typically adds modern internals like Bluetooth and higher power while keeping your factory knobs functional and your dashboard untouched.
Do I need to upgrade my alternator for a modern classic car audio system?
Upgrading your alternator is mandatory if you plan on adding external amplifiers to your classic car audio system. Most factory alternators from the 1960s only produce 35 to 60 amps, which is barely enough for the headlights and ignition. A high-output 100-amp or 140-amp alternator provides the stable current needed to prevent your lights from dimming during heavy bass hits.
What is the best way to hide a subwoofer in a classic car?
Hide your subwoofer by using shallow-mount enclosures under the front seats or building a false floor in the trunk. Another effective method is mounting a free-air subwoofer to the rear package tray, provided you seal the trunk cavity completely. These methods provide the low-end punch you need without sacrificing the period-correct look of your interior or cutting into original sheet metal.
How do I stop my vintage car doors from rattling with new speakers?
Apply butyl-based vibration dampeners directly to the inner door skin to stop the metal from ringing like a bell. Follow this by adding a layer of closed-cell foam between the door panel and the metal frame to act as a gasket. This decoupling technique prevents the plastic or vinyl trim from buzzing against the steel when your speakers are playing at high volume.
Should I use 1-way, 2-way, or 3-way speakers in my restomod?
Choose 2-way component speakers for the best balance of sound quality and installation ease. These allow you to place the tweeter at ear level for better imaging while the woofer stays in a factory location. While 3-way systems offer superior midrange detail, they often require custom fabrication that can compromise a stealthy, original appearance in a classic car audio system.
What is a ‘no-cut’ radio and why is it important for classic cars?
A no-cut radio is a head unit specifically engineered to fit into your original twin-shaft dashboard opening without any trimming or drilling. Preserving the factory dash is vital for maintaining the vehicle’s historical integrity and market value. These units look like 1960s hardware on the outside but contain modern digital processors and Bluetooth connectivity on the inside to satisfy modern expectations.
Is Bluetooth audio quality good enough for a high-end system?
Modern Bluetooth technology is more than capable of delivering high-fidelity sound for a classic car audio system. While a hardwired USB connection offers the highest possible bit rate, current Bluetooth protocols provide a clean signal that is indistinguishable from a CD for most listeners. The convenience of wireless streaming usually outweighs the marginal gains of a physical cable in a noisy vintage cabin.
How much sound deadening material do I actually need?
You generally need to cover 25 to 50 percent of the flat metal surfaces with butyl sheets to stop structural resonance. Adding more material beyond this point provides diminishing returns for vibration control, though it can help with heat rejection. Focus your efforts on the center of large, unreinforced panels like the floor pans and the inner door skins to achieve the best results.