

A sagging corner is more than a ride-height problem: escaping air can force the compressor to work harder. Troubleshooting air suspension leaks and failures starts with the symptoms: check for uneven ride height, hissing, frequent compressor operation, or a ride that sways or bounces. Then distinguish an air leak from a height-sensor, controller, or solenoid-valve fault.
It’s natural to suspect the air spring when a vehicle sits low, but the cause could also be a line, fitting, electrical connection, or control component. Follow the clues before replacing parts. This guide explains how to inspect likely leak points, use soapy water to spot escaping air, and recognize when electronic controls or valves may be affecting ride quality and stability. A methodical approach to troubleshooting air suspension leaks and failures can help you identify why the compressor is working harder and where to focus your inspection, whether you’re restoring a classic or refining a modern build.
Key Takeaways
- Match changes in ride height and handling to the system behavior that could be causing them, rather than replacing parts by guesswork.
- Separate mechanical symptoms from sensor or controller faults by observing whether height adjustments respond consistently.
- Use the way the suspension fills and holds air to narrow down whether a valve or leak may be disrupting the system.
- Inspect likely leak points methodically, then decide whether the issue calls for a focused repair or a broader system assessment.
1. How leaks affect ride quality, stability, and compressor wear
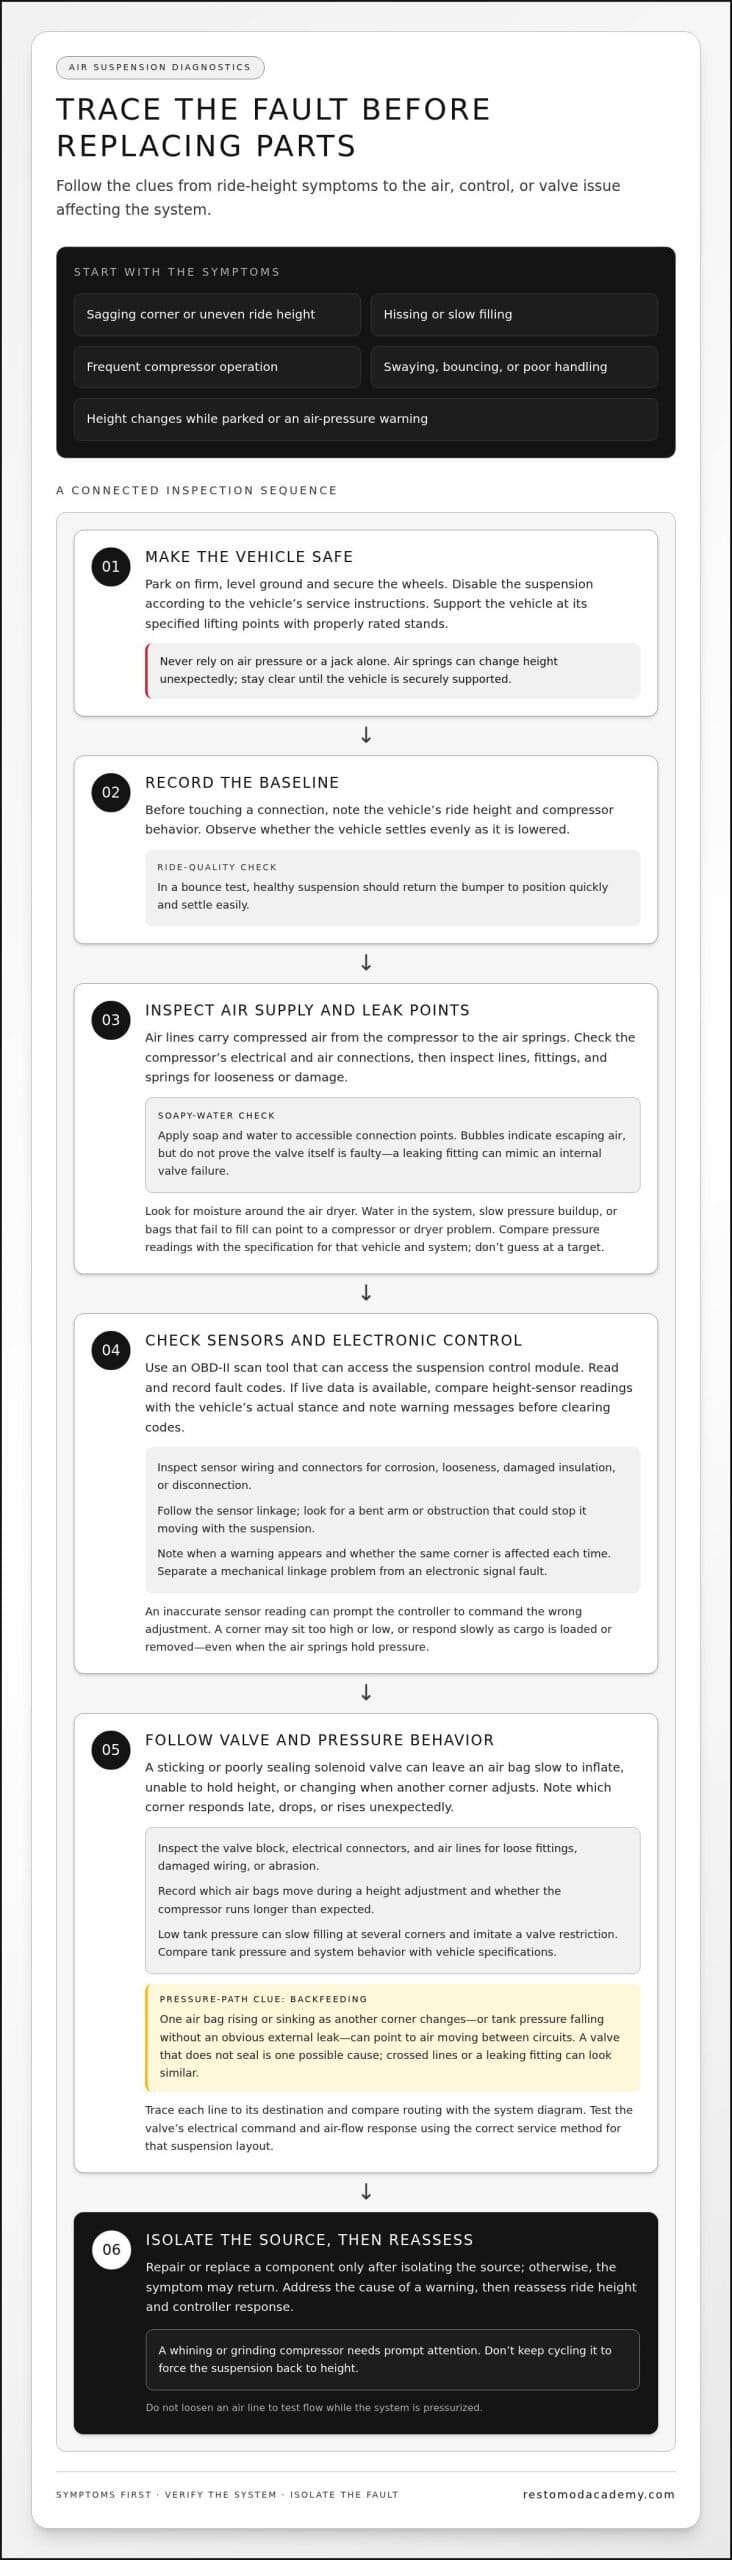
Common signs of an air suspension leak or failure include a sagging corner, uneven ride height, hissing, slow filling, frequent compressor operation, or a vehicle that sways or bounces. A change in height while parked or an air-pressure warning also deserves attention, especially alongside poor handling.
Air lines carry compressed air from the compressor to the air springs, so a leak at a line, fitting, or spring can reduce the system’s ability to hold its set height. The affected end may sit low, while the compressor runs more often to restore pressure. That extra workload can contribute to overheating and failure; a faulty compressor can then bring slow pressure buildup and inconsistent ride height. For a basic ride-quality check, observe whether the vehicle settles evenly as it is lowered. In a bounce test, healthy suspension should return the bumper to position quickly and settle easily.
Before working under a vehicle with air suspension, park on firm, level ground, secure the wheels, and disable the suspension system according to the vehicle’s service instructions. Support the vehicle at its specified lifting points with properly rated stands. Never rely on air pressure or a jack alone. Air springs can change height unexpectedly, so stay clear until the vehicle is securely supported.
Before touching a connection, note the vehicle’s ride height and compressor behavior. Check the compressor’s electrical and air connections, then look for loose fittings, damaged lines, or moisture around the air dryer. Don’t guess at a pressure target: compare any reading with the specification for that vehicle and system. The air dryer removes moisture, helping prevent freezing and corrosion. Water in the system, slow pressure buildup, or bags that fail to fill can point to a compressor or dryer problem. A whining or grinding compressor needs prompt attention. Don’t keep cycling it to force the suspension back to height.
2. Sensor and electronic controller problems
Height sensors measure the distance between the chassis and a wheel, helping the suspension system maintain its intended ride height. If a sensor gives inaccurate readings, the controller may command the wrong adjustment. A corner may sit too high or low, or the vehicle may respond slowly as cargo is loaded or removed. These changes can affect ride quality and stability even when the air springs hold pressure.
To diagnose air suspension problems with an OBD-II scanner, use a scan tool that can access the vehicle’s suspension control module, then read and record the fault codes. If the tool provides live data, compare the height-sensor readings with the vehicle’s actual stance and note any warning messages before clearing the codes.
Next, inspect the components identified by the codes. Check sensor wiring and connectors for corrosion, looseness, damaged insulation, or disconnection. Follow the sensor linkage and look for a bent arm or obstruction that could prevent it moving with the suspension. A faulty leveling valve can also leave the vehicle too high or low, or cause slow adjustment as the load changes. Distinguish a mechanical linkage problem from an electronic signal fault.
An electronic control unit, or ECU, interprets sensor input and commands system adjustments. Corroded wiring, loose connections, and software problems can interrupt that process. An air-suspension warning light or inconsistent height corrections may point to a sensor or control-module fault. Record when the warning appears, such as after starting the vehicle or changing the load, and whether the same corner is affected each time. This pattern helps narrow the inspection. Address the cause, not just the warning: verify the connector and sensor signal, then reassess ride height and controller response. If the fault returns, diagnose the module’s wiring and operation further before replacing parts.
3. Solenoid valve problems
Solenoid valves control the movement of compressed air through the suspension system. A valve that sticks, fails to open, or doesn’t seal can leave an air bag slow to inflate, unable to hold height, or changing when another corner adjusts. Note whether the same corner repeatedly responds late, drops, or rises unexpectedly. This pattern can help distinguish a valve issue from a general loss of air pressure.
Start with a visual inspection of the valve block, electrical connectors, and connected air lines. Look for loose fittings, damaged wiring, or abrasion where a line meets the block. Apply soap and water to accessible connection points: bubbles indicate escaping air, but don’t prove the valve itself is faulty. A leaking fitting can mimic an internal valve failure. Record which air bags move during a height adjustment and whether the compressor runs longer than expected.
The air tank stores compressed air before it travels to the air bags. Low tank pressure can slow filling at several corners and imitate a valve restriction. Compare tank pressure and system behavior with the vehicle’s specifications, using suitable gauges and procedures. Don’t loosen an air line to test flow while the system is pressurized. Assess pressure changes across a valve using the correct service method for that suspension layout.
Backfeeding occurs when air passes through a path that should be closed, allowing pressure to move between circuits. For example, one air bag may rise or sink as another corner changes, or the tank may lose pressure despite no obvious external leak. A valve that doesn’t seal can cause this behavior, but crossed lines or a leaking fitting can produce similar clues. Trace each line to its destination, compare the routing with the system diagram, and test the valve’s electrical command and air-flow response. Repair or replace a component only after isolating the source; otherwise, the symptom may return.
4. Air suspension leaks
Common air suspension leaks show up as a low corner, a vehicle sitting lower than usual, or a hissing sound. Road debris can puncture an air spring, while salt, moisture, and winter temperatures can contribute to corrosion and damage. Air springs can fatigue, especially in colder climates, and pneumatic lines or fittings can corrode over time.
To find a leak, inspect the air springs, lines, and fittings, then apply soap and water to accessible connection points. Bubbles forming at a joint or line indicate escaping air. A compatible smoke-testing tool may also help trace a leak when used according to its instructions. Don’t introduce smoke into a pressurized system unless the equipment and procedure are designed for it. Check line routing for contact with sharp edges, hot surfaces, or moving parts.
Replace a damaged air spring rather than patching it: a temporary repair may not hold under pressure. Replacing both sides isn’t automatic. Assess each spring’s condition and follow the vehicle manufacturer’s replacement guidance. If one spring is damaged and the other shows cracks, wear, or leakage, those signs can inform the repair decision.
In the United States, air suspension repair costs depend on the case and are provided after a quote request. Key factors include diagnosis, the failed component, labor, and damage to related parts. Whether to repair or convert to coil springs also depends on the required components, installation work, and the vehicle’s intended setup. Don’t compare the cost of replacing one leaking line with a complete conversion as if they were equivalent repairs.
Compressors may fail from overheating or lack of maintenance. Bags, lines, and valve blocks can be affected by punctures, fatigue, corrosion, or damaged connections. After finding a leak, inspect the full air suspension system, then confirm the repair holds pressure and the suspension works evenly before returning the vehicle to service.
Restomod Academy: The Ultimate Restomod Guide
When diagnosing a suspension fault raises broader questions about your build, Restomod Academy’s The Ultimate Restomod Guide can help you develop your understanding of classic-car restoration and modification before deciding how modern systems fit your project.
If you’re weighing design choices or planning a larger restomod, Restomod Consulting Services can help you think through the project. Premium Project Blueprints provide structured guidance for building. These resources support informed planning, but they don’t replace vehicle-specific diagnosis or hands-on repair instructions for a faulty air suspension component.
Contact Restomod Academy to explore which resource best fits your next project.
Make the Next Decision with Purpose
A diagnosis can do more than get a vehicle back on the road. It can clarify what you want from the build: preserve the original character, improve everyday reliability, or bring modern performance to a classic platform. Let the evidence guide your decision. A disciplined approach to troubleshooting air suspension leaks and failures helps you distinguish a focused repair from a broader project decision, so your next step is guided by the vehicle, not guesswork.
Before moving forward, capture what you observed and how the suspension behaved. Use those notes to frame the work, set priorities, and keep the project’s goals in view. If you’re ready to develop those ideas into a considered restomod plan, contact Restomod Academy.
Take the time to build with intention. Each well-chosen decision brings your vision closer to a machine that feels distinctly yours.
Frequently Asked Questions
How do you fix a leaking air spring or air line step by step?
Replace a leaking air spring or damaged air line rather than relying on a patch to hold under pressure. Park securely, follow the vehicle’s procedure to disable and depressurize the system, then support the vehicle before removing components. Fit the correct replacement part, route the line away from heat and rubbing points, and seat connections as specified. Restore the system according to its service instructions, then inspect for leaks and confirm it maintains height.
How can you test an air suspension compressor and relay?
Test the compressor’s power supply, relay operation, and pressure output against the vehicle’s service specifications. Using the wiring diagram, inspect the relay and connector for heat damage or corrosion, then use a multimeter to check the specified circuit. A scan tool may show whether the control module is requesting compressor operation. If power reaches the compressor but it doesn’t build pressure, inspect its connections and dryer before deciding which component needs repair.
Is it safe to drive with a leaking or failed air suspension?
Don’t drive if the vehicle has a pronounced sag, unstable handling, tire contact, or a suspension warning accompanied by poor ride control. A low corner can alter how the vehicle responds, and continued compressor operation may worsen damage. If the vehicle sits unevenly or changes height unexpectedly, stop somewhere safe and arrange recovery rather than attempting to continue. Even a minor symptom warrants prompt assessment before normal driving resumes.
A sagging corner is more than a ride-height problem: escaping air can force the compressor to work harder. Troubleshooting air suspension leaks and failures starts with the symptoms: check for uneven ride height, hissing, frequent compressor operation, or a ride that sways or bounces. Then distinguish an air leak from a height-sensor, controller, or solenoid-valve fault.
It’s natural to suspect the air spring when a vehicle sits low, but the cause could also be a line, fitting, electrical connection, or control component. Follow the clues before replacing parts. This guide explains how to inspect likely leak points, use soapy water to spot escaping air, and recognize when electronic controls or valves may be affecting ride quality and stability. A methodical approach to troubleshooting air suspension leaks and failures can help you identify why the compressor is working harder and where to focus your inspection, whether you’re restoring a classic or refining a modern build.
Key Takeaways
- Match changes in ride height and handling to the system behavior that could be causing them, rather than replacing parts by guesswork.
- Separate mechanical symptoms from sensor or controller faults by observing whether height adjustments respond consistently.
- Use the way the suspension fills and holds air to narrow down whether a valve or leak may be disrupting the system.
- Inspect likely leak points methodically, then decide whether the issue calls for a focused repair or a broader system assessment.
1. How leaks affect ride quality, stability, and compressor wear
Common signs of an air suspension leak or failure include a sagging corner, uneven ride height, hissing, slow filling, frequent compressor operation, or a vehicle that sways or bounces. A change in height while parked or an air-pressure warning also deserves attention, especially alongside poor handling.
Air lines carry compressed air from the compressor to the air springs, so a leak at a line, fitting, or spring can reduce the system’s ability to hold its set height. The affected end may sit low, while the compressor runs more often to restore pressure. That extra workload can contribute to overheating and failure; a faulty compressor can then bring slow pressure buildup and inconsistent ride height. For a basic ride-quality check, observe whether the vehicle settles evenly as it is lowered. In a bounce test, healthy suspension should return the bumper to position quickly and settle easily.
Before working under a vehicle with air suspension, park on firm, level ground, secure the wheels, and disable the suspension system according to the vehicle’s service instructions. Support the vehicle at its specified lifting points with properly rated stands. Never rely on air pressure or a jack alone. Air springs can change height unexpectedly, so stay clear until the vehicle is securely supported.
Before touching a connection, note the vehicle’s ride height and compressor behavior. Check the compressor’s electrical and air connections, then look for loose fittings, damaged lines, or moisture around the air dryer. Don’t guess at a pressure target: compare any reading with the specification for that vehicle and system. The air dryer removes moisture, helping prevent freezing and corrosion. Water in the system, slow pressure buildup, or bags that fail to fill can point to a compressor or dryer problem. A whining or grinding compressor needs prompt attention. Don’t keep cycling it to force the suspension back to height.
2. Sensor and electronic controller problems
Height sensors measure the distance between the chassis and a wheel, helping the suspension system maintain its intended ride height. If a sensor gives inaccurate readings, the controller may command the wrong adjustment. A corner may sit too high or low, or the vehicle may respond slowly as cargo is loaded or removed. These changes can affect ride quality and stability even when the air springs hold pressure.
To diagnose air suspension problems with an OBD-II scanner, use a scan tool that can access the vehicle’s suspension control module, then read and record the fault codes. If the tool provides live data, compare the height-sensor readings with the vehicle’s actual stance and note any warning messages before clearing the codes.
Next, inspect the components identified by the codes. Check sensor wiring and connectors for corrosion, looseness, damaged insulation, or disconnection. Follow the sensor linkage and look for a bent arm or obstruction that could prevent it moving with the suspension. A faulty leveling valve can also leave the vehicle too high or low, or cause slow adjustment as the load changes. Distinguish a mechanical linkage problem from an electronic signal fault.
An electronic control unit, or ECU, interprets sensor input and commands system adjustments. Corroded wiring, loose connections, and software problems can interrupt that process. An air-suspension warning light or inconsistent height corrections may point to a sensor or control-module fault. Record when the warning appears, such as after starting the vehicle or changing the load, and whether the same corner is affected each time. This pattern helps narrow the inspection. Address the cause, not just the warning: verify the connector and sensor signal, then reassess ride height and controller response. If the fault returns, diagnose the module’s wiring and operation further before replacing parts.
3. Solenoid valve problems
Solenoid valves control the movement of compressed air through the suspension system. A valve that sticks, fails to open, or doesn’t seal can leave an air bag slow to inflate, unable to hold height, or changing when another corner adjusts. Note whether the same corner repeatedly responds late, drops, or rises unexpectedly. This pattern can help distinguish a valve issue from a general loss of air pressure.
Start with a visual inspection of the valve block, electrical connectors, and connected air lines. Look for loose fittings, damaged wiring, or abrasion where a line meets the block. Apply soap and water to accessible connection points: bubbles indicate escaping air, but don’t prove the valve itself is faulty. A leaking fitting can mimic an internal valve failure. Record which air bags move during a height adjustment and whether the compressor runs longer than expected.
The air tank stores compressed air before it travels to the air bags. Low tank pressure can slow filling at several corners and imitate a valve restriction. Compare tank pressure and system behavior with the vehicle’s specifications, using suitable gauges and procedures. Don’t loosen an air line to test flow while the system is pressurized. Assess pressure changes across a valve using the correct service method for that suspension layout.
Backfeeding occurs when air passes through a path that should be closed, allowing pressure to move between circuits. For example, one air bag may rise or sink as another corner changes, or the tank may lose pressure despite no obvious external leak. A valve that doesn’t seal can cause this behavior, but crossed lines or a leaking fitting can produce similar clues. Trace each line to its destination, compare the routing with the system diagram, and test the valve’s electrical command and air-flow response. Repair or replace a component only after isolating the source; otherwise, the symptom may return.
4. Air suspension leaks
Common air suspension leaks show up as a low corner, a vehicle sitting lower than usual, or a hissing sound. Road debris can puncture an air spring, while salt, moisture, and winter temperatures can contribute to corrosion and damage. Air springs can fatigue, especially in colder climates, and pneumatic lines or fittings can corrode over time.
To find a leak, inspect the air springs, lines, and fittings, then apply soap and water to accessible connection points. Bubbles forming at a joint or line indicate escaping air. A compatible smoke-testing tool may also help trace a leak when used according to its instructions. Don’t introduce smoke into a pressurized system unless the equipment and procedure are designed for it. Check line routing for contact with sharp edges, hot surfaces, or moving parts.
Replace a damaged air spring rather than patching it: a temporary repair may not hold under pressure. Replacing both sides isn’t automatic. Assess each spring’s condition and follow the vehicle manufacturer’s replacement guidance. If one spring is damaged and the other shows cracks, wear, or leakage, those signs can inform the repair decision.
In the United States, air suspension repair costs depend on the case and are provided after a quote request. Key factors include diagnosis, the failed component, labor, and damage to related parts. Whether to repair or convert to coil springs also depends on the required components, installation work, and the vehicle’s intended setup. Don’t compare the cost of replacing one leaking line with a complete conversion as if they were equivalent repairs.
Compressors may fail from overheating or lack of maintenance. Bags, lines, and valve blocks can be affected by punctures, fatigue, corrosion, or damaged connections. After finding a leak, inspect the full air suspension system, then confirm the repair holds pressure and the suspension works evenly before returning the vehicle to service.
Restomod Academy: The Ultimate Restomod Guide
When diagnosing a suspension fault raises broader questions about your build, Restomod Academy’s The Ultimate Restomod Guide can help you develop your understanding of classic-car restoration and modification before deciding how modern systems fit your project.
If you’re weighing design choices or planning a larger restomod, Restomod Consulting Services can help you think through the project. Premium Project Blueprints provide structured guidance for building. These resources support informed planning, but they don’t replace vehicle-specific diagnosis or hands-on repair instructions for a faulty air suspension component.
Contact Restomod Academy to explore which resource best fits your next project.
Make the Next Decision with Purpose
A diagnosis can do more than get a vehicle back on the road. It can clarify what you want from the build: preserve the original character, improve everyday reliability, or bring modern performance to a classic platform. Let the evidence guide your decision. A disciplined approach to troubleshooting air suspension leaks and failures helps you distinguish a focused repair from a broader project decision, so your next step is guided by the vehicle, not guesswork.
Before moving forward, capture what you observed and how the suspension behaved. Use those notes to frame the work, set priorities, and keep the project’s goals in view. If you’re ready to develop those ideas into a considered restomod plan, contact Restomod Academy.
Take the time to build with intention. Each well-chosen decision brings your vision closer to a machine that feels distinctly yours.
Frequently Asked Questions
How do you fix a leaking air spring or air line step by step?
Replace a leaking air spring or damaged air line rather than relying on a patch to hold under pressure. Park securely, follow the vehicle’s procedure to disable and depressurize the system, then support the vehicle before removing components. Fit the correct replacement part, route the line away from heat and rubbing points, and seat connections as specified. Restore the system according to its service instructions, then inspect for leaks and confirm it maintains height.
How can you test an air suspension compressor and relay?
Test the compressor’s power supply, relay operation, and pressure output against the vehicle’s service specifications. Using the wiring diagram, inspect the relay and connector for heat damage or corrosion, then use a multimeter to check the specified circuit. A scan tool may show whether the control module is requesting compressor operation. If power reaches the compressor but it doesn’t build pressure, inspect its connections and dryer before deciding which component needs repair.
Is it safe to drive with a leaking or failed air suspension?
Don’t drive if the vehicle has a pronounced sag, unstable handling, tire contact, or a suspension warning accompanied by poor ride control. A low corner can alter how the vehicle responds, and continued compressor operation may worsen damage. If the vehicle sits unevenly or changes height unexpectedly, stop somewhere safe and arrange recovery rather than attempting to continue. Even a minor symptom warrants prompt assessment before normal driving resumes.